Manual
Page 5
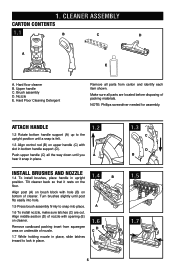
...Align post (A) on brush block with opening (E) on cleaner. Align middle section (D) of nozzle. 1.6 DE C 1.7 While holding nozzle in place, slide latches inward to lock in upright 1.4 B position. Nozzle E. 1. Hard floor cleaner B. Tilt cleaner back so that it snap in place. 1.2 A ... Attach handle 1.2 Rotate bottom handle support (A) up to snap into hole. 1.5 Press brush assembly firmly to the upright position until post fits easily into place. Cleaner ASSEMBLY Carton contents 1.1 B C D A E A. Upper handle C. Brush assembly D. Push upper handle (C) all...
...Align post (A) on brush block with opening (E) on cleaner. Align middle section (D) of nozzle. 1.6 DE C 1.7 While holding nozzle in place, slide latches inward to lock in upright 1.4 B position. Nozzle E. 1. Hard floor cleaner B. Tilt cleaner back so that it snap in place. 1.2 A ... Attach handle 1.2 Rotate bottom handle support (A) up to snap into hole. 1.5 Press brush assembly firmly to the upright position until post fits easily into place. Cleaner ASSEMBLY Carton contents 1.1 B C D A E A. Upper handle C. Brush assembly D. Push upper handle (C) all...
Manual
Page 6
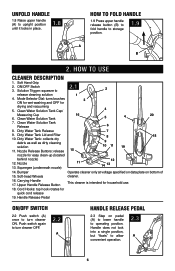
...upright position until it locks in place. 1.8 How to fold handle 1.9 Press upper handle release button (B) to fold handle to 2.1 2 release cleaning solution 1 4. Solution Trigger: squeeze to storage position. 1.9 A B 2. Nozzle Release Buttons: release 15 8 18 9 10 11 19 nozzle for drying and vacuuming 5. Soft-tread Wheels cleaner.... ON/OFF Switch 3. Clean Water Solution Tank Cap/ 4 Measuring Cup 16 6. Nozzle 11 13. Bumper Operate cleaner only at voltage specified on data plate on pedal (A) to lower handle to allow convenient operation. 2.3 A 6 ...
...upright position until it locks in place. 1.8 How to fold handle 1.9 Press upper handle release button (B) to fold handle to 2.1 2 release cleaning solution 1 4. Solution Trigger: squeeze to storage position. 1.9 A B 2. Nozzle Release Buttons: release 15 8 18 9 10 11 19 nozzle for drying and vacuuming 5. Soft-tread Wheels cleaner.... ON/OFF Switch 3. Clean Water Solution Tank Cap/ 4 Measuring Cup 16 6. Nozzle 11 13. Bumper Operate cleaner only at voltage specified on data plate on pedal (A) to lower handle to allow convenient operation. 2.3 A 6 ...
Manual
Page 7
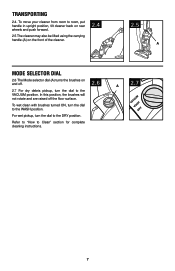
... dial to the DRY position. Transporting 2.4. Refer to "How to room, put handle in upright position, tilt cleaner back on rear wheels and push forward. 2.5 The cleaner may also be lifted using the carrying handle (A) on the front of the cleaner. 2.4 2.5 A Mode selector dial 2.6 The Mode selector dial (A) turns the brushes on and off...
... dial to the DRY position. Transporting 2.4. Refer to "How to room, put handle in upright position, tilt cleaner back on rear wheels and push forward. 2.5 The cleaner may also be lifted using the carrying handle (A) on the front of the cleaner. 2.4 2.5 A Mode selector dial 2.6 The Mode selector dial (A) turns the brushes on and off...
Manual
Page 8
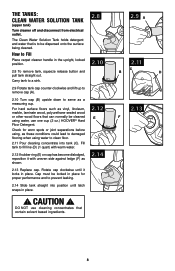
...If rubber ring (E) on cap has become dislodged, reposition it locks in the upright, locked position. 2.8 To remove tank, squeeze release button and pull tank straight out. Fill tank to Fill Place carpet cleaner handle in place. Cap must be dispersed onto the surface being cleaned. Rotate cap... clockwise until latch snaps in place for proper performance and to damaged flooring when using water, use one cup (2 oz.) HOOVER® Hard Floor Detergent. The ...
...If rubber ring (E) on cap has become dislodged, reposition it locks in the upright, locked position. 2.8 To remove tank, squeeze release button and pull tank straight out. Fill tank to Fill Place carpet cleaner handle in place. Cap must be dispersed onto the surface being cleaned. Rotate cap... clockwise until latch snaps in place for proper performance and to damaged flooring when using water, use one cup (2 oz.) HOOVER® Hard Floor Detergent. The ...
Manual
Page 11
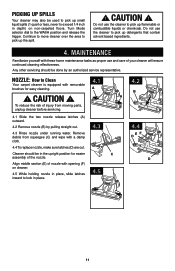
... spills (1 quart or less, never to exceed 1/4 inch in depth) on cleaner. 4.5 While holding nozzle in place, slide latches inward to lock in the upright position for easy cleaning. ! Align middle section (E) of the nozzle. CAUTION ! Remove debris from moving parts, unplug cleaner before servicing. 4.1 Slide the two nozzle release latches (A) outward. 4.2 Remove...
... spills (1 quart or less, never to exceed 1/4 inch in depth) on cleaner. 4.5 While holding nozzle in place, slide latches inward to lock in the upright position for easy cleaning. ! Align middle section (E) of the nozzle. CAUTION ! Remove debris from moving parts, unplug cleaner before servicing. 4.1 Slide the two nozzle release latches (A) outward. 4.2 Remove...
Manual
Page 12
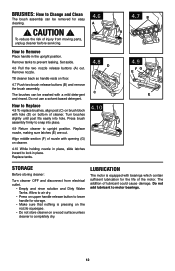
...Pull the two nozzle release buttons (A) out. Tilt cleaner back so handle rests on a wood surface unless cleaner is equipped with opening (G) on cleaner. 4.10 While holding nozzle in place, slide latches inward to lock in the upright position. Align middle section (F) of nozzle with ... nozzle squeegee. • Do not store cleaner on floor. 4.7 Push two brush release buttons (B) and remove the brush assembly. Remove tanks to upright position. Turn brushes slightly until post fits easily into place. 4.9 Return cleaner to prevent leaking. brushes: How to Change...
...Pull the two nozzle release buttons (A) out. Tilt cleaner back so handle rests on a wood surface unless cleaner is equipped with opening (G) on cleaner. 4.10 While holding nozzle in place, slide latches inward to lock in the upright position. Align middle section (F) of nozzle with ... nozzle squeegee. • Do not store cleaner on floor. 4.7 Push two brush release buttons (B) and remove the brush assembly. Remove tanks to upright position. Turn brushes slightly until post fits easily into place. 4.9 Return cleaner to prevent leaking. brushes: How to Change...


