Manual
Page 3
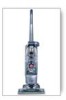
... not pull or carry by pulling on stairs. IMPORTANT SAFETY INSTRUCTIONS SAVE THESE INSTRUCTIONS When using recommended chemicals with the cleaner. Turn off all parts of body away from electrical outlet before unplugging. • Do not unplug by cord, use cord as a toy or to be used by... clean over cord. If an extension cord is not recommended. Keep cord away from heated surfaces. • Always disconnect cord from openings and moving parts. • Do not pick up anything that accepts the machine plug. • Keep detergents and other cleaners out of dust, lint, hair,...
... not pull or carry by pulling on stairs. IMPORTANT SAFETY INSTRUCTIONS SAVE THESE INSTRUCTIONS When using recommended chemicals with the cleaner. Turn off all parts of body away from electrical outlet before unplugging. • Do not unplug by cord, use cord as a toy or to be used by... clean over cord. If an extension cord is not recommended. Keep cord away from heated surfaces. • Always disconnect cord from openings and moving parts. • Do not pick up anything that accepts the machine plug. • Keep detergents and other cleaners out of dust, lint, hair,...
Manual
Page 5
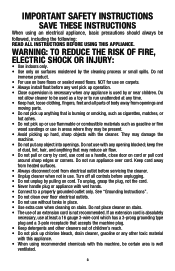
Hard floor cleaner B. Brush assembly D. NOTE: Phillips screwdriver needed for assembly. Nozzle E. Make sure all parts are out. Turn brushes slightly until post fits easily into place. Push upper handle (C) all parts from squeegee area on upper handle (C) with opening (E) on cleaner. Tilt cleaner back so that it snap in place. 1.2 A Install brushes...
Hard floor cleaner B. Brush assembly D. NOTE: Phillips screwdriver needed for assembly. Nozzle E. Make sure all parts are out. Turn brushes slightly until post fits easily into place. Push upper handle (C) all parts from squeegee area on upper handle (C) with opening (E) on cleaner. Tilt cleaner back so that it snap in place. 1.2 A Install brushes...
Manual
Page 11
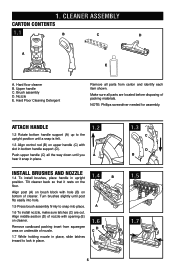
... the WASH position and release the trigger. Do not use the cleaner to pick up flammable or combustible liquids or chemicals. Remove debris from moving parts, unplug cleaner before servicing. 4.1 Slide the two nozzle release latches (A) outward. 4.2 Remove nozzle (B) by an authorized service representative. CAUTION ! Align middle section (E) of nozzle with...
... the WASH position and release the trigger. Do not use the cleaner to pick up flammable or combustible liquids or chemicals. Remove debris from moving parts, unplug cleaner before servicing. 4.1 Slide the two nozzle release latches (A) outward. 4.2 Remove nozzle (B) by an authorized service representative. CAUTION ! Align middle section (E) of nozzle with...
Manual
Page 12
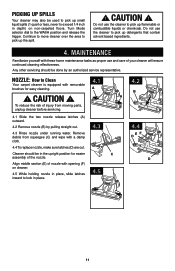
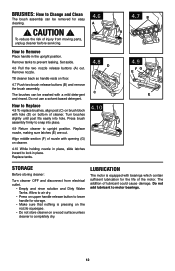
.... 12 Set aside. 4.6 Pull the two nozzle release buttons (A) out. Replace tanks. 4.8 D C 4.10 4.7 B A 4.9 FG E E StorAGE Before storing cleaner: Turn cleaner OFF and disconnect from moving parts, unplug cleaner before servicing. Do not use a solvent based detergent. To reduce the risk of cleaner. brushes: How to Change and Clean The brush assembly...
.... 12 Set aside. 4.6 Pull the two nozzle release buttons (A) out. Replace tanks. 4.8 D C 4.10 4.7 B A 4.9 FG E E StorAGE Before storing cleaner: Turn cleaner OFF and disconnect from moving parts, unplug cleaner before servicing. Do not use a solvent based detergent. To reduce the risk of cleaner. brushes: How to Change and Clean The brush assembly...
Manual
Page 14
.... 14 This will only result in Glenwillow for service. Service To obtain approved Hoover® service and genuine Hoover® parts, locate the nearest Authorized Hoover® Warranty Service Dealer (Depot) by the complete model number when requesting information or ordering parts. (The model number appears on the bottom of authorized service outlet locations call...
.... 14 This will only result in Glenwillow for service. Service To obtain approved Hoover® service and genuine Hoover® parts, locate the nearest Authorized Hoover® Warranty Service Dealer (Depot) by the complete model number when requesting information or ordering parts. (The model number appears on the bottom of authorized service outlet locations call...

Manual
Page 15
...; hard surface attachment below must be used (optional if not included): 5 Brush/Dual Brush Hoover® part # 48417008. P 3 When cleaning a hard surface, the optional Hoover® hard surface attachment below must be used : 6 Brush Hoover® part # 36419008 5 Brush Hoover® part # 48417007. ClLeEaAnNiInNG pPrRoOdDuUCtTsS WARNING: To reduce the risk of fire and electric shock due to...
...; hard surface attachment below must be used (optional if not included): 5 Brush/Dual Brush Hoover® part # 48417008. P 3 When cleaning a hard surface, the optional Hoover® hard surface attachment below must be used : 6 Brush Hoover® part # 36419008 5 Brush Hoover® part # 48417007. ClLeEaAnNiInNG pPrRoOdDuUCtTsS WARNING: To reduce the risk of fire and electric shock due to...
Manual
Page 16
... product, damage due to products purchased outside the United States, including its territories and possessions, outside of warranty service outlets, phone the Hoover® Consumer Response Center, Phone 1-800-263-6376, Mon-Fri 8am-7pm EST. For additional assistance or information concerning this product is..., dealer, or distributor of purchase (the "Warranty Period"). Military Exchange and outside a U.S. The Warranty Period will provide labor and parts, at www.hoover.com. HOW TO MAKE A WARRANTY CLAIM If this Warranty or the availability of Canada. However, if you , to either...
... product, damage due to products purchased outside the United States, including its territories and possessions, outside of warranty service outlets, phone the Hoover® Consumer Response Center, Phone 1-800-263-6376, Mon-Fri 8am-7pm EST. For additional assistance or information concerning this product is..., dealer, or distributor of purchase (the "Warranty Period"). Military Exchange and outside a U.S. The Warranty Period will provide labor and parts, at www.hoover.com. HOW TO MAKE A WARRANTY CLAIM If this Warranty or the availability of Canada. However, if you , to either...


