Manual
Page 2
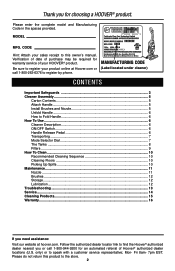
...Manufacturing Code in the spaces provided. Be sure to register your product online at hoover.com. Manufacturing code (Label located under cleaner) Contents Important Safeguards 3 Cleaner Assembly...5 Carton Contents 5 Attach Handle...5 Install Brushes and Nozzle 5 Unfold Handle...6 How to Fold Handle 6 How To Use...6... 10 Picking Up Spills 10 Maintenance...11 Nozzle...11 Brushes...12 Storage...12 Lubrication...12 Troubleshooting...13 Service...14 Cleaning Products...15 Warranty...16 If you need assistance: Visit our website at Hoover.com or call 1-800-944-9200 for an automated...
...Manufacturing Code in the spaces provided. Be sure to register your product online at hoover.com. Manufacturing code (Label located under cleaner) Contents Important Safeguards 3 Cleaner Assembly...5 Carton Contents 5 Attach Handle...5 Install Brushes and Nozzle 5 Unfold Handle...6 How to Fold Handle 6 How To Use...6... 10 Picking Up Spills 10 Maintenance...11 Nozzle...11 Brushes...12 Storage...12 Lubrication...12 Troubleshooting...13 Service...14 Cleaning Products...15 Warranty...16 If you need assistance: Visit our website at Hoover.com or call 1-800-944-9200 for an automated...
Manual
Page 5
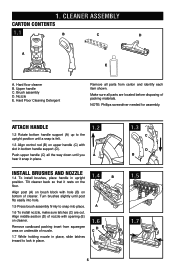
...shown. Make sure all parts are out. Push upper handle (C) all parts from squeegee area on upper handle (C) with hole (B) on cleaner. Turn brushes slightly until a snap is felt. 1.3 Align control rod (B) on underside of nozzle. 1.6 DE C 1.7 While holding nozzle in place, slide latches... snap into place. Align middle section (D) of nozzle with opening (E) on bottom of packing materials. Hard floor cleaner B. Brush assembly D. Align post (A) on brush block with slot in bottom handle support (D). 1. Hard Floor Cleaning Detergent Remove all the way down until you hear it rests...
...shown. Make sure all parts are out. Push upper handle (C) all parts from squeegee area on upper handle (C) with hole (B) on cleaner. Turn brushes slightly until a snap is felt. 1.3 Align control rod (B) on underside of nozzle. 1.6 DE C 1.7 While holding nozzle in place, slide latches... snap into place. Align middle section (D) of nozzle with opening (E) on bottom of packing materials. Hard floor cleaner B. Brush assembly D. Align post (A) on brush block with slot in bottom handle support (D). 1. Hard Floor Cleaning Detergent Remove all the way down until you hear it rests...
Manual
Page 6
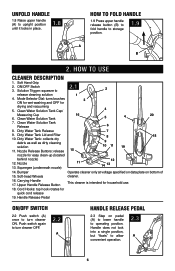
... handle release button (B) to fold handle to turn cleaner ON. HOW TO USE Cleaner Description 1. Soft Hand Grip 2. ON/OFF Switch 3. Mode Selector Dial: turns brushes 3 ON for wet washing and OFF for easy clean-up (located behind nozzle) 12. Clean Water Solution Tank Cap/ 4 Measuring Cup 16 6. Push switch again...
... handle release button (B) to fold handle to turn cleaner ON. HOW TO USE Cleaner Description 1. Soft Hand Grip 2. ON/OFF Switch 3. Mode Selector Dial: turns brushes 3 ON for wet washing and OFF for easy clean-up (located behind nozzle) 12. Clean Water Solution Tank Cap/ 4 Measuring Cup 16 6. Push switch again...
Manual
Page 7
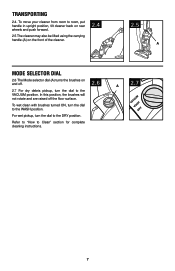
... lifted using the carrying handle (A) on the front of the cleaner. 2.4 2.5 A Mode selector dial 2.6 The Mode selector dial (A) turns the brushes on and off the floor surface. In this position, the brushes will not rotate and are raised off . 2.7 For dry debris pickup, turn the dial to the WASH position. For wet... pickup, turn the dial to the VACUUM position. Refer to "How to the DRY position. To wet clean with brushes turned ON, turn the dial to Clean" section for complete cleaning instructions. 2.6 2.7 A VACUWUAMSDHRY 7 Transporting 2.4.
... lifted using the carrying handle (A) on the front of the cleaner. 2.4 2.5 A Mode selector dial 2.6 The Mode selector dial (A) turns the brushes on and off the floor surface. In this position, the brushes will not rotate and are raised off . 2.7 For dry debris pickup, turn the dial to the WASH position. For wet... pickup, turn the dial to the VACUUM position. Refer to "How to the DRY position. To wet clean with brushes turned ON, turn the dial to Clean" section for complete cleaning instructions. 2.6 2.7 A VACUWUAMSDHRY 7 Transporting 2.4.

Manual
Page 9
... low or reduced. 2.17 How to Clean Turn cleaner off is recommended that the Dirty Water Tank be cleaned by tapping the filter or gently brushing using your hand. Replace lid onto Dirty Water Tank, pressing down on the filter screen located in lid. Allow filter to prevent the tank from...
... low or reduced. 2.17 How to Clean Turn cleaner off is recommended that the Dirty Water Tank be cleaned by tapping the filter or gently brushing using your hand. Replace lid onto Dirty Water Tank, pressing down on the filter screen located in lid. Allow filter to prevent the tank from...
Manual
Page 10
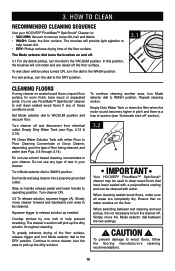
...floor. Slowly move cleaner over area to operating position. The cleaner's suction will provide light agitation to the DRY position. The brushes will pick up the dirty solution. Do not use solvent based cleaning concentrates in your cleaner. To continue cleaning another area, ...floor surface, release trigger and turn Mode selector dial to help loosen dirt. • DRY: Pickup reduces drying time of wax in your HOOVER® FloorMate™ SpinScrub® Cleaner to: • VACUUM: Vacuum to the DRY position. 3.1 VACUWUAMSDHRY Cleaning floors If using cleaner on...
...floor. Slowly move cleaner over area to operating position. The cleaner's suction will provide light agitation to the DRY position. The brushes will pick up the dirty solution. Do not use solvent based cleaning concentrates in your cleaner. To continue cleaning another area, ...floor surface, release trigger and turn Mode selector dial to help loosen dirt. • DRY: Pickup reduces drying time of wax in your HOOVER® FloorMate™ SpinScrub® Cleaner to: • VACUUM: Vacuum to the DRY position. 3.1 VACUWUAMSDHRY Cleaning floors If using cleaner on...
Manual
Page 11
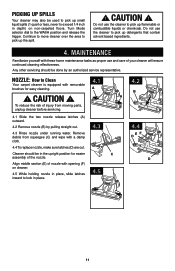
.... 4.5 While holding nozzle in place, slide latches inward to lock in the upright position for easier assembly of injury from squeegee (C) and wipe with removable brushes for easy cleaning. ! CAUTION ! Remove debris from moving parts, unplug cleaner before servicing. 4.1 Slide the two nozzle release latches (A) outward. 4.2 Remove nozzle (B) by an authorized...
.... 4.5 While holding nozzle in place, slide latches inward to lock in the upright position for easier assembly of injury from squeegee (C) and wipe with removable brushes for easy cleaning. ! CAUTION ! Remove debris from moving parts, unplug cleaner before servicing. 4.1 Slide the two nozzle release latches (A) outward. 4.2 Remove nozzle (B) by an authorized...
Manual
Page 12
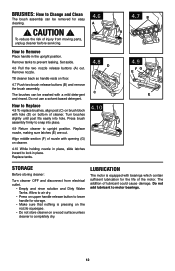
...is pressing on the nozzle squeegee. • Do not store cleaner on floor. 4.7 Push two brush release buttons (B) and remove the brush assembly. Turn brushes slightly until post fits easily into place. 4.9 Return cleaner to upright position. Replace nozzle, making sure...for easy cleaning. 4.6 A ! Remove tanks to motor bearings. 12 Do not use a solvent based detergent. How to Replace 4.8 To replace brushes, align post (C) on brush block with hole (D) on bottom of nozzle with a mild detergent and rinsed. Align middle section (F) of cleaner. Replace tanks. 4.8 D ...
...is pressing on the nozzle squeegee. • Do not store cleaner on floor. 4.7 Push two brush release buttons (B) and remove the brush assembly. Turn brushes slightly until post fits easily into place. 4.9 Return cleaner to upright position. Replace nozzle, making sure...for easy cleaning. 4.6 A ! Remove tanks to motor bearings. 12 Do not use a solvent based detergent. How to Replace 4.8 To replace brushes, align post (C) on brush block with hole (D) on bottom of nozzle with a mild detergent and rinsed. Align middle section (F) of cleaner. Replace tanks. 4.8 D ...
Manual
Page 13
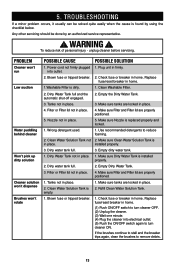
...Tank full and the automatic shut-off engaged. 2. Tanks not in place. 5. Filter or Filter lid not in place. 4. Cleaner solution won't dispense Brushes won 't run 1. Make sure tanks are locked in place. 3. Replace fuse/reset breaker in place. 2. Empty the Dirty Water Tank. 3. Empty...puddling behind cleaner 1. Dirty Water Tank not in place. 2. Blown fuse or tripped breaker. 1. If the brushes continue to stall and the breaker trips again, clean the brushes to reduce foaming. 2. To reduce risk of personal injury - Make sure Filter and Filter lid are properly ...
...Tank full and the automatic shut-off engaged. 2. Tanks not in place. 5. Filter or Filter lid not in place. 4. Cleaner solution won't dispense Brushes won 't run 1. Make sure tanks are locked in place. 3. Replace fuse/reset breaker in place. 2. Empty the Dirty Water Tank. 3. Empty...puddling behind cleaner 1. Dirty Water Tank not in place. 2. Blown fuse or tripped breaker. 1. If the brushes continue to stall and the breaker trips again, clean the brushes to reduce foaming. 2. To reduce risk of personal injury - Make sure Filter and Filter lid are properly ...

Manual
Page 15
... and retailers nationwide. 15 P 3 When cleaning a hard surface, the optional Hoover® hard surface attachment below must be used : 6 Brush Hoover® part # 36419008 5 Brush Hoover® part # 48417007. For optimal performance use with the appliance as noted below. ® Hoover Cleaning Product Guide Hoover Hoover Platinum Platinum Collection® Collection® Deep Professional Pet Plus Product Name...
... and retailers nationwide. 15 P 3 When cleaning a hard surface, the optional Hoover® hard surface attachment below must be used : 6 Brush Hoover® part # 36419008 5 Brush Hoover® part # 48417007. For optimal performance use with the appliance as noted below. ® Hoover Cleaning Product Guide Hoover Hoover Platinum Platinum Collection® Collection® Deep Professional Pet Plus Product Name...


