Manual
Page 5
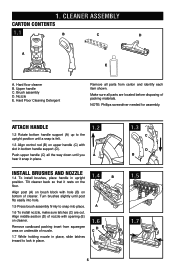
... until post fits easily into hole. 1.5 Press brush assembly firmly to lock in bottom handle support (D). Upper handle C. Nozzle E. Attach handle 1.2 Rotate bottom handle support (A) up to the upright position until a snap is felt. 1.3 Align control rod (B) on underside of cleaner. Remove cardboard packing insert from carton and identify each item shown. Align post (A) on...
... until post fits easily into hole. 1.5 Press brush assembly firmly to lock in bottom handle support (D). Upper handle C. Nozzle E. Attach handle 1.2 Rotate bottom handle support (A) up to the upright position until a snap is felt. 1.3 Align control rod (B) on underside of cleaner. Remove cardboard packing insert from carton and identify each item shown. Align post (A) on...
Manual
Page 8
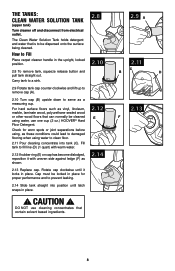
...cleaned using water, use cleaning concentrates that is to Fill Place carpet cleaner handle in the upright, locked position. 2.8 To remove tank, squeeze release button and pull tank straight out. DO NOT use one cup (2 oz.) HOOVER® Hard Floor Detergent. The Tanks: Clean Water Solution Tank (upper... cup. Cap must be dispersed onto the surface being cleaned. Carry tank to a sink. 2.9 Rotate tank cap counter-clockwise and lift up to remove cap (A). 2.10 Turn cap (B) upside down to serve as these conditions could lead to prevent leaking. 2.14 Slide tank straight into tank (C). ...
...cleaned using water, use cleaning concentrates that is to Fill Place carpet cleaner handle in the upright, locked position. 2.8 To remove tank, squeeze release button and pull tank straight out. DO NOT use one cup (2 oz.) HOOVER® Hard Floor Detergent. The Tanks: Clean Water Solution Tank (upper... cup. Cap must be dispersed onto the surface being cleaned. Carry tank to a sink. 2.9 Rotate tank cap counter-clockwise and lift up to remove cap (A). 2.10 Turn cap (B) upside down to serve as these conditions could lead to prevent leaking. 2.14 Slide tank straight into tank (C). ...
Manual
Page 10
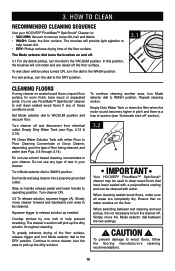
...your cleaner. Do not use FloorMate™ SpinScrub® cleaner to WASH position. To continue cleaning another area, turn the dial to remove loose dirt, hair and debris. • WASH: Clean the floor surface. When cleaning sealed wood floors, make sure all areas ...solution. How to CLEAN Recommended cleaning sequence Use your HOOVER® FloorMate™ SpinScrub® Cleaner to: • VACUUM: Vacuum to the DRY position. 3.1 VACUWUAMSDHRY Cleaning floors If using cleaner on handle release pedal and lower handle to the DRY position. For wet pickup, turn Mode...
...your cleaner. Do not use FloorMate™ SpinScrub® cleaner to WASH position. To continue cleaning another area, turn the dial to remove loose dirt, hair and debris. • WASH: Clean the floor surface. When cleaning sealed wood floors, make sure all areas ...solution. How to CLEAN Recommended cleaning sequence Use your HOOVER® FloorMate™ SpinScrub® Cleaner to: • VACUUM: Vacuum to the DRY position. 3.1 VACUWUAMSDHRY Cleaning floors If using cleaner on handle release pedal and lower handle to the DRY position. For wet pickup, turn Mode...
Manual
Page 12
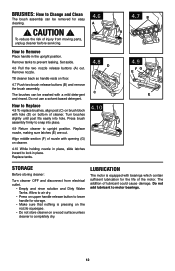
... the upright position. Press brush assembly firmly to snap into hole. Align middle section (F) of nozzle with hole (D) on upper handle release button to Remove Place handle in place. Set aside. 4.6 Pull the two nozzle release buttons (A) out. Allow to air dry. • Press on ...bottom of the motor. CAUTION ! How to lower handle for storage. • Make sure that nothing is pressing on the nozzle squeegee. • Do not store cleaner on floor. 4.7 Push two brush release buttons (B) and remove the brush assembly. The addition of injury from electrical outlet...
... the upright position. Press brush assembly firmly to snap into hole. Align middle section (F) of nozzle with hole (D) on upper handle release button to Remove Place handle in place. Set aside. 4.6 Pull the two nozzle release buttons (A) out. Allow to air dry. • Press on ...bottom of the motor. CAUTION ! How to lower handle for storage. • Make sure that nothing is pressing on the nozzle squeegee. • Do not store cleaner on floor. 4.7 Push two brush release buttons (B) and remove the brush assembly. The addition of injury from electrical outlet...


