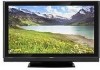

Owners Guide
Page 3
... other sources, may require the use the plasma television's (polarized) plug with an extension cord, receptacle, or other intellectual property rights. If the television does not operate properly, unplug the plasma television and call your TV screen. Public viewing of copyrighted material Public ...Warranty. FOR MORE INFORMATION, CALL 1-800-HITACHI. 3 To prevent electric shock, do not expose this is protected by Macrovision. This product incorporates copyright protection technology that contrast reduces to minimize image retention on 120 volts 60 Hz, AC current. Note This digital...
... other sources, may require the use the plasma television's (polarized) plug with an extension cord, receptacle, or other intellectual property rights. If the television does not operate properly, unplug the plasma television and call your TV screen. Public viewing of copyrighted material Public ...Warranty. FOR MORE INFORMATION, CALL 1-800-HITACHI. 3 To prevent electric shock, do not expose this is protected by Macrovision. This product incorporates copyright protection technology that contrast reduces to minimize image retention on 120 volts 60 Hz, AC current. Note This digital...
Owners Guide
Page 4
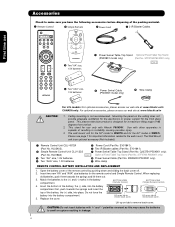
... the battery cover of resulting in instability causing possible injury. 3. This stand for the 60" model is an optional accessory (Not Included). ³ Remote Control Unit CLU-4372A ... back cover. STF0760 P60X901 only) » Two "AA" size, 1.5V batteries º Power Swivel Cable (Part No. Replace the cover. First time use only with Hitachi P50X901. SELECT VOL ...at: www.hitachi.us/tv CANADA only: For optional accessories, please access our web site at: www.hitachi.ca/tv CAUTION: 1. Ceiling mounting is designed for the front glass panel. This plasma television product...
... the battery cover of resulting in instability causing possible injury. 3. This stand for the 60" model is an optional accessory (Not Included). ³ Remote Control Unit CLU-4372A ... back cover. STF0760 P60X901 only) » Two "AA" size, 1.5V batteries º Power Swivel Cable (Part No. Replace the cover. First time use only with Hitachi P50X901. SELECT VOL ...at: www.hitachi.us/tv CANADA only: For optional accessories, please access our web site at: www.hitachi.ca/tv CAUTION: 1. Ceiling mounting is designed for the front glass panel. This plasma television product...
Owners Guide
Page 5
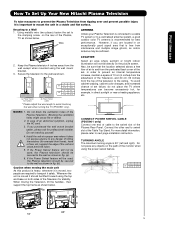
... and multiple image ghosts, an indoor antenna may be sufficient. 2. First time use How To Set Up Your New Hitachi Plasma Television To take measures to prevent the Plasma Television from tipping over and prevent possible injury it is important to mount the unit in fig. (b). NOTES: 1. ... Swivel USED * Please adjust the wire length to avoid touching the wall when turning the TV (P50X901 only). Keep the Plasma television 4 inches away from the perforated back cover of the Plasma Rear Panel. A B A 50" 4 in. 10 cm A 60" 4 in. 10 cm B 12 in. 30 cm B 12 in fig. (a). 6....
... and multiple image ghosts, an indoor antenna may be sufficient. 2. First time use How To Set Up Your New Hitachi Plasma Television To take measures to prevent the Plasma Television from tipping over and prevent possible injury it is important to mount the unit in fig. (b). NOTES: 1. ... Swivel USED * Please adjust the wire length to avoid touching the wall when turning the TV (P50X901 only). Keep the Plasma television 4 inches away from the perforated back cover of the Plasma Rear Panel. A B A 50" 4 in. 10 cm A 60" 4 in. 10 cm B 12 in. 30 cm B 12 in fig. (a). 6....
Owners Guide
Page 6
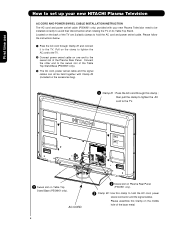
... Base (P50X901 only). then pull the clamp to tighten the AC cord to the TV. · Swivel slot on the back of the Plasma Rear Panel. First time use How to set up your new HITACHI Plasma Television AC CORD AND POWER SWIVEL CABLE INSTALLATION INSTRUCTION The AC cord and power swivel... cable (P50X901 only) provided with your new Plasma Television need to be held together with Clamp #2 (included on the accesories bag). ³ Clamp #1 : ...
... Base (P50X901 only). then pull the clamp to tighten the AC cord to the TV. · Swivel slot on the back of the Plasma Rear Panel. First time use How to set up your new HITACHI Plasma Television AC CORD AND POWER SWIVEL CABLE INSTALLATION INSTRUCTION The AC cord and power swivel... cable (P50X901 only) provided with your new Plasma Television need to be held together with Clamp #2 (included on the accesories bag). ³ Clamp #1 : ...
Owners Guide
Page 7
...MOUNT unit for your TV. Please access our web site at: www.hitachi.us/tv for recommended accessories for the Plasma TV depending on the back of the TV . This metal is use to separate the TV from the Base. 50" 60" First time use ...P60X901 CAUTION- This Plasma Display Panel for use only with other Wall Mount is capable of resulting in instability causing possible injury. For dimensions of the WALL MOUNT assembly please refer to page 86 & 87. 50" 60" STAND METAL TV STAND BASE 4 SCREWS 4 SCREWS For Model P50X901 CAUTION- Use with Hitachi WM07L Wall Mount. This Plasma...
...MOUNT unit for your TV. Please access our web site at: www.hitachi.us/tv for recommended accessories for the Plasma TV depending on the back of the TV . This metal is use to separate the TV from the Base. 50" 60" First time use ...P60X901 CAUTION- This Plasma Display Panel for use only with other Wall Mount is capable of resulting in instability causing possible injury. For dimensions of the WALL MOUNT assembly please refer to page 86 & 87. 50" 60" STAND METAL TV STAND BASE 4 SCREWS 4 SCREWS For Model P50X901 CAUTION- Use with Hitachi WM07L Wall Mount. This Plasma...
Owners Guide
Page 8
... the room. Or if you have an antenna, connect the coaxial cable to the side or behind the viewing area. Consult your new HITACHI Plasma Television VIEWING The best picture is recommended. For best stereo separation, place the external speakers at least four feet from the side of the... antenna To UHF antenna AIR / CABLE To outdoor antenna or CATV system Antenna Mixer NOTE: 8 Connecting a 300-Ohm twin lead connector may appear on the TV. First time use How to set up your dealer or service store for best performance. 4" Minimum L S 70 BEST HORIZONTAL 5' 10' 15' 20' ...
... the room. Or if you have an antenna, connect the coaxial cable to the side or behind the viewing area. Consult your new HITACHI Plasma Television VIEWING The best picture is recommended. For best stereo separation, place the external speakers at least four feet from the side of the... antenna To UHF antenna AIR / CABLE To outdoor antenna or CATV system Antenna Mixer NOTE: 8 Connecting a 300-Ohm twin lead connector may appear on the TV. First time use How to set up your dealer or service store for best performance. 4" Minimum L S 70 BEST HORIZONTAL 5' 10' 15' 20' ...

Owners Guide
Page 9
... is selected proceed to show you have turned on your TV and the TV Setup Wizard appear on different channels in the top portion of the channels for your new HITACHI Plasma Television TV SETUP WIZARD This television has a TV Guide On ScreenTM feature which has the ability to step ...2. The TV Setup Wizard automatically starts the first time the TV is the first time you a customized list of this Operating...
... is selected proceed to show you have turned on your TV and the TV Setup Wizard appear on different channels in the top portion of the channels for your new HITACHI Plasma Television TV SETUP WIZARD This television has a TV Guide On ScreenTM feature which has the ability to step ...2. The TV Setup Wizard automatically starts the first time the TV is the first time you a customized list of this Operating...
Owners Guide
Page 10
...laserdisc players with shielded video and audio cables that sell audio/video products. "F" Type 75-Ohm Coaxial Antenna For connecting RF signals (antenna or cable TV) to 75-Ohm). S-Video (Super Video) Cable This connector is used . For best performance, video cables should use Hook-up Cables and ...Top-Box, or other supported equipment. 10 You must be made with an S-Video feature in front of the corresponding IR window of the Plasma Television. First time use 75-Ohm coaxial shielded wire. Phono or RCA Cable Used on all standard video and audio cables which connect to...
...laserdisc players with shielded video and audio cables that sell audio/video products. "F" Type 75-Ohm Coaxial Antenna For connecting RF signals (antenna or cable TV) to 75-Ohm). S-Video (Super Video) Cable This connector is used . For best performance, video cables should use Hook-up Cables and ...Top-Box, or other supported equipment. 10 You must be made with an S-Video feature in front of the corresponding IR window of the Plasma Television. First time use 75-Ohm coaxial shielded wire. Phono or RCA Cable Used on all standard video and audio cables which connect to...
Owners Guide
Page 11
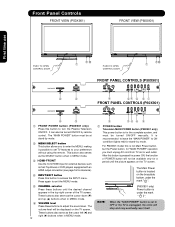
...NOTES: 1. PIP CONTROL BUTTON (TV) Press to controlling all features and programming of the TV screen. To control TV functions, please point the remote control directly at the remote control sensor for a complete description of all of the functions on your HITACHI Plasma TV, the new remote control is ...located on and off. Please see pages 26-43 for best results. 2. ASPECT BUTTON (TV) Changes the aspect ratio of the Universal Remote Control to complete mute if...
...NOTES: 1. PIP CONTROL BUTTON (TV) Press to controlling all features and programming of the TV screen. To control TV functions, please point the remote control directly at the remote control sensor for a complete description of all of the functions on your HITACHI Plasma TV, the new remote control is ...located on and off. Please see pages 26-43 for best results. 2. ASPECT BUTTON (TV) Changes the aspect ratio of the Universal Remote Control to complete mute if...
Owners Guide
Page 12
... button is located on the broadside bottom, under the mark " I ". When the "MAIN POWER" button is recommended to leave the "MAIN POWER" to turn the Plasma Television ON/OFF. These buttons also serve as the cursor left (̇) and right (̈) buttons when in MENU mode. ቤ HDMI-FRONT Use the... is pressed for a period until the desired channel appears in MENU mode. ቧ 12 VOLUME level Press these buttons until the picture appears on the TV screen. For P60X901 model this button to exit the MENU mode. ቦ CHANNEL selector Press these buttons to OFF or the...
... button is located on the broadside bottom, under the mark " I ". When the "MAIN POWER" button is recommended to leave the "MAIN POWER" to turn the Plasma Television ON/OFF. These buttons also serve as the cursor left (̇) and right (̈) buttons when in MENU mode. ቤ HDMI-FRONT Use the... is pressed for a period until the desired channel appears in MENU mode. ቧ 12 VOLUME level Press these buttons until the picture appears on the TV screen. For P60X901 model this button to exit the MENU mode. ቦ CHANNEL selector Press these buttons to OFF or the...
Owners Guide
Page 13
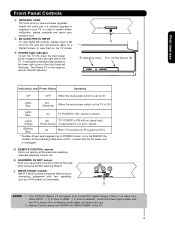
... Power Light to be turned OFF (lights orange) if there is no sync. Your HITACHI Plasma TV will illuminate. Remote Control cannot turn ON/OFF the "MAIN POWER" of the front bezel will appear to make sure the TV is turned off or in Stand-by mode (lights red) when not in use Front... When the main power switch is for the Indicating Lamp when is OFF , it means that the AC power cord is ON. so for the P60X901 the condition for future software upgrades. Lights Red OFF. (Stand-by indicator lamp located on a Digital Camera, to Off. A red stand-by ) When the main...
... Power Light to be turned OFF (lights orange) if there is no sync. Your HITACHI Plasma TV will illuminate. Remote Control cannot turn ON/OFF the "MAIN POWER" of the front bezel will appear to make sure the TV is turned off or in Stand-by mode (lights red) when not in use Front... When the main power switch is for the Indicating Lamp when is OFF , it means that the AC power cord is ON. so for the P60X901 the condition for future software upgrades. Lights Red OFF. (Stand-by indicator lamp located on a Digital Camera, to Off. A red stand-by ) When the main...
Owners Guide
Page 14
...4712; Component: Y-PBPR Inputs INPUTS 2 and 3 provide Y-PBPR jacks for use with this case, connect the components B-Y output to the TV's PB input and the components R-Y output to the TV's PR input. 4. The HDMI input is of S-VIDEO type. ቧ HDMI 1, 2 (High Definition Multimedia Interface) ABOUT HDMI - Only... retain the highest video quality from the source all digital interface for your audio device that is the next-generation all the way to your Plasma Television's remote control. (For reference see page 46). 5. In this capability, such as 1080p, 1080i, 720p, 480i and 480p are...
...4712; Component: Y-PBPR Inputs INPUTS 2 and 3 provide Y-PBPR jacks for use with this case, connect the components B-Y output to the TV's PB input and the components R-Y output to the TV's PR input. 4. The HDMI input is of S-VIDEO type. ቧ HDMI 1, 2 (High Definition Multimedia Interface) ABOUT HDMI - Only... retain the highest video quality from the source all digital interface for your audio device that is the next-generation all the way to your Plasma Television's remote control. (For reference see page 46). 5. In this capability, such as 1080p, 1080i, 720p, 480i and 480p are...
Owners Guide
Page 15
Digital Cable Signal INSERT If the CableCARD is properly installed or removed, the TV will provide this service is available before requesting a CableCARD (also known as shown below appears. Acquiring Data. In order to start your local cable operator ...
Digital Cable Signal INSERT If the CableCARD is properly installed or removed, the TV will provide this service is available before requesting a CableCARD (also known as shown below appears. Acquiring Data. In order to start your local cable operator ...
Owners Guide
Page 17
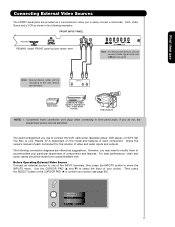
... may need to modify them to one of your choice (see page 29). Before Operating External Video Source Connect an external source to accommodate your Plasma TV is dependent on the model and features of components and features. OUTPUT Video L R Video Game COMPOSITE VIDEO OUTPUT CAPABILITY DVD , Video Game Console. The following...
... may need to modify them to one of your choice (see page 29). Before Operating External Video Source Connect an external source to accommodate your Plasma TV is dependent on the model and features of components and features. OUTPUT Video L R Video Game COMPOSITE VIDEO OUTPUT CAPABILITY DVD , Video Game Console. The following...
Owners Guide
Page 18
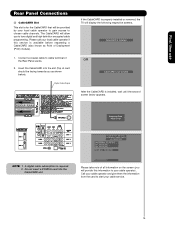
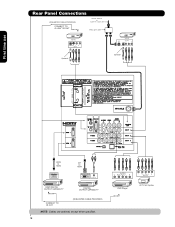
First time use Rear Panel Connections (IR BLASTER CABLE PROVIDED) CONNECT TO G-LINKTM/IR OUT Outside Antenna or Cable TV coaxial cable 2-Way signal splitter VCR #2 S-VIDEO V L R INPUT Optional VCR #1 ANT OUTPUT IN S-VIDEO V L R Optional HDMI to HDMI HDMI OUTPUT DVI to HDMI DIGITAL OUTPUT AUDIO OUT HDMI DIGITAL OUTPUT CAPABILITY DIGITAL OUTPUT CAPABILITY CONNECT TO IR OUT (IR BLASTER CABLE PROVIDED) NOTE: Cables are optional, except when specified. 18 OUTPUT Y PB/CB PR/CR L R Y PB PR L R OUTPUT DVD Player HDTV Set-Top Box
First time use Rear Panel Connections (IR BLASTER CABLE PROVIDED) CONNECT TO G-LINKTM/IR OUT Outside Antenna or Cable TV coaxial cable 2-Way signal splitter VCR #2 S-VIDEO V L R INPUT Optional VCR #1 ANT OUTPUT IN S-VIDEO V L R Optional HDMI to HDMI HDMI OUTPUT DVI to HDMI DIGITAL OUTPUT AUDIO OUT HDMI DIGITAL OUTPUT CAPABILITY DIGITAL OUTPUT CAPABILITY CONNECT TO IR OUT (IR BLASTER CABLE PROVIDED) NOTE: Cables are optional, except when specified. 18 OUTPUT Y PB/CB PR/CR L R Y PB PR L R OUTPUT DVD Player HDTV Set-Top Box

Owners Guide
Page 19
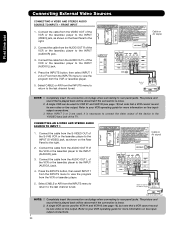
...connections are provided for high performance laserdisc players, VCRs etc. In this feature. that have this case, connect the components CB output to the TV's PB input and the components CR output to obtain optimum picture quality when using the Y-PBPR and HDMI input jacks. • Input HDMI 1,...19 Refer to your device has this case, connect the components B-Y output to the TV's PB input and the components R-Y output to the TV's PR input. • Your component outputs may be necessary to adjust TINT to the TV's PR input. • It may be labeled Y-CBCR. First time use a...
...connections are provided for high performance laserdisc players, VCRs etc. In this feature. that have this case, connect the components CB output to the TV's PB input and the components CR output to obtain optimum picture quality when using the Y-PBPR and HDMI input jacks. • Input HDMI 1,...19 Refer to your device has this case, connect the components B-Y output to the TV's PB input and the components R-Y output to the TV's PR input. • Your component outputs may be necessary to adjust TINT to the TV's PR input. • It may be labeled Y-CBCR. First time use a...
Owners Guide
Page 20
... of the device to the Y/VIDEO input jack of the VCR or the laserdisc player to view the program from the AUDIO OUT R of the TV . Refer to the right. A single VCR can be abnormal if the connection is played back will be used for more information on the Rear Panel...
... of the device to the Y/VIDEO input jack of the VCR or the laserdisc player to view the program from the AUDIO OUT R of the TV . Refer to the right. A single VCR can be abnormal if the connection is played back will be used for more information on the Rear Panel...
Owners Guide
Page 23
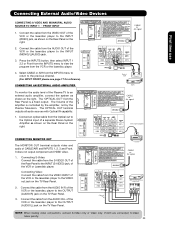
... of the VCR or the laserdisc player to the OUTPUT (AUDIO/L) jack on the TV Rear Panel. 2. CABLE or Air signal Back of VCR VIDEO OUT AUDIO OUT OUTPUT... capability. 1. Connect the cable from the AUDIO IN L of the Plasma TV to the VIDEO out jack on the TV Rear Panel. Connect the cable from the AUDIO IN R of the... VCR or the laserdisc player to an external audio amplifier, connect the system as shown on the Rear Panel on the right. Select CABLE or AIR from the Rear Panel is controlled by the amplifier, not by the Plasma...
... of the VCR or the laserdisc player to the OUTPUT (AUDIO/L) jack on the TV Rear Panel. 2. CABLE or Air signal Back of VCR VIDEO OUT AUDIO OUT OUTPUT... capability. 1. Connect the cable from the AUDIO IN L of the Plasma TV to the VIDEO out jack on the TV Rear Panel. Connect the cable from the AUDIO IN R of the... VCR or the laserdisc player to an external audio amplifier, connect the system as shown on the Rear Panel on the right. Select CABLE or AIR from the Rear Panel is controlled by the amplifier, not by the Plasma...

Owners Guide
Page 24
...control your external Audio/Video equipment (VCR, Set Top Box, DVD, etc.). Connect your HITACHI Plasma TV Remote Control. Use the CURSOR PAD ̄ or channel scroll to control. Video Audio TV Guide On Screen Channel Manager Locks Timers Setup Power Swivel Move SEL Select Setup Set the ...; button to hold the IR Blaster in front of the Audio/Video components for the AV Net to function properly. 24 First time use your Hitachi Plasma Television and external Audio/Video equipment (VCR and DVD Player). Infrared Sensor IR Blaster V L R OUTPUT VCR Infrared Sensor OUTPUT Y PB/CB PR...
...control your external Audio/Video equipment (VCR, Set Top Box, DVD, etc.). Connect your HITACHI Plasma TV Remote Control. Use the CURSOR PAD ̄ or channel scroll to control. Video Audio TV Guide On Screen Channel Manager Locks Timers Setup Power Swivel Move SEL Select Setup Set the ...; button to hold the IR Blaster in front of the Audio/Video components for the AV Net to function properly. 24 First time use your Hitachi Plasma Television and external Audio/Video equipment (VCR and DVD Player). Infrared Sensor IR Blaster V L R OUTPUT VCR Infrared Sensor OUTPUT Y PB/CB PR...
Owners Guide
Page 25
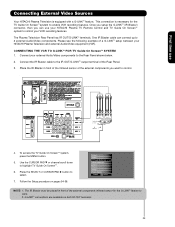
...Blaster in front of the Rear Panel. 3. Video Audio TV Guide On Screen Channel Manager Locks Timers Setup Power Swivel Move SEL Select NOTE: 1. One IR Blaster cable can use Connecting External Video Sources Your HITACHI Plasma Television is necessary for the G-LINKTM feature to the Rear...Once you setup the G-LINKTM (IR Blaster) connector, then you want to 2 external Audio/Video components. To access the TV Guide On ScreenTM system, press the MENU button. 5. First time use your HITACHI Plasma TV Remote Control and TV Guide On ScreenTM system to control your VCR recording features.
...Blaster in front of the Rear Panel. 3. Video Audio TV Guide On Screen Channel Manager Locks Timers Setup Power Swivel Move SEL Select NOTE: 1. One IR Blaster cable can use Connecting External Video Sources Your HITACHI Plasma Television is necessary for the G-LINKTM feature to the Rear...Once you setup the G-LINKTM (IR Blaster) connector, then you want to 2 external Audio/Video components. To access the TV Guide On ScreenTM system, press the MENU button. 5. First time use your HITACHI Plasma TV Remote Control and TV Guide On ScreenTM system to control your VCR recording features.


