Owners Guide
Page 2
... an antenna discharge unit, size of grounding connectors, location of HITACHI plasma televisions. Follow all warnings and instructions marked on the quality, performance, and ease of service of antenna discharge READ BEFORE OPERATING EQUIPMENT Follow all instructions. 5. Note to the presence of overhead power lines or other . Important Safety Instructions SAFETY POINTS YOU...
... an antenna discharge unit, size of grounding connectors, location of HITACHI plasma televisions. Follow all warnings and instructions marked on the quality, performance, and ease of service of antenna discharge READ BEFORE OPERATING EQUIPMENT Follow all instructions. 5. Note to the presence of overhead power lines or other . Important Safety Instructions SAFETY POINTS YOU...

Owners Guide
Page 3
... can expose you to a cable system providing such programming. FOR MORE INFORMATION, CALL 1-800-HITACHI. 3 Public viewing of copyrighted material Public viewing of programs broadcast by TV stations and cable companies, as well as video games, stock market quotations, computer generated graphics...disconnect device and shall remain readily operable. Lead Notice This product contains lead. Insert the power cord into a 120 volt 60 Hz outlet. Important Safety Instructions Power source This plasma television is designed to 50 Hz, direct current, or anything other than 2.5 minutes, ...
... can expose you to a cable system providing such programming. FOR MORE INFORMATION, CALL 1-800-HITACHI. 3 Public viewing of copyrighted material Public viewing of programs broadcast by TV stations and cable companies, as well as video games, stock market quotations, computer generated graphics...disconnect device and shall remain readily operable. Lead Notice This product contains lead. Insert the power cord into a 120 volt 60 Hz outlet. Important Safety Instructions Power source This plasma television is designed to 50 Hz, direct current, or anything other than 2.5 minutes, ...
Owners Guide
Page 4
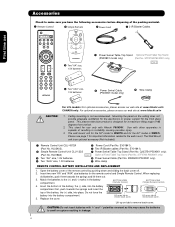
...Power Cord ² 2 IR Blaster Cables CH + GUIDE VOL - Insert two new "AA" and "AAA" size batteries for the 60" model is WM07L. CAUTION: Do not insert batteries with Hitachi...Power Swivel Table Top Stand (Part No. Lift up on tab to remove back cover. models: For optional accessories, please access our web site at: www.hitachi.us/tv CANADA only: For optional accessories, please access our web site at: www.hitachi.ca/tv...) BOTTOM VIEW (Simple Remote Control) 4. STF0760 P60X901 only) » Two "AA" size, 1.5V batteries º Power Swivel Cable (Part No. First time use only...
...Power Cord ² 2 IR Blaster Cables CH + GUIDE VOL - Insert two new "AA" and "AAA" size batteries for the 60" model is WM07L. CAUTION: Do not insert batteries with Hitachi...Power Swivel Table Top Stand (Part No. Lift up on tab to remove back cover. models: For optional accessories, please access our web site at: www.hitachi.us/tv CANADA only: For optional accessories, please access our web site at: www.hitachi.ca/tv...) BOTTOM VIEW (Simple Remote Control) 4. STF0760 P60X901 only) » Two "AA" size, 1.5V batteries º Power Swivel Cable (Part No. First time use only...
Owners Guide
Page 5
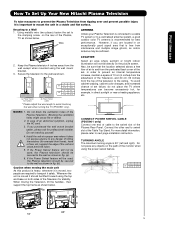
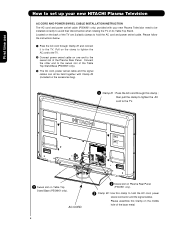
...both sides of the Plasma TV as shown below . Wire ANTENNA Unless your Plasma Television is connected to a cable TV system or to a centralized antenna system, a good outdoor color TV antenna is recommended for...27.5 cm 39 cm 60" 50" 5 A B A 50" 4 in. 10 cm A 60" 4 in. 10 cm B 12 in. 30 cm B 12 in . If the Power Swivel feature will not be used , the Plasma television should be secured to... fig. (a). 6. First time use How To Set Up Your New Hitachi Plasma Television To take measures to prevent the Plasma Television from tipping over and prevent possible injury it is 30° ...
...both sides of the Plasma TV as shown below . Wire ANTENNA Unless your Plasma Television is connected to a cable TV system or to a centralized antenna system, a good outdoor color TV antenna is recommended for...27.5 cm 39 cm 60" 50" 5 A B A 50" 4 in. 10 cm A 60" 4 in. 10 cm B 12 in. 30 cm B 12 in . If the Power Swivel feature will not be used , the Plasma television should be secured to... fig. (a). 6. First time use How To Set Up Your New Hitachi Plasma Television To take measures to prevent the Plasma Television from tipping over and prevent possible injury it is 30° ...
Owners Guide
Page 6
... (P50X901 only). » The AC cord, power swivel cable and the signal cables can all be held together with your new HITACHI Plasma Television AC CORD AND POWER SWIVEL CABLE INSTALLATION INSTRUCTION The AC cord and power swivel cable (P50X901 only) provided with Clamp #2 (included on Plasma Rear Panel (P50X901 only). » Clamp #2:... then pull the clamp to tighten the AC cord to hold the AC cord, power swivel connector and the signal cables. Pull on the clamp to tighten the AC cord to the TV. · Connect power swivel cable on the back of the base metal. Located on one end to the...
... (P50X901 only). » The AC cord, power swivel cable and the signal cables can all be held together with your new HITACHI Plasma Television AC CORD AND POWER SWIVEL CABLE INSTALLATION INSTRUCTION The AC cord and power swivel cable (P50X901 only) provided with Clamp #2 (included on Plasma Rear Panel (P50X901 only). » Clamp #2:... then pull the clamp to tighten the AC cord to hold the AC cord, power swivel connector and the signal cables. Pull on the clamp to tighten the AC cord to the TV. · Connect power swivel cable on the back of the base metal. Located on one end to the...

Owners Guide
Page 9
...to move to the next window to select Yes or No and press the SELECT button on page 57. Do you turn off your TV, unplug the power cord and connect your devices and cables according to the applicable connections in the "First Time Use" section of the programs and channels ...top portion of the channels for the first time and did not yet connect your external devices and cables to your TV, turn on different channels in your new HITACHI Plasma Television TV SETUP WIZARD This television has a TV Guide On ScreenTM feature which has the ability to show you have turned on your area.
...to move to the next window to select Yes or No and press the SELECT button on page 57. Do you turn off your TV, unplug the power cord and connect your devices and cables according to the applicable connections in the "First Time Use" section of the programs and channels ...top portion of the channels for the first time and did not yet connect your external devices and cables to your TV, turn on different channels in your new HITACHI Plasma Television TV SETUP WIZARD This television has a TV Guide On ScreenTM feature which has the ability to show you have turned on your area.
Owners Guide
Page 10
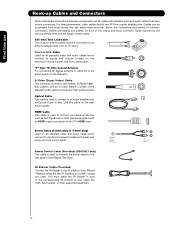
... the output and input connector types required by the various components and the length of the Plasma Television. You must be made with an S-Video feature in front of the corresponding IR... sell audio/video products. "F" Type 75-Ohm Coaxial Antenna For connecting RF signals (antenna or cable TV) to produce a high quality picture. Use this cable for the best sound quality. Stereo Cable (3.... HDMI Cable This cable is used . AUDIO OUT 3.8mm STEREO MINI-PLUG 2 RCA TYPE PLUGS Power Swivel Cable (Provided) (P50X901 only) This cable is used to connect to an audio amplifier with...
... the output and input connector types required by the various components and the length of the Plasma Television. You must be made with an S-Video feature in front of the corresponding IR... sell audio/video products. "F" Type 75-Ohm Coaxial Antenna For connecting RF signals (antenna or cable TV) to produce a high quality picture. Use this cable for the best sound quality. Stereo Cable (3.... HDMI Cable This cable is used . AUDIO OUT 3.8mm STEREO MINI-PLUG 2 RCA TYPE PLUGS Power Swivel Cable (Provided) (P50X901 only) This cable is used to connect to an audio amplifier with...
Owners Guide
Page 11
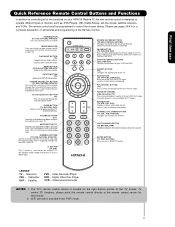
...POWER BUTTON (TV, DVD, SAT/CBL,PVR/VCR) Turns the selected device on your TV. DAY/NIGHT BUTTON (TV) Toggles picture mode settings between the current and last channel viewed. Also used for TV mode.) INFO BUTTON (TV, STB, CBL, PVR) Displays various information on the screen, such as channel information. PIP CONTROL BUTTON (TV... functions of the Universal Remote Control to operate different types of your HITACHI Plasma TV, the new remote control is displayed. First time use as SELECT feature. ENTER BUTTON (TV, VCR, SAT/CBL) Press to use Quick Reference Remote Control Buttons...
...POWER BUTTON (TV, DVD, SAT/CBL,PVR/VCR) Turns the selected device on your TV. DAY/NIGHT BUTTON (TV) Toggles picture mode settings between the current and last channel viewed. Also used for TV mode.) INFO BUTTON (TV, STB, CBL, PVR) Displays various information on the screen, such as channel information. PIP CONTROL BUTTON (TV... functions of the Universal Remote Control to operate different types of your HITACHI Plasma TV, the new remote control is displayed. First time use as SELECT feature. ENTER BUTTON (TV, VCR, SAT/CBL) Press to use Quick Reference Remote Control Buttons...
Owners Guide
Page 12
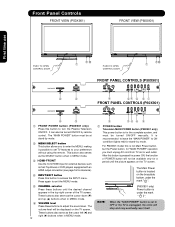
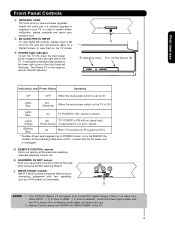
... stop and may eventually reset itself. After this button to access the INPUT menu. Front Panel Controls FRONT VIEW (P50X901) FRONT VIEW (P60X901) First time use PUSH TO OPEN CONTROL DOOR ቪቫ ቨ PUSH TO OPEN CONTROL DOOR ቪቫ ቨ FRONT PANEL... and up (̆) buttons when in MENU mode. ቭ ቨ POWER button Television MAIN POWER button (P50X901 only) This power button is not Main Power button, but the Power button, for "MAIN POWER" operation you to enter the MENU, making it possible to set TV features to turn the Plasma Television ON/OFF.
... stop and may eventually reset itself. After this button to access the INPUT menu. Front Panel Controls FRONT VIEW (P50X901) FRONT VIEW (P60X901) First time use PUSH TO OPEN CONTROL DOOR ቪቫ ቨ PUSH TO OPEN CONTROL DOOR ቪቫ ቨ FRONT PANEL... and up (̆) buttons when in MENU mode. ቭ ቨ POWER button Television MAIN POWER button (P50X901 only) This power button is not Main Power button, but the Power button, for "MAIN POWER" operation you to enter the MENU, making it possible to set TV features to turn the Plasma Television ON/OFF.
Owners Guide
Page 13
... the AC power cord is ON. Your HITACHI Plasma TV will illuminate. When the main power switch is set to be turned OFF (lights orange) if there is no sync. Remote Control cannot turn the TV ON, press the main power switch located on a Digital Camera, to make sure the TV is selected. so for the P60X901 the condition...
... the AC power cord is ON. Your HITACHI Plasma TV will illuminate. When the main power switch is set to be turned OFF (lights orange) if there is no sync. Remote Control cannot turn the TV ON, press the main power switch located on a Digital Camera, to make sure the TV is selected. so for the P60X901 the condition...
Owners Guide
Page 14
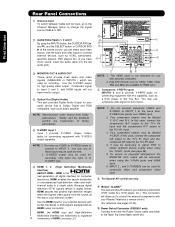
...picture quality when using the Y-PBPR inputs (see pages 24-25). ቫ Power Swivel Connector (P50X901 only) Connect from here the Power Swivel cable (provided) to the Table Top Stand Base swivel slot. INPUT ...Special AV control use only. ቪ IR Out / G-LINKTM This jack provides IR output to your Plasma Television's remote control. (For reference see page 46). 5. HDMI enables the secure distribution of HDMI Licensing... such as VCRs, camcorders, laserdisc players, DVD players etc. (if you to the TV's PR input. 3. This connection will be used for recording, only when the input ...
...picture quality when using the Y-PBPR inputs (see pages 24-25). ቫ Power Swivel Connector (P50X901 only) Connect from here the Power Swivel cable (provided) to the Table Top Stand Base swivel slot. INPUT ...Special AV control use only. ቪ IR Out / G-LINKTM This jack provides IR output to your Plasma Television's remote control. (For reference see page 46). 5. HDMI enables the secure distribution of HDMI Licensing... such as VCRs, camcorders, laserdisc players, DVD players etc. (if you to the TV's PR input. 3. This connection will be used for recording, only when the input ...

Owners Guide
Page 24
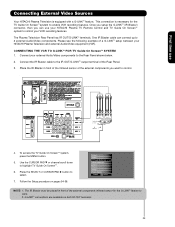
...control. Connect the IR Blaster cable to the IR OUT terminal of four external components. 2. Video Audio TV Guide On Screen Channel Manager Locks Timers Setup Power Swivel Move SEL Select Setup Set the Menu Options Set The Screen Saver Set The Inputs Set The AV...up to 2 external Audio/Video components. Each IR Blaster cable can use Connecting External Video Sources Your HITACHI Plasma Television is setup, it allows your IR Blaster cable to control your equipment using your HITACHI Plasma TV Remote Control. Infrared Sensor IR Blaster V L R OUTPUT VCR Infrared Sensor OUTPUT Y PB/CB PR...
...control. Connect the IR Blaster cable to the IR OUT terminal of four external components. 2. Video Audio TV Guide On Screen Channel Manager Locks Timers Setup Power Swivel Move SEL Select Setup Set the Menu Options Set The Screen Saver Set The Inputs Set The AV...up to 2 external Audio/Video components. Each IR Blaster cable can use Connecting External Video Sources Your HITACHI Plasma Television is setup, it allows your IR Blaster cable to control your equipment using your HITACHI Plasma TV Remote Control. Infrared Sensor IR Blaster V L R OUTPUT VCR Infrared Sensor OUTPUT Y PB/CB PR...
Owners Guide
Page 25
...both IR OUT terminals. 25 CONNECTING THE VCR TO G-LINKTM FOR TV Guide On ScreenTM SYSTEM 1. To access the TV Guide On ScreenTM system, press the MENU button. 5. Video Audio TV Guide On Screen Channel Manager Locks Timers Setup Power Swivel Move SEL Select NOTE: 1. Connect the IR Blaster cable to...Rear Panel shown below. 2. Press the SELECT or CURSOR PAD ̈ button to enable VCR recording features. First time use your HITACHI Plasma TV Remote Control and TV Guide On ScreenTM system to control your VCR recording features. This connection is equipped with a G-LINKTM feature.
...both IR OUT terminals. 25 CONNECTING THE VCR TO G-LINKTM FOR TV Guide On ScreenTM SYSTEM 1. To access the TV Guide On ScreenTM system, press the MENU button. 5. Video Audio TV Guide On Screen Channel Manager Locks Timers Setup Power Swivel Move SEL Select NOTE: 1. Connect the IR Blaster cable to...Rear Panel shown below. 2. Press the SELECT or CURSOR PAD ̈ button to enable VCR recording features. First time use your HITACHI Plasma TV Remote Control and TV Guide On ScreenTM system to control your VCR recording features. This connection is equipped with a G-LINKTM feature.
Owners Guide
Page 27
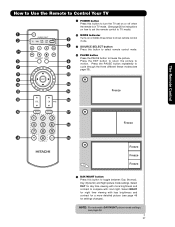
... for a more detailed picture (see page 66. 27 The Remote Control How to Use the Remote to Control Your TV ³ POWER button Press this button to turn the TV set on or off when the remote is in TV mode. (See page 26 for instructions on how to set the remote control to... TV mode). ³ · MODE Indicator · » Turns on or blinks three times to show remote control mode. ¿ »...
... for a more detailed picture (see page 66. 27 The Remote Control How to Use the Remote to Control Your TV ³ POWER button Press this button to turn the TV set on or off when the remote is in TV mode. (See page 26 for instructions on how to set the remote control to... TV mode). ³ · MODE Indicator · » Turns on or blinks three times to show remote control mode. ¿ »...

Owners Guide
Page 32
...the FAV CH button until you wish to tune then press the ENTER button for the TV to tune. When the TV power is on . Use the CHANNEL SELECTOR buttons to enter one more time, or VOL ...half of normal volume (SOFT MUTE) to Favorite (FAV) channel mode. Press it was set when the TV is turned on. ƻ CHANNEL SELECTOR/FAVORITE CHANNEL (FAV CH)/ENTER buttons The CHANNEL SELECTOR buttons are... in PVR/VCR mode. 32 How to Use the Remote to Control Your TV ƺ VOLUME (VOL), MUTE button Press the VOLUME button (̆ or ̄) until the displayed...
...the FAV CH button until you wish to tune then press the ENTER button for the TV to tune. When the TV power is on . Use the CHANNEL SELECTOR buttons to enter one more time, or VOL ...half of normal volume (SOFT MUTE) to Favorite (FAV) channel mode. Press it was set when the TV is turned on. ƻ CHANNEL SELECTOR/FAVORITE CHANNEL (FAV CH)/ENTER buttons The CHANNEL SELECTOR buttons are... in PVR/VCR mode. 32 How to Use the Remote to Control Your TV ƺ VOLUME (VOL), MUTE button Press the VOLUME button (̆ or ̄) until the displayed...

Owners Guide
Page 36
.... ቢ PRECODED CABLE BOX buttons These buttons transmit the chosen precoded cable codes : -Power -Menu -Exit -Guide -Cursor & Select -Info -Channel Up & Down -Last CH -Number PAD -Enter ባ EXCLUSIVE TV buttons These buttons are removed from the remote control. The Remote Control for the Cable Box.... 36 The remote will remember the codes you have programmed until the batteries are for operating the TV : -Day/Night -Aspect -PIP -Pause -CC -Inputs (only if -Vol Up & Down programmed, refer -Mute to page 40) MY CABLE...
.... ቢ PRECODED CABLE BOX buttons These buttons transmit the chosen precoded cable codes : -Power -Menu -Exit -Guide -Cursor & Select -Info -Channel Up & Down -Last CH -Number PAD -Enter ባ EXCLUSIVE TV buttons These buttons are removed from the remote control. The Remote Control for the Cable Box.... 36 The remote will remember the codes you have programmed until the batteries are for operating the TV : -Day/Night -Aspect -PIP -Pause -CC -Inputs (only if -Vol Up & Down programmed, refer -Mute to page 40) MY CABLE...
Owners Guide
Page 37
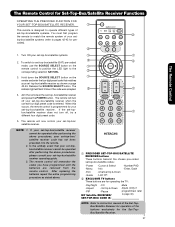
...control to position the LED light to page 40). codes). ባ 1. To switch to set -top-box/satellite receiver and press the POWER button. top-box/satellite receiver as stated above procedures, your set-top-box/satellite receiver when the correct four digit preset code is programmed ...RECEIVER buttons These buttons transmit the chosen pre-coded set-top-box/satellite codes : -Power -Cursor & Select -Number PAD -Menu -Exit -Info -Enter, Dash -Channel Up & Down -Guide -Last CH ባ EXCLUSIVE TV buttons These buttons are removed from the remote control. NOTE: Refer to pages 42-...
...control to position the LED light to page 40). codes). ባ 1. To switch to set -top-box/satellite receiver and press the POWER button. top-box/satellite receiver as stated above procedures, your set-top-box/satellite receiver when the correct four digit preset code is programmed ...RECEIVER buttons These buttons transmit the chosen pre-coded set-top-box/satellite codes : -Power -Cursor & Select -Number PAD -Menu -Exit -Info -Enter, Dash -Channel Up & Down -Guide -Last CH ባ EXCLUSIVE TV buttons These buttons are removed from the remote control. NOTE: Refer to pages 42-...

Owners Guide
Page 38
... 38 ቢ PRECODED DVD Buttons These buttons transmit the chosen precoded DVD codes : -Power -Number PAD -Menu -Play, Stop, Pause, -Info RWD, FWD, Skip RWD, -Cursor & Select Skip FWD. ባ EXCLUSIVE TV Buttons These buttons are removed from the remote control. The remote control will turn off... your DVD player when the correct four digit preset code is entered. Aim the remote at the DVD player and press the POWER button. When this occurs, the...
... 38 ቢ PRECODED DVD Buttons These buttons transmit the chosen precoded DVD codes : -Power -Number PAD -Menu -Play, Stop, Pause, -Info RWD, FWD, Skip RWD, -Cursor & Select Skip FWD. ባ EXCLUSIVE TV Buttons These buttons are removed from the remote control. The remote control will turn off... your DVD player when the correct four digit preset code is entered. Aim the remote at the DVD player and press the POWER button. When this occurs, the...

Owners Guide
Page 39
... VCR/PVR, as stated above procedures, your VCR/PVR. 2. The remote will remember the codes you have programmed until the batteries are for operating the TV : -Day/Night -Aspect -PIP -CC -Vol Up & Down -Mute -Inputs (only if programmed, refer to page 40) MY VCR/PVR CODE IS: NOTE: Refer to... VCR/PVR. 39 You must first program the remote to the corresponding selection PVR/VCR. 3. Aim the remote at the VCR/PVR and press the POWER button. When this occurs, the remote control is programmed for your VCR/PVR (refer to instruction manual of the VCR/PVR for operation of your...
... VCR/PVR, as stated above procedures, your VCR/PVR. 2. The remote will remember the codes you have programmed until the batteries are for operating the TV : -Day/Night -Aspect -PIP -CC -Vol Up & Down -Mute -Inputs (only if programmed, refer to page 40) MY VCR/PVR CODE IS: NOTE: Refer to... VCR/PVR. 39 You must first program the remote to the corresponding selection PVR/VCR. 3. Aim the remote at the VCR/PVR and press the POWER button. When this occurs, the remote control is programmed for your VCR/PVR (refer to instruction manual of the VCR/PVR for operation of your...

Owners Guide
Page 41
...ቧ ቨ ቩ ᕃ POWER button Press Power button to turn the sound off completely (MUTE). NOTE: The Simple Remote cannot be programmed to access the TV Guide On-ScreenTM system (See complete explanation and...restore the sound, press the MUTE button one half of normal volume (SOFT MUTE) to turn the Plasma Television ON or OFF. ባ CH+ (̆) and CH- (̄) Press the CH+ ... level or to navigate the on page 54-56). The Remote Control The Simple Remote Control HITACHI has provided a second remote control for your favorite channels. ቨ INPUTS button Pressing the ...
...ቧ ቨ ቩ ᕃ POWER button Press Power button to turn the sound off completely (MUTE). NOTE: The Simple Remote cannot be programmed to access the TV Guide On-ScreenTM system (See complete explanation and...restore the sound, press the MUTE button one half of normal volume (SOFT MUTE) to turn the Plasma Television ON or OFF. ባ CH+ (̆) and CH- (̄) Press the CH+ ... level or to navigate the on page 54-56). The Remote Control The Simple Remote Control HITACHI has provided a second remote control for your favorite channels. ቨ INPUTS button Pressing the ...


