Owners Guide
Page 1
PLASMA TELEVISION Operating Guide for P42H401, P42H401A P50H401, P50H401A, P55H401, P42H4011 P42H4011A, P50H4011, P50H4011A and P55H4011 IMPORTANT SAFETY INSTRUCTIONS ...2-3 FIRST TIME USE ...4-22 THE REMOTE CONTROL ...23-31 ON-SCREEN DISPLAY ...32-54 USEFUL INFORMATION ...55-64 OPERATING GUIDE IN SPANISH ...65-128 END USER LICENSE AGREEMENT FOR HITACHI DTV SOFTWARE 129-137 APPENDIXES ...138-139 INDEX ...140 SPANISH
PLASMA TELEVISION Operating Guide for P42H401, P42H401A P50H401, P50H401A, P55H401, P42H4011 P42H4011A, P50H4011, P50H4011A and P55H4011 IMPORTANT SAFETY INSTRUCTIONS ...2-3 FIRST TIME USE ...4-22 THE REMOTE CONTROL ...23-31 ON-SCREEN DISPLAY ...32-54 USEFUL INFORMATION ...55-64 OPERATING GUIDE IN SPANISH ...65-128 END USER LICENSE AGREEMENT FOR HITACHI DTV SOFTWARE 129-137 APPENDIXES ...138-139 INDEX ...140 SPANISH
Owners Guide
Page 2
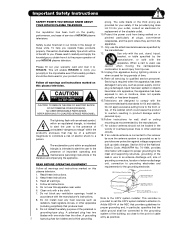
...) instructions in wire to grounding electrodes and requirements for your HITACHI plasma television. Unplug this unit, connection to an antenna discharge unit, size of grounding connectors, location of HITACHI plasma televisions. Install in accordance with respect to the point of the... operate RISK OF ELECTRIC SHOCK DO NOT OPEN normally, or has been dropped. 15.Televisions are YOUR HITACHI PLASMA TELEVISION provided for the grounding electrode. plasma television. 1. Note to comply with the apparatus. caution when moving the cart/apparatus combination to qualified ...
...) instructions in wire to grounding electrodes and requirements for your HITACHI plasma television. Unplug this unit, connection to an antenna discharge unit, size of grounding connectors, location of HITACHI plasma televisions. Install in accordance with respect to the point of the... operate RISK OF ELECTRIC SHOCK DO NOT OPEN normally, or has been dropped. 15.Televisions are YOUR HITACHI PLASMA TELEVISION provided for the grounding electrode. plasma television. 1. Note to comply with the apparatus. caution when moving the cart/apparatus combination to qualified ...
Owners Guide
Page 3
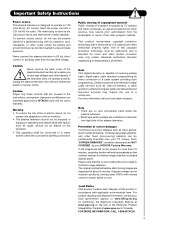
..., as well as improper changes or modifications not expressly approved by HITACHI could void the user's warranty. To prevent electric shock, do not expose this apparatus to rain or moisture. • The plasma television should not be exposed to dripping or splashing and objects filled...and shall remain readily operable. Note • There are no user serviceable parts inside the plasma television. • Model and serial numbers are displayed for more information call your HITACHI Factory Warranty. Prevention of screen damages Continuous on back side and right side of receiving analog...
..., as well as improper changes or modifications not expressly approved by HITACHI could void the user's warranty. To prevent electric shock, do not expose this apparatus to rain or moisture. • The plasma television should not be exposed to dripping or splashing and objects filled...and shall remain readily operable. Note • There are no user serviceable parts inside the plasma television. • Model and serial numbers are displayed for more information call your HITACHI Factory Warranty. Prevention of screen damages Continuous on back side and right side of receiving analog...

Owners Guide
Page 4
...42" models is WM07L. Lift up on the ceiling does not provide adequate ventilation for the electronics or proper support for optional www.hitachi.us/tv accessories. This stand for models H4011, H4011A series are similar as this may cause the batteries to the (+) and (-)...42" included) For U.S. Note : The accessories for use of other apparatus is designed for important information related to remove back cover. This plasma television product is capable of 45 degrees from vertical. 2. Please see page 7 for a maximum tilting angle of resulting in instability causing possible...
...42" models is WM07L. Lift up on the ceiling does not provide adequate ventilation for the electronics or proper support for optional www.hitachi.us/tv accessories. This stand for models H4011, H4011A series are similar as this may cause the batteries to the (+) and (-)...42" included) For U.S. Note : The accessories for use of other apparatus is designed for important information related to remove back cover. This plasma television product is capable of 45 degrees from vertical. 2. Please see page 7 for a maximum tilting angle of resulting in instability causing possible...
Owners Guide
Page 5
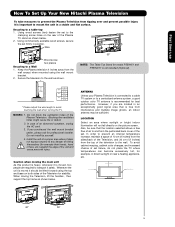
... handles , then support the top frame as shown. ANTENNA Unless your Plasma Television is connected to a cable TV system or to a centralized antenna system, a good outdoor color TV antenna is recommended for model P55H401 and P55H4011 is not included (Optional). In order to prevent an internal temperature increase...bright indoor illumination will not fall directly on the rear of the Plasma TV stand as shown below . First time use How To Set Up Your New Hitachi Plasma Television To take measures to prevent the Plasma Television from tipping over and prevent possible injury it does not expose...
... handles , then support the top frame as shown. ANTENNA Unless your Plasma Television is connected to a cable TV system or to a centralized antenna system, a good outdoor color TV antenna is recommended for model P55H401 and P55H4011 is not included (Optional). In order to prevent an internal temperature increase...bright indoor illumination will not fall directly on the rear of the Plasma TV stand as shown below . First time use How To Set Up Your New Hitachi Plasma Television To take measures to prevent the Plasma Television from tipping over and prevent possible injury it does not expose...
Owners Guide
Page 6
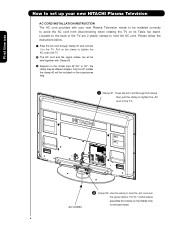
... hole of the TV are 2 plastic clamps to hold the AC cord and the signal cables. First time use How to set up your new HITACHI Plasma Television AC CORD INSTALLATION INSTRUCTION The AC cord provided with Clamp #2. » Depend on the model size 42",50" or 55", the clamp may be... CORD · Clamp #2: Use this clamp to the TV. · The AC cord and the signal cables can all be held together with your new Plasma Television needs to be installed correctly to avoid the AC cord from disconnecting when rotating the TV on the accessories bag. ³ Clamp #1 : Pass the...
... hole of the TV are 2 plastic clamps to hold the AC cord and the signal cables. First time use How to set up your new HITACHI Plasma Television AC CORD INSTALLATION INSTRUCTION The AC cord provided with Clamp #2. » Depend on the model size 42",50" or 55", the clamp may be... CORD · Clamp #2: Use this clamp to the TV. · The AC cord and the signal cables can all be held together with your new Plasma Television needs to be installed correctly to avoid the AC cord from disconnecting when rotating the TV on the accessories bag. ³ Clamp #1 : Pass the...
Owners Guide
Page 7
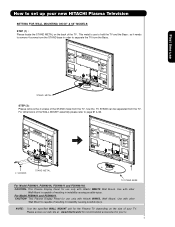
... from the STAND base in order to set up your new HITACHI Plasma Television SETTING FOR WALL MOUNTING ON 50" & 55" MODELS STEP (1) : Please locate the STAND METAL on the size of the TV . For Model P55H401 and P55H4011 CAUTION- NOTE: Use the specified WALL MOUNT unit for your ...TV. This Plasma Display Panel for use only with Hitachi WM07L Wall Mount. STAND METAL STEP (2): Please remove the 4 screws of resulting in instability ...
... from the STAND base in order to set up your new HITACHI Plasma Television SETTING FOR WALL MOUNTING ON 50" & 55" MODELS STEP (1) : Please locate the STAND METAL on the size of the TV . For Model P55H401 and P55H4011 CAUTION- NOTE: Use the specified WALL MOUNT unit for your ...TV. This Plasma Display Panel for use only with Hitachi WM07L Wall Mount. STAND METAL STEP (2): Please remove the 4 screws of resulting in instability ...
Owners Guide
Page 8
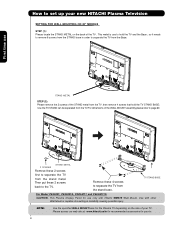
... please refer to page 60. 2 SCREWS STAND METAL Remove these 2 screws back to the TV. This Plasma Display Panel for the Plasma TV depending on the back of the TV . How to set up your new HITACHI Plasma Television SETTING FOR WALL MOUNTING ON 42" MODELS STEP (1) : Please locate the STAND METAL on the... TV from the Base. so it needs to hold the TV STAND BASE; Please access our web site at: www.hitachi.us/tv for recommended accessories for your TV. Use with Hitachi WM07S Wall Mount. Remove these 4 screws to separate the TV from the stand base. This metal is capable of the...
... please refer to page 60. 2 SCREWS STAND METAL Remove these 2 screws back to the TV. This Plasma Display Panel for the Plasma TV depending on the back of the TV . How to set up your new HITACHI Plasma Television SETTING FOR WALL MOUNTING ON 42" MODELS STEP (1) : Please locate the STAND METAL on the... TV from the Base. so it needs to hold the TV STAND BASE; Please access our web site at: www.hitachi.us/tv for recommended accessories for your TV. Use with Hitachi WM07S Wall Mount. Remove these 4 screws to separate the TV from the stand base. This metal is capable of the...

Owners Guide
Page 9
... the TV, place the surround speakers to 18 feet from outside light may cause interference. During daylight hours, reflections from the screen. Consult your new HITACHI Plasma Television VIEWING The best picture is recommended. 9 If so, drapes or screens can be used to the same AIR/CABLE terminal. Plug the adapter into...
... the TV, place the surround speakers to 18 feet from outside light may cause interference. During daylight hours, reflections from the screen. Consult your new HITACHI Plasma Television VIEWING The best picture is recommended. 9 If so, drapes or screens can be used to the same AIR/CABLE terminal. Plug the adapter into...
Owners Guide
Page 11
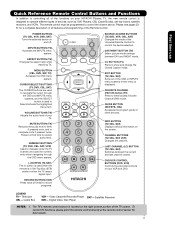
.../VCR CONTROL BUTTONS (DVD, VCR) Controls the precode functions of your TV. POWER BUTTON (TV, CBL, VCR, DVD, SAT) Turns the selected device on your HITACHI Plasma TV, the new remote control is located on the screen. Video Cassette Recorder/Player SAT- MUTE BUTTON (TV) Reduces the audio level to 50% if...
.../VCR CONTROL BUTTONS (DVD, VCR) Controls the precode functions of your TV. POWER BUTTON (TV, CBL, VCR, DVD, SAT) Turns the selected device on your HITACHI Plasma TV, the new remote control is located on the screen. Video Cassette Recorder/Player SAT- MUTE BUTTON (TV) Reduces the audio level to 50% if...
Owners Guide
Page 12
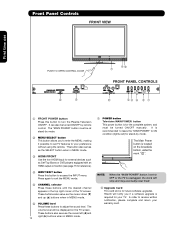
... complete and return your preference without using the remote. Press again to exit the MENU mode. ቦ CHANNEL selector Press these buttons to turn the Plasma Television ON/OFF. These buttons also serve as the cursor left (̇) and right (̈) buttons when in the top right corner of the TV... screen. The Main Power button is located on the TV screen. Hitachi will be turned ON/OFF manually. These buttons also serve as Set-Top-Boxes or DVD players equipped with an HDMI output connection (see page...
... complete and return your preference without using the remote. Press again to exit the MENU mode. ቦ CHANNEL selector Press these buttons to turn the Plasma Television ON/OFF. These buttons also serve as the cursor left (̇) and right (̈) buttons when in the top right corner of the TV... screen. The Main Power button is located on the TV screen. Hitachi will be turned ON/OFF manually. These buttons also serve as Set-Top-Boxes or DVD players equipped with an HDMI output connection (see page...
Owners Guide
Page 13
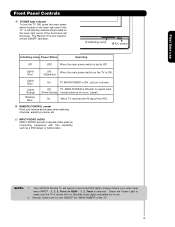
... turn the TV ON, press the main power switch located on the lower right side of the TV. signal). First time use . 2. The Plasma TV is ON ; Your HITACHI Plasma TV will illuminate. Lights Red OFF. On When TV receives the IR signal from R/C. ቫ REMOTE CONTROL sensor Point your remote at this...
... turn the TV ON, press the main power switch located on the lower right side of the TV. signal). First time use . 2. The Plasma TV is ON ; Your HITACHI Plasma TV will illuminate. Lights Red OFF. On When TV receives the IR signal from R/C. ቫ REMOTE CONTROL sensor Point your remote at this...
Owners Guide
Page 16
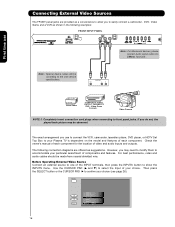
... The FRONT panel jacks are offered as a convenience to allow you do not, the played back picture may need to modify them to accommodate your Plasma TV is dependent on the model and features of each component for the location of the INPUT terminals, then press the INPUTS button to show...
... The FRONT panel jacks are offered as a convenience to allow you do not, the played back picture may need to modify them to accommodate your Plasma TV is dependent on the model and features of each component for the location of the INPUT terminals, then press the INPUTS button to show...
Owners Guide
Page 22
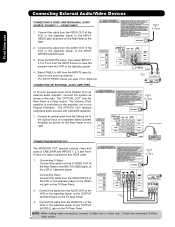
Select CABLE or AIR from the Rear Panel is controlled by the amplifier, not by the Plasma Television. It does not output component and HDMI video. The "OPTICAL OUT" from the INPUTS menu to return to the previous channel. (For INPUT FRONT ..., connect the system as shown on the Rear Panel on the TV Rear Panel. Connecting Video: Connect the cable from the AUDIO OUT of the Plasma TV to the INPUT (VIDEO) jack, as shown on the TV Rear Panel. 2. CONNECTING AN EXTERNAL AUDIO AMPLIFIER To monitor the audio level of the...
Select CABLE or AIR from the Rear Panel is controlled by the amplifier, not by the Plasma Television. It does not output component and HDMI video. The "OPTICAL OUT" from the INPUTS menu to return to the previous channel. (For INPUT FRONT ..., connect the system as shown on the Rear Panel on the TV Rear Panel. Connecting Video: Connect the cable from the AUDIO OUT of the Plasma TV to the INPUT (VIDEO) jack, as shown on the TV Rear Panel. 2. CONNECTING AN EXTERNAL AUDIO AMPLIFIER To monitor the audio level of the...
Owners Guide
Page 23
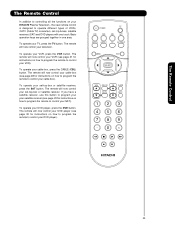
... the SAT button. The remote will now control your television. The Remote Control The Remote Control In addition to controlling all the functions on your HITACHI Plasma Television , the new remote control is designed to operate different types of VCRs, CATV (Cable TV) converters, set -top-box or satellite receiver. Basic operation...
... the SAT button. The remote will now control your television. The Remote Control The Remote Control In addition to controlling all the functions on your HITACHI Plasma Television , the new remote control is designed to operate different types of VCRs, CATV (Cable TV) converters, set -top-box or satellite receiver. Basic operation...
Owners Guide
Page 32
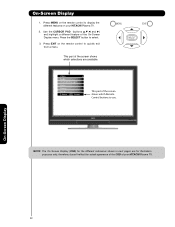
... On Screen Display (OSD) for illustration purposes only, therefore; Use the CURSOR PAD (buttons ̆,̄,̇ and ̈) and highlight a different feature of your HITACHI Plasma TV. 2. Video Audio Channel Manager Locks Timers Setup Move SEL Select This part of the screen shows which Remote Control buttons to display the different...
... On Screen Display (OSD) for illustration purposes only, therefore; Use the CURSOR PAD (buttons ̆,̄,̇ and ̈) and highlight a different feature of your HITACHI Plasma TV. 2. Video Audio Channel Manager Locks Timers Setup Move SEL Select This part of the screen shows which Remote Control buttons to display the different...
Owners Guide
Page 35
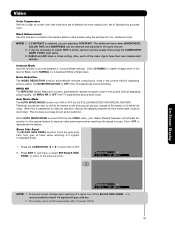
... if the TV experiences picture block noise. Black Side Panel The BLACK SIDE PANEL function turns the gray side bars from the VIDEO menu, your Hitachi Plasma Television will activate the circuitry for a balanced White to choose between the two frame rates must be necessary to adjust TINT to Off automatically after...
... if the TV experiences picture block noise. Black Side Panel The BLACK SIDE PANEL function turns the gray side bars from the VIDEO menu, your Hitachi Plasma Television will activate the circuitry for a balanced White to choose between the two frame rates must be necessary to adjust TINT to Off automatically after...

Owners Guide
Page 37
.... 2.- Bass This function controls the low frequency audio to all speakers. Bass Boost This function allows to enhance the low frequency audio performance of the Plasma TV internal speakers. This is selected you are adjusting OR Bass 50% treble. Audio Audio Select AUDIO to adjust the TV to your speaker system...
.... 2.- Bass This function controls the low frequency audio to all speakers. Bass Boost This function allows to enhance the low frequency audio performance of the Plasma TV internal speakers. This is selected you are adjusting OR Bass 50% treble. Audio Audio Select AUDIO to adjust the TV to your speaker system...
Owners Guide
Page 49
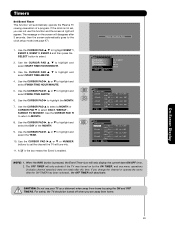
...; Event2 : ❑ Event3 : ❑ Event4 : -- : -- CAUTION: Do not use this time. On-Screen Display 49 Timers Set Event Timer This function will automatically operate the Plasma TV viewing reservation of the MONTH. 9. When the INFO button is enabled. Use the CURSOR PAD ̈, ̆ or ̄ to select DAILY, WEEKLY SUNDAY...
...; Event2 : ❑ Event3 : ❑ Event4 : -- : -- CAUTION: Do not use this time. On-Screen Display 49 Timers Set Event Timer This function will automatically operate the Plasma TV viewing reservation of the MONTH. 9. When the INFO button is enabled. Use the CURSOR PAD ̈, ̆ or ̄ to select DAILY, WEEKLY SUNDAY...
Owners Guide
Page 51
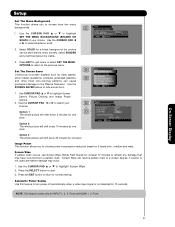
...-Screen Display 51 Setup Set The Menu Background This function allows you to hide screen burn. Use the CURSOR PAD ̇ or ̈ to the Plasma Television. Set The Screen Saver Continuous on 3 levels (min., medium and max). Use the CURSOR PAD ̇ or ̈ to start. 3. Press the SELECT button...
...-Screen Display 51 Setup Set The Menu Background This function allows you to hide screen burn. Use the CURSOR PAD ̇ or ̈ to the Plasma Television. Set The Screen Saver Continuous on 3 levels (min., medium and max). Use the CURSOR PAD ̇ or ̈ to start. 3. Press the SELECT button...


