Owners Guide
Page 3
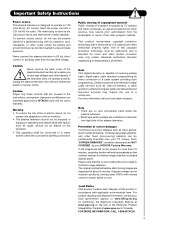
... that contrast reduces to minimize image retention on the screen for home and other hazards. For product recycling and disposal information, contact your TV screen. Caution Never remove the back cover of screen damages Continuous on -demand, a cable operator's enhanced program guide and data-enhanced...such as video-on -screen displays such as the disconnect device and shall remain readily operable. Please note that is protected by your HITACHI Factory Warranty. Lead Notice This product contains lead. Insert the power cord into a 120 volt 60 Hz outlet. If the television ...
... that contrast reduces to minimize image retention on the screen for home and other hazards. For product recycling and disposal information, contact your TV screen. Caution Never remove the back cover of screen damages Continuous on -demand, a cable operator's enhanced program guide and data-enhanced...such as video-on -screen displays such as the disconnect device and shall remain readily operable. Please note that is protected by your HITACHI Factory Warranty. Lead Notice This product contains lead. Insert the power cord into a 120 volt 60 Hz outlet. If the television ...

Owners Guide
Page 4
... by pushing down and sliding the back cover off. 2. The wall mount unit for the 50" and 42" models is WM07S and for optional www.hitachi.us/tv accessories. Match the batteries to swell or rupture resulting in instability causing possible injury. 3. CAUTION: Do not insert batteries with...
... by pushing down and sliding the back cover off. 2. The wall mount unit for the 50" and 42" models is WM07S and for optional www.hitachi.us/tv accessories. Match the batteries to swell or rupture resulting in instability causing possible injury. 3. CAUTION: Do not insert batteries with...
Owners Guide
Page 5
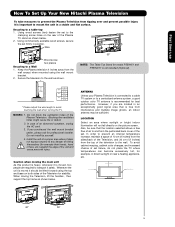
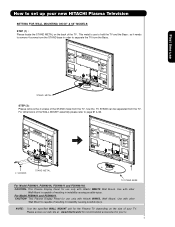
... Set Up Your New Hitachi Plasma Television To take measures to prevent the Plasma Television from tipping over and prevent possible injury it is important to mount the unit in . 10 cm * Please adjust the wire length to avoid touching the wall when turning the TV. Securing to the wall...50" 5 Keep the Plasma television 4 inches away from the top of the Television for model P55H401 and P55H4011 is moved, two people are located in position. In case of set failure, do not place the TV where temperatures can become excessively hot, for example their hands, head or face, etc.) against...
... Set Up Your New Hitachi Plasma Television To take measures to prevent the Plasma Television from tipping over and prevent possible injury it is important to mount the unit in . 10 cm * Please adjust the wire length to avoid touching the wall when turning the TV. Securing to the wall...50" 5 Keep the Plasma television 4 inches away from the top of the Television for model P55H401 and P55H4011 is moved, two people are located in position. In case of set failure, do not place the TV where temperatures can become excessively hot, for example their hands, head or face, etc.) against...
Owners Guide
Page 6
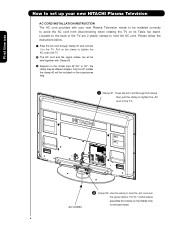
... on the middle hole of the TV are 2 plastic clamps to hold the AC cord and the signal cables. First time use How to set up your new HITACHI Plasma Television AC CORD INSTALLATION INSTRUCTION The AC cord provided with your new Plasma Television needs to be held together with Clamp #2. ...» Depend on the accessories bag. ³ Clamp #1 : Pass the AC cord through Clamp #1 and connect it to the TV.
... on the middle hole of the TV are 2 plastic clamps to hold the AC cord and the signal cables. First time use How to set up your new HITACHI Plasma Television AC CORD INSTALLATION INSTRUCTION The AC cord provided with your new Plasma Television needs to be held together with Clamp #2. ...» Depend on the accessories bag. ³ Clamp #1 : Pass the AC cord through Clamp #1 and connect it to the TV.
Owners Guide
Page 7
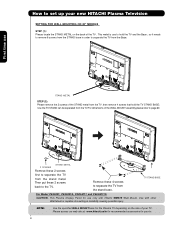
...capable of the STAND metal from the TV, now the TV STAND can be separated from the Base. This metal is use only with Hitachi WM07L Wall Mount. For Model P55H401 and P55H4011 CAUTION- For dimensions of your TV. First time use only with Hitachi WM07S Wall Mount. Please access our ...web site at: www.hitachi.us/tv for recommended accessories for use How to separate the TV from the TV. This Plasma Display ...
...capable of the STAND metal from the TV, now the TV STAND can be separated from the Base. This metal is use only with Hitachi WM07L Wall Mount. For Model P55H401 and P55H4011 CAUTION- For dimensions of your TV. First time use only with Hitachi WM07S Wall Mount. Please access our ...web site at: www.hitachi.us/tv for recommended accessories for use How to separate the TV from the TV. This Plasma Display ...
Owners Guide
Page 8
... to remove 6 screws from the TV, then remove 4 screws that hold the TV and the Base ; TV STAND BASE For Model P42H401, P42H401A, P42H4011 and P42H4011A CAUTION- Remove these 2 screws back to the TV. Please access our web site at: www.hitachi.us/tv for recommended accessories for use to hold... the TV STAND BASE; How to set up your new HITACHI Plasma Television SETTING FOR WALL MOUNTING ON 42" MODELS STEP (1) : ...
... to remove 6 screws from the TV, then remove 4 screws that hold the TV and the Base ; TV STAND BASE For Model P42H401, P42H401A, P42H4011 and P42H4011A CAUTION- Remove these 2 screws back to the TV. Please access our web site at: www.hitachi.us/tv for recommended accessories for use to hold... the TV STAND BASE; How to set up your new HITACHI Plasma Television SETTING FOR WALL MOUNTING ON 42" MODELS STEP (1) : ...

Owners Guide
Page 9
... VIEWING ANGLE 80 S ANTENNA CONNECTIONS TO REAR JACK PANEL VHF (75-Ohm) antenna/CATV (Cable TV) When using a 300-Ohm twin lead from outside light may cause interference. Consult your new HITACHI Plasma Television VIEWING The best picture is recommended. 9 Using a 75-Ohm coaxial cable is seen by... UHF antenna AIR / CABLE To outdoor antenna or CATV system Antenna Mixer NOTE: Connecting a 300-Ohm twin lead connector may appear on the TV. During daylight hours, reflections from an outdoor antenna, connect the VHF or UHF antenna leads to the AIR/CABLE (75-Ohm) terminal. R...
... VIEWING ANGLE 80 S ANTENNA CONNECTIONS TO REAR JACK PANEL VHF (75-Ohm) antenna/CATV (Cable TV) When using a 300-Ohm twin lead from outside light may cause interference. Consult your new HITACHI Plasma Television VIEWING The best picture is recommended. 9 Using a 75-Ohm coaxial cable is seen by... UHF antenna AIR / CABLE To outdoor antenna or CATV system Antenna Mixer NOTE: Connecting a 300-Ohm twin lead connector may appear on the TV. During daylight hours, reflections from an outdoor antenna, connect the VHF or UHF antenna leads to the AIR/CABLE (75-Ohm) terminal. R...
Owners Guide
Page 10
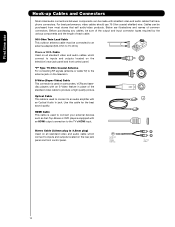
... are illustrations and names of the standard video cable to 75-Ohm). "F" Type 75-Ohm Coaxial Antenna For connecting RF signals (antenna or cable TV) to an audio amplifier with an S-Video feature in place of common connectors. Cables can be purchased from most stores that have phono connectors. ... television's rear jack panel and front control panel. Phono or RCA Cable Used on all standard video and audio cable which connect to the TV's HDMI input. HDMI Cable This cable is used to connect your external devices such as Set-Top-Boxes or DVD players equipped with shielded...
... are illustrations and names of the standard video cable to 75-Ohm). "F" Type 75-Ohm Coaxial Antenna For connecting RF signals (antenna or cable TV) to an audio amplifier with an S-Video feature in place of common connectors. Cables can be purchased from most stores that have phono connectors. ... television's rear jack panel and front control panel. Phono or RCA Cable Used on all standard video and audio cable which connect to the TV's HDMI input. HDMI Cable This cable is used to connect your external devices such as Set-Top-Boxes or DVD players equipped with shielded...
Owners Guide
Page 11
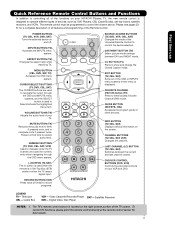
...of the functions on your HITACHI Plasma TV, the new remote control is displayed. ASPECT BUTTON (TV) Changes the aspect ratio while watching TV. MENU BUTTON (CBL, DVD, SAT, TV) Accesses the OSD menu system. NUMERIC BUTTONS (TV, DVD, CBL, SAT, VCR) Used to manually enter the TV channel, and used to...and change the Closed Caption mode. GUIDE BUTTON (SAT/STB, CBL) Accesses the program guide of the TV screen. INFO BUTTON (TV, CBL, SAT) Displays various information on and off. CHANNEL BUTTONS (TV, CBL, SAT, VCR) Changes the channel. DVD/VCR CONTROL BUTTONS (DVD, VCR) Controls the ...
...of the functions on your HITACHI Plasma TV, the new remote control is displayed. ASPECT BUTTON (TV) Changes the aspect ratio while watching TV. MENU BUTTON (CBL, DVD, SAT, TV) Accesses the OSD menu system. NUMERIC BUTTONS (TV, DVD, CBL, SAT, VCR) Used to manually enter the TV channel, and used to...and change the Closed Caption mode. GUIDE BUTTON (SAT/STB, CBL) Accesses the program guide of the TV screen. INFO BUTTON (TV, CBL, SAT) Displays various information on and off. CHANNEL BUTTONS (TV, CBL, SAT, VCR) Changes the channel. DVD/VCR CONTROL BUTTONS (DVD, VCR) Controls the ...
Owners Guide
Page 12
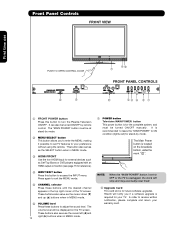
...slot is for your TV. The "MAIN POWER" button must be at stand-by mode. The Main Power button is required for the complete system, and must be turned ON/OFF manually. Hitachi will be turned .... ባ MENU/SELECT button This button allows you if a software upgrade is located on the TV screen. The volume level will notify you to enter the MENU, making it possible to set to... the cursor down (̄) and up (̆) buttons when in the top right corner of the TV screen. In order to turn the Plasma Television ON/OFF. Front Panel Controls FRONT VIEW First time use...
...slot is for your TV. The "MAIN POWER" button must be at stand-by mode. The Main Power button is required for the complete system, and must be turned ON/OFF manually. Hitachi will be turned .... ባ MENU/SELECT button This button allows you if a software upgrade is located on the TV screen. The volume level will notify you to enter the MENU, making it possible to set to... the cursor down (̄) and up (̆) buttons when in the top right corner of the TV screen. In order to turn the Plasma Television ON/OFF. Front Panel Controls FRONT VIEW First time use...
Owners Guide
Page 13
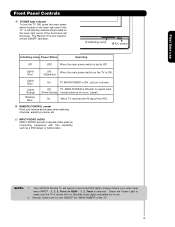
Your HITACHI Plasma TV will illuminate. A red stand-by indicator lamp located on the lower right corner ...operation. ቪ Indicating Lamp ቫ R/C sensor Indicating Lamp Power Status Operating Off OFF. The Plasma TV is set to make sure the TV is turned off or in use Front Panel Controls ቪ POWER light indicator To turn ON/OFF ...player or Camcorders. Check the Power Light to Off. Remote Control can not turn the TV ON, press the main power switch located on the TV is shown. When the main power switch is now ready for connecting equipment with no signal...
Your HITACHI Plasma TV will illuminate. A red stand-by indicator lamp located on the lower right corner ...operation. ቪ Indicating Lamp ቫ R/C sensor Indicating Lamp Power Status Operating Off OFF. The Plasma TV is set to make sure the TV is turned off or in use Front Panel Controls ቪ POWER light indicator To turn ON/OFF ...player or Camcorders. Check the Power Light to Off. Remote Control can not turn the TV ON, press the main power switch located on the TV is shown. When the main power switch is now ready for connecting equipment with no signal...
Owners Guide
Page 14
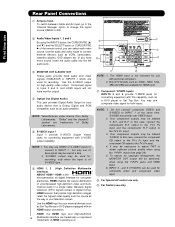
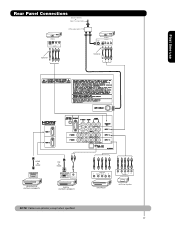
... remain in a single cable. Rear Panel Connections ቢ Antenna Input To switch between Cable and Air input, go to the Channel Manager option to the TV's PR input. 4. Use the HDMI input for connecting equipment with personal computers. 2. INPUT 2 , and 3 (Y/VIDEO) can select each video ቩ ቤ...DVD players etc. (if you can be used for consumer electronics. First time use with this case, connect the components B-Y output to the TV's PB input and the components R-Y output to connect external devices, such as 1080p, 1080i, 720p, 480i and 480p are used at the same...
... remain in a single cable. Rear Panel Connections ቢ Antenna Input To switch between Cable and Air input, go to the Channel Manager option to the TV's PR input. 4. Use the HDMI input for connecting equipment with personal computers. 2. INPUT 2 , and 3 (Y/VIDEO) can select each video ቩ ቤ...DVD players etc. (if you can be used for consumer electronics. First time use with this case, connect the components B-Y output to the TV's PB input and the components R-Y output to connect external devices, such as 1080p, 1080i, 720p, 480i and 480p are used at the same...
Owners Guide
Page 16
... to easily connect a camcorder , DVD, Video Game and a VCR as suggestions. Then press the SELECT button or the CURSOR PAD ̈ to confirm your Plasma TV is dependent on the model and features of components and features. INPUTS HDMI 2 HDMI-Front Air /Cable Input 1 Input 2 Move SEL Sel. 16 For best...
... to easily connect a camcorder , DVD, Video Game and a VCR as suggestions. Then press the SELECT button or the CURSOR PAD ̈ to confirm your Plasma TV is dependent on the model and features of components and features. INPUTS HDMI 2 HDMI-Front Air /Cable Input 1 Input 2 Move SEL Sel. 16 For best...
Owners Guide
Page 17
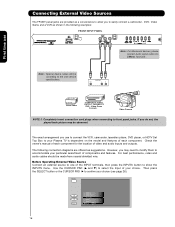
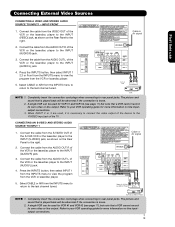
First time use Rear Panel Connections Outside Antenna or Cable TV coaxial cable 2-Way signal splitter VCR #2 S-VIDEO V L R INPUT Optional VCR #1 ANT OUTPUT IN S-VIDEO V L R Optional HDMI to HDMI HDMI OUTPUT HDMI DIGITAL OUTPUT CAPABILITY DVI to HDMI DIGITAL OUTPUT AUDIO OUT DIGITAL OUTPUT CAPABILITY NOTE: Cables are optional, except when specified. OUTPUT Y PB/CB PR/CR L R Y PB PR L R OUTPUT DVD Player HDTV Set-Top Box 17
First time use Rear Panel Connections Outside Antenna or Cable TV coaxial cable 2-Way signal splitter VCR #2 S-VIDEO V L R INPUT Optional VCR #1 ANT OUTPUT IN S-VIDEO V L R Optional HDMI to HDMI HDMI OUTPUT HDMI DIGITAL OUTPUT CAPABILITY DVI to HDMI DIGITAL OUTPUT AUDIO OUT DIGITAL OUTPUT CAPABILITY NOTE: Cables are optional, except when specified. OUTPUT Y PB/CB PR/CR L R Y PB PR L R OUTPUT DVD Player HDTV Set-Top Box 17
Owners Guide
Page 18
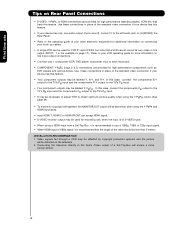
...more information on the television. 2. INSTALLATION RECOMMENDATION: 1. In this case, connect the components CB output to the TV's PB input and the components CR output to the TV's PR input. • Your component outputs may be affected by copyright protection systems and the picture will be abnormal... Input HDMI 1, HDMI 2 or HDMI FRONT can be labeled Y-CBCR. In this case, connect the components B-Y output to the TV's PB input and the components R-Y output to the TV's PR input. • It may be distorted on line input-output connections. • Connect only 1 component (VCR, DVD ...
...more information on the television. 2. INSTALLATION RECOMMENDATION: 1. In this case, connect the components CB output to the TV's PB input and the components CR output to the TV's PR input. • Your component outputs may be affected by copyright protection systems and the picture will be abnormal... Input HDMI 1, HDMI 2 or HDMI FRONT can be labeled Y-CBCR. In this case, connect the components B-Y output to the TV's PB input and the components R-Y output to the TV's PR input. • It may be distorted on line input-output connections. • Connect only 1 component (VCR, DVD ...
Owners Guide
Page 19
... to the INPUT (AUDIO/L) jack. 4. Cable or Air signal 5. Back of VCR Video OUTPUT VCR NOTE: 1. Connect the cable from the AUDIO OUT R of the TV . Connect the cable from the AUDIO OUT L of the VCR or the laserdisc player to the INPUT (AUDIO/R) jack. 3. Completely insert the connection cord plugs...
... to the INPUT (AUDIO/L) jack. 4. Cable or Air signal 5. Back of VCR Video OUTPUT VCR NOTE: 1. Connect the cable from the AUDIO OUT R of the TV . Connect the cable from the AUDIO OUT L of the VCR or the laserdisc player to the INPUT (AUDIO/R) jack. 3. Completely insert the connection cord plugs...
Owners Guide
Page 22
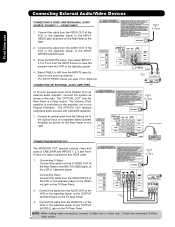
... OUT terminal outputs video and audio of the VCR or the laserdisc player to an external audio amplifier, connect the system as shown on the TV Rear Panel. 2. Connect the cable from the AUDIO OUT of the VCR or the laserdisc player to the INPUT (S-VIDEO) jack, of the amplifier is.../R) jack on the right. 2. Connect an optical cable from the AUDIO IN R of a separate Stereo System Amplifier as shown on the Rear Panel on the TV Rear Panel. Connect the cable from the Optical out to the Optical input of the VCR or the laserdisc player to the INPUT (MONO)/L(AUDIO...
... OUT terminal outputs video and audio of the VCR or the laserdisc player to an external audio amplifier, connect the system as shown on the TV Rear Panel. 2. Connect the cable from the AUDIO OUT of the VCR or the laserdisc player to the INPUT (S-VIDEO) jack, of the amplifier is.../R) jack on the right. 2. Connect an optical cable from the AUDIO IN R of a separate Stereo System Amplifier as shown on the Rear Panel on the TV Rear Panel. Connect the cable from the Optical out to the Optical input of the VCR or the laserdisc player to the INPUT (MONO)/L(AUDIO...
Owners Guide
Page 23
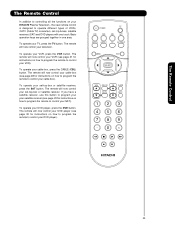
... page 31 for instructions on how to program the remote to control your SAT). To operate your HITACHI Plasma Television , the new remote control is designed to operate different types of VCRs, CATV (Cable TV) converters, set -top-box or satellite receiver. The Remote Control The Remote Control In addition to controlling...
... page 31 for instructions on how to program the remote to control your SAT). To operate your HITACHI Plasma Television , the new remote control is designed to operate different types of VCRs, CATV (Cable TV) converters, set -top-box or satellite receiver. The Remote Control The Remote Control In addition to controlling...
Owners Guide
Page 24
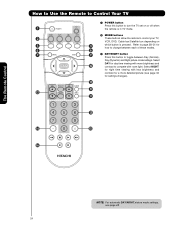
... ƺ ƻ NOTE: For automatic DAY/NIGHT picture mode settings, see page 48. 24 The Remote Control How to Use the Remote to Control Your TV ³ POWER button Press this button to toggle between each of these modes. ¶ ¾ » DAY/NIGHT button Press this button to turn ...the TV set on or off when ³ the remote is in TV mode. · MODE buttons · These buttons allow the remote to control your TV, VCR, DVD, Cable box/Satellite box depending on ´ ¿ » ²...
... ƺ ƻ NOTE: For automatic DAY/NIGHT picture mode settings, see page 48. 24 The Remote Control How to Use the Remote to Control Your TV ³ POWER button Press this button to toggle between each of these modes. ¶ ¾ » DAY/NIGHT button Press this button to turn ...the TV set on or off when ³ the remote is in TV mode. · MODE buttons · These buttons allow the remote to control your TV, VCR, DVD, Cable box/Satellite box depending on ´ ¿ » ²...
Owners Guide
Page 25
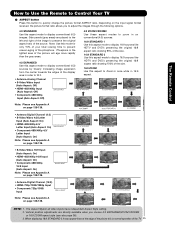
... edges of the display area in order to fill it may appear lines at the edge of the picture this is normal operation of the TV 25 IMA G E INPUT • S-Video/Video 16:9 Input (Auto Aspect: On) • HDMI-480i/480p 16:9 Input (Auto Aspect: On) • Component-480i/480p IMA... G E INPUT 4:3 ZOOM1/ZOOM2 Use these aspect modes to zoom in on page 138-139. The Remote Control How to Use the Remote to Control Your TV ¿ ASPECT button Press this mode for only 15% of your total viewing time to prevent uneven aging of the phosphors. Note: Please see Appendix...
... edges of the display area in order to fill it may appear lines at the edge of the picture this is normal operation of the TV 25 IMA G E INPUT • S-Video/Video 16:9 Input (Auto Aspect: On) • HDMI-480i/480p 16:9 Input (Auto Aspect: On) • Component-480i/480p IMA... G E INPUT 4:3 ZOOM1/ZOOM2 Use these aspect modes to zoom in on page 138-139. The Remote Control How to Use the Remote to Control Your TV ¿ ASPECT button Press this mode for only 15% of your total viewing time to prevent uneven aging of the phosphors. Note: Please see Appendix...


