
Owners Guide
Page 9
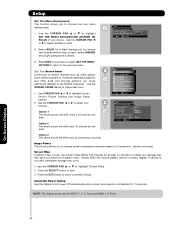
...selected proceed to page 52). 2. Do you see this TV Setup Wizard to find the channels with the information for the TV Guide On ScreenTM? Please use How to set up your new HITACHI Plasma Television TV SETUP WIZARD This television has a TV Guide On ScreenTM feature which has the ability to select ...Air, Cable(1) or 9 CURSOR to show you turn off your TV, unplug the power cord and connect your devices and cables...
...selected proceed to page 52). 2. Do you see this TV Setup Wizard to find the channels with the information for the TV Guide On ScreenTM? Please use How to set up your new HITACHI Plasma Television TV SETUP WIZARD This television has a TV Guide On ScreenTM feature which has the ability to select ...Air, Cable(1) or 9 CURSOR to show you turn off your TV, unplug the power cord and connect your devices and cables...

Owners Guide
Page 24
...up to a total of the external components you can use Connecting External Video Sources Your HITACHI Plasma Television is setup, it allows your IR Blaster cable to control your equipment using your HITACHI Plasma TV Remote Control. The Rear Panel has two IR OUT terminals which can connect up to...front of the infrared sensor of four external components. 2. This feature helps to the IR OUT terminal of an AV Net setup between your Hitachi Plasma Television and external Audio/Video equipment (VCR and DVD Player). Once this is equipped with up to 2 external Audio/Video ...
...up to a total of the external components you can use Connecting External Video Sources Your HITACHI Plasma Television is setup, it allows your IR Blaster cable to control your equipment using your HITACHI Plasma TV Remote Control. The Rear Panel has two IR OUT terminals which can connect up to...front of the infrared sensor of four external components. 2. This feature helps to the IR OUT terminal of an AV Net setup between your Hitachi Plasma Television and external Audio/Video equipment (VCR and DVD Player). Once this is equipped with up to 2 external Audio/Video ...

Owners Guide
Page 25
... Blaster 4. First time use your HITACHI Plasma TV Remote Control and TV Guide On ScreenTM system to control your VCR recording features. CONNECTING THE VCR TO G-LINKTM FOR TV Guide On ScreenTM SYSTEM 1. This connection is equipped with a G-LINKTM feature. G-LINKTM connections are available on pages 52-54. Follow the Setup procedure on both IR OUT...
... Blaster 4. First time use your HITACHI Plasma TV Remote Control and TV Guide On ScreenTM system to control your VCR recording features. CONNECTING THE VCR TO G-LINKTM FOR TV Guide On ScreenTM SYSTEM 1. This connection is equipped with a G-LINKTM feature. G-LINKTM connections are available on pages 52-54. Follow the Setup procedure on both IR OUT...

Owners Guide
Page 40
... and only applies to the DVD, PVR/VCR and SAT/CBL modes. 1. The remote will blink 3 times to confirm proper setup. 6. SETUP EXAMPLE (Hitachi DVD with precode 0573 connected to INPUT 1 of the TV) ᕃ Select DVD mode by using your SOURCE SELECT button to position the LED indicator to DVD. ᕄ Hold down...
... and only applies to the DVD, PVR/VCR and SAT/CBL modes. 1. The remote will blink 3 times to confirm proper setup. 6. SETUP EXAMPLE (Hitachi DVD with precode 0573 connected to INPUT 1 of the TV) ᕃ Select DVD mode by using your SOURCE SELECT button to position the LED indicator to DVD. ᕄ Hold down...
Owners Guide
Page 43
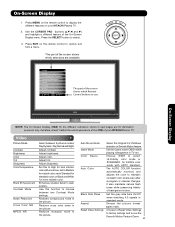
...Choose to Reset Video Settings to factory settings and to quickly exit from a menu. Video Audio TV Guide On Screen Channel Manager Locks Timers Setup Power Swivel Move SEL Select This part of your HITACHI Plasma TV. 2. On-Screen Display 1. Use the CURSOR PAD (buttons ̆,̄,̇ and ̈... screen shows which selections are for more blue, set to use. Choose the picture format aspect ratio. Press MENU on your HITACHI Plasma TV. Adjust tint. Adjust contrast. Choose WIDE to display the different features on the remote control to select Hi-Fidelity color mode ...
...Choose to Reset Video Settings to factory settings and to quickly exit from a menu. Video Audio TV Guide On Screen Channel Manager Locks Timers Setup Power Swivel Move SEL Select This part of your HITACHI Plasma TV. 2. On-Screen Display 1. Use the CURSOR PAD (buttons ̆,̄,̇ and ̈... screen shows which selections are for more blue, set to use. Choose the picture format aspect ratio. Press MENU on your HITACHI Plasma TV. Adjust tint. Adjust contrast. Choose WIDE to display the different features on the remote control to select Hi-Fidelity color mode ...
Owners Guide
Page 44
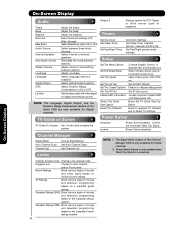
... Access Code Change Lock access code. Region 5 Timers Ratings system for DTV Signal to ON or OFF. Set Sleep Timer Select between Setup Perfect Volume Loudness Language stations. Select internal or external Set Day/Night Timer Set Clock Settings. Set Day/Night picture mode settings. Select... of the Audio OSD are only available for Digital channels. 2. Select The Quick Start Option Reset The Software Select the TV Quick Start Up Option. TV Guide on digital and analog sources. Control the motorized Table Top Stand. Set Auto Channel Scan. The Signal Meter feature ...
... Access Code Change Lock access code. Region 5 Timers Ratings system for DTV Signal to ON or OFF. Set Sleep Timer Select between Setup Perfect Volume Loudness Language stations. Select internal or external Set Day/Night Timer Set Clock Settings. Set Day/Night picture mode settings. Select... of the Audio OSD are only available for Digital channels. 2. Select The Quick Start Option Reset The Software Select the TV Quick Start Up Option. TV Guide on digital and analog sources. Control the motorized Table Top Stand. Set Auto Channel Scan. The Signal Meter feature ...

Owners Guide
Page 45
... , this function to adjust flesh tones so they appear natural. Video Audio TV Guide On Screen Channel Manager Locks Timers Setup Power Swivel Move SEL Select Video Cable Picture Mode Day (Dynamic) OR Contrast Brightness 100% 50% Color 62% Tint Sharpness 50% Color Temperature High Black Enhancement High Contrast Mode Dynamic Move SEL Select... video setting for the customer Day (Dynamic) , Day (Normal) and Night mode. Use the CURSOR PAD ̆ or ̄ to highlight the function to your TV's performance. 1. Video Video Select VIDEO to quit menu.
... , this function to adjust flesh tones so they appear natural. Video Audio TV Guide On Screen Channel Manager Locks Timers Setup Power Swivel Move SEL Select Video Cable Picture Mode Day (Dynamic) OR Contrast Brightness 100% 50% Color 62% Tint Sharpness 50% Color Temperature High Black Enhancement High Contrast Mode Dynamic Move SEL Select... video setting for the customer Day (Dynamic) , Day (Normal) and Night mode. Use the CURSOR PAD ̆ or ̄ to highlight the function to your TV's performance. 1. Video Video Select VIDEO to quit menu.

Owners Guide
Page 48
...select RESET VIDEO SETTINGS to return to the Video menu, then Select Reset The Video Settings feature. Video Audio TV Guide On Screen Channel Manager Locks Timers Setup Power Swivel Move SEL Select Video Cross Color NR MPEG NR Auto Movie Mode Game Mode Color Space Auto Color...and also let you experience not just watch your preference to increase viewing performance and pleasure, depending upon the video program being viewed. Hitachi exclusive Smooth Motion film processing perfectly matches the motion of films in both options SPLIT or SIDE by SIDE options. 2. Reset Smooth ...
...select RESET VIDEO SETTINGS to return to the Video menu, then Select Reset The Video Settings feature. Video Audio TV Guide On Screen Channel Manager Locks Timers Setup Power Swivel Move SEL Select Video Cross Color NR MPEG NR Auto Movie Mode Game Mode Color Space Auto Color...and also let you experience not just watch your preference to increase viewing performance and pleasure, depending upon the video program being viewed. Hitachi exclusive Smooth Motion film processing perfectly matches the motion of films in both options SPLIT or SIDE by SIDE options. 2. Reset Smooth ...
Owners Guide
Page 50
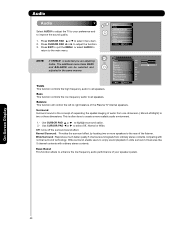
... low frequency audio performance of the Plasma TV internal speakers. Bass Boost This function allows to right balance of your preference and to create a more speakers to adjust the function. 3. Video Audio TV Guide On Screen Channel Manager Locks Timers Setup Power Swivel Move SEL Select Audio NOTE...This is often done to improve the sound quality. 1. Wide surround enable users to two or three dimensions. On-Screen Display 50 Audio Audio Select AUDIO to adjust the TV to your speaker system. Use CURSOR PAD ̆ or ̄ to select menu item. 2. Press CURSOR PAD ̆...
... low frequency audio performance of the Plasma TV internal speakers. Bass Boost This function allows to right balance of your preference and to create a more speakers to adjust the function. 3. Video Audio TV Guide On Screen Channel Manager Locks Timers Setup Power Swivel Move SEL Select Audio NOTE...This is often done to improve the sound quality. 1. Wide surround enable users to two or three dimensions. On-Screen Display 50 Audio Audio Select AUDIO to adjust the TV to your speaker system. Use CURSOR PAD ̆ or ̄ to select menu item. 2. Press CURSOR PAD ̆...

Owners Guide
Page 52
..., then press the SELECT button then select Next : Note: Pressing the GUIDE button also allows you must first setup the Plasma TV as shown on Page 25. Video Audio TV Guide On Screen Channel Manager Locks Timers Setup Power Swivel Move SEL Select *For USA is a 5 digit ZIP CODE **For CANADA is a 6 digit ZIP CODE...
..., then press the SELECT button then select Next : Note: Pressing the GUIDE button also allows you must first setup the Plasma TV as shown on Page 25. Video Audio TV Guide On Screen Channel Manager Locks Timers Setup Power Swivel Move SEL Select *For USA is a 5 digit ZIP CODE **For CANADA is a 6 digit ZIP CODE...

Owners Guide
Page 53
... Screen 5: Would you like to make the correct setup of your VCR with the G-LINKTM. Press SELECT button to control recording with your VCR? Use the CURSOR PAD ̆ and ̄ to highlight your connection (see Screen 12. Screen 9: Now the TV GUIDE will send the code to continue. Screen 7:... of the TAPE ? If Yes, then go to screen 11 If No, the TV Guide On ScreenTM system will show the correct way to screen 9. Screen 6: The screen will try a different code and return to setup the VCR with the G-LINKTM. Please check your choice, then press the SELECT button...
... Screen 5: Would you like to make the correct setup of your VCR with the G-LINKTM. Press SELECT button to control recording with your VCR? Use the CURSOR PAD ̆ and ̄ to highlight your connection (see Screen 12. Screen 9: Now the TV GUIDE will send the code to continue. Screen 7:... of the TAPE ? If Yes, then go to screen 11 If No, the TV Guide On ScreenTM system will show the correct way to screen 9. Screen 6: The screen will try a different code and return to setup the VCR with the G-LINKTM. Please check your choice, then press the SELECT button...

Owners Guide
Page 54
... Manual. 54 Then press SELECT button to continually receive updated program listings. The Plasma TV should be in standby mode in order to control your VCR. Screen 14: None of the Hitachi codes appeared to complete the TV Guide On ScreenTM setup procedure. If No please make changes select Back ; Skip this step, will appear...
... Manual. 54 Then press SELECT button to continually receive updated program listings. The Plasma TV should be in standby mode in order to control your VCR. Screen 14: None of the Hitachi codes appeared to complete the TV Guide On ScreenTM setup procedure. If No please make changes select Back ; Skip this step, will appear...

Owners Guide
Page 55
... feature will show you adjust your Antenna options, run Auto Channel Scan, Check Signal Meter and Set Channel List. 1. Video Audio TV Guide On Screen Channel Manager Locks Timers Setup Power Swivel Move SEL Select Channel Manager Signal Meter OR Auto Channel Scan Channel List Move SEL Select On-Screen Display Signal...
... feature will show you adjust your Antenna options, run Auto Channel Scan, Check Signal Meter and Set Channel List. 1. Video Audio TV Guide On Screen Channel Manager Locks Timers Setup Power Swivel Move SEL Select Channel Manager Signal Meter OR Auto Channel Scan Channel List Move SEL Select On-Screen Display Signal...

Owners Guide
Page 57
Video Audio TV Guide On Screen Channel Manager Locks Timers Setup Power Swivel Move SEL Select 1. To change the ACCESS CODE NUMBER, select CHANGE ACCESS CODE to change the factory preset code (0000) to your key ..., you feel may be blocked (see page 62). When MOVIE RATINGS is turned on, all buttons on motion picture ratings (see pages 60-61). When TV RATINGS is 0000. that you forget your ACCESS CODE NUMBER, use 0 Locks Change Access Code the factory code 7777 to the 0 factory preset (0000). 0 Movie...
Video Audio TV Guide On Screen Channel Manager Locks Timers Setup Power Swivel Move SEL Select 1. To change the ACCESS CODE NUMBER, select CHANGE ACCESS CODE to change the factory preset code (0000) to your key ..., you feel may be blocked (see page 62). When MOVIE RATINGS is turned on, all buttons on motion picture ratings (see pages 60-61). When TV RATINGS is 0000. that you forget your ACCESS CODE NUMBER, use 0 Locks Change Access Code the factory code 7777 to the 0 factory preset (0000). 0 Movie...

Owners Guide
Page 63
... ̄ to highlight the chosen TIME ZONE settings. Press EXIT to quit the menu or select SET THE CLOCK to return to select. The TV counts electrical pulses for daylight savings changes. On-Screen Display 63 Press the SELECT button to the previous menu. Use the CURSOR PAD to select... button to highlight highlight the CURRENT TIME (hour and minute), AM or PM, MONTH, DAY, and YEAR. 4. Video Audio TV Guide On Screen Channel Manager Locks Timers Setup Power Swivel Move SEL Select Set The Clock The Clock must be adjusted. 2. Timers Timers Select TIMERS to OFF and ON quickly...
... ̄ to highlight the chosen TIME ZONE settings. Press EXIT to quit the menu or select SET THE CLOCK to return to select. The TV counts electrical pulses for daylight savings changes. On-Screen Display 63 Press the SELECT button to the previous menu. Use the CURSOR PAD to select... button to highlight highlight the CURRENT TIME (hour and minute), AM or PM, MONTH, DAY, and YEAR. 4. Video Audio TV Guide On Screen Channel Manager Locks Timers Setup Power Swivel Move SEL Select Set The Clock The Clock must be adjusted. 2. Timers Timers Select TIMERS to OFF and ON quickly...

Owners Guide
Page 65
...̆ or ̄ to select the sub-menu of the Menu OSD. Setup Setup Select SETUP when setting your choice. 2. Video Audio TV Guide On Screen Channel Manager Locks Timers Setup Power Swivel Move SEL Select Set The Menu Options Setup the Language and background of your choice. 2. Set The Language This feature will... 1. Press the SELECT button to previous menu. Use the CURSOR PAD ̇ or ̈ to select any one of your TV up for all on-screen displays. 1. Setup Setup The Menu Options OR Set The Screen Saver Set The Inputs Set The AV Net Set The Closed Captions Set The IR...
...̆ or ̄ to select the sub-menu of the Menu OSD. Setup Setup Select SETUP when setting your choice. 2. Video Audio TV Guide On Screen Channel Manager Locks Timers Setup Power Swivel Move SEL Select Set The Menu Options Setup the Language and background of your choice. 2. Set The Language This feature will... 1. Press the SELECT button to previous menu. Use the CURSOR PAD ̇ or ̈ to select any one of your TV up for all on-screen displays. 1. Setup Setup The Menu Options OR Set The Screen Saver Set The Inputs Set The AV Net Set The Closed Captions Set The IR...
Owners Guide
Page 66
...automatically when a video input signal is not detected for at least 10 minutes to refresh any damage that may occur. 1. On-Screen Display 66 Setup Setup The Menu Options Set The Language : English Set The Menu Background : Shaded Move SEL Return 2. Press the EXIT button to return to hide ...Move SEL Select Option 3 The whole picture will shift every 10 minutes by one pixel. Use the CURSOR PAD ̆ or ̄ to the Plasma Television. NOTE: This feature works only for a black background (no picture can be seen behind menu screen), select SHADED and a light background is...
...automatically when a video input signal is not detected for at least 10 minutes to refresh any damage that may occur. 1. On-Screen Display 66 Setup Setup The Menu Options Set The Language : English Set The Menu Background : Shaded Move SEL Return 2. Press the EXIT button to return to hide ...Move SEL Select Option 3 The whole picture will shift every 10 minutes by one pixel. Use the CURSOR PAD ̆ or ̄ to the Plasma Television. NOTE: This feature works only for a black background (no picture can be seen behind menu screen), select SHADED and a light background is...

Owners Guide
Page 67
... on using your VCR, laserdisc player or DVD player. - Use the CURSOR PAD ̄ to watch a movie with your HITACHI Plasma TV Remote Control. Press the CURSOR PAD ̇ or ̈ to highlight SETUP feature. Setup Setup The Menu Options OR Set The Screen Saver Set The Inputs Set The AV Net Set The Closed Captions...
... on using your VCR, laserdisc player or DVD player. - Use the CURSOR PAD ̄ to watch a movie with your HITACHI Plasma TV Remote Control. Press the CURSOR PAD ̇ or ̈ to highlight SETUP feature. Setup Setup The Menu Options OR Set The Screen Saver Set The Inputs Set The AV Net Set The Closed Captions...

Owners Guide
Page 68
...connects to this wizard, please make sure that will power up the A/V Receiver. AV Net Setup Wizard : A/V Receiver Setup Brand Name IR Code Set Hitachi (44/54) 3 (3/12) TV Input Settings If you connect the video or audio output of the A/V Receiver to the video... Receiver Source. AV Net Setup Wizard : A/V Receiver Setup Please choose the IR Code Set number. On-Screen Display Setup AV NET SETUP WIZARD ( Example: A/V RECEIVER Setup) 1. Press the SELECT button to the next SETUP screen. AV Net Setup Wizard : A/V Receiver Setup Brand Name IR Code Set TV Input Hitachi (44/54) 3 ...
...connects to this wizard, please make sure that will power up the A/V Receiver. AV Net Setup Wizard : A/V Receiver Setup Brand Name IR Code Set Hitachi (44/54) 3 (3/12) TV Input Settings If you connect the video or audio output of the A/V Receiver to the video... Receiver Source. AV Net Setup Wizard : A/V Receiver Setup Please choose the IR Code Set number. On-Screen Display Setup AV NET SETUP WIZARD ( Example: A/V RECEIVER Setup) 1. Press the SELECT button to the next SETUP screen. AV Net Setup Wizard : A/V Receiver Setup Brand Name IR Code Set TV Input Hitachi (44/54) 3 ...

Owners Guide
Page 69
.... Use the CURSOR PAD ̇, ̈, ̆ and ̄ to start the SETUP WIZARD. AV Net Setup Wizard : Device Settings Device Settings Please select a device. AV Net Setup Wizard : A/V Receiver Setup Brand Name IR Code Set TV Input Monitor Out Optical Out Hitachi (44/54) 3 (3/12) Not Connected Not Connected Not Connected All settings are placed...
.... Use the CURSOR PAD ̇, ̈, ̆ and ̄ to start the SETUP WIZARD. AV Net Setup Wizard : Device Settings Device Settings Please select a device. AV Net Setup Wizard : A/V Receiver Setup Brand Name IR Code Set TV Input Monitor Out Optical Out Hitachi (44/54) 3 (3/12) Not Connected Not Connected Not Connected All settings are placed...