
Owners Guide
Page 1
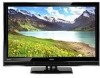
PLASMA TELEVISION Spanish Section 87~172 Click Here Operating Guide for P50V701 IMPORTANT SAFETY INSTRUCTIONS 2-3 FIRST TIME USE ...4-25 THE REMOTE CONTROL...26-42 ON-SCREEN DISPLAY ...43-79 USEFUL INFORMATION...80-86 OPERATING GUIDE IN SPANISH 87-172 END USER LICENSE AGREEMENT FOR HITACHI DTV SOFTWARE 173-181 APPENDIXES...182-183 INDEX...184 Change 1 Page 33, Added note about PIP message
PLASMA TELEVISION Spanish Section 87~172 Click Here Operating Guide for P50V701 IMPORTANT SAFETY INSTRUCTIONS 2-3 FIRST TIME USE ...4-25 THE REMOTE CONTROL...26-42 ON-SCREEN DISPLAY ...43-79 USEFUL INFORMATION...80-86 OPERATING GUIDE IN SPANISH 87-172 END USER LICENSE AGREEMENT FOR HITACHI DTV SOFTWARE 173-181 APPENDIXES...182-183 INDEX...184 Change 1 Page 33, Added note about PIP message

Owners Guide
Page 2
...to provide some protection against voltage surges and The exclamation point within an equilateral triangle, is used, use Please fill out your HITACHI plasma television. A polarized plug has two system of the polarized or cable ground shall be discovered in product damage and/or personal ...NEC that provides guidelines for the grounding electrode. Section 810 of important operating and maintenance (servicing) instructions in the design of HITACHI plasma televisions. Please read it to the presence of the National Electric Code, ANSI/NFPA No. 70-1984, provides information with one...
...to provide some protection against voltage surges and The exclamation point within an equilateral triangle, is used, use Please fill out your HITACHI plasma television. A polarized plug has two system of the polarized or cable ground shall be discovered in product damage and/or personal ...NEC that provides guidelines for the grounding electrode. Section 810 of important operating and maintenance (servicing) instructions in the design of HITACHI plasma televisions. Please read it to the presence of the National Electric Code, ANSI/NFPA No. 70-1984, provides information with one...
Owners Guide
Page 3
...the power cord into a 120 volt 60 Hz outlet. Please note that is protected by your TV screen. Important Safety Instructions Power source This plasma television is designed to operate on -demand, a cable operator's enhanced program guide and data-enhanced ... will restore after moving ) patterns can be permanently imprinted onto your HITACHI Factory Warranty. Never connect the plasma television to 50 Hz, direct current, or anything other sources, may require the use the plasma television's (polarized) plug with a protective earthing connection. For more ...
...the power cord into a 120 volt 60 Hz outlet. Please note that is protected by your TV screen. Important Safety Instructions Power source This plasma television is designed to operate on -demand, a cable operator's enhanced program guide and data-enhanced ... will restore after moving ) patterns can be permanently imprinted onto your HITACHI Factory Warranty. Never connect the plasma television to 50 Hz, direct current, or anything other sources, may require the use the plasma television's (polarized) plug with a protective earthing connection. For more ...

Owners Guide
Page 4
...plasma television product is designed for the front glass panel. When replacing old batteries, push them towards the springs and insert the top of the packing material. ³ Remote Control · Two "AA" size, 1.5V batteries » Power Swivel Table Top Stand (included) First time use only with Hitachi P50V701.... models: For optional accessories, please access our web site at: www.hitachi.us/tv CAUTION: 1. EW08433). ...(Part No. Insert two new "AA" size batteries for the 50" model is capable of the battery, the (-) side, into the...
...plasma television product is designed for the front glass panel. When replacing old batteries, push them towards the springs and insert the top of the packing material. ³ Remote Control · Two "AA" size, 1.5V batteries » Power Swivel Table Top Stand (included) First time use only with Hitachi P50V701.... models: For optional accessories, please access our web site at: www.hitachi.us/tv CAUTION: 1. EW08433). ...(Part No. Insert two new "AA" size batteries for the 50" model is capable of the battery, the (-) side, into the...
Owners Guide
Page 5
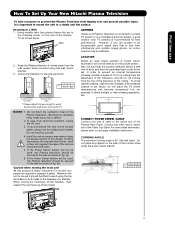
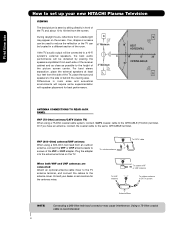
First time use How To Set Up Your New Hitachi Plasma Television To take measures to prevent the Plasma Television from tipping over and prevent possible injury it safely. Wire ANTENNA Unless your Plasma Television is connected to a cable TV system or to prevent an internal temperature increase, maintain...system, a good outdoor color TV antenna is recommended for professional installer. Connect the other end to swivel slot of the television to mount the unit in a stable and flat surface. A B A 50" 4 in. 10 cm B 12 in . 50" D 27.5 cm 39 cm 50" 5 Blocking the ventilation ...
First time use How To Set Up Your New Hitachi Plasma Television To take measures to prevent the Plasma Television from tipping over and prevent possible injury it safely. Wire ANTENNA Unless your Plasma Television is connected to a cable TV system or to prevent an internal temperature increase, maintain...system, a good outdoor color TV antenna is recommended for professional installer. Connect the other end to swivel slot of the television to mount the unit in a stable and flat surface. A B A 50" 4 in. 10 cm B 12 in . 50" D 27.5 cm 39 cm 50" 5 Blocking the ventilation ...
Owners Guide
Page 6
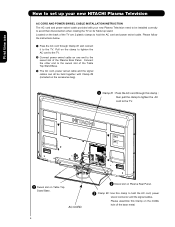
... cable. Please follow the instructions below. ³ Pass the AC cord through this clamp ; Pull on the clamp to tighten the AC cord to the TV. · Connect power swivel cable on one end to the swivel slot of the Table Top Stand Base. » The AC cord, power swivel cable... and the signal cables can all be held together with your new HITACHI Plasma Television AC CORD AND POWER SWIVEL CABLE INSTALLATION INSTRUCTION The AC cord and power swivel cable provided with Clamp #2 (included on the accesories bag). ³...
... cable. Please follow the instructions below. ³ Pass the AC cord through this clamp ; Pull on the clamp to tighten the AC cord to the TV. · Connect power swivel cable on one end to the swivel slot of the Table Top Stand Base. » The AC cord, power swivel cable... and the signal cables can all be held together with your new HITACHI Plasma Television AC CORD AND POWER SWIVEL CABLE INSTALLATION INSTRUCTION The AC cord and power swivel cable provided with Clamp #2 (included on the accesories bag). ³...

Owners Guide
Page 7
...the specified WALL MOUNT unit for the Plasma TV depending on the back of the TV . Please access our web site at: www.hitachi.us/tv for recommended accessories for use to separate the TV from the TV. First time use How to set up your new HITACHI Plasma Television SETTING FOR WALL MOUNTING STEP (1)...from the TV, now the TV STAND can be separated from the Base. This Plasma Display Panel for your TV. This metal is use only with other Wall Mount is capable of the WALL MOUNT assembly please refer to page 84. 4 SCREWS STAND METAL TV STAND BASE For Model P50V701 CAUTION-
...the specified WALL MOUNT unit for the Plasma TV depending on the back of the TV . Please access our web site at: www.hitachi.us/tv for recommended accessories for use to separate the TV from the TV. First time use How to set up your new HITACHI Plasma Television SETTING FOR WALL MOUNTING STEP (1)...from the TV, now the TV STAND can be separated from the Base. This Plasma Display Panel for your TV. This metal is use only with other Wall Mount is capable of the WALL MOUNT assembly please refer to page 84. 4 SCREWS STAND METAL TV STAND BASE For Model P50V701 CAUTION-
Owners Guide
Page 8
... speakers, the best audio performance will require some experimentation with speaker placement for the antenna mixer. Differences in a different section of the TV and about 10 to 18 feet from the screen. For best stereo separation, place the external speakers at least four feet from the side...lead from an outdoor antenna, connect the VHF or UHF antenna leads to screws of the TV, place the surround speakers to the side or behind the viewing area. Consult your new HITACHI Plasma Television VIEWING The best picture is recommended. Or if you have an antenna, connect the ...
... speakers, the best audio performance will require some experimentation with speaker placement for the antenna mixer. Differences in a different section of the TV and about 10 to 18 feet from the screen. For best stereo separation, place the external speakers at least four feet from the side...lead from an outdoor antenna, connect the VHF or UHF antenna leads to screws of the TV, place the surround speakers to the side or behind the viewing area. Consult your new HITACHI Plasma Television VIEWING The best picture is recommended. Or if you have an antenna, connect the ...

Owners Guide
Page 9
...you a customized list of the programs and channels available in your area. For updating and adding the channels available in the top portion of the TV Setup Wizard. 1. If this is broadcast on different channels in the "First Time Use" section of this Operating Guide. 2. Air Scanning Channel ...the Auto Channel Scan feature on -screen, start the Auto Channel Scan. Please use How to set up your new HITACHI Plasma Television TV SETUP WIZARD This television has a TV Guide On ScreenTM feature which has the ability to find the channels with the information for your area. Use the ...
...you a customized list of the programs and channels available in your area. For updating and adding the channels available in the top portion of the TV Setup Wizard. 1. If this is broadcast on different channels in the "First Time Use" section of this Operating Guide. 2. Air Scanning Channel ...the Auto Channel Scan feature on -screen, start the Auto Channel Scan. Please use How to set up your new HITACHI Plasma Television TV SETUP WIZARD This television has a TV Guide On ScreenTM feature which has the ability to find the channels with the information for your area. Use the ...
Owners Guide
Page 10
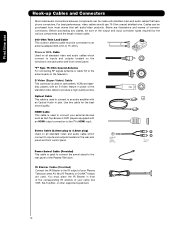
...and front control panel. S-Video (Super Video) Cable This connector is used on the television. Optical Cable This cable is used to connect to the TV's HDMI input. HDMI Cable This cable is used to the IR output of common connectors. Below are used. IR Blaster Cable (Provided) Connect the IR... your external devices such as Set-Top-Boxes or DVD players equipped with an S-Video feature in front of the corresponding IR window of your Plasma Television when AV Net, IR Passthru or G-LINKTM feature are illustrations and names of your cable box VCR, Set-Top-Box, or other supported ...
...and front control panel. S-Video (Super Video) Cable This connector is used on the television. Optical Cable This cable is used to connect to the TV's HDMI input. HDMI Cable This cable is used to the IR output of common connectors. Below are used. IR Blaster Cable (Provided) Connect the IR... your external devices such as Set-Top-Boxes or DVD players equipped with an S-Video feature in front of the corresponding IR window of your Plasma Television when AV Net, IR Passthru or G-LINKTM feature are illustrations and names of your cable box VCR, Set-Top-Box, or other supported ...

Owners Guide
Page 11
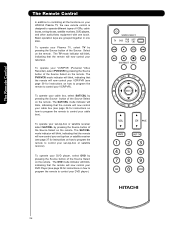
... show and change the Picture-in DVD or PVR/VCR. MUTE BUTTON (TV) Reduces the audio level to 50% if pressed once, and to restore audio level. Press it a third time to complete mute if pressed twice. NUMERIC BUTTONS (TV, DVD, SAT/CBL, PVR/VCR) Used to manually enter the...in Set-Top-Box (STB) mode or when the TV uses a digital input. To control TV functions, please point the remote control directly at the remote control sensor for TV mode.) INFO BUTTON (TV, STB, CBL, PVR) Displays various information on your HITACHI Plasma TV, the new remote control is designed to navigate through the...
... show and change the Picture-in DVD or PVR/VCR. MUTE BUTTON (TV) Reduces the audio level to 50% if pressed once, and to restore audio level. Press it a third time to complete mute if pressed twice. NUMERIC BUTTONS (TV, DVD, SAT/CBL, PVR/VCR) Used to manually enter the...in Set-Top-Box (STB) mode or when the TV uses a digital input. To control TV functions, please point the remote control directly at the remote control sensor for TV mode.) INFO BUTTON (TV, STB, CBL, PVR) Displays various information on your HITACHI Plasma TV, the new remote control is designed to navigate through the...
Owners Guide
Page 12
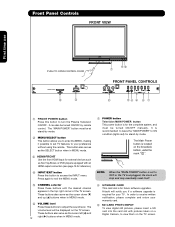
...until the desired channel appears in the top right corner of the TV screen. Hitachi will notify you to enter the MENU, making it possible to set to turn the Plasma Television ON/OFF. It can also be displayed on the TV screen. These buttons also serve as the cursor left (̇) and... is located on a Digital Camera, to ON condition (lights red) for reference). ብ INPUT/EXIT button Press this button to OFF or the TV is unplugged, the clock will stop and may eventually reset itself. ቩ UPGRADE CARD This card slot is for future software upgrades. These buttons also...
...until the desired channel appears in the top right corner of the TV screen. Hitachi will notify you to enter the MENU, making it possible to set to turn the Plasma Television ON/OFF. It can also be displayed on the TV screen. These buttons also serve as the cursor left (̇) and... is located on a Digital Camera, to ON condition (lights red) for reference). ብ INPUT/EXIT button Press this button to OFF or the TV is unplugged, the clock will stop and may eventually reset itself. ቩ UPGRADE CARD This card slot is for future software upgrades. These buttons also...

Owners Guide
Page 13
The Plasma TV is ON ; signal). NOTES: 1. Your HITACHI Plasma TV will illuminate. Off TV MAIN POWER is ON with this area while using the AV NET Learning Wizard. ቭ INPUT-FRONT JACKS INPUT-FRONT provide composite Video jacks for ... INPUT : 1, 2, 3, Front or HDMI : 1, 2, Front is selected. picture is ON. First time use . 2. A red stand-by ) When the main power switch on the TV is shown. On When TV receives the IR signal from R/C. ቫ REMOTE CONTROL sensor Point your remote at this area when selecting channels, adjusting volume, etc. ቫ LEARNING...
The Plasma TV is ON ; signal). NOTES: 1. Your HITACHI Plasma TV will illuminate. Off TV MAIN POWER is ON with this area while using the AV NET Learning Wizard. ቭ INPUT-FRONT JACKS INPUT-FRONT provide composite Video jacks for ... INPUT : 1, 2, 3, Front or HDMI : 1, 2, Front is selected. picture is ON. First time use . 2. A red stand-by ) When the main power switch on the TV is shown. On When TV receives the IR signal from R/C. ቫ REMOTE CONTROL sensor Point your remote at this area when selecting channels, adjusting volume, etc. ቫ LEARNING...
Owners Guide
Page 14
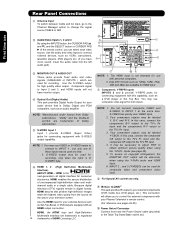
... Set-Top-Boxes or DVD players equipped with an HDMI output connection. In this case, connect the components B-Y output to the TV's PB input and the components R-Y output to the TV's PR input. 3. INPUT 2 , and 3 (Y/VIDEO) can select each video ቤ source. Rear Panel Connections First time use ቢ ..., laserdisc players, DVD players etc. (if you have monitor output. ብ Optical Out (Digital Audio) This jack provides Digital Audio Output for your Plasma Television's remote control. (For reference see page 45). 5. This connection will be used for consumer electronics.
... Set-Top-Boxes or DVD players equipped with an HDMI output connection. In this case, connect the components B-Y output to the TV's PB input and the components R-Y output to the TV's PR input. 3. INPUT 2 , and 3 (Y/VIDEO) can select each video ቤ source. Rear Panel Connections First time use ቢ ..., laserdisc players, DVD players etc. (if you have monitor output. ብ Optical Out (Digital Audio) This jack provides Digital Audio Output for your Plasma Television's remote control. (For reference see page 45). 5. This connection will be used for consumer electronics.

Owners Guide
Page 17
... from coaxial shielded wire. The exact arrangement you do not, the played back picture may need to modify them to select the Input of your Plasma TV is dependent on the model and features of components and features. Before Operating External Video Source Connect an external source to one of video and...
... from coaxial shielded wire. The exact arrangement you do not, the played back picture may need to modify them to select the Input of your Plasma TV is dependent on the model and features of components and features. Before Operating External Video Source Connect an external source to one of video and...

Owners Guide
Page 23
Connect the cable from the AUDIO IN R of the Plasma TV to the OUTPUT (AUDIO/R) jack on the right. Select CABLE or AIR from ...audio level of the VCR or the laserdisc player to an external audio amplifier, connect the system as shown on the TV Rear Panel. 3. Connecting S-Video: Connect the cable from the AUDIO IN L of the VCR or the laserdisc player..., of the VCR or the laserdisc player to the INPUT (VIDEO) jack, as shown on the Rear Panel on the TV Rear Panel. 2. OPTICAL IN Stereo System Amplifier or DVD Player CABLE or Air signal Optional VCR or other external components R...
Connect the cable from the AUDIO IN R of the Plasma TV to the OUTPUT (AUDIO/R) jack on the right. Select CABLE or AIR from ...audio level of the VCR or the laserdisc player to an external audio amplifier, connect the system as shown on the TV Rear Panel. 3. Connecting S-Video: Connect the cable from the AUDIO IN L of the VCR or the laserdisc player..., of the VCR or the laserdisc player to the INPUT (VIDEO) jack, as shown on the Rear Panel on the TV Rear Panel. 2. OPTICAL IN Stereo System Amplifier or DVD Player CABLE or Air signal Optional VCR or other external components R...

Owners Guide
Page 24
...it allows your IR Blaster cable to control your equipment using your external Audio/Video components to the Rear Panel shown below. 2. Connect your HITACHI Plasma TV Remote Control. Connect the IR Blaster cable to hold the IR Blaster in place. 3. ACCESS THE AV NET SETUP WIZARD Press the MENU ...24 The correct codes must be placed in front of the infrared sensor of four external components. 2. First time use your HITACHI remote control to control your Hitachi Plasma Television and external Audio/Video equipment (VCR and DVD Player). Use the CURSOR PAD ̄ to highlight the SET THE...
...it allows your IR Blaster cable to control your equipment using your external Audio/Video components to the Rear Panel shown below. 2. Connect your HITACHI Plasma TV Remote Control. Connect the IR Blaster cable to hold the IR Blaster in place. 3. ACCESS THE AV NET SETUP WIZARD Press the MENU ...24 The correct codes must be placed in front of the infrared sensor of four external components. 2. First time use your HITACHI remote control to control your Hitachi Plasma Television and external Audio/Video equipment (VCR and DVD Player). Use the CURSOR PAD ̄ to highlight the SET THE...

Owners Guide
Page 25
... button to the Rear Panel shown below. 2. Connect your VCR recording features. First time use your HITACHI Plasma Television and external Audio/Video equipment (VCR). Video Audio TV Guide On Screen Channel Manager Locks Timers Setup Power Swivel Move SEL Select NOTE: 1. Connect the IR...select. 7. Place the IR Blaster in front of a G-LINKTM setup between your HITACHI Plasma TV Remote Control and TV Guide On ScreenTM system to enable VCR recording features. CONNECTING THE VCR TO G-LINKTM FOR TV Guide On ScreenTM SYSTEM 1. This connection is equipped with a G-LINKTM feature. Once...
... button to the Rear Panel shown below. 2. Connect your VCR recording features. First time use your HITACHI Plasma Television and external Audio/Video equipment (VCR). Video Audio TV Guide On Screen Channel Manager Locks Timers Setup Power Swivel Move SEL Select NOTE: 1. Connect the IR...select. 7. Place the IR Blaster in front of a G-LINKTM setup between your HITACHI Plasma TV Remote Control and TV Guide On ScreenTM system to enable VCR recording features. CONNECTING THE VCR TO G-LINKTM FOR TV Guide On ScreenTM SYSTEM 1. This connection is equipped with a G-LINKTM feature. Once...
Owners Guide
Page 26
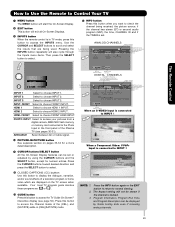
To operate your Plasma TV, select TV by pressing the Source button of the Source Select on the remote. To...cable boxes, set-top-boxes, satellite receivers, DVD players, and other audio/video equipment with one area. The TV mode indicator will blink, indicating that the remote will now control your VCR/PVR (see page 38 for instructions ...top-box or satellite receiver). The DVD mode indicator will blink, indicating that the remote will now control your HITACHI Plasma TV, the new remote control is designed to operate different types of the Source Select on the remote. The PVR...
To operate your Plasma TV, select TV by pressing the Source button of the Source Select on the remote. To...cable boxes, set-top-boxes, satellite receivers, DVD players, and other audio/video equipment with one area. The TV mode indicator will blink, indicating that the remote will now control your VCR/PVR (see page 38 for instructions ...top-box or satellite receiver). The DVD mode indicator will blink, indicating that the remote will now control your HITACHI Plasma TV, the new remote control is designed to operate different types of the Source Select on the remote. The PVR...
Owners Guide
Page 29
...to select. ¹ CLOSED CAPTIONS (CC) button Use this button to display the dialogue, narration, and/or sound effects of the Plasma TV (see page 52). Program Information, Program Run Time and Program Description can be shown if the channel is set or adjusted by ... INPUT 3 Select to choose HDMI 1 INPUT. Digital channel Program Information Program Run Time Show Name 3:00PM- 3:30M REGION 5 ST DTvCC TV-G D Air 15-1 KPBS-HD 1080i 3:17PM Main Picture Source and channel indication Broadcast channel identification Clock Audio Broadcast Alternate Broadcast Picture Format Rating...
...to select. ¹ CLOSED CAPTIONS (CC) button Use this button to display the dialogue, narration, and/or sound effects of the Plasma TV (see page 52). Program Information, Program Run Time and Program Description can be shown if the channel is set or adjusted by ... INPUT 3 Select to choose HDMI 1 INPUT. Digital channel Program Information Program Run Time Show Name 3:00PM- 3:30M REGION 5 ST DTvCC TV-G D Air 15-1 KPBS-HD 1080i 3:17PM Main Picture Source and channel indication Broadcast channel identification Clock Audio Broadcast Alternate Broadcast Picture Format Rating...


