
Owners Guide
Page 1
PLASMA TELEVISION Operating Guide for P50S601 IMPORTANT SAFETY INSTRUCTIONS 2-3 FIRST TIME USE ...4-21 THE REMOTE CONTROL...22-33 ON-SCREEN DISPLAY ...34-57 USEFUL INFORMATION...58-64 END USER LICENSE AGREEMENT FOR HITACHI DTV SOFTWARE 129-137 APPENDIXES...138-139 INDEX...140
PLASMA TELEVISION Operating Guide for P50S601 IMPORTANT SAFETY INSTRUCTIONS 2-3 FIRST TIME USE ...4-21 THE REMOTE CONTROL...22-33 ON-SCREEN DISPLAY ...34-57 USEFUL INFORMATION...58-64 END USER LICENSE AGREEMENT FOR HITACHI DTV SOFTWARE 129-137 APPENDIXES...138-139 INDEX...140
Owners Guide
Page 3
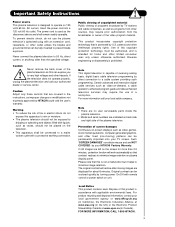
...a mains socket outlet with remote control or power switch on unit. If the television does not operate properly, unplug the plasma television and call your HITACHI Factory Warranty. Public viewing of copyrighted material Public viewing of programs broadcast by TV stations and cable companies, ... TV screen. For more than the specified voltage. Please note that are covered in accordance with an extension cord, receptacle, or other sources, may require the use the plasma television's (polarized) plug with applicable environmental laws. Never connect the plasma television to 50 ...
...a mains socket outlet with remote control or power switch on unit. If the television does not operate properly, unplug the plasma television and call your HITACHI Factory Warranty. Public viewing of copyrighted material Public viewing of programs broadcast by TV stations and cable companies, ... TV screen. For more than the specified voltage. Please note that are covered in accordance with an extension cord, receptacle, or other sources, may require the use the plasma television's (polarized) plug with applicable environmental laws. Never connect the plasma television to 50 ...
Owners Guide
Page 4
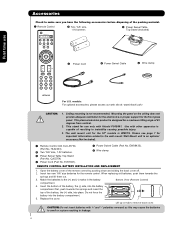
...plasma television product is designed for the 50" models is capable of the remote control by pushing down and sliding the back cover off. 2. The wall mount unit for a maximum tilting angle of 45 degrees from vertical. 2. EW08433). ² Wire clamp REMOTE CONTROL...resulting in the battery Bottom View (Remote Control) compartment. 4. models: For optional accessories, please access our web site at: www.hitachi.us/tv CAUTION: 1. This stand for ...out. 3. First time use only with Hitachi P50S601. Wall Mount unit is not recommended. QJ03754) ¿ Power Cord (Part No...
...plasma television product is designed for the 50" models is capable of the remote control by pushing down and sliding the back cover off. 2. The wall mount unit for a maximum tilting angle of 45 degrees from vertical. 2. EW08433). ² Wire clamp REMOTE CONTROL...resulting in the battery Bottom View (Remote Control) compartment. 4. models: For optional accessories, please access our web site at: www.hitachi.us/tv CAUTION: 1. This stand for ...out. 3. First time use only with Hitachi P50S601. Wall Mount unit is not recommended. QJ03754) ¿ Power Cord (Part No...
Owners Guide
Page 10
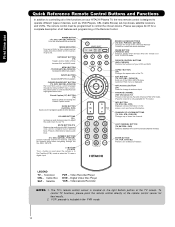
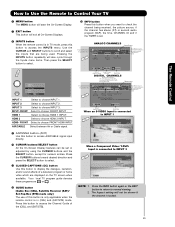
...the INPUTS menu system. MUTE BUTTON (TV) Reduces the audio level to 50% if pressed once, and to control the device selected. CHANNEL UP & DOWN BUTTONS (TV, CBL, STB, PVR/VCR) Changes up and decrease down the channel. LAST CHANNEL BUTTON (TV, SAT/CBL, PVR) Switches between ... through the the OSD, INPUTS. (-) BUTTON (TV,STB) The (-) button is used for TV mode.) INFO BUTTON (TV, STB, CBL, PVR) Displays various information on the right bottom portion of the functions on your HITACHI Plasma TV, the new remote control is only available for numeric entry when navigating through...
...the INPUTS menu system. MUTE BUTTON (TV) Reduces the audio level to 50% if pressed once, and to control the device selected. CHANNEL UP & DOWN BUTTONS (TV, CBL, STB, PVR/VCR) Changes up and decrease down the channel. LAST CHANNEL BUTTON (TV, SAT/CBL, PVR) Switches between ... through the the OSD, INPUTS. (-) BUTTON (TV,STB) The (-) button is used for TV mode.) INFO BUTTON (TV, STB, CBL, PVR) Displays various information on the right bottom portion of the functions on your HITACHI Plasma TV, the new remote control is only available for numeric entry when navigating through...
Owners Guide
Page 11
... for stand-by remote control. Hitachi will be turned ON/OFF manually. It can also be at stand-by mode. ባ MENU/SELECT button This button allows you if a software upgrade is required for future software upgrades. It is located on the TV screen. In order to turn the Plasma Television ON/OFF.... These buttons also serve as the cursor left (̇) and right (̈) buttons when in the top right corner of the TV screen. The Main Power button is recommended to ...
... for stand-by remote control. Hitachi will be turned ON/OFF manually. It can also be at stand-by mode. ባ MENU/SELECT button This button allows you if a software upgrade is required for future software upgrades. It is located on the TV screen. In order to turn the Plasma Television ON/OFF.... These buttons also serve as the cursor left (̇) and right (̈) buttons when in the top right corner of the TV screen. The Main Power button is recommended to ...
Owners Guide
Page 12
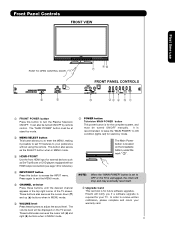
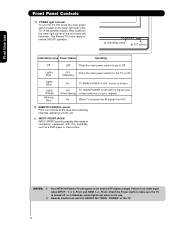
...FRONT JACKS INPUT- Your HITACHI Plasma TV will illuminate. picture is ON ; On TV MAIN POWER is shown. First time use . 2. A red stand-by ) When the main power switch on the lower right side of the TV. 12 NOTES: 1. FRONT provide composite Video jacks for remote ON/OFF operation. &#... not in use Front Panel Controls ቪ POWER light indicator To turn ON/OFF the "MAIN POWER" of the TV. The Plasma TV is set to make sure the TV is ON. On When TV receives the IR signal from R/C. ቫ REMOTE CONTROL sensor Point your remote at this capability, such as...
...FRONT JACKS INPUT- Your HITACHI Plasma TV will illuminate. picture is ON ; On TV MAIN POWER is shown. First time use . 2. A red stand-by ) When the main power switch on the lower right side of the TV. 12 NOTES: 1. FRONT provide composite Video jacks for remote ON/OFF operation. &#... not in use Front Panel Controls ቪ POWER light indicator To turn ON/OFF the "MAIN POWER" of the TV. The Plasma TV is set to make sure the TV is ON. On When TV receives the IR signal from R/C. ቫ REMOTE CONTROL sensor Point your remote at this capability, such as...
Owners Guide
Page 13
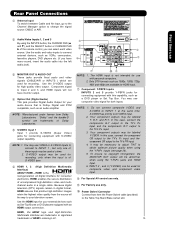
... when using the Y-PBPR jacks and HDMI Input. 6. In this case, connect the component CB output to the TV's PB input and the component CR output to the TV's PR input. 4. You may use VIDEO or S-VIDEO inputs to connect to the Table Top Stand Base swivel ...way to connect external devices, such as an audio amplifier. First time use with S-VIDEO output capability. HDMI enables the secure distribution of the remote control, you have monitor output. ብ Optical Out (Digital Audio) This jack provides Digital Audio Output for connecting equipment with personal computers. 2. ...
... when using the Y-PBPR jacks and HDMI Input. 6. In this case, connect the component CB output to the TV's PB input and the component CR output to the TV's PR input. 4. You may use VIDEO or S-VIDEO inputs to connect to the Table Top Stand Base swivel ...way to connect external devices, such as an audio amplifier. First time use with S-VIDEO output capability. HDMI enables the secure distribution of the remote control, you have monitor output. ብ Optical Out (Digital Audio) This jack provides Digital Audio Output for connecting equipment with personal computers. 2. ...
Owners Guide
Page 22
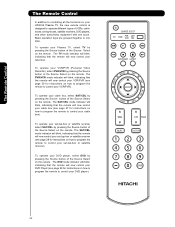
..., satellite receivers, DVD players, and other audio/video equipment with one area. The Remote Control The Remote Control In addition to controlling all the functions on your HITACHI Plasma TV, the new remote control is designed to operate different types of the Source Select on the remote. Basic operation keys are grouped together in one touch. The PVR/VCR mode indicator...
..., satellite receivers, DVD players, and other audio/video equipment with one area. The Remote Control The Remote Control In addition to controlling all the functions on your HITACHI Plasma TV, the new remote control is designed to operate different types of the Source Select on the remote. Basic operation keys are grouped together in one touch. The PVR/VCR mode indicator...

Owners Guide
Page 23
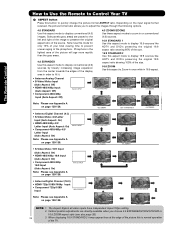
...settings, see page 50. 23 Select NIGHT for night time viewing with less brightness and º ¾ contrast for a more brightness and contrast to toggle between Day (Normal), Day (Dynamic) and Night picture mode settings. The Remote Control How to Use the Remote to Control Your TV ³ POWER ...button Press this button to turn the TV set on or off when the remote is in TV mode. (See page 22 for instructions on how to set the remote control to TV mode). ³ · MODE ...
...settings, see page 50. 23 Select NIGHT for night time viewing with less brightness and º ¾ contrast for a more brightness and contrast to toggle between Day (Normal), Day (Dynamic) and Night picture mode settings. The Remote Control How to Use the Remote to Control Your TV ³ POWER ...button Press this button to turn the TV set on or off when the remote is in TV mode. (See page 22 for instructions on how to set the remote control to TV mode). ³ · MODE ...
Owners Guide
Page 24
... STANDARD 2 Use this mode for only 15% of your total viewing time to prevent uneven aging of the source. The Remote Control How to Use the Remote to Control Your TV ´ ASPECT button Press this aspect to Zoom-in once while in all video inputs have independent Aspect Style setting. 2....sources. 16:9 STANDARD 1 Use this aspect mode to display 16:9 sources like HDTV and DVD's preserving the original 16:9 aspect ratio showing 100% of the TV. Depending on page 138-139. The Aspect Style in 16:9 aspect. • Antenna-Analog Channel • S-Video/Video Input (Auto Aspect: Off) ...
... STANDARD 2 Use this mode for only 15% of your total viewing time to prevent uneven aging of the source. The Remote Control How to Use the Remote to Control Your TV ´ ASPECT button Press this aspect to Zoom-in once while in all video inputs have independent Aspect Style setting. 2....sources. 16:9 STANDARD 1 Use this aspect mode to display 16:9 sources like HDTV and DVD's preserving the original 16:9 aspect ratio showing 100% of the TV. Depending on page 138-139. The Aspect Style in 16:9 aspect. • Antenna-Analog Channel • S-Video/Video Input (Auto Aspect: Off) ...
Owners Guide
Page 25
...2 Move SEL Select INPUT 1 Select to scroll and select the inputs that are displayed on the TV screen when available. The Aspect setting will exit all On-Screen Displays. º INPUTS button When the remote control is in (CBL) and (SAT/STB) mode. Use the CURSOR and SELECT buttons to choose ...Auto 10:00 AM Closed Caption setting Event timer When an S-VIDEO Input is in TV mode, press this button when you want to check the channel being used. The Remote Control How to Use the Remote to Control Your TV ² MENU button The MENU button will start the On-Screen Display. ¶ ...
...2 Move SEL Select INPUT 1 Select to scroll and select the inputs that are displayed on the TV screen when available. The Aspect setting will exit all On-Screen Displays. º INPUTS button When the remote control is in (CBL) and (SAT/STB) mode. Use the CURSOR and SELECT buttons to choose ...Auto 10:00 AM Closed Caption setting Event timer When an S-VIDEO Input is in TV mode, press this button when you want to check the channel being used. The Remote Control How to Use the Remote to Control Your TV ² MENU button The MENU button will start the On-Screen Display. ¶ ...
Owners Guide
Page 26
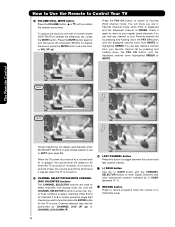
... set to AUTO (see page 55). Use the CHANNEL SELECTOR buttons to enter one more time, or VOL UP (̆). How to Use the Remote to Control Your TV ƹ VOLUME (VOL), MUTE button Press the VOLUME button (̆ or ̄) until you are used to select channels, lock access code, etc. When...
... set to AUTO (see page 55). Use the CHANNEL SELECTOR buttons to enter one more time, or VOL UP (̆). How to Use the Remote to Control Your TV ƹ VOLUME (VOL), MUTE button Press the VOLUME button (̆ or ̄) until you are used to select channels, lock access code, etc. When...
Owners Guide
Page 27
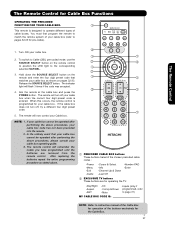
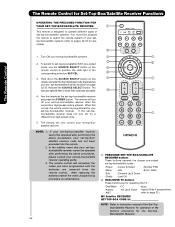
... -Menu -Exit -Guide -Cursor & Select -Info -Channel Up & Down -Last CH -Number PAD -Enter ባ EXCLUSIVE TV buttons These buttons are removed from the remote control. Aim the remote at the cable box and press the POWER button. If the cable box does not turn off , try a different four digit... batteries are for operating the TV : -Day/Night -Aspect -ANT -CC -Vol Up & Down -Mute MY CABLE BOX CODE IS: -Inputs (only if programmed, refer to page 31) NOTE: Refer to the corresponding ቢ selection SAT/CBL. ባ 3. NOTE: 1. The Remote Control for Cable Box Functions OPERATING...
... -Menu -Exit -Guide -Cursor & Select -Info -Channel Up & Down -Last CH -Number PAD -Enter ባ EXCLUSIVE TV buttons These buttons are removed from the remote control. Aim the remote at the cable box and press the POWER button. If the cable box does not turn off , try a different four digit... batteries are for operating the TV : -Day/Night -Aspect -ANT -CC -Vol Up & Down -Mute MY CABLE BOX CODE IS: -Inputs (only if programmed, refer to page 31) NOTE: Refer to the corresponding ቢ selection SAT/CBL. ባ 3. NOTE: 1. The Remote Control for Cable Box Functions OPERATING...
Owners Guide
Page 28
... -Power -Menu -Exit -Guide -Cursor & Select -Info -Channel Up & Down -Last CH -Number PAD -Enter, Dash ባ EXCLUSIVE TV buttons These buttons are removed from the remote control. To switch to set-top-box/satellite (SAT) pre-coded ባ mode, use the SOURCE SELECT button on the ቢ... the LED light to pages 32-33 for the Set-TopBox/Satellite Receiver. Aim the remote at the set -top-box/satellite systems. ቢ ቢ ባ 2. When this occurs, the remote control is programmed for operating the TV : -Day/Night -Aspect -ANT -CC -Vol Up & Down -Mute -Inputs ...
... -Power -Menu -Exit -Guide -Cursor & Select -Info -Channel Up & Down -Last CH -Number PAD -Enter, Dash ባ EXCLUSIVE TV buttons These buttons are removed from the remote control. To switch to set-top-box/satellite (SAT) pre-coded ባ mode, use the SOURCE SELECT button on the ቢ... the LED light to pages 32-33 for the Set-TopBox/Satellite Receiver. Aim the remote at the set -top-box/satellite systems. ቢ ቢ ባ 2. When this occurs, the remote control is programmed for operating the TV : -Day/Night -Aspect -ANT -CC -Vol Up & Down -Mute -Inputs ...
Owners Guide
Page 29
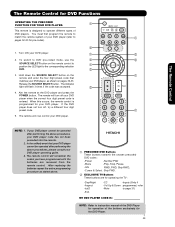
...player cannot be operated after performing the above procedures, please consult your DVD player code has not been precoded into the remote. 2. The Remote Control for operating the TV : -Day/Night -Aspect -ANT -Exit -CC -Inputs (Only if -Vol Up & Down programmed, refer -Mute..., FWD, Skip RWD, -Cursor & Select Skip FWD. ባ EXCLUSIVE TV Buttons These buttons are removed from the remote control. The indicator light will now control your DVD player. ቢ ባ 2. When this occurs, the remote control is designed to ቢ pages 32-33 for the DVD Player. 29...
...player cannot be operated after performing the above procedures, please consult your DVD player code has not been precoded into the remote. 2. The Remote Control for operating the TV : -Day/Night -Aspect -ANT -Exit -CC -Inputs (Only if -Vol Up & Down programmed, refer -Mute..., FWD, Skip RWD, -Cursor & Select Skip FWD. ባ EXCLUSIVE TV Buttons These buttons are removed from the remote control. The indicator light will now control your DVD player. ቢ ባ 2. When this occurs, the remote control is designed to ቢ pages 32-33 for the DVD Player. 29...
Owners Guide
Page 30
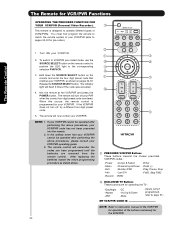
...Number PAD -Last CH -RWD -Enter -Dash (-) -Play, Pause, Stop -FWD, Skip FWD ባ EXCLUSIVE TV Buttons These buttons are removed from the remote control. Hold down the SOURCE SELECT button on the remote and enter the four digit preset code that your VCR/PVR cannot be operated after performing the above... the TV : -Day/Night -Aspect -ANT -CC -Vol Up & Down -Mute -Inputs (only if programmed, refer to page 31) MY VCR/PVR CODE IS: NOTE: Refer to pages 32-33 for your PVR when the correct four digit preset code is programmed for pre-codes). ቢ The Remote Control ባ...
...Number PAD -Last CH -RWD -Enter -Dash (-) -Play, Pause, Stop -FWD, Skip FWD ባ EXCLUSIVE TV Buttons These buttons are removed from the remote control. Hold down the SOURCE SELECT button on the remote and enter the four digit preset code that your VCR/PVR cannot be operated after performing the above... the TV : -Day/Night -Aspect -ANT -CC -Vol Up & Down -Mute -Inputs (only if programmed, refer to page 31) MY VCR/PVR CODE IS: NOTE: Refer to pages 32-33 for your PVR when the correct four digit preset code is programmed for pre-codes). ቢ The Remote Control ባ...
Owners Guide
Page 31
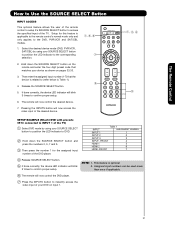
... 1 INPUT ASSIGNMENT NUMBER INPUT 1 1 INPUT 2 2 INPUT 3 3 INPUT- FRONT 4 HDMI 1 5 HDMI 2 6 HDMI- NOTE: 1. SETUP EXAMPLE (Hitachi DVD with precode 0573 connected to INPUT 1 of the TV) ᕃ Select DVD mode by using your SOURCE SELECT button to position the LED indicator to DVD. ᕄ Hold down the...optional feature allows the user of the remote control to setup it's SOURCE SELECT button to the DVD, PVR/VCR and SAT/CBL modes. 1. Setup for the assigned input number of the TV. This feature is applicable to the remote control's normal mode only and only applies ...
... 1 INPUT ASSIGNMENT NUMBER INPUT 1 1 INPUT 2 2 INPUT 3 3 INPUT- FRONT 4 HDMI 1 5 HDMI 2 6 HDMI- NOTE: 1. SETUP EXAMPLE (Hitachi DVD with precode 0573 connected to INPUT 1 of the TV) ᕃ Select DVD mode by using your SOURCE SELECT button to position the LED indicator to DVD. ᕄ Hold down the...optional feature allows the user of the remote control to setup it's SOURCE SELECT button to the DVD, PVR/VCR and SAT/CBL modes. 1. Setup for the assigned input number of the TV. This feature is applicable to the remote control's normal mode only and only applies ...

Owners Guide
Page 32
The Remote Control Remote Control Codes Cable BRAND Codes ABC 0003,0008,0011 Americast 0899 Amino 1602 Bell South 0899 Clearmaster 0883 ClearMax 0883 Coolmax 0883 Digeo 1187 Director 0476 General Instrument.. 0476,0810,0276,0003, 0011 GoldStar 0144 Hamlin 0009,0273 Hitachi 0011,1421 i3 Micro... 0037,0038,1237 Gradiente 0000 Harley Davidson 0000 Harman/Kardon 0081,0038 Harwood 0072 Headquarter 0046 Hewlett Packard 1972 HI-Q 0047 Hitachi 0000,0042,0041,0065, 0089, 0105, 0543, 0544 Howard Computers ....... 1972 HP 1972 Hughes Network System.0042,0739 Humax...
The Remote Control Remote Control Codes Cable BRAND Codes ABC 0003,0008,0011 Americast 0899 Amino 1602 Bell South 0899 Clearmaster 0883 ClearMax 0883 Coolmax 0883 Digeo 1187 Director 0476 General Instrument.. 0476,0810,0276,0003, 0011 GoldStar 0144 Hamlin 0009,0273 Hitachi 0011,1421 i3 Micro... 0037,0038,1237 Gradiente 0000 Harley Davidson 0000 Harman/Kardon 0081,0038 Harwood 0072 Headquarter 0046 Hewlett Packard 1972 HI-Q 0047 Hitachi 0000,0042,0041,0065, 0089, 0105, 0543, 0544 Howard Computers ....... 1972 HP 1972 Hughes Network System.0042,0739 Humax...

Owners Guide
Page 34
... to select. 3. Press EXIT on your HITACHI Plasma TV. Video Audio Channel Manager Locks Timers Setup Power Swivel Move SEL Select This part of the screen shows which selections are for more reddish color. doesn't reflect the actual apearance of the OSD of the screen shows which Remote Control buttons to Standard for standard colors...
... to select. 3. Press EXIT on your HITACHI Plasma TV. Video Audio Channel Manager Locks Timers Setup Power Swivel Move SEL Select This part of the screen shows which selections are for more reddish color. doesn't reflect the actual apearance of the OSD of the screen shows which Remote Control buttons to Standard for standard colors...

Owners Guide
Page 54
... quit menu or select SET THE INPUTS to return to select between the Off and Auto settings. On-Screen Display 54 If no remote control button is pressed after the TV is turned on. Setup Setup The Menu Options Set The Screen Saver Set The Inputs Set The Closed Captions Select The Quick... been turned on using the AUTO LINK feature, it detects a video signal to INPUT 3. Off Select OFF to disable this , turn your TV as described above. 2. NOTE: 1. This is now reset and will automatically turn off after three hours. Press the CURSOR PAD ̆, ̄ to highlight the ...
... quit menu or select SET THE INPUTS to return to select between the Off and Auto settings. On-Screen Display 54 If no remote control button is pressed after the TV is turned on. Setup Setup The Menu Options Set The Screen Saver Set The Inputs Set The Closed Captions Select The Quick... been turned on using the AUTO LINK feature, it detects a video signal to INPUT 3. Off Select OFF to disable this , turn your TV as described above. 2. NOTE: 1. This is now reset and will automatically turn off after three hours. Press the CURSOR PAD ̆, ̄ to highlight the ...


