Owners Guide
Page 3
...moving images are displayed for about 6 minutes. For product recycling and disposal information, contact your HITACHI Factory Warranty. Note • There are no user serviceable parts inside the plasma television. • Model and serial numbers are indicated on the screen for more information call... broadcast by HITACHI could void the user's warranty. Caution Never remove the back cover of the plasma television. If still images are left on back side and right side of the plasma television as improper changes or modifications not expressly approved by TV stations and ...
...moving images are displayed for about 6 minutes. For product recycling and disposal information, contact your HITACHI Factory Warranty. Note • There are no user serviceable parts inside the plasma television. • Model and serial numbers are indicated on the screen for more information call... broadcast by HITACHI could void the user's warranty. Caution Never remove the back cover of the plasma television. If still images are left on back side and right side of the plasma television as improper changes or modifications not expressly approved by TV stations and ...

Owners Guide
Page 4
...Please visit our For optional accessories, please access our web site at: website for the 55" models is WM07S and for optional www.hitachi.us/tv accessories. Match the batteries to swell or rupture resulting in the battery Bottom View (Remote Control) compartment. 4. Wall Mount unit is ...; Wire Clamp (50" models only) First time use of the remote control by pushing down and sliding the back cover off. 2. This plasma television product is an optional accessory (Not Included). ³ Remote Control Unit CLU-4371UG2 (Part No HL02075 only H401 series) Remote Control Unit...
...Please visit our For optional accessories, please access our web site at: website for the 55" models is WM07S and for optional www.hitachi.us/tv accessories. Match the batteries to swell or rupture resulting in the battery Bottom View (Remote Control) compartment. 4. Wall Mount unit is ...; Wire Clamp (50" models only) First time use of the remote control by pushing down and sliding the back cover off. 2. This plasma television product is an optional accessory (Not Included). ³ Remote Control Unit CLU-4371UG2 (Part No HL02075 only H401 series) Remote Control Unit...
Owners Guide
Page 5
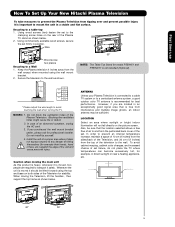
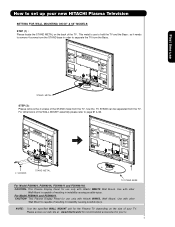
...system, a good outdoor color TV antenna is not included (Optional). Using commercially available wood screws, secure the set failure, do not place the TV where temperatures can become excessively hot, for stability. First time use How To Set Up Your New Hitachi Plasma Television To take measures to ...prevent the Plasma Television from tipping over and prevent possible injury it is ...
...system, a good outdoor color TV antenna is not included (Optional). Using commercially available wood screws, secure the set failure, do not place the TV where temperatures can become excessively hot, for stability. First time use How To Set Up Your New Hitachi Plasma Television To take measures to ...prevent the Plasma Television from tipping over and prevent possible injury it is ...
Owners Guide
Page 6
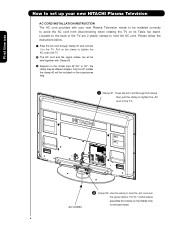
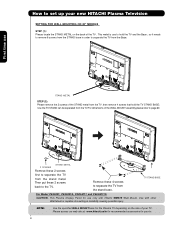
.... ³ Clamp #1 : Pass the AC cord through Clamp #1 and connect it to the TV. AC CORD · Clamp #2: Use this clamp to hold the AC cord. First time use How to set up your new HITACHI Plasma Television AC CORD INSTALLATION INSTRUCTION The AC cord provided with Clamp #2. » Depend on the... model size 42",50" or 55", the clamp may be installed correctly to avoid the AC cord from disconnecting when rotating the TV on its Table top stand.
.... ³ Clamp #1 : Pass the AC cord through Clamp #1 and connect it to the TV. AC CORD · Clamp #2: Use this clamp to hold the AC cord. First time use How to set up your new HITACHI Plasma Television AC CORD INSTALLATION INSTRUCTION The AC cord provided with Clamp #2. » Depend on the... model size 42",50" or 55", the clamp may be installed correctly to avoid the AC cord from disconnecting when rotating the TV on its Table top stand.
Owners Guide
Page 7
...possible injury. Use with Hitachi WM07L Wall Mount. Use with Hitachi WM07S Wall Mount. Please access our web site at: www.hitachi.us/tv for recommended accessories for the Plasma TV depending on the back of the TV . First time use How to set up your new HITACHI Plasma Television SETTING FOR WALL... separate the TV from the TV. For Model P55H401 and P55H4011 CAUTION- This Plasma Display Panel for use only with other Wall Mount is capable of the WALL MOUNT assembly please refer to page 61 & 62. 4 SCREWS STAND METAL TV STAND BASE For Model P50H401, P50H401A, P50H4011 and P50H4011A...
...possible injury. Use with Hitachi WM07L Wall Mount. Use with Hitachi WM07S Wall Mount. Please access our web site at: www.hitachi.us/tv for recommended accessories for the Plasma TV depending on the back of the TV . First time use How to set up your new HITACHI Plasma Television SETTING FOR WALL... separate the TV from the TV. For Model P55H401 and P55H4011 CAUTION- This Plasma Display Panel for use only with other Wall Mount is capable of the WALL MOUNT assembly please refer to page 61 & 62. 4 SCREWS STAND METAL TV STAND BASE For Model P50H401, P50H401A, P50H4011 and P50H4011A...
Owners Guide
Page 8
... base in instability causing possible injury. NOTE: Use the specified WALL MOUNT base for the Plasma TV depending on the back of resulting in order to hold the TV STAND BASE; Please access our web site at: www.hitachi.us/tv for recommended accessories for use STAND METAL STEP (2): Please remove the 2 screws of the...
... base in instability causing possible injury. NOTE: Use the specified WALL MOUNT base for the Plasma TV depending on the back of resulting in order to hold the TV STAND BASE; Please access our web site at: www.hitachi.us/tv for recommended accessories for use STAND METAL STEP (2): Please remove the 2 screws of the...

Owners Guide
Page 9
... at least four feet from the side of the picture screen center. Plug the adapter into the antenna terminal on the screen. Consult your new HITACHI Plasma Television VIEWING The best picture is recommended. 9 First time use How to set up your dealer or service store for best performance. 4" Minimum L ...S 80 BEST HORIZONTAL 5' 10' 15' 20' VIEWING ANGLE 80 S ANTENNA CONNECTIONS TO REAR JACK PANEL VHF (75-Ohm) antenna/CATV (Cable TV) When using a 300-Ohm twin lead from an outdoor antenna, connect the VHF or UHF antenna leads to screws of the VHF or UHF adapter...
... at least four feet from the side of the picture screen center. Plug the adapter into the antenna terminal on the screen. Consult your new HITACHI Plasma Television VIEWING The best picture is recommended. 9 First time use How to set up your dealer or service store for best performance. 4" Minimum L ...S 80 BEST HORIZONTAL 5' 10' 15' 20' VIEWING ANGLE 80 S ANTENNA CONNECTIONS TO REAR JACK PANEL VHF (75-Ohm) antenna/CATV (Cable TV) When using a 300-Ohm twin lead from an outdoor antenna, connect the VHF or UHF antenna leads to screws of the VHF or UHF adapter...
Owners Guide
Page 11
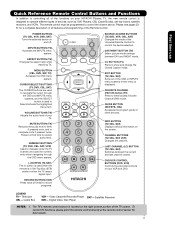
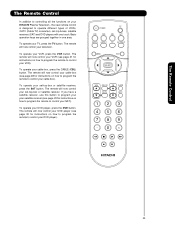
... when the remote is designed to operate different types of the Remote Control. EXIT BUTTON (TV, CBL, SAT) Exits out of the TV screen. GUIDE BUTTON (SAT/STB, CBL) Accesses the program guide of your HITACHI Plasma TV, the new remote control is in Set-Top-Box (STB) mode or when the... TV uses a digital input. DVD/VCR CONTROL BUTTONS (DVD, VCR) Controls the precode functions of other devices. Video Cassette Recorder/Player SAT- To control TV functions, please point the remote...
... when the remote is designed to operate different types of the Remote Control. EXIT BUTTON (TV, CBL, SAT) Exits out of the TV screen. GUIDE BUTTON (SAT/STB, CBL) Accesses the program guide of your HITACHI Plasma TV, the new remote control is in Set-Top-Box (STB) mode or when the... TV uses a digital input. DVD/VCR CONTROL BUTTONS (DVD, VCR) Controls the precode functions of other devices. Video Cassette Recorder/Player SAT- To control TV functions, please point the remote...
Owners Guide
Page 12
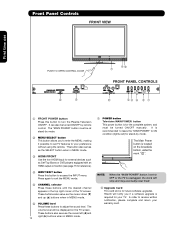
.../SELECT button This button allows you if a software upgrade is recommended to leave the "MAIN POWER" to turn the Plasma Television ON/OFF. The Main Power button is located on the TV screen. Hitachi will stop and may eventually reset itself. ቩ Upgrade Card This card slot is for stand-by mode. Press... button This power button is for your warranty card. This button also serves as the SELECT button when in the top right corner of the TV screen. The volume level will be turned ON/OFF by remote control. NOTE: When the "MAIN POWER" button is set to OFF or the...
.../SELECT button This button allows you if a software upgrade is recommended to leave the "MAIN POWER" to turn the Plasma Television ON/OFF. The Main Power button is located on the TV screen. Hitachi will stop and may eventually reset itself. ቩ Upgrade Card This card slot is for stand-by mode. Press... button This power button is for your warranty card. This button also serves as the SELECT button when in the top right corner of the TV screen. The volume level will be turned ON/OFF by remote control. NOTE: When the "MAIN POWER" button is set to OFF or the...
Owners Guide
Page 13
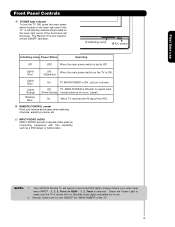
...the main power switch on the lower right corner of the TV. 13 signal). On When TV receives the IR signal from R/C. ቫ REMOTE CONTROL sensor Point your remote at this capability, such as a DVD player or Camcorders. Your HITACHI Plasma TV will illuminate. First time use . 2. A red stand-...by indicator lamp located on the TV is ON. (Stand-by mode (lights red) when not in use Front Panel Controls ቪ POWER...
...the main power switch on the lower right corner of the TV. 13 signal). On When TV receives the IR signal from R/C. ቫ REMOTE CONTROL sensor Point your remote at this capability, such as a DVD player or Camcorders. Your HITACHI Plasma TV will illuminate. First time use . 2. A red stand-...by indicator lamp located on the TV is ON. (Stand-by mode (lights red) when not in use Front Panel Controls ቪ POWER...
Owners Guide
Page 16
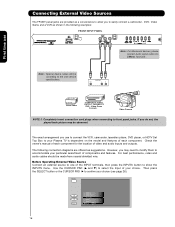
First time use to connect the VCR, camcorder, laserdisc player, DVD player, or HDTV Set Top Box to your Plasma TV is dependent on the model and features of video and audio inputs and outputs. Video Camera NOTE:1. If you to easily connect a camcorder , DVD, Video ...
First time use to connect the VCR, camcorder, laserdisc player, DVD player, or HDTV Set Top Box to your Plasma TV is dependent on the model and features of video and audio inputs and outputs. Video Camera NOTE:1. If you to easily connect a camcorder , DVD, Video ...
Owners Guide
Page 22
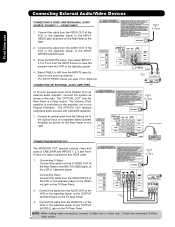
... Panel. 2. NOTE: When making video connections, connect S-Video only or Video only. Connect the cable from the VIDEO INPUT of the Plasma TV to the OUTPUT (AUDIO/R) jack on the TV Rear Panel. The OPTICAL OUT terminal outputs all audio sources with Optical IN capability. 1. Select CABLE or AIR from the INPUTS menu... to return to view the program from the AUDIO IN R of the VCR or the laserdisc player to the OUTPUT (AUDIO/L) jack on the TV Rear Panel. The "OPTICAL OUT" from the S-VIDEO OUT of the Rear Panel to the INPUT (VIDEO) jack, as shown on the Rear Panel on...
... Panel. 2. NOTE: When making video connections, connect S-Video only or Video only. Connect the cable from the VIDEO INPUT of the Plasma TV to the OUTPUT (AUDIO/R) jack on the TV Rear Panel. The OPTICAL OUT terminal outputs all audio sources with Optical IN capability. 1. Select CABLE or AIR from the INPUTS menu... to return to view the program from the AUDIO IN R of the VCR or the laserdisc player to the OUTPUT (AUDIO/L) jack on the TV Rear Panel. The "OPTICAL OUT" from the S-VIDEO OUT of the Rear Panel to the INPUT (VIDEO) jack, as shown on the Rear Panel on...
Owners Guide
Page 23
... the SAT button. The remote will now control your VCR (see page 30 for instructions on your HITACHI Plasma Television , the new remote control is designed to operate different types of VCRs, CATV (Cable TV) converters, set-top-boxes, satellite receivers (SAT) and DVD players with one area. To operate ...your DVD player, press the DVD button. To operate your TV, press the TV button. To operate your cable box, press the CABLE (CBL) button. The remote will now control your DVD player (see page 31 for...
... the SAT button. The remote will now control your VCR (see page 30 for instructions on your HITACHI Plasma Television , the new remote control is designed to operate different types of VCRs, CATV (Cable TV) converters, set-top-boxes, satellite receivers (SAT) and DVD players with one area. To operate ...your DVD player, press the DVD button. To operate your TV, press the TV button. To operate your cable box, press the CABLE (CBL) button. The remote will now control your DVD player (see page 31 for...
Owners Guide
Page 32
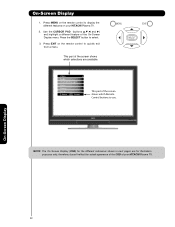
Video Audio Channel Manager Locks Timers Setup Move SEL Select This part of your HITACHI Plasma TV. 2. doesn't reflect the actual apearance of the OSD of the screen shows which selections are for illustration purposes only, therefore; Press the SELECT button to ...) for the different submenus shown in next pages are available. This part of the On-Screen Display menu. On-Screen Display 1. Press MENU on your HITACHI Plasma TV.
Video Audio Channel Manager Locks Timers Setup Move SEL Select This part of your HITACHI Plasma TV. 2. doesn't reflect the actual apearance of the OSD of the screen shows which selections are for illustration purposes only, therefore; Press the SELECT button to ...) for the different submenus shown in next pages are available. This part of the On-Screen Display menu. On-Screen Display 1. Press MENU on your HITACHI Plasma TV.
Owners Guide
Page 35
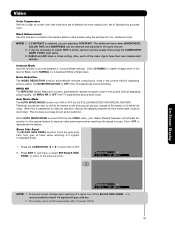
... PANEL to return to Off automatically after TV power Off/On. 35 This setting return to the previous menu. NOTE: 1. It may be reconciled. Black Side Panel The BLACK SIDE PANEL function turns the gray side bars from the VIDEO menu, your Hitachi Plasma Television will activate the circuitry for this ... 2 Contrast Mode settings. CABLE and AIR share a Video setting. Set to DYNAMIC for darker images more natural color, set to OFF if the TV experiences picture blocking. When film is selected, you are shot on film at 24 frames or still pictures per second, instead of 30 frames or...
... PANEL to return to Off automatically after TV power Off/On. 35 This setting return to the previous menu. NOTE: 1. It may be reconciled. Black Side Panel The BLACK SIDE PANEL function turns the gray side bars from the VIDEO menu, your Hitachi Plasma Television will activate the circuitry for this ... 2 Contrast Mode settings. CABLE and AIR share a Video setting. Set to DYNAMIC for darker images more natural color, set to OFF if the TV experiences picture blocking. When film is selected, you are shot on film at 24 frames or still pictures per second, instead of 30 frames or...

Owners Guide
Page 37
... adjusting OR Bass 50% treble. Balance This function will control the left to enhance the low frequency audio performance of the Plasma TV internal speakers. Audio Audio Select AUDIO to adjust the TV to your speaker system. Use CURSOR PAD ̆ or ̄ to enjoy sound playback in the same manner. Wide surround...
... adjusting OR Bass 50% treble. Balance This function will control the left to enhance the low frequency audio performance of the Plasma TV internal speakers. Audio Audio Select AUDIO to adjust the TV to your speaker system. Use CURSOR PAD ̆ or ̄ to enjoy sound playback in the same manner. Wide surround...
Owners Guide
Page 49
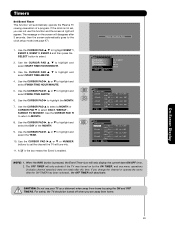
...) were not made after this function and the screen at right will appear. CAUTION: Do not use this time. For safety, the TV should be turned off when you change the channel or operate the menu after 3 seconds, then the screen automatically goes to highlight the ...AM AM Jan. 1 2007 Cable ------- ❑ Event4 : -- : -- When the INFO button is enabled. Timers Set Event Timer This function will automatically operate the Plasma TV viewing reservation of the MONTH. 9. Use the CURSOR PAD ̈, ̆ or ̄ to select. 2. Use the CURSOR PAD ̆, ̄ to highlight ...
...) were not made after this function and the screen at right will appear. CAUTION: Do not use this time. For safety, the TV should be turned off when you change the channel or operate the menu after 3 seconds, then the screen automatically goes to highlight the ...AM AM Jan. 1 2007 Cable ------- ❑ Event4 : -- : -- When the INFO button is enabled. Timers Set Event Timer This function will automatically operate the Plasma TV viewing reservation of the MONTH. 9. Use the CURSOR PAD ̈, ̆ or ̄ to select. 2. Use the CURSOR PAD ̆, ̄ to highlight ...
Owners Guide
Page 57
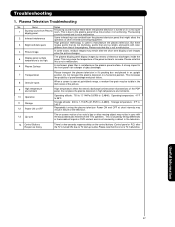
...5 Display panel surface temperature is seen at short intervals may remain after the TV is not a TV malfunction. This is due to the plasma panel drive circuit when it 's packing box and placed in it is used to TV start-up routine. The buzzing sound is normal and is not a malfunction. ...2 Infrared interference Some infrared rays are too bright, and points with the associated audio heard from Plasma display panel. The plasma display panel display images by a defect in...
...5 Display panel surface temperature is seen at short intervals may remain after the TV is not a TV malfunction. This is due to the plasma panel drive circuit when it 's packing box and placed in it is used to TV start-up routine. The buzzing sound is normal and is not a malfunction. ...2 Infrared interference Some infrared rays are too bright, and points with the associated audio heard from Plasma display panel. The plasma display panel display images by a defect in...


