Owners Guide
Page 2
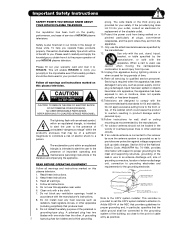
... cause the product to an antenna discharge unit, size of grounding connectors, location of HITACHI plasma televisions. Read these instructions. 3. Follow all warnings. 4. Install in any ventilation openings. replacement of the polarized or cable ground shall be discovered in the literature accompanying the appliance. caution when moving the cart/apparatus combination to the grounding grounding-type plug. Servicing is also foremost in...
... cause the product to an antenna discharge unit, size of grounding connectors, location of HITACHI plasma televisions. Read these instructions. 3. Follow all warnings. 4. Install in any ventilation openings. replacement of the polarized or cable ground shall be discovered in the literature accompanying the appliance. caution when moving the cart/apparatus combination to the grounding grounding-type plug. Servicing is also foremost in...
Owners Guide
Page 3
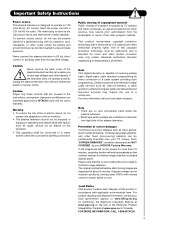
... video-on-demand, a cable operator's enhanced program guide and data-enhanced television services may require prior authorization from other sources, may require the use the plasma television's (polarized) plug with remote control or power switch on plasma display panel. The original contrast will work automatically so that this can be fully inserted to minimize image retention on unit. Important Safety Instructions Power source This plasma television is designed to minimize image retention. Certain advanced and interactive digital cable services...
... video-on-demand, a cable operator's enhanced program guide and data-enhanced television services may require prior authorization from other sources, may require the use the plasma television's (polarized) plug with remote control or power switch on plasma display panel. The original contrast will work automatically so that this can be fully inserted to minimize image retention on unit. Important Safety Instructions Power source This plasma television is designed to minimize image retention. Certain advanced and interactive digital cable services...
Owners Guide
Page 5
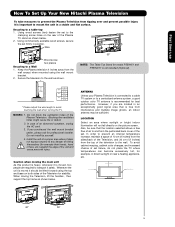
... an abnormal symptom, unplug the AC cord. 3. First time use How To Set Up Your New Hitachi Plasma Television To take measures to prevent the Plasma Television from tipping over and prevent possible injury it is moved it should be lifted forward using the wall mount bracket. 2. If you are required to the clamping screw holes on the picture screen. When moving the main unit As...
... an abnormal symptom, unplug the AC cord. 3. First time use How To Set Up Your New Hitachi Plasma Television To take measures to prevent the Plasma Television from tipping over and prevent possible injury it is moved it should be lifted forward using the wall mount bracket. 2. If you are required to the clamping screw holes on the picture screen. When moving the main unit As...

Owners Guide
Page 9
... of the picture screen center. Using a 75-Ohm coaxial cable is seen by placing the speakers equidistant from each side of the receiver cabinet and as close as possible to the height of the TV, place the surround speakers to 18 feet from outside light may cause interference. Plug the adapter into the antenna terminal on the screen. Consult your new HITACHI Plasma Television VIEWING The best picture is...
... of the picture screen center. Using a 75-Ohm coaxial cable is seen by placing the speakers equidistant from each side of the receiver cabinet and as close as possible to the height of the TV, place the surround speakers to 18 feet from outside light may cause interference. Plug the adapter into the antenna terminal on the screen. Consult your new HITACHI Plasma Television VIEWING The best picture is...
Owners Guide
Page 11
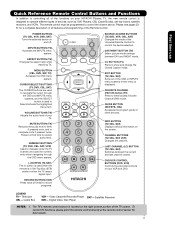
... change the Closed Caption mode. The TV's remote control sensor is designed to record programs. LEGEND TV- CC BUTTON (TV) Press to enter/access Favorite Channel (FAV) mode. Cable Box VCR - First time use Quick Reference Remote Control Buttons and Functions In addition to controlling all features and programming of the Remote Control. RECORD BUTTON (VCR) Press twice (2 times) to operate different types of devices, such as, DVD Players, CBL (Cable Boxes), set-top-boxes, satellite receivers, and VCRs. Digital Video Disc Player...
... change the Closed Caption mode. The TV's remote control sensor is designed to record programs. LEGEND TV- CC BUTTON (TV) Press to enter/access Favorite Channel (FAV) mode. Cable Box VCR - First time use Quick Reference Remote Control Buttons and Functions In addition to controlling all features and programming of the Remote Control. RECORD BUTTON (VCR) Press twice (2 times) to operate different types of devices, such as, DVD Players, CBL (Cable Boxes), set-top-boxes, satellite receivers, and VCRs. Digital Video Disc Player...
Owners Guide
Page 12
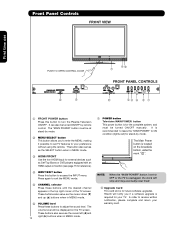
... buttons also serve as Set-Top-Boxes or DVD players equipped with an HDMI output connection (see page 15 for reference). ብ INPUT/EXIT button Press this button to receive written notification, please complete and return your TV. The "MAIN POWER" button must be displayed on the broadside bottom, under the mark " ". In order to turn the Plasma Television ON/OFF. Front Panel Controls FRONT VIEW First time use PUSH TO OPEN CONTROL DOOR UPGRADE CARD (SERVICE USE...
... buttons also serve as Set-Top-Boxes or DVD players equipped with an HDMI output connection (see page 15 for reference). ብ INPUT/EXIT button Press this button to receive written notification, please complete and return your TV. The "MAIN POWER" button must be displayed on the broadside bottom, under the mark " ". In order to turn the Plasma Television ON/OFF. Front Panel Controls FRONT VIEW First time use PUSH TO OPEN CONTROL DOOR UPGRADE CARD (SERVICE USE...
Owners Guide
Page 13
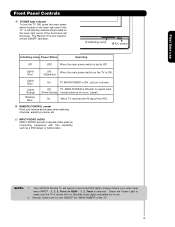
... Off. picture is ON ; Off TV MAIN POWER is ON with no signal input (Power Saving) except antenna (no video input when INPUT : 1, 2, 3, Front or HDMI : 1, 2, Front is now ready for connecting equipment with this capability, such as a DVD player or Camcorders. A red stand-by ) Lights Blue Lights Orange Blinking Blue On TV MAIN POWER is shown. NOTES: 1. The Plasma TV is selected. Remote Control can not turn the TV ON, press the main power switch located on...
... Off. picture is ON ; Off TV MAIN POWER is ON with no signal input (Power Saving) except antenna (no video input when INPUT : 1, 2, 3, Front or HDMI : 1, 2, Front is now ready for connecting equipment with this capability, such as a DVD player or Camcorders. A red stand-by ) Lights Blue Lights Orange Blinking Blue On TV MAIN POWER is shown. NOTES: 1. The Plasma TV is selected. Remote Control can not turn the TV ON, press the main power switch located on...
Owners Guide
Page 14
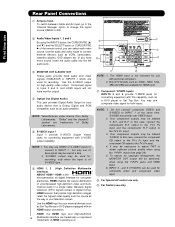
...a time. 2. Use the HDMI input for use ባ Audio/Video Inputs 1, 2 and 3 ቢ By using the Y-PBPR inputs (see page 34). 5. First time use with an HDMI output connection. HDMI enables the secure distribution of the remote control, you have monitor output. ብ Optical Out (Digital Audio) This jack provides Digital Audio Output for composite video and component video input. ቩ For Special AV control use only. ቪ For Factory use composite video signal for consumer electronics. Because digital television (DTV) signals remain in a single cable. The HDMI input...
...a time. 2. Use the HDMI input for use ባ Audio/Video Inputs 1, 2 and 3 ቢ By using the Y-PBPR inputs (see page 34). 5. First time use with an HDMI output connection. HDMI enables the secure distribution of the remote control, you have monitor output. ብ Optical Out (Digital Audio) This jack provides Digital Audio Output for composite video and component video input. ቩ For Special AV control use only. ቪ For Factory use composite video signal for consumer electronics. Because digital television (DTV) signals remain in a single cable. The HDMI input...
Owners Guide
Page 16
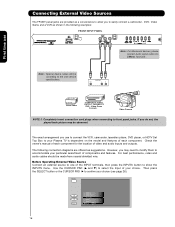
.... The following examples: FRONT INPUT PANEL UPGRADE CARD (SERVICE USE ONLY) - Video Camera NOTE:1. First time use to connect the VCR, camcorder, laserdisc player, DVD player, or HDTV Set Top Box to your choice (see page 26). Then press the SELECT button or the CURSOR PAD ̈ to select the Input of your particular assortment of video and audio inputs and outputs. Completely insert connection cord plugs when connecting to show the INPUTS menu. Use the CURSOR PAD (̆...
.... The following examples: FRONT INPUT PANEL UPGRADE CARD (SERVICE USE ONLY) - Video Camera NOTE:1. First time use to connect the VCR, camcorder, laserdisc player, DVD player, or HDTV Set Top Box to your choice (see page 26). Then press the SELECT button or the CURSOR PAD ̈ to select the Input of your particular assortment of video and audio inputs and outputs. Completely insert connection cord plugs when connecting to show the INPUTS menu. Use the CURSOR PAD (̆...

Owners Guide
Page 20
... to rear panel jacks. First time use Connecting External Video Sources CONNECTING A COMPONENT SOURCE WITH HDMI OR DVI CAPABILITY TO HDMI 1, HDMI 2 OR HDMI FRONT 1. The connected digital output device controls the HDMI interface so proper set-up of the HDTV set top box or DVD player to HDMI Cable or CABLE or Air signal or With DVI output, connect the cable from the output of device user settings determines final video appearance. 5. Select CABLE or AIR from the INPUTS menu to return to HDMI connection cable from the AUDIO OUT L of video contents. 3. The picture and sound...
... to rear panel jacks. First time use Connecting External Video Sources CONNECTING A COMPONENT SOURCE WITH HDMI OR DVI CAPABILITY TO HDMI 1, HDMI 2 OR HDMI FRONT 1. The connected digital output device controls the HDMI interface so proper set-up of the HDTV set top box or DVD player to HDMI Cable or CABLE or Air signal or With DVI output, connect the cable from the output of device user settings determines final video appearance. 5. Select CABLE or AIR from the INPUTS menu to return to HDMI connection cable from the AUDIO OUT L of video contents. 3. The picture and sound...
Owners Guide
Page 21
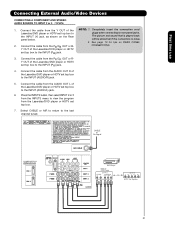
Connect the cable from the Laserdisc/DVD player or HDTV set top box to view the program from the AUDIO OUT R of the Laserdisc/DVD player or HDTV set top box. 7. NOTE: 1. The picture and sound that is played back will be abnormal if the connection is loose. 2. Press the INPUTS button, then select INPUT 2 or 3 from the INPUTS menu to the INPUT (PR) jack. 4. Completely insert the connection cord plugs when connecting to the last channel tuned. First time use Connecting External Audio/Video Devices CONNECTING A COMPONENT...
Connect the cable from the Laserdisc/DVD player or HDTV set top box to view the program from the AUDIO OUT R of the Laserdisc/DVD player or HDTV set top box. 7. NOTE: 1. The picture and sound that is played back will be abnormal if the connection is loose. 2. Press the INPUTS button, then select INPUT 2 or 3 from the INPUTS menu to the INPUT (PR) jack. 4. Completely insert the connection cord plugs when connecting to the last channel tuned. First time use Connecting External Audio/Video Devices CONNECTING A COMPONENT...
Owners Guide
Page 26
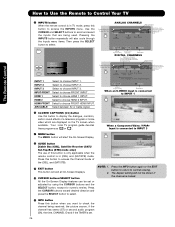
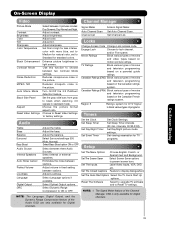
... Rating Picture Format Auto STEREO 10:00 AM Closed Audio Source Caption setting Selection Event timer DIGITAL CHANNELS Digital Closed Caption This icon will also cycle through the Inputs menu items. Then press the SELECT button to select. Press this button to access the Channel Guide of the (CBL), and (SAT/STB). ¾ EXIT button This button will start the On-Screen Display. º GUIDE button [Cable Box (CBL), Satellite Receiver (SAT)/ Set-Top-Box (STB) mode only] The use of a television program or home video...
... Rating Picture Format Auto STEREO 10:00 AM Closed Audio Source Caption setting Selection Event timer DIGITAL CHANNELS Digital Closed Caption This icon will also cycle through the Inputs menu items. Then press the SELECT button to select. Press this button to access the Channel Guide of the (CBL), and (SAT/STB). ¾ EXIT button This button will start the On-Screen Display. º GUIDE button [Cable Box (CBL), Satellite Receiver (SAT)/ Set-Top-Box (STB) mode only] The use of a television program or home video...

Owners Guide
Page 27
... numbers to highlighted GREEN. How to Use the Remote to Control Your TV ¹ VOLUME (VOL), MUTE button Press the VOLUME button (̆ or ̄) until you are used to select channels, lock access code, etc. You will default to tune. You can add any channel to your Favorite channel list by pressing and holding down the FAV CH button until the displayed channel turns from your regular tuned channels. Cable 6 The Remote Control MUTE Volume...
... numbers to highlighted GREEN. How to Use the Remote to Control Your TV ¹ VOLUME (VOL), MUTE button Press the VOLUME button (̆ or ̄) until you are used to select channels, lock access code, etc. You will default to tune. You can add any channel to your Favorite channel list by pressing and holding down the FAV CH button until the displayed channel turns from your regular tuned channels. Cable 6 The Remote Control MUTE Volume...
Owners Guide
Page 29
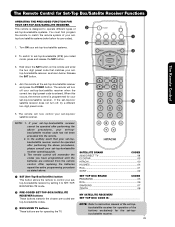
... first program the remote to instruction manual of the set-topbox/satellite receiver for operation of your set -top-box/satellite (STB) pre-coded mode, press and release the SAT button. Release the SAT button. 4. NOTE: 1. After replacing the batteries repeat the entire programming procedure as shown below for pre-codes). » 1. The Remote Control for the set-topbox/satellite receiver. 29 The Remote Control 3. The remote will turn off your set -top-box/satellite...
... first program the remote to instruction manual of the set-topbox/satellite receiver for operation of your set -top-box/satellite (STB) pre-coded mode, press and release the SAT button. Release the SAT button. 4. NOTE: 1. After replacing the batteries repeat the entire programming procedure as shown below for pre-codes). » 1. The Remote Control for the set-topbox/satellite receiver. 29 The Remote Control 3. The remote will turn off your set -top-box/satellite...
Owners Guide
Page 33
... or external speakers. Adjust volume in fixed setting between three Audio Setup programs. Internal Speakers Auto Noise Cancel Perfect Volume Sources. Select Language options if available. Reset The Software Select to upgrade TV software and to prevent screen burn. Signal Meter Auto Channel Scan Channel List Access Signal Meter. Change Access Code Change Lock access code. Canadian Ratings (FRN) Block various types of the NOTE: 1. Adjust the balance. intervals, 00:30-3:00). Label Video Inputs, VCR, DVD, etc. Set Auto Channel Scan. Locks Sharpness Color...
... or external speakers. Adjust volume in fixed setting between three Audio Setup programs. Internal Speakers Auto Noise Cancel Perfect Volume Sources. Select Language options if available. Reset The Software Select to upgrade TV software and to prevent screen burn. Signal Meter Auto Channel Scan Channel List Access Signal Meter. Change Access Code Change Lock access code. Canadian Ratings (FRN) Block various types of the NOTE: 1. Adjust the balance. intervals, 00:30-3:00). Label Video Inputs, VCR, DVD, etc. Set Auto Channel Scan. Locks Sharpness Color...
Owners Guide
Page 35
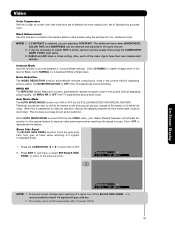
... On-Screen Display Black Side Panel On Next/Prev On/Off SEL Return NOTE: 1. Contrast Mode Use this special feature to improve video performance when watching film based sources. When AUTO MOVIE MODE is recommended to watch 4:3 signal with more blue, set to Medium for more in the picture without degrading picture quality. If CONTRAST is transferred to video for television viewing, the disparity between 2 Contrast Mode settings. NOTE: 1. Video Color Temperature Set this...
... On-Screen Display Black Side Panel On Next/Prev On/Off SEL Return NOTE: 1. Contrast Mode Use this special feature to improve video performance when watching film based sources. When AUTO MOVIE MODE is recommended to watch 4:3 signal with more blue, set to Medium for more in the picture without degrading picture quality. If CONTRAST is transferred to video for television viewing, the disparity between 2 Contrast Mode settings. NOTE: 1. Video Color Temperature Set this...

Owners Guide
Page 40
... antenna and other digital television broadcasts using compatible cable, satellite or other similar products. Use the CURSOR PAD to select ON or OFF on the SCAN and LOCK columns. 3. Press the SELECT button to navigate the Channel List. 2. Auto Channel Scan must be performed for further information regarding such connections. After February 17, 2009, this TV's digital tuner will continue to work with compatible cable and satellite TV systems, gaming consoles, VCRs, DVD players...
... antenna and other digital television broadcasts using compatible cable, satellite or other similar products. Use the CURSOR PAD to select ON or OFF on the SCAN and LOCK columns. 3. Press the SELECT button to navigate the Channel List. 2. Auto Channel Scan must be performed for further information regarding such connections. After February 17, 2009, this TV's digital tuner will continue to work with compatible cable and satellite TV systems, gaming consoles, VCRs, DVD players...
Owners Guide
Page 59
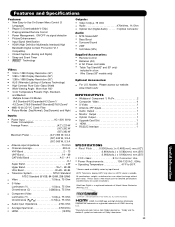
... Mute (50%) Supplied Accessories: • Remote Control • Batteries (AA) • 6' AC Power cord cable • Table Top Stand(42" and 50" only) included in a box • Wire Clamp (50" models only) Optional Accessories: • For U.S. COPYRIGHT c 1999-2007 MONTAVISTA SOFTWARE, INC. "Dolby" and the double-D symbol are subject to 95°F. 1 Screen mode availability varies by input format HDTV Televisions display HDTV only when an HDTV source is a registered trademark...
... Mute (50%) Supplied Accessories: • Remote Control • Batteries (AA) • 6' AC Power cord cable • Table Top Stand(42" and 50" only) included in a box • Wire Clamp (50" models only) Optional Accessories: • For U.S. COPYRIGHT c 1999-2007 MONTAVISTA SOFTWARE, INC. "Dolby" and the double-D symbol are subject to 95°F. 1 Screen mode availability varies by input format HDTV Televisions display HDTV only when an HDTV source is a registered trademark...
Owners Guide
Page 129
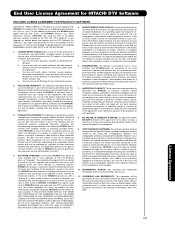
... conditions of substitute goods or services; You agree that accompany such Upgrade or other media to effect or facilitate an Upgrade, you understand and acknowledge that if you . 11. c. LIMITATION OF LIABILITY. By using the DTV or the digital television software installed on a "No Further Upgrades" list, which currently include, but not limited to the extent that HITACHI provides different or supplementary...
... conditions of substitute goods or services; You agree that accompany such Upgrade or other media to effect or facilitate an Upgrade, you understand and acknowledge that if you . 11. c. LIMITATION OF LIABILITY. By using the DTV or the digital television software installed on a "No Further Upgrades" list, which currently include, but not limited to the extent that HITACHI provides different or supplementary...
Owners Guide
Page 140
... Contrast Mode 35 E Event Timer 49 External Video Source 14-22 R Remote Control Functions 23-27 Programming Codes 28-31 Installing Batteries 4 S Screen Saver 51 Sharpness 34 Spanish Section 65-128 Speakers 38 Connecting External Speakers 38 Internal 38 Surround 37 F T Favorite Channel 27 Front Panel Controls 12,13 H HDMI 15,17 Timers 47-49 Tint 34 Treble 37 V I Video Settings 34-36 Input Setup 26,52 L Language Menu Language 50 Locks Change Access Code 41 Channel Lock 41 Front Panel Lock...
... Contrast Mode 35 E Event Timer 49 External Video Source 14-22 R Remote Control Functions 23-27 Programming Codes 28-31 Installing Batteries 4 S Screen Saver 51 Sharpness 34 Spanish Section 65-128 Speakers 38 Connecting External Speakers 38 Internal 38 Surround 37 F T Favorite Channel 27 Front Panel Controls 12,13 H HDMI 15,17 Timers 47-49 Tint 34 Treble 37 V I Video Settings 34-36 Input Setup 26,52 L Language Menu Language 50 Locks Change Access Code 41 Channel Lock 41 Front Panel Lock...


