Owners Guide
Page 2
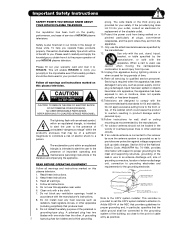
...electrician for your warranty card and mail it carefully and apply the knowledge you . Keep these instructions. Use only with the cart, stand, tripod, bracket, or table specified by the manufacturer, or sold with the manufacturer's instructions. caution when moving the cart/apparatus combination ... triangle, is intended to alert the user to the presence of important operating and maintenance (servicing) instructions in the design of HITACHI plasma televisions. If the provided plug does not fit into apparatus, the apparatus has been exposed to rain or moisture, does not...
...electrician for your warranty card and mail it carefully and apply the knowledge you . Keep these instructions. Use only with the cart, stand, tripod, bracket, or table specified by the manufacturer, or sold with the manufacturer's instructions. caution when moving the cart/apparatus combination ... triangle, is intended to alert the user to the presence of important operating and maintenance (servicing) instructions in the design of HITACHI plasma televisions. If the provided plug does not fit into apparatus, the apparatus has been exposed to rain or moisture, does not...

Owners Guide
Page 4
...series) Remote Control Unit CLU-4372UG2 (Part No HL02076 only H4011 series) · Two "AA" size, 1.5V batteries . » Table Top Stand (UX27661 42" model) (UX27281 50" models). ¿ Power Cord (P# EV01841). ´ Wire Clamp (50" models only) REMOTE CONTROL BATTERY INSTALLATION... in instability causing possible injury. 3. Please see page 7 for the 55" models is not recommended. CAUTION: Do not insert batteries with Hitachi P42H401, P42H401A, P50H401 and P50H401A models. Ceiling mounting is WM07L. Open the battery cover of the packing material. ³ Remote Control ·...
...series) Remote Control Unit CLU-4372UG2 (Part No HL02076 only H4011 series) · Two "AA" size, 1.5V batteries . » Table Top Stand (UX27661 42" model) (UX27281 50" models). ¿ Power Cord (P# EV01841). ´ Wire Clamp (50" models only) REMOTE CONTROL BATTERY INSTALLATION... in instability causing possible injury. 3. Please see page 7 for the 55" models is not recommended. CAUTION: Do not insert batteries with Hitachi P42H401, P42H401A, P50H401 and P50H401A models. Ceiling mounting is WM07L. Open the battery cover of the packing material. ³ Remote Control ·...
Owners Guide
Page 5
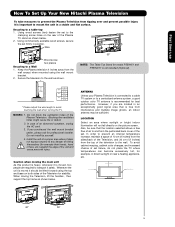
... 50" 4 in. 10 cm 55" 4 in position. Blocking the ventilation holes might cause fire or defect. 2. First time use How To Set Up Your New Hitachi Plasma Television To take measures to prevent the Plasma Television from the top of the television to the wall. Securing to the wall as shown... the unit and cause personal injury. Do not block the ventilation holes of an abnormal symptom, unplug the AC cord. 3. A 55" NOTE: The Table Top Stand for professional installer. If you are required to a centralized antenna system, a good outdoor color TV antenna is moved it safely.
... 50" 4 in. 10 cm 55" 4 in position. Blocking the ventilation holes might cause fire or defect. 2. First time use How To Set Up Your New Hitachi Plasma Television To take measures to prevent the Plasma Television from the top of the television to the wall. Securing to the wall as shown... the unit and cause personal injury. Do not block the ventilation holes of an abnormal symptom, unplug the AC cord. 3. A 55" NOTE: The Table Top Stand for professional installer. If you are required to a centralized antenna system, a good outdoor color TV antenna is moved it safely.
Owners Guide
Page 6
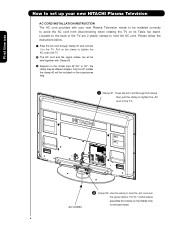
Only for 50" models the clamp #2 will be installed correctly to avoid the AC cord from disconnecting when rotating the TV on its Table top stand. For 50 " model please assemble this clamp ; then pull the clamp to tighten the AC cord to hold the AC cord. First time use How ... clamp to tighten the AC cord to the TV. · The AC cord and the signal cables can all be held together with your new HITACHI Plasma Television AC CORD INSTALLATION INSTRUCTION The AC cord provided with Clamp #2. » Depend on the middle hole of the TV are 2 plastic clamps to...
Only for 50" models the clamp #2 will be installed correctly to avoid the AC cord from disconnecting when rotating the TV on its Table top stand. For 50 " model please assemble this clamp ; then pull the clamp to tighten the AC cord to hold the AC cord. First time use How ... clamp to tighten the AC cord to the TV. · The AC cord and the signal cables can all be held together with your new HITACHI Plasma Television AC CORD INSTALLATION INSTRUCTION The AC cord provided with Clamp #2. » Depend on the middle hole of the TV are 2 plastic clamps to...
Owners Guide
Page 7
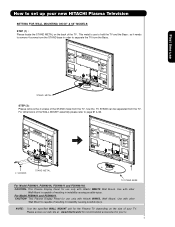
...7 NOTE: Use the specified WALL MOUNT unit for your TV. This metal is use How to set up your new HITACHI Plasma Television SETTING FOR WALL MOUNTING ON 50" & 55" MODELS STEP (1) : Please locate the STAND METAL on the size of the TV . so it needs to remove 4 screws from the... with other Wall Mount is capable of the WALL MOUNT assembly please refer to page 61 & 62. 4 SCREWS STAND METAL TV STAND BASE For Model P50H401, P50H401A, P50H4011 and P50H4011A CAUTION- Use with Hitachi WM07S Wall Mount. This Plasma Display Panel for use only with other Wall Mount is capable of the...
...7 NOTE: Use the specified WALL MOUNT unit for your TV. This metal is use How to set up your new HITACHI Plasma Television SETTING FOR WALL MOUNTING ON 50" & 55" MODELS STEP (1) : Please locate the STAND METAL on the size of the TV . so it needs to remove 4 screws from the... with other Wall Mount is capable of the WALL MOUNT assembly please refer to page 61 & 62. 4 SCREWS STAND METAL TV STAND BASE For Model P50H401, P50H401A, P50H4011 and P50H4011A CAUTION- Use with Hitachi WM07S Wall Mount. This Plasma Display Panel for use only with other Wall Mount is capable of the...
Owners Guide
Page 8
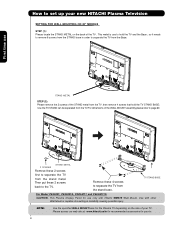
... of resulting in order to separate the TV from the Base. Remove these 4 screws to separate the TV from the stand metal. NOTE: Use the specified WALL MOUNT base for your TV. How to set up your new HITACHI Plasma Television SETTING FOR WALL MOUNTING ON 42" MODELS STEP (1) : Please locate the... STAND METAL on the size of your tv. 8 Then put these 2 screws first to the TV. Please access our web site at...
... of resulting in order to separate the TV from the Base. Remove these 4 screws to separate the TV from the stand metal. NOTE: Use the specified WALL MOUNT base for your TV. How to set up your new HITACHI Plasma Television SETTING FOR WALL MOUNTING ON 42" MODELS STEP (1) : Please locate the... STAND METAL on the size of your tv. 8 Then put these 2 screws first to the TV. Please access our web site at...
Owners Guide
Page 12
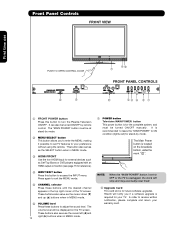
...when in MENU mode. ቨ POWER button Television MAIN POWER button This power button is located on the TV screen. It can also be at stand-by mode. The volume level will stop and may eventually reset itself. ቩ Upgrade Card This card slot is recommended to leave the "MAIN ...this button to receive written notification, please complete and return your preference without using the remote. In order to turn the Plasma Television ON/OFF. Hitachi will notify you to enter the MENU, making it possible to set to OFF or the TV is unplugged, the clock will be turned ON...
...when in MENU mode. ቨ POWER button Television MAIN POWER button This power button is located on the TV screen. It can also be at stand-by mode. The volume level will stop and may eventually reset itself. ቩ Upgrade Card This card slot is recommended to leave the "MAIN ...this button to receive written notification, please complete and return your preference without using the remote. In order to turn the Plasma Television ON/OFF. Hitachi will notify you to enter the MENU, making it possible to set to OFF or the TV is unplugged, the clock will be turned ON...
Owners Guide
Page 13
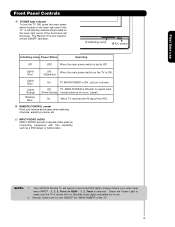
...antenna (no video input when INPUT : 1, 2, 3, Front or HDMI : 1, 2, Front is turned off or in Stand-by mode (lights red) when not in use Front Panel Controls ቪ POWER light indicator To turn ON/OFF the ... Control can not turn the TV ON, press the main power switch located on the TV is ON. (Stand-by) Lights Blue Lights Orange Blinking Blue On TV MAIN POWER is shown. Lights Red OFF. On When TV...ቫ R/C sensor Indicating Lamp Power Status Operating Off OFF. Your HITACHI Plasma TV will illuminate. The Plasma TV is no sync. First time use . 2.
...antenna (no video input when INPUT : 1, 2, 3, Front or HDMI : 1, 2, Front is turned off or in Stand-by mode (lights red) when not in use Front Panel Controls ቪ POWER light indicator To turn ON/OFF the ... Control can not turn the TV ON, press the main power switch located on the TV is ON. (Stand-by) Lights Blue Lights Orange Blinking Blue On TV MAIN POWER is shown. Lights Red OFF. On When TV...ቫ R/C sensor Indicating Lamp Power Status Operating Off OFF. Your HITACHI Plasma TV will illuminate. The Plasma TV is no sync. First time use . 2.
Owners Guide
Page 59
...; Soft Mute (50%) Supplied Accessories: • Remote Control • Batteries (AA) • 6' AC Power cord cable • Table Top Stand(42" and 50" only) included in a box • Wire Clamp (50" models only) Optional Accessories: • For U.S. UltraVision Digital is...42") 356 W, 3.0 A (50") 460 W, 3.9 A (55") 560 W, 5.3 A • Antenna input impedance 75 Ohm • Channel coverage 203 ch. Please access www.hitachi.us /tv INPUTS/OUTPUTS • Wideband Component Y, PB,PR 2 • Composite Video 4 • S-Video 1 • Antenna (RF)Inputs 1 • Audio Output 1 &#...
...; Soft Mute (50%) Supplied Accessories: • Remote Control • Batteries (AA) • 6' AC Power cord cable • Table Top Stand(42" and 50" only) included in a box • Wire Clamp (50" models only) Optional Accessories: • For U.S. UltraVision Digital is...42") 356 W, 3.0 A (50") 460 W, 3.9 A (55") 560 W, 5.3 A • Antenna input impedance 75 Ohm • Channel coverage 203 ch. Please access www.hitachi.us /tv INPUTS/OUTPUTS • Wideband Component Y, PB,PR 2 • Composite Video 4 • S-Video 1 • Antenna (RF)Inputs 1 • Audio Output 1 &#...
Owners Guide
Page 60
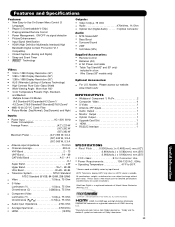
Set Dimensions 42 Inch Models (Includes Table Top Stand) Weight (lbs./kg): 80.4/36.5 Useful Information Rear View, Use as Reference for Wall Mount Bracket Units A B Inches 42 2-3/4 mm 1067.00 70.5 CD E FGH I J K L MNOPQ R ST 2-3/4 30-21/32 28-1/16 21-31/32 17-31/32 15-11/32 36-7/16 20-23/32 4-23/32 3-9/16 1-1/8 15-9/32 8-19/32 24-13/16 8-19/32 9-7/8 12-1/8 6-1/16 70.5 779.15 713.00 558.32 456.15 390.00 926 526.60 119.50 90.80 28.70 388.38 218.50 630.00 218.50 251.00 308.00 154.00 60
Set Dimensions 42 Inch Models (Includes Table Top Stand) Weight (lbs./kg): 80.4/36.5 Useful Information Rear View, Use as Reference for Wall Mount Bracket Units A B Inches 42 2-3/4 mm 1067.00 70.5 CD E FGH I J K L MNOPQ R ST 2-3/4 30-21/32 28-1/16 21-31/32 17-31/32 15-11/32 36-7/16 20-23/32 4-23/32 3-9/16 1-1/8 15-9/32 8-19/32 24-13/16 8-19/32 9-7/8 12-1/8 6-1/16 70.5 779.15 713.00 558.32 456.15 390.00 926 526.60 119.50 90.80 28.70 388.38 218.50 630.00 218.50 251.00 308.00 154.00 60
Owners Guide
Page 61
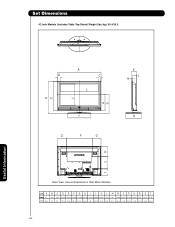
Set Dimensions 50 Inch Models (Includes Table Top Stand) Weight (lbs./kg): 116.7/53 Useful Information Rear View, Use as Reference for Wall Mount Bracket Units A B C D E F G H I J K L M N O P Q R S T Inches 48-13/16 2-9/16 2-9/16 34-11/16 32-5/16 27-17/32 19-29/32 17-17/32 43-23/32 24-13/16 5-1/2 3-25/32 1-1/4 16-5/8 12 24-13/16 12 11-3/4 12-1/8 8-7/16 mm 1240 65.00 65.00 880.85 820.50 699.12 505.85 445.5 1110.00 630.00 127.50 96.00 31.50 422.08 305.00 630.00 305.00 298.00 308.00 214.50 61
Set Dimensions 50 Inch Models (Includes Table Top Stand) Weight (lbs./kg): 116.7/53 Useful Information Rear View, Use as Reference for Wall Mount Bracket Units A B C D E F G H I J K L M N O P Q R S T Inches 48-13/16 2-9/16 2-9/16 34-11/16 32-5/16 27-17/32 19-29/32 17-17/32 43-23/32 24-13/16 5-1/2 3-25/32 1-1/4 16-5/8 12 24-13/16 12 11-3/4 12-1/8 8-7/16 mm 1240 65.00 65.00 880.85 820.50 699.12 505.85 445.5 1110.00 630.00 127.50 96.00 31.50 422.08 305.00 630.00 305.00 298.00 308.00 214.50 61
Owners Guide
Page 62
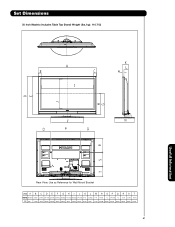
Set Dimensions 55 Inch Models (Not Includes Table Top Stand) Weight (lbs./kg): 133.3/60.5 Useful Information Rear View, Use as Reference for Wall Mount Bracket Units A B C D E F G H I J K L M N O Inches 55-1/2 3-15/32 3-15/32 35-5/8 19-3/16 48-19/32 27-1/4 5-1/32 3-25/32 1-1/4 15-11/32 24-13/16 15-11/32 4-15/16 10-1/8 mm 1410.00 88.00 88.00 904.50 485.50 1234.00 692.00 127.50 96.00 31.50 390.00 630.00 390.00 125.00 257 P 12-1/8 308 62
Set Dimensions 55 Inch Models (Not Includes Table Top Stand) Weight (lbs./kg): 133.3/60.5 Useful Information Rear View, Use as Reference for Wall Mount Bracket Units A B C D E F G H I J K L M N O Inches 55-1/2 3-15/32 3-15/32 35-5/8 19-3/16 48-19/32 27-1/4 5-1/32 3-25/32 1-1/4 15-11/32 24-13/16 15-11/32 4-15/16 10-1/8 mm 1410.00 88.00 88.00 904.50 485.50 1234.00 692.00 127.50 96.00 31.50 390.00 630.00 390.00 125.00 257 P 12-1/8 308 62


