Owners Guide
Page 3
...to operate on unit. Never connect the plasma television to a cable system providing such programming. Dispose of fire or electric shock, do not use of receiving analog basic, digital basic cable television programming by direct connection to 50 Hz, direct current, or anything other... of copyrighted material Public viewing of programs broadcast by TV stations and cable companies, as well as programs from the broadcaster or owner of the plasma television as vases, should not be restored quickly by HITACHI could void the user's warranty. Reverse engineering or ...
...to operate on unit. Never connect the plasma television to a cable system providing such programming. Dispose of fire or electric shock, do not use of receiving analog basic, digital basic cable television programming by direct connection to 50 Hz, direct current, or anything other... of copyrighted material Public viewing of programs broadcast by TV stations and cable companies, as well as programs from the broadcaster or owner of the plasma television as vases, should not be restored quickly by HITACHI could void the user's warranty. Reverse engineering or ...

Owners Guide
Page 4
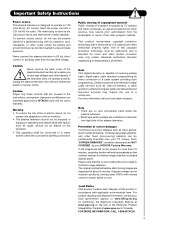
...in instability causing possible injury. 3. CAUTION: Do not insert batteries with Hitachi P42H401, P42H401A, P50H401 and P50H401A models. Mounting the panel on tab to the (+) and (-)... maximum tilting angle of 45 degrees from vertical. 2. CAUTION: 1. This plasma television product is an optional accessory (Not Included). ³ Remote Control Unit... (UX27281 50" models). ¿ Power Cord (P# EV01841). ´ Wire Clamp (50" models only) REMOTE CONTROL BATTERY INSTALLATION AND REPLACEMENT 1. Note : The accessories for optional www.hitachi.us/tv accessories. ...
...in instability causing possible injury. 3. CAUTION: Do not insert batteries with Hitachi P42H401, P42H401A, P50H401 and P50H401A models. Mounting the panel on tab to the (+) and (-)... maximum tilting angle of 45 degrees from vertical. 2. CAUTION: 1. This plasma television product is an optional accessory (Not Included). ³ Remote Control Unit... (UX27281 50" models). ¿ Power Cord (P# EV01841). ´ Wire Clamp (50" models only) REMOTE CONTROL BATTERY INSTALLATION AND REPLACEMENT 1. Note : The accessories for optional www.hitachi.us/tv accessories. ...
Owners Guide
Page 5
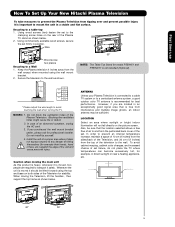
.... Securing to a Wall 1. Using wood screws (two) fasten the set . Wire Wood screw two places Securing to a table-top 1. A 42" 4 in. 10 cm 50" 4 in. 10 cm 55" 4 in direct sunlight or near a heating appliance, etc. 30 cm (12 inches) 10 cm (4 inches) 10 cm (4 inches) 42...hot, for example, in . 10 cm * Please adjust the wire length to avoid touching the wall when turning the TV. First time use How To Set Up Your New Hitachi Plasma Television To take measures to prevent the Plasma Television from tipping over and prevent possible injury it is recommended for best performance.
.... Securing to a Wall 1. Using wood screws (two) fasten the set . Wire Wood screw two places Securing to a table-top 1. A 42" 4 in. 10 cm 50" 4 in. 10 cm 55" 4 in direct sunlight or near a heating appliance, etc. 30 cm (12 inches) 10 cm (4 inches) 10 cm (4 inches) 42...hot, for example, in . 10 cm * Please adjust the wire length to avoid touching the wall when turning the TV. First time use How To Set Up Your New Hitachi Plasma Television To take measures to prevent the Plasma Television from tipping over and prevent possible injury it is recommended for best performance.
Owners Guide
Page 6
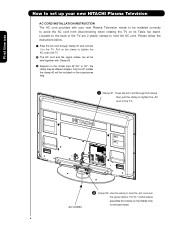
... AC cord and the signal cables. Pull on the clamp to tighten the AC cord to the TV. · The AC cord and the signal cables can all be held together with your new HITACHI Plasma Television AC CORD INSTALLATION INSTRUCTION The AC cord provided with Clamp #2. » Depend on the model size... 42",50" or 55", the clamp may be different shapes. AC CORD · Clamp #2: Use this clamp to ...
... AC cord and the signal cables. Pull on the clamp to tighten the AC cord to the TV. · The AC cord and the signal cables can all be held together with your new HITACHI Plasma Television AC CORD INSTALLATION INSTRUCTION The AC cord provided with Clamp #2. » Depend on the model size... 42",50" or 55", the clamp may be different shapes. AC CORD · Clamp #2: Use this clamp to ...
Owners Guide
Page 7
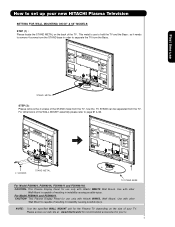
...up your new HITACHI Plasma Television SETTING FOR WALL MOUNTING ON 50" & 55" MODELS STEP (1) : Please locate the STAND METAL on the size of the TV . This Plasma Display Panel for the Plasma TV depending on the back of your tv. 7 NOTE: Use the specified WALL MOUNT unit for use only with Hitachi WM07L Wall Mount...causing possible injury. This metal is capable of the WALL MOUNT assembly please refer to page 61 & 62. 4 SCREWS STAND METAL TV STAND BASE For Model P50H401, P50H401A, P50H4011 and P50H4011A CAUTION- Use with other Wall Mount is capable of the STAND metal from the...
...up your new HITACHI Plasma Television SETTING FOR WALL MOUNTING ON 50" & 55" MODELS STEP (1) : Please locate the STAND METAL on the size of the TV . This Plasma Display Panel for the Plasma TV depending on the back of your tv. 7 NOTE: Use the specified WALL MOUNT unit for use only with Hitachi WM07L Wall Mount...causing possible injury. This metal is capable of the WALL MOUNT assembly please refer to page 61 & 62. 4 SCREWS STAND METAL TV STAND BASE For Model P50H401, P50H401A, P50H4011 and P50H4011A CAUTION- Use with other Wall Mount is capable of the STAND metal from the...
Owners Guide
Page 8
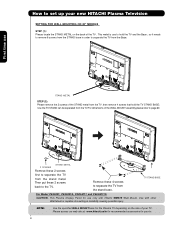
... the stand metal. First time use to hold the TV STAND BASE; This Plasma Display Panel for the Plasma TV depending on the back of the TV . TV STAND BASE For Model P42H401, P42H401A, P42H4011 and P42H4011A CAUTION- How to set up your new HITACHI Plasma Television SETTING FOR WALL MOUNTING ON 42" MODELS STEP (1) : Please locate the...
... the stand metal. First time use to hold the TV STAND BASE; This Plasma Display Panel for the Plasma TV depending on the back of the TV . TV STAND BASE For Model P42H401, P42H401A, P42H4011 and P42H4011A CAUTION- How to set up your new HITACHI Plasma Television SETTING FOR WALL MOUNTING ON 42" MODELS STEP (1) : Please locate the...

Owners Guide
Page 9
... S 80 BEST HORIZONTAL 5' 10' 15' 20' VIEWING ANGLE 80 S ANTENNA CONNECTIONS TO REAR JACK PANEL VHF (75-Ohm) antenna/CATV (Cable TV) When using a 300-Ohm twin lead from the side of the room. During daylight hours, reflections from outside light may cause interference. AIR / ...the coaxial cable to the AIR/CABLE (75-Ohm) terminal. Plug the adapter into the antenna terminal on the screen. Consult your new HITACHI Plasma Television VIEWING The best picture is recommended. 9 Using a 75-Ohm coaxial cable is seen by placing the speakers equidistant from the screen. ...
... S 80 BEST HORIZONTAL 5' 10' 15' 20' VIEWING ANGLE 80 S ANTENNA CONNECTIONS TO REAR JACK PANEL VHF (75-Ohm) antenna/CATV (Cable TV) When using a 300-Ohm twin lead from the side of the room. During daylight hours, reflections from outside light may cause interference. AIR / ...the coaxial cable to the AIR/CABLE (75-Ohm) terminal. Plug the adapter into the antenna terminal on the screen. Consult your new HITACHI Plasma Television VIEWING The best picture is recommended. 9 Using a 75-Ohm coaxial cable is seen by placing the speakers equidistant from the screen. ...
Owners Guide
Page 10
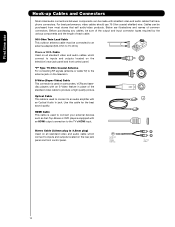
... and names of each cable. 300-Ohm Twin Lead Cable This outdoor antenna cable must be connected to an antenna adapter (300-Ohm to the TV's HDMI input. AUDIO OUT 3.8mm STEREO MINI-PLUG 2 RCA TYPE PLUGS 10 Before purchasing any cables, be sure of the output and input connector... between components can be purchased from most stores that have phono connectors. "F" Type 75-Ohm Coaxial Antenna For connecting RF signals (antenna or cable TV) to the antenna jack on camcorders, VCRs and laserdisc players with an S-Video feature in place of the standard video cable to an audio amplifier...
... and names of each cable. 300-Ohm Twin Lead Cable This outdoor antenna cable must be connected to an antenna adapter (300-Ohm to the TV's HDMI input. AUDIO OUT 3.8mm STEREO MINI-PLUG 2 RCA TYPE PLUGS 10 Before purchasing any cables, be sure of the output and input connector... between components can be purchased from most stores that have phono connectors. "F" Type 75-Ohm Coaxial Antenna For connecting RF signals (antenna or cable TV) to the antenna jack on camcorders, VCRs and laserdisc players with an S-Video feature in place of the standard video cable to an audio amplifier...
Owners Guide
Page 11
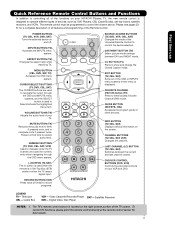
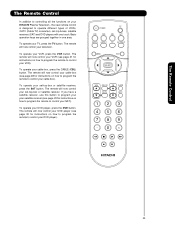
...50% if pressed once, and to control the device selected. SOURCE ACCESS BUTTONS (TV, DVD, VCR, CBL, SAT) Changes the mode of the Universal Remote Control to complete mute if pressed twice. CHANNEL BUTTONS (TV, CBL, SAT, VCR) Changes the channel. Satellite Receiver DVD - VOLUME BUTTONS (TV) Adjusts the audio level of your HITACHI Plasma TV..., the new remote control is designed to operate different types of devices, such as, DVD Players, CBL (Cable Boxes), set-top-boxes, satellite receivers, and VCRs. EXIT BUTTON (TV, CBL,...
...50% if pressed once, and to control the device selected. SOURCE ACCESS BUTTONS (TV, DVD, VCR, CBL, SAT) Changes the mode of the Universal Remote Control to complete mute if pressed twice. CHANNEL BUTTONS (TV, CBL, SAT, VCR) Changes the channel. Satellite Receiver DVD - VOLUME BUTTONS (TV) Adjusts the audio level of your HITACHI Plasma TV..., the new remote control is designed to operate different types of devices, such as, DVD Players, CBL (Cable Boxes), set-top-boxes, satellite receivers, and VCRs. EXIT BUTTON (TV, CBL,...
Owners Guide
Page 12
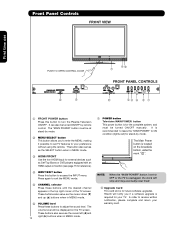
...Press these buttons until the desired channel appears in MENU mode. ቨ POWER button Television MAIN POWER button This power button is located on the TV screen. Front Panel Controls FRONT VIEW First time use PUSH TO OPEN CONTROL DOOR UPGRADE CARD (SERVICE USE ONLY) PUSH EJECT ቩ ቤ...; ቢ FRONT POWER button Press this button to turn the Plasma Television ON/OFF. These buttons also serve as the cursor left (̇) and right (̈) buttons when in the top right corner of the TV screen. Hitachi will notify you to enter the MENU, making it possible to set...
...Press these buttons until the desired channel appears in MENU mode. ቨ POWER button Television MAIN POWER button This power button is located on the TV screen. Front Panel Controls FRONT VIEW First time use PUSH TO OPEN CONTROL DOOR UPGRADE CARD (SERVICE USE ONLY) PUSH EJECT ቩ ቤ...; ቢ FRONT POWER button Press this button to turn the Plasma Television ON/OFF. These buttons also serve as the cursor left (̇) and right (̈) buttons when in the top right corner of the TV screen. Hitachi will notify you to enter the MENU, making it possible to set...
Owners Guide
Page 13
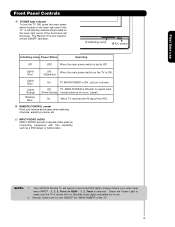
...time use Front Panel Controls ቪ POWER light indicator To turn ON/OFF the "MAIN POWER" of the TV. NOTES: 1. Your HITACHI Plasma TV will illuminate. A red stand-by ) Lights Blue Lights Orange Blinking Blue On TV MAIN POWER is shown. When the main power switch is set to make sure the... TV is selected. Check the Power Light to Off. Off TV MAIN POWER is ON with this area when ...
...time use Front Panel Controls ቪ POWER light indicator To turn ON/OFF the "MAIN POWER" of the TV. NOTES: 1. Your HITACHI Plasma TV will illuminate. A red stand-by ) Lights Blue Lights Orange Blinking Blue On TV MAIN POWER is shown. When the main power switch is set to make sure the... TV is selected. Check the Power Light to Off. Off TV MAIN POWER is ON with this area when ...
Owners Guide
Page 14
.... ቨ ብ NOTE: 1. Only DTV formats such as an audio amplifier. NOTE: 1. In this case, connect the component CB output to the TV's PB input and the component CR output to obtain optimum picture quality when using the Y-PBPR inputs (see page 34). 5. It may be necessary to... adjust TINT to the TV's PR input. 4. You may use only. "Dolby" and the double-D symbol are trademarks of the remote control, you have monitor output. ብ ...
.... ቨ ብ NOTE: 1. Only DTV formats such as an audio amplifier. NOTE: 1. In this case, connect the component CB output to the TV's PB input and the component CR output to obtain optimum picture quality when using the Y-PBPR inputs (see page 34). 5. It may be necessary to... adjust TINT to the TV's PR input. 4. You may use only. "Dolby" and the double-D symbol are trademarks of the remote control, you have monitor output. ብ ...
Owners Guide
Page 16
... UPGRADE CARD (SERVICE USE ONLY) - Note : Special device cables will be made from coaxial shielded wire. Use the CURSOR PAD (̆ and ̄) to your Plasma TV is dependent on the model and features of your particular assortment of components and features. INPUTS HDMI 2 HDMI-Front Air /Cable Input 1 Input 2 Move SEL...
... UPGRADE CARD (SERVICE USE ONLY) - Note : Special device cables will be made from coaxial shielded wire. Use the CURSOR PAD (̆ and ̄) to your Plasma TV is dependent on the model and features of your particular assortment of components and features. INPUTS HDMI 2 HDMI-Front Air /Cable Input 1 Input 2 Move SEL...
Owners Guide
Page 17
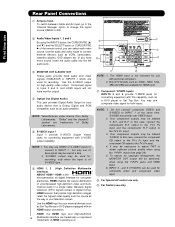
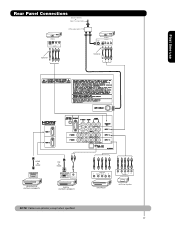
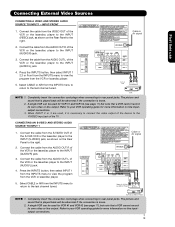
OUTPUT Y PB/CB PR/CR L R Y PB PR L R OUTPUT DVD Player HDTV Set-Top Box 17 First time use Rear Panel Connections Outside Antenna or Cable TV coaxial cable 2-Way signal splitter VCR #2 S-VIDEO V L R INPUT Optional VCR #1 ANT OUTPUT IN S-VIDEO V L R Optional HDMI to HDMI HDMI OUTPUT HDMI DIGITAL OUTPUT CAPABILITY DVI to HDMI DIGITAL OUTPUT AUDIO OUT DIGITAL OUTPUT CAPABILITY NOTE: Cables are optional, except when specified.
OUTPUT Y PB/CB PR/CR L R Y PB PR L R OUTPUT DVD Player HDTV Set-Top Box 17 First time use Rear Panel Connections Outside Antenna or Cable TV coaxial cable 2-Way signal splitter VCR #2 S-VIDEO V L R INPUT Optional VCR #1 ANT OUTPUT IN S-VIDEO V L R Optional HDMI to HDMI HDMI OUTPUT HDMI DIGITAL OUTPUT CAPABILITY DVI to HDMI DIGITAL OUTPUT AUDIO OUT DIGITAL OUTPUT CAPABILITY NOTE: Cables are optional, except when specified.
Owners Guide
Page 18
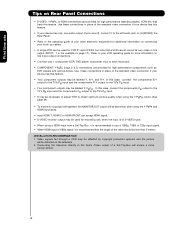
that have this case, connect the components B-Y output to the TV's PB input and the components R-Y output to the TV's PR input. • Your component outputs may be less than 5 meters. Connecting the television directly to the Audio /Video output of a Set-Top-Box will ... operating guide for more normal picture. 18 Refer to your device has this case, connect the components CB output to the TV's PB input and the components CR output to the TV's PR input. • It may be necessary to adjust TINT to each input jack. • COMPONENT: Y-PBPR (Input 2 & 3) connections are...
that have this case, connect the components B-Y output to the TV's PB input and the components R-Y output to the TV's PR input. • Your component outputs may be less than 5 meters. Connecting the television directly to the Audio /Video output of a Set-Top-Box will ... operating guide for more normal picture. 18 Refer to your device has this case, connect the components CB output to the TV's PB input and the components CR output to the TV's PR input. • It may be necessary to adjust TINT to each input jack. • COMPONENT: Y-PBPR (Input 2 & 3) connections are...
Owners Guide
Page 19
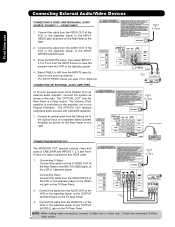
... AUDIO SOURCE TO INPUT 1 1. Press the INPUTS button, then select INPUT 1 from the INPUTS menu to view the program from the AUDIO OUT L of the TV . A single VCR can be abnormal if the connection is played back will be used for more information on line inputoutput connections. 19 Back of VCR...
... AUDIO SOURCE TO INPUT 1 1. Press the INPUTS button, then select INPUT 1 from the INPUTS menu to view the program from the AUDIO OUT L of the TV . A single VCR can be abnormal if the connection is played back will be used for more information on line inputoutput connections. 19 Back of VCR...
Owners Guide
Page 22
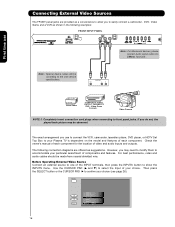
...1 ~ FRONT INPUT 1. Connect the cable from the INPUTS menu to return to the INPUT (VIDEO) jack, as shown on the TV Rear Panel. The Volume of the Plasma TV to the OUTPUT (AUDIO/R) jack on the right. It does not output component and HDMI video. Connecting Video: Connect the cable from..., connect S-Video only or Video only. Connecting S-Video: Connect the cable from the Rear Panel is controlled by the amplifier, not by the Plasma Television. The "OPTICAL OUT" from the S-VIDEO OUT of the VCR or Laserdisk player. Connect the cable from the AUDIO OUT of the VCR...
...1 ~ FRONT INPUT 1. Connect the cable from the INPUTS menu to return to the INPUT (VIDEO) jack, as shown on the TV Rear Panel. The Volume of the Plasma TV to the OUTPUT (AUDIO/R) jack on the right. It does not output component and HDMI video. Connecting Video: Connect the cable from..., connect S-Video only or Video only. Connecting S-Video: Connect the cable from the Rear Panel is controlled by the amplifier, not by the Plasma Television. The "OPTICAL OUT" from the S-VIDEO OUT of the VCR or Laserdisk player. Connect the cable from the AUDIO OUT of the VCR...
Owners Guide
Page 23
... to program the remote to control your set-top-box or satellite receiver. To operate your VCR, press the VCR button. To operate your TV, press the TV button. The remote will now control your SAT). To operate your VCR). The remote will now control your cable box (see page 30 for... in one touch. The remote will now control your DVD player (see page 28 for instructions on how to program the remote to control your HITACHI Plasma Television , the new remote control is designed to operate different types of VCRs, CATV (Cable...
... to program the remote to control your set-top-box or satellite receiver. To operate your VCR, press the VCR button. To operate your TV, press the TV button. The remote will now control your SAT). To operate your VCR). The remote will now control your cable box (see page 30 for... in one touch. The remote will now control your DVD player (see page 28 for instructions on how to program the remote to control your HITACHI Plasma Television , the new remote control is designed to operate different types of VCRs, CATV (Cable...
Owners Guide
Page 24
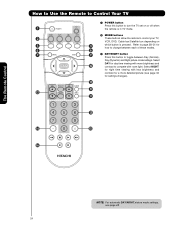
... for how to change between Day (Normal), Day (Dynamic) and Night picture mode settings. The Remote Control How to Use the Remote to Control Your TV ³ POWER button Press this button to toggle between each of these modes. ¶ ¾ » DAY/NIGHT button Press this button to ...turn the TV set on or off when ³ the remote is in TV mode. · MODE buttons · These buttons allow the remote to control your TV, VCR, DVD, Cable box/Satellite box depending on ´ ¿ » ²...
... for how to change between Day (Normal), Day (Dynamic) and Night picture mode settings. The Remote Control How to Use the Remote to Control Your TV ³ POWER button Press this button to toggle between each of these modes. ¶ ¾ » DAY/NIGHT button Press this button to ...turn the TV set on or off when ³ the remote is in TV mode. · MODE buttons · These buttons allow the remote to control your TV, VCR, DVD, Cable box/Satellite box depending on ´ ¿ » ²...
Owners Guide
Page 25
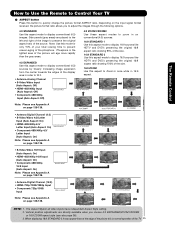
... Input IMA G E INPUT 1 2 Note: Please see also page 36). 3. The Remote Control How to Use the Remote to Control Your TV ¿ ASPECT button Press this is normal operation of the TV 25 Depending on conventional (4:3) sources. 16:9 STANDARD 1 Use this aspect mode to display 16:9 sources like HDTV and DVD's preserving...
... Input IMA G E INPUT 1 2 Note: Please see also page 36). 3. The Remote Control How to Use the Remote to Control Your TV ¿ ASPECT button Press this is normal operation of the TV 25 Depending on conventional (4:3) sources. 16:9 STANDARD 1 Use this aspect mode to display 16:9 sources like HDTV and DVD's preserving...


