Owners Guide
Page 3
... and call your HITACHI Factory Warranty. Warning • To reduce the risk of the plasma television. Insert the power cord into a 120 volt 60 Hz outlet. This product incorporates copyright protection technology that are NOT COVERED by TV stations and cable companies, as well as the disconnect device and shall remain readily operable...
... and call your HITACHI Factory Warranty. Warning • To reduce the risk of the plasma television. Insert the power cord into a 120 volt 60 Hz outlet. This product incorporates copyright protection technology that are NOT COVERED by TV stations and cable companies, as well as the disconnect device and shall remain readily operable...

Owners Guide
Page 4
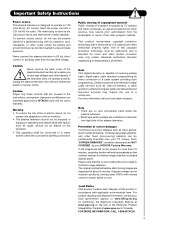
... 4 CAUTION: Do not insert batteries with Hitachi P42H401, P42H401A, P50H401 and P50H401A models. The wall mount unit for the 50" and 42" models is WM07S and for a maximum... tilting angle of the battery, the (+) side, into place. When replacing old batteries, push them towards the springs and insert the top of 45 degrees from vertical. 2. Replace the cover. This plasma...not provide adequate ventilation for the electronics or proper support for optional www.hitachi.us/tv accessories. Accessories Check to remove back cover. CAUTION: 1. The use ...
... 4 CAUTION: Do not insert batteries with Hitachi P42H401, P42H401A, P50H401 and P50H401A models. The wall mount unit for the 50" and 42" models is WM07S and for a maximum... tilting angle of the battery, the (+) side, into place. When replacing old batteries, push them towards the springs and insert the top of 45 degrees from vertical. 2. Replace the cover. This plasma...not provide adequate ventilation for the electronics or proper support for optional www.hitachi.us/tv accessories. Accessories Check to remove back cover. CAUTION: 1. The use ...
Owners Guide
Page 5
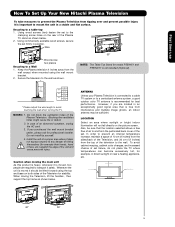
... product is heavy, whenever it safely. Also, be sufficient. First time use How To Set Up Your New Hitachi Plasma Television To take measures to prevent the Plasma Television from the perforated back cover of the set. Using commercially available wood screws, secure the set to the... base on the picture screen. Install the unit at a proper area where it is recommended for professional installer. Keep the Plasma television 4 inches away from the top of the Plasma TV stand as shown. A 42" 4 in. 10 cm 50" 4 in. 10 cm 55" 4 in a stable and flat surface. NOTES: 1....
... product is heavy, whenever it safely. Also, be sufficient. First time use How To Set Up Your New Hitachi Plasma Television To take measures to prevent the Plasma Television from the perforated back cover of the set. Using commercially available wood screws, secure the set to the... base on the picture screen. Install the unit at a proper area where it is recommended for professional installer. Keep the Plasma television 4 inches away from the top of the Plasma TV stand as shown. A 42" 4 in. 10 cm 50" 4 in. 10 cm 55" 4 in a stable and flat surface. NOTES: 1....
Owners Guide
Page 6
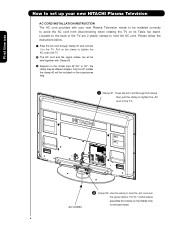
... when rotating the TV on the middle hole of the TV are 2 plastic clamps to hold the AC cord and the signal cables. Only for 50" models the clamp #2 will be included on the model size 42",50" or 55", the clamp may be held together with your new HITACHI Plasma Television AC CORD... INSTALLATION INSTRUCTION The AC cord provided with Clamp #2. » Depend on the accessories bag. ³ Clamp #1 : Pass the AC cord through Clamp #1 and connect it to the TV. Pull on the ...
... when rotating the TV on the middle hole of the TV are 2 plastic clamps to hold the AC cord and the signal cables. Only for 50" models the clamp #2 will be included on the model size 42",50" or 55", the clamp may be held together with your new HITACHI Plasma Television AC CORD... INSTALLATION INSTRUCTION The AC cord provided with Clamp #2. » Depend on the accessories bag. ³ Clamp #1 : Pass the AC cord through Clamp #1 and connect it to the TV. Pull on the ...
Owners Guide
Page 7
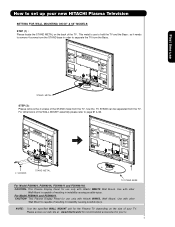
...the back of the WALL MOUNT assembly please refer to page 61 & 62. 4 SCREWS STAND METAL TV STAND BASE For Model P50H401, P50H401A, P50H4011 and P50H4011A CAUTION- First time use How to set up your new HITACHI Plasma Television SETTING FOR WALL MOUNTING ON 50" & 55" MODELS STEP (1) : Please locate the STAND ...METAL on the size of the STAND metal from the TV, now the TV STAND can be separated from the Base. so it needs to ...
...the back of the WALL MOUNT assembly please refer to page 61 & 62. 4 SCREWS STAND METAL TV STAND BASE For Model P50H401, P50H401A, P50H4011 and P50H4011A CAUTION- First time use How to set up your new HITACHI Plasma Television SETTING FOR WALL MOUNTING ON 50" & 55" MODELS STEP (1) : Please locate the STAND ...METAL on the size of the STAND metal from the TV, now the TV STAND can be separated from the Base. so it needs to ...
Owners Guide
Page 8
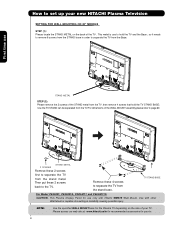
...: Use the specified WALL MOUNT base for your tv. 8 TV STAND BASE For Model P42H401, P42H401A, P42H4011 and P42H4011A CAUTION- Please access our web site at: www.hitachi.us/tv for recommended accessories for the Plasma TV depending on the size of your new HITACHI Plasma Television SETTING FOR WALL MOUNTING ON 42" MODELS STEP (1) : Please locate the STAND METAL...
...: Use the specified WALL MOUNT base for your tv. 8 TV STAND BASE For Model P42H401, P42H401A, P42H4011 and P42H4011A CAUTION- Please access our web site at: www.hitachi.us/tv for recommended accessories for the Plasma TV depending on the size of your new HITACHI Plasma Television SETTING FOR WALL MOUNTING ON 42" MODELS STEP (1) : Please locate the STAND METAL...

Owners Guide
Page 9
...from each side of the receiver cabinet and as close as possible to the height of the picture screen center. Consult your new HITACHI Plasma Television VIEWING The best picture is recommended. 9 Using a 75-Ohm coaxial cable is seen by placing the speakers equidistant from the ... L S 80 BEST HORIZONTAL 5' 10' 15' 20' VIEWING ANGLE 80 S ANTENNA CONNECTIONS TO REAR JACK PANEL VHF (75-Ohm) antenna/CATV (Cable TV) When using a 300-Ohm twin lead from outside light may cause interference. During daylight hours, reflections from an outdoor antenna, connect the VHF or UHF...
...from each side of the receiver cabinet and as close as possible to the height of the picture screen center. Consult your new HITACHI Plasma Television VIEWING The best picture is recommended. 9 Using a 75-Ohm coaxial cable is seen by placing the speakers equidistant from the ... L S 80 BEST HORIZONTAL 5' 10' 15' 20' VIEWING ANGLE 80 S ANTENNA CONNECTIONS TO REAR JACK PANEL VHF (75-Ohm) antenna/CATV (Cable TV) When using a 300-Ohm twin lead from outside light may cause interference. During daylight hours, reflections from an outdoor antenna, connect the VHF or UHF...
Owners Guide
Page 10
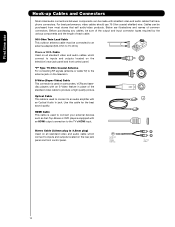
... panel and front control panel. First time use 75-Ohm coaxial shielded wire. "F" Type 75-Ohm Coaxial Antenna For connecting RF signals (antenna or cable TV) to 75-Ohm). Stereo Cable (3.8mm plug to 3.5mm plug) Used on the rear jack panel and front control panel. S-Video (Super Video) Cable This... to an audio amplifier with an HDMI output connection to inputs and outputs located on all standard video and audio cables which connect to the TV's HDMI input. Use this cable for the best sound quality. Below are illustrations and names of the standard video cable to inputs and outputs located...
... panel and front control panel. First time use 75-Ohm coaxial shielded wire. "F" Type 75-Ohm Coaxial Antenna For connecting RF signals (antenna or cable TV) to 75-Ohm). Stereo Cable (3.8mm plug to 3.5mm plug) Used on the rear jack panel and front control panel. S-Video (Super Video) Cable This... to an audio amplifier with an HDMI output connection to inputs and outputs located on all standard video and audio cables which connect to the TV's HDMI input. Use this cable for the best sound quality. Below are illustrations and names of the standard video cable to inputs and outputs located...
Owners Guide
Page 11
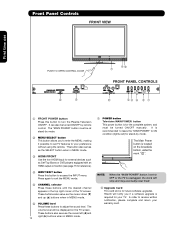
...your VCR and DVD. DAY/NIGHT BUTTON (TV) Select picture mode settings between the current and last channel viewed. CC BUTTON (TV) Press to record programs. LEGEND TV- INFO BUTTON (TV, CBL, SAT) Displays various information on your HITACHI Plasma TV, the new remote control is designed to navigate... the cursor through the OSD menu system. (-) BUTTON (TV, SAT) The (-) button is used ...
...your VCR and DVD. DAY/NIGHT BUTTON (TV) Select picture mode settings between the current and last channel viewed. CC BUTTON (TV) Press to record programs. LEGEND TV- INFO BUTTON (TV, CBL, SAT) Displays various information on your HITACHI Plasma TV, the new remote control is designed to navigate... the cursor through the OSD menu system. (-) BUTTON (TV, SAT) The (-) button is used ...
Owners Guide
Page 12
.... NOTE: When the "MAIN POWER" button is set TV features to your preference without using the remote. The Main Power button is for reference). ብ INPUT/EXIT button Press this button to turn the Plasma Television ON/OFF. It is required for stand-by mode. ባ MENU/SELECT ...button This button allows you to enter the MENU, making it possible to set to receive written notification, please complete and return your TV. Hitachi will be turned ON/OFF manually...
.... NOTE: When the "MAIN POWER" button is set TV features to your preference without using the remote. The Main Power button is for reference). ብ INPUT/EXIT button Press this button to turn the Plasma Television ON/OFF. It is required for stand-by mode. ባ MENU/SELECT ...button This button allows you to enter the MENU, making it possible to set to receive written notification, please complete and return your TV. Hitachi will be turned ON/OFF manually...
Owners Guide
Page 13
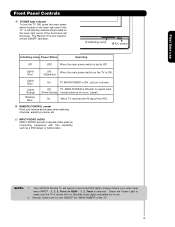
... When TV receives ...Indicating Lamp Power Status Operating Off OFF. Remote Control can not turn the TV ON, press the main power switch located on the lower right corner of... the main power switch on the TV is ON. (Stand-by indicator lamp located on the lower right side of the TV. 13 NOTES: 1. Check the.... When the main power switch is set to make sure the TV is selected. First time use . 2. picture is now ready for... light indicator To turn ON/OFF the "MAIN POWER" of the TV. The Plasma TV is shown. Off TV MAIN POWER is ON with this capability, such as a DVD player...
... When TV receives ...Indicating Lamp Power Status Operating Off OFF. Remote Control can not turn the TV ON, press the main power switch located on the lower right corner of... the main power switch on the TV is ON. (Stand-by indicator lamp located on the lower right side of the TV. 13 NOTES: 1. Check the.... When the main power switch is set to make sure the TV is selected. First time use . 2. picture is now ready for... light indicator To turn ON/OFF the "MAIN POWER" of the TV. The Plasma TV is shown. Off TV MAIN POWER is ON with this capability, such as a DVD player...
Owners Guide
Page 14
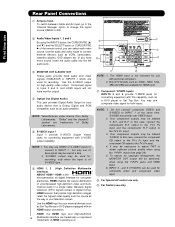
... ቨ Component: Y-PBPR Inputs INPUTS 2 and 3 provide Y-PBPR jacks for connecting equipment with this case, connect the components B-Y output to the TV's PB input and the components R-Y output to change the signal source CABLE or AIR. Rear Panel Connections ቢ Antenna Input To switch between Cable ...and Air input, go to the Channel Manager option to the TV's PR input. 3. "Dolby" and the double-D symbol are trademarks of the remote control, you have monitor output. ብ Optical Out (Digital...
... ቨ Component: Y-PBPR Inputs INPUTS 2 and 3 provide Y-PBPR jacks for connecting equipment with this case, connect the components B-Y output to the TV's PB input and the components R-Y output to change the signal source CABLE or AIR. Rear Panel Connections ቢ Antenna Input To switch between Cable ...and Air input, go to the Channel Manager option to the TV's PR input. 3. "Dolby" and the double-D symbol are trademarks of the remote control, you have monitor output. ብ Optical Out (Digital...
Owners Guide
Page 16
... jacks are offered as a convenience to allow you use to connect the VCR, camcorder, laserdisc player, DVD player, or HDTV Set Top Box to your Plasma TV is dependent on the model and features of each component for the location of video and audio inputs and outputs. Completely insert connection cord plugs...
... jacks are offered as a convenience to allow you use to connect the VCR, camcorder, laserdisc player, DVD player, or HDTV Set Top Box to your Plasma TV is dependent on the model and features of each component for the location of video and audio inputs and outputs. Completely insert connection cord plugs...
Owners Guide
Page 17
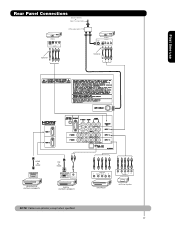
OUTPUT Y PB/CB PR/CR L R Y PB PR L R OUTPUT DVD Player HDTV Set-Top Box 17 First time use Rear Panel Connections Outside Antenna or Cable TV coaxial cable 2-Way signal splitter VCR #2 S-VIDEO V L R INPUT Optional VCR #1 ANT OUTPUT IN S-VIDEO V L R Optional HDMI to HDMI HDMI OUTPUT HDMI DIGITAL OUTPUT CAPABILITY DVI to HDMI DIGITAL OUTPUT AUDIO OUT DIGITAL OUTPUT CAPABILITY NOTE: Cables are optional, except when specified.
OUTPUT Y PB/CB PR/CR L R Y PB PR L R OUTPUT DVD Player HDTV Set-Top Box 17 First time use Rear Panel Connections Outside Antenna or Cable TV coaxial cable 2-Way signal splitter VCR #2 S-VIDEO V L R INPUT Optional VCR #1 ANT OUTPUT IN S-VIDEO V L R Optional HDMI to HDMI HDMI OUTPUT HDMI DIGITAL OUTPUT CAPABILITY DVI to HDMI DIGITAL OUTPUT AUDIO OUT DIGITAL OUTPUT CAPABILITY NOTE: Cables are optional, except when specified.
Owners Guide
Page 18
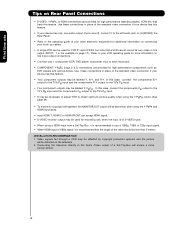
...PBPR (Input 2 & 3) connections are provided for high performance laserdisc players, VCRs etc. In this case, connect the components B-Y output to the TV's PB input and the components R-Y output to the operating guide of your other electronic equipment for additional information on connecting your VCR operating guide for...through a VCR may be labeled Y, B-Y, and R-Y. that have this case, connect the components CB output to the TV's PB input and the components CR output to the TV's PR input. • It may be necessary to adjust TINT to obtain optimum picture quality when using the Y-PBPR...
...PBPR (Input 2 & 3) connections are provided for high performance laserdisc players, VCRs etc. In this case, connect the components B-Y output to the TV's PB input and the components R-Y output to the operating guide of your other electronic equipment for additional information on connecting your VCR operating guide for...through a VCR may be labeled Y, B-Y, and R-Y. that have this case, connect the components CB output to the TV's PB input and the components CR output to the TV's PR input. • It may be necessary to adjust TINT to obtain optimum picture quality when using the Y-PBPR...
Owners Guide
Page 19
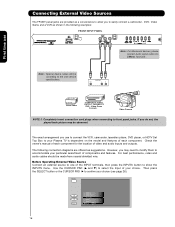
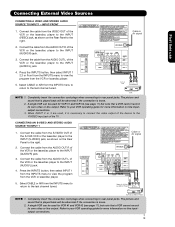
... OUTPUT VCR NOTE: 1. Connect the cable from the VCR or laserdisc player. Press the INPUTS button, then select INPUT 1 from the VIDEO OUT of the TV . First time use Connecting External Video Sources CONNECTING A VIDEO AND STEREO AUDIO SOURCE TO INPUT1 ~ INPUT-FRONT 1. The picture and sound that a VCR cannot record...
... OUTPUT VCR NOTE: 1. Connect the cable from the VCR or laserdisc player. Press the INPUTS button, then select INPUT 1 from the VIDEO OUT of the TV . First time use Connecting External Video Sources CONNECTING A VIDEO AND STEREO AUDIO SOURCE TO INPUT1 ~ INPUT-FRONT 1. The picture and sound that a VCR cannot record...
Owners Guide
Page 22
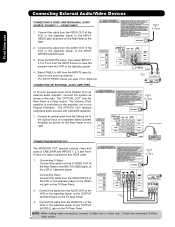
... the cable from the VIDEO INPUT of the VCR or the laserdisc player to the INPUT (S-VIDEO) jack, of the Plasma TV to the INPUT (VIDEO) jack, as shown on the TV Rear Panel. Optional VCR or other external components R L V S-VIDEO INPUT 3. Connecting Video: Connect the cable from ...INPUTS 1, 2, 3 and Front. CABLE or Air signal 1. Connect the cable from the Rear Panel is controlled by the amplifier, not by the Plasma Television. NOTE: When making video connections, connect S-Video only or Video only. Connecting External Audio/Video Devices First time use CONNECTING A VIDEO AND...
... the cable from the VIDEO INPUT of the VCR or the laserdisc player to the INPUT (S-VIDEO) jack, of the Plasma TV to the INPUT (VIDEO) jack, as shown on the TV Rear Panel. Optional VCR or other external components R L V S-VIDEO INPUT 3. Connecting Video: Connect the cable from ...INPUTS 1, 2, 3 and Front. CABLE or Air signal 1. Connect the cable from the Rear Panel is controlled by the amplifier, not by the Plasma Television. NOTE: When making video connections, connect S-Video only or Video only. Connecting External Audio/Video Devices First time use CONNECTING A VIDEO AND...
Owners Guide
Page 23
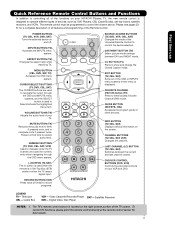
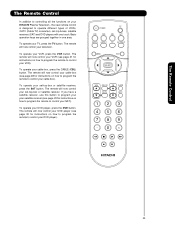
The Remote Control The Remote Control In addition to controlling all the functions on your HITACHI Plasma Television , the new remote control is designed to operate different types of VCRs, CATV (Cable TV) converters, set-top-boxes, satellite receivers (SAT) and DVD players with one area. Basic operation keys are... grouped together in one touch. The remote will now control your TV, press the TV button. To operate your set -top-box or satellite receiver, press the SAT button. The remote will now control your cable box ...
The Remote Control The Remote Control In addition to controlling all the functions on your HITACHI Plasma Television , the new remote control is designed to operate different types of VCRs, CATV (Cable TV) converters, set-top-boxes, satellite receivers (SAT) and DVD players with one area. Basic operation keys are... grouped together in one touch. The remote will now control your TV, press the TV button. To operate your set -top-box or satellite receiver, press the SAT button. The remote will now control your cable box ...
Owners Guide
Page 24
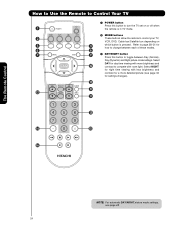
... for a more detailed picture (see page 34 for night time viewing with room light. The Remote Control How to Use the Remote to Control Your TV ³ POWER button Press this button to toggle between each of these modes. ¶ ¾ » DAY/NIGHT button Press this button to turn ...the TV set on or off when ³ the remote is in TV mode. · MODE buttons · These buttons allow the remote to control your TV, VCR, DVD, Cable box/Satellite box depending on ´ ¿ » ² ...
... for a more detailed picture (see page 34 for night time viewing with room light. The Remote Control How to Use the Remote to Control Your TV ³ POWER button Press this button to toggle between each of these modes. ¶ ¾ » DAY/NIGHT button Press this button to turn ...the TV set on or off when ³ the remote is in TV mode. · MODE buttons · These buttons allow the remote to control your TV, VCR, DVD, Cable box/Satellite box depending on ´ ¿ » ² ...
Owners Guide
Page 25
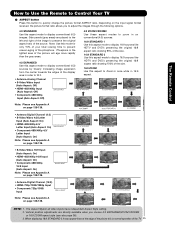
The Remote Control How to Use the Remote to Control Your TV ¿ ASPECT button Press this aspect mode to display 16:9 sources like HDTV and DVD's preserving the original 16:9 aspect ratio showing 100% of the ... directly available when you to adjust the images through the following options. 4:3 STANDARD Use this aspect mode to preserve the original aspect ratio of the TV 25 Vertical position adjustments are placed to the left and right of the image to display conventional (4:3) images. The Aspect Style in 16:9 aspect. Note...
The Remote Control How to Use the Remote to Control Your TV ¿ ASPECT button Press this aspect mode to display 16:9 sources like HDTV and DVD's preserving the original 16:9 aspect ratio showing 100% of the ... directly available when you to adjust the images through the following options. 4:3 STANDARD Use this aspect mode to preserve the original aspect ratio of the TV 25 Vertical position adjustments are placed to the left and right of the image to display conventional (4:3) images. The Aspect Style in 16:9 aspect. Note...


