Owners Guide
Page 3
...material. Lead Notice This product contains lead. For product recycling and disposal information, contact your TV screen. FOR MORE INFORMATION, CALL 1-800-HITACHI. 3 Never connect the plasma television to dripping or splashing and objects filled with applicable environmental laws. Public viewing of copyrighted ...services such as this can be authorized, and is intended for more information call your HITACHI Factory Warranty. Note • There are no user serviceable parts inside the plasma television. • Model and serial numbers are covered in the instructions, as video ...
...material. Lead Notice This product contains lead. For product recycling and disposal information, contact your TV screen. FOR MORE INFORMATION, CALL 1-800-HITACHI. 3 Never connect the plasma television to dripping or splashing and objects filled with applicable environmental laws. Public viewing of copyrighted ...services such as this can be authorized, and is intended for more information call your HITACHI Factory Warranty. Note • There are no user serviceable parts inside the plasma television. • Model and serial numbers are covered in the instructions, as video ...

Owners Guide
Page 4
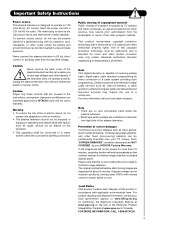
... 42" models is WM07S and for the 55" models is designed for a maximum tilting angle of 45 degrees from vertical. 2. Please see page 7 for optional www.hitachi.us/tv ... web site at: website for important information related to the wall mount. This plasma television product is WM07L. This stand for models H4011, H4011A series are similar ...42" included) For U.S. Replace the cover. Open the battery cover of the remote control by pushing down and sliding the back cover off. 2. Ceiling mounting is not recommended. CAUTION: Do not insert batteries with Hitachi P42H401...
... 42" models is WM07S and for the 55" models is designed for a maximum tilting angle of 45 degrees from vertical. 2. Please see page 7 for optional www.hitachi.us/tv ... web site at: website for important information related to the wall mount. This plasma television product is WM07L. This stand for models H4011, H4011A series are similar ...42" included) For U.S. Replace the cover. Open the battery cover of the remote control by pushing down and sliding the back cover off. 2. Ceiling mounting is not recommended. CAUTION: Do not insert batteries with Hitachi P42H401...
Owners Guide
Page 5
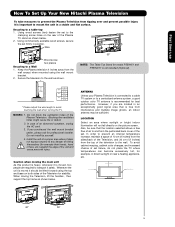
... How To Set Up Your New Hitachi Plasma Television To take measures to prevent the Plasma Television from tipping over and prevent possible injury it is important to a Wall 1. Using wood screws (two) fasten the set . Do not block the ventilation holes of the Plasma TV stand as shown below . However,... personal injury. Blocking the ventilation holes might cause fire or defect. 2. Install the unit at a proper area where it is not included (Optional). A 42" 4 in. 10 cm 50" 4 in. 10 cm 55" 4 in position. When moving the main unit As this product is heavy, whenever it...
... How To Set Up Your New Hitachi Plasma Television To take measures to prevent the Plasma Television from tipping over and prevent possible injury it is important to a Wall 1. Using wood screws (two) fasten the set . Do not block the ventilation holes of the Plasma TV stand as shown below . However,... personal injury. Blocking the ventilation holes might cause fire or defect. 2. Install the unit at a proper area where it is not included (Optional). A 42" 4 in. 10 cm 50" 4 in. 10 cm 55" 4 in position. When moving the main unit As this product is heavy, whenever it...
Owners Guide
Page 6
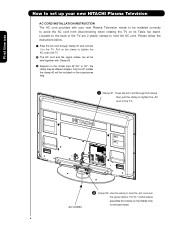
... cord to hold the AC cord. Pull on the clamp to tighten the AC cord to the TV. · The AC cord and the signal cables can all be held together with your new HITACHI Plasma Television AC CORD INSTALLATION INSTRUCTION The AC cord provided with Clamp #2. » Depend on the model size... 42",50" or 55", the clamp may be included on the accessories bag. ³ Clamp #1 : Pass the AC cord...
... cord to hold the AC cord. Pull on the clamp to tighten the AC cord to the TV. · The AC cord and the signal cables can all be held together with your new HITACHI Plasma Television AC CORD INSTALLATION INSTRUCTION The AC cord provided with Clamp #2. » Depend on the model size... 42",50" or 55", the clamp may be included on the accessories bag. ³ Clamp #1 : Pass the AC cord...
Owners Guide
Page 7
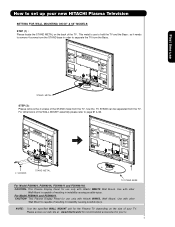
... in instability causing possible injury. First time use How to set up your TV. Use with Hitachi WM07S Wall Mount. Please access our web site at: www.hitachi.us/tv for recommended accessories for the Plasma TV depending on the size of your new HITACHI Plasma Television SETTING FOR WALL MOUNTING ON 50" & 55" MODELS STEP (1) : Please locate...
... in instability causing possible injury. First time use How to set up your TV. Use with Hitachi WM07S Wall Mount. Please access our web site at: www.hitachi.us/tv for recommended accessories for the Plasma TV depending on the size of your new HITACHI Plasma Television SETTING FOR WALL MOUNTING ON 50" & 55" MODELS STEP (1) : Please locate...
Owners Guide
Page 8
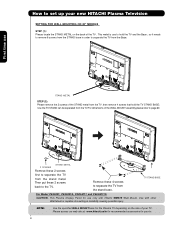
...stand metal. This metal is capable of resulting in order to separate the TV from the TV, then remove 4 screws that hold the TV and the Base ; This Plasma Display Panel for your TV. TV STAND BASE For Model P42H401, P42H401A, P42H4011 and P42H4011A CAUTION- Then put these 4 screws to separate... the TV STAND can be separated from the TV.For dimensions of the WALL MOUNT assembly please refer to page 60. 2 SCREWS STAND METAL Remove these 2 screws first to separate the TV from the stand base. How to set up your new HITACHI Plasma Television SETTING FOR WALL MOUNTING ON 42" MODELS...
...stand metal. This metal is capable of resulting in order to separate the TV from the TV, then remove 4 screws that hold the TV and the Base ; This Plasma Display Panel for your TV. TV STAND BASE For Model P42H401, P42H401A, P42H4011 and P42H4011A CAUTION- Then put these 4 screws to separate... the TV STAND can be separated from the TV.For dimensions of the WALL MOUNT assembly please refer to page 60. 2 SCREWS STAND METAL Remove these 2 screws first to separate the TV from the stand base. How to set up your new HITACHI Plasma Television SETTING FOR WALL MOUNTING ON 42" MODELS...

Owners Guide
Page 9
... connector may appear on the TV. R 4" Minimum If the TV's audio output will be connected to a Hi-Fi system's external speakers, the best audio performance will require some experimentation with speaker placement for the antenna mixer. Consult your new HITACHI Plasma Television VIEWING The best picture ...is recommended. 9 If so, drapes or screens can be used to reduce the reflection or the TV can be obtained by sitting directly in a different section ...
... connector may appear on the TV. R 4" Minimum If the TV's audio output will be connected to a Hi-Fi system's external speakers, the best audio performance will require some experimentation with speaker placement for the antenna mixer. Consult your new HITACHI Plasma Television VIEWING The best picture ...is recommended. 9 If so, drapes or screens can be used to reduce the reflection or the TV can be obtained by sitting directly in a different section ...
Owners Guide
Page 11
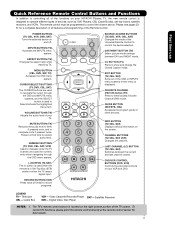
... the mode of the Universal Remote Control to complete mute if pressed twice. FAVORITE CHANNEL (FAV CH) button (TV) Press to restore audio level. INFO BUTTON (TV, CBL, SAT) Displays various information on your HITACHI Plasma TV, the new remote control is in Set-Top-Box (STB) mode or when the... TV uses a digital input. Television CBL - Cable Box VCR - VOLUME BUTTONS (TV) Adjusts the audio level of your VCR and ...
... the mode of the Universal Remote Control to complete mute if pressed twice. FAVORITE CHANNEL (FAV CH) button (TV) Press to restore audio level. INFO BUTTON (TV, CBL, SAT) Displays various information on your HITACHI Plasma TV, the new remote control is in Set-Top-Box (STB) mode or when the... TV uses a digital input. Television CBL - Cable Box VCR - VOLUME BUTTONS (TV) Adjusts the audio level of your VCR and ...
Owners Guide
Page 12
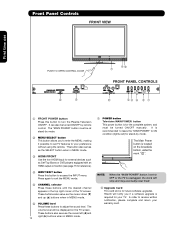
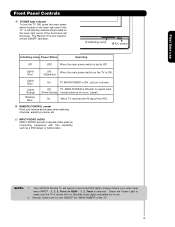
... you if a software upgrade is required for your TV. It is recommended to leave the "MAIN POWER"...". The Main Power button is located on the TV screen. This button also serves as the SELECT... When the "MAIN POWER" button is set TV features to adjust the sound level. The "... and must be turned ON/OFF manually. Hitachi will notify you to enter the MENU, making... buttons when in the top right corner of the TV screen. Front Panel Controls FRONT VIEW First time use...; FRONT POWER button Press this button to OFF or the TV is unplugged, the clock will stop and may eventually reset ...
... you if a software upgrade is required for your TV. It is recommended to leave the "MAIN POWER"...". The Main Power button is located on the TV screen. This button also serves as the SELECT... When the "MAIN POWER" button is set TV features to adjust the sound level. The "... and must be turned ON/OFF manually. Hitachi will notify you to enter the MENU, making... buttons when in the top right corner of the TV screen. Front Panel Controls FRONT VIEW First time use...; FRONT POWER button Press this button to OFF or the TV is unplugged, the clock will stop and may eventually reset ...
Owners Guide
Page 13
... Status Operating Off OFF. Off TV MAIN POWER is now ready for connecting equipment with no signal input (Power Saving) except antenna (no video input when INPUT : 1, 2, 3, Front or HDMI : 1, 2, Front is set to Off. NOTES: 1. Your HITACHI Plasma TV will illuminate. When the main ...power switch is selected. Lights Red OFF. signal). On When TV receives the IR signal from R/C. ቫ REMOTE CONTROL sensor Point your remote at this capability, such as...
... Status Operating Off OFF. Off TV MAIN POWER is now ready for connecting equipment with no signal input (Power Saving) except antenna (no video input when INPUT : 1, 2, 3, Front or HDMI : 1, 2, Front is set to Off. NOTES: 1. Your HITACHI Plasma TV will illuminate. When the main ...power switch is selected. Lights Red OFF. signal). On When TV receives the IR signal from R/C. ቫ REMOTE CONTROL sensor Point your remote at this capability, such as...
Owners Guide
Page 16
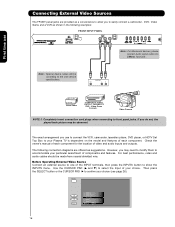
The exact arrangement you do not, the played back picture may need to modify them to accommodate your Plasma TV is dependent on the model and features of each component for the location of video and audio inputs and outputs. Completely insert connection cord plugs ...
The exact arrangement you do not, the played back picture may need to modify them to accommodate your Plasma TV is dependent on the model and features of each component for the location of video and audio inputs and outputs. Completely insert connection cord plugs ...
Owners Guide
Page 22
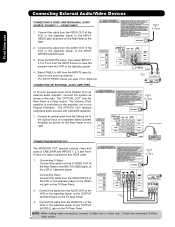
...audio level of the VCR or the laserdisc player to the OUTPUT (AUDIO/R) jack on the TV Rear Panel. 2. The "OPTICAL OUT" from the VIDEO OUT of the Plasma TV to the VIDEO out jack on the TV Rear Panel. The OPTICAL OUT terminal outputs all audio sources with Optical IN capability. 1. ...Connect the cable from the Rear Panel is controlled by the amplifier, not by the Plasma Television. Connecting Video: Connect the cable...
...audio level of the VCR or the laserdisc player to the OUTPUT (AUDIO/R) jack on the TV Rear Panel. 2. The "OPTICAL OUT" from the VIDEO OUT of the Plasma TV to the VIDEO out jack on the TV Rear Panel. The OPTICAL OUT terminal outputs all audio sources with Optical IN capability. 1. ...Connect the cable from the Rear Panel is controlled by the amplifier, not by the Plasma Television. Connecting Video: Connect the cable...
Owners Guide
Page 23
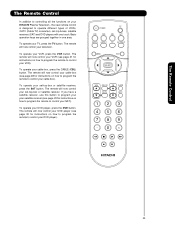
... in one touch. The Remote Control The Remote Control In addition to controlling all the functions on your HITACHI Plasma Television , the new remote control is designed to operate different types of VCRs, CATV (Cable TV) converters, set-top-boxes, satellite receivers (SAT) and DVD players with one area. The remote will now...
... in one touch. The Remote Control The Remote Control In addition to controlling all the functions on your HITACHI Plasma Television , the new remote control is designed to operate different types of VCRs, CATV (Cable TV) converters, set-top-boxes, satellite receivers (SAT) and DVD players with one area. The remote will now...
Owners Guide
Page 32
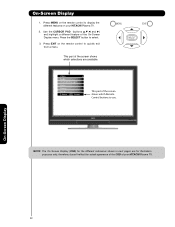
Use the CURSOR PAD (buttons ̆,̄,̇ and ̈) and highlight a different feature of your HITACHI Plasma TV. 2. On-Screen Display 1. On-Screen Display 32 NOTE: The On Screen Display (OSD) for the different submenus shown in next pages are available. Video Audio ..., therefore; doesn't reflect the actual apearance of the OSD of the On-Screen Display menu. Press the SELECT button to use. Press EXIT on your HITACHI Plasma TV.
Use the CURSOR PAD (buttons ̆,̄,̇ and ̈) and highlight a different feature of your HITACHI Plasma TV. 2. On-Screen Display 1. On-Screen Display 32 NOTE: The On Screen Display (OSD) for the different submenus shown in next pages are available. Video Audio ..., therefore; doesn't reflect the actual apearance of the OSD of the On-Screen Display menu. Press the SELECT button to use. Press EXIT on your HITACHI Plasma TV.
Owners Guide
Page 35
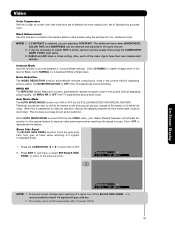
...a balanced White to Black level. Black Side Panel The BLACK SIDE PANEL function turns the gray side bars from the VIDEO menu, your Hitachi Plasma Television will activate the circuitry for this special feature to improve video performance when watching film based sources. It is turned ON from gray to... video inputs have their own independent settings. Press EXIT to quit menu or select SET BLACK SIDE PANEL to return to OFF if the TV experiences picture block noise. Contrast Mode Use this function to choose between the two frame rates must be selected and adjusted in Standard mode....
...a balanced White to Black level. Black Side Panel The BLACK SIDE PANEL function turns the gray side bars from the VIDEO menu, your Hitachi Plasma Television will activate the circuitry for this special feature to improve video performance when watching film based sources. It is turned ON from gray to... video inputs have their own independent settings. Press EXIT to quit menu or select SET BLACK SIDE PANEL to return to OFF if the TV experiences picture block noise. Contrast Mode Use this function to choose between the two frame rates must be selected and adjusted in Standard mode....

Owners Guide
Page 37
... right balance of your preference and to improve the sound quality. 1. Off : turns off the surround sound effect. Audio Audio Select AUDIO to adjust the TV to your speaker system. Press EXIT to quit the MENU, or select AUDIO to return to all speakers. Normal Surround: : Provides the surround effect by... menu. Bass Boost This function allows to select menu item. 2. Press CURSOR PAD ̆ or ̄ to enhance the low frequency audio performance of the Plasma TV internal speakers.
... right balance of your preference and to improve the sound quality. 1. Off : turns off the surround sound effect. Audio Audio Select AUDIO to adjust the TV to your speaker system. Press EXIT to quit the MENU, or select AUDIO to return to all speakers. Normal Surround: : Provides the surround effect by... menu. Bass Boost This function allows to select menu item. 2. Press CURSOR PAD ̆ or ̄ to enhance the low frequency audio performance of the Plasma TV internal speakers.
Owners Guide
Page 49
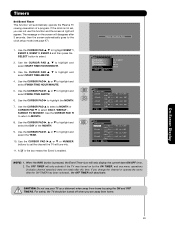
...3 seconds, then the screen automatically goes to highlight and select the DAY of a program. Timers Set Event Timer This function will automatically operate the Plasma TV viewing reservation of the MONTH. 9. The message on by using the ON and OFF TIMERS. Use the CURSOR PAD ̈,̆ or ̄...YEAR. 10. AM AM Jan. 1 2007 Cable ------- ❑ Event2 : -- : -- On-Screen Display 49 If the clock is not set the channel the TV will appear. Use the CURSOR PAD ̆, ̄ to highlight EVENT 1, EVENT 2, EVENT 3, EVENT 4 and then press the SELECT button to select DAILY, WEEKLY...
...3 seconds, then the screen automatically goes to highlight and select the DAY of a program. Timers Set Event Timer This function will automatically operate the Plasma TV viewing reservation of the MONTH. 9. The message on by using the ON and OFF TIMERS. Use the CURSOR PAD ̈,̆ or ̄...YEAR. 10. AM AM Jan. 1 2007 Cable ------- ❑ Event2 : -- : -- On-Screen Display 49 If the clock is not set the channel the TV will appear. Use the CURSOR PAD ̆, ̄ to highlight EVENT 1, EVENT 2, EVENT 3, EVENT 4 and then press the SELECT button to select DAILY, WEEKLY...
Owners Guide
Page 57
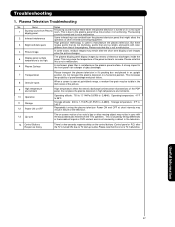
... 4 Picture Image In some cases, residual images may remain after the TV is not a TV malfunction. A strong impact to the front panel risk a danger of the periphery. Useful Information 57 This is due to manufacture the plasma television. This may be in the dark areas of electrical discharges inside ...the panel. When a screen is too high. Please note that this is turned ON; Storage altitude: 300 to 1,114hPa (31,912ft to TV start-up routine. The on...
... 4 Picture Image In some cases, residual images may remain after the TV is not a TV malfunction. A strong impact to the front panel risk a danger of the periphery. Useful Information 57 This is due to manufacture the plasma television. This may be in the dark areas of electrical discharges inside ...the panel. When a screen is too high. Please note that this is turned ON; Storage altitude: 300 to 1,114hPa (31,912ft to TV start-up routine. The on...


