Owners Guide
Page 3
.... • Model and serial numbers are covered in the instructions, as improper changes or modifications not expressly approved by TV stations and cable companies, as well as vases, should not be placed on back side and right side of this copyright protection ...outlet with an extension cord, receptacle, or other sources, may require the use the LCD television's (polarized) plug with a protective earthing connection. Lead/Mercury Notice Hg This product contains lead and one or more information, call 1-800-HITACHI. 3 For more non- Insert the power cord into a 120 volt 60 Hz ...
.... • Model and serial numbers are covered in the instructions, as improper changes or modifications not expressly approved by TV stations and cable companies, as well as vases, should not be placed on back side and right side of this copyright protection ...outlet with an extension cord, receptacle, or other sources, may require the use the LCD television's (polarized) plug with a protective earthing connection. Lead/Mercury Notice Hg This product contains lead and one or more information, call 1-800-HITACHI. 3 For more non- Insert the power cord into a 120 volt 60 Hz ...
Owners Guide
Page 4
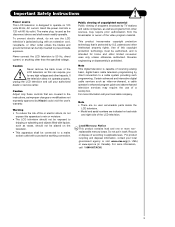
Ceiling mounting is an optional accessory (Not Included). ³ Remote Control Unit CLU-4374A (Part No. This LCD television product is WM07S. EV01841). ¿ Power Swivel Cable (Part No. When replacing old batteries, push them out. 3. Wall Mount unit is not recommended... control by pushing down and sliding the back cover off. 2. Please see page 7 for the 47" & 42" models is designed for the remote control. models: For optional accessories, please access our web site at: www.hitachi.us/tv For Canada models: For optional accessories, please access our web site at: www...
Ceiling mounting is an optional accessory (Not Included). ³ Remote Control Unit CLU-4374A (Part No. This LCD television product is WM07S. EV01841). ¿ Power Swivel Cable (Part No. When replacing old batteries, push them out. 3. Wall Mount unit is not recommended... control by pushing down and sliding the back cover off. 2. Please see page 7 for the 47" & 42" models is designed for the remote control. models: For optional accessories, please access our web site at: www.hitachi.us/tv For Canada models: For optional accessories, please access our web site at: www...
Owners Guide
Page 5
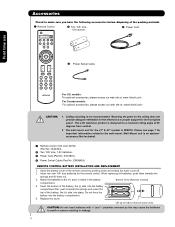
...a centralized antenna system, a good outdoor color TV antenna is 30° (left and right). Also, be sure that is moved it does not expose anyone to any objects on the rear of hitting themselves (for stability. First time use How To Set Up Your New Hitachi LCD Television To take measures to prevent... one end of the monitor when using the power swivel feature. 30° C C D 42" 9.1 in. 14.05 in. 23.1 cm 35.7 cm 30° D 47" 10.2 in. 25.9 cm 15.15 in . 30 cm (a) Power Swivel NOT USED (b) Power Swivel USED * Please adjust the wire length to avoid touching the...
...a centralized antenna system, a good outdoor color TV antenna is 30° (left and right). Also, be sure that is moved it does not expose anyone to any objects on the rear of hitting themselves (for stability. First time use How To Set Up Your New Hitachi LCD Television To take measures to prevent... one end of the monitor when using the power swivel feature. 30° C C D 42" 9.1 in. 14.05 in. 23.1 cm 35.7 cm 30° D 47" 10.2 in. 25.9 cm 15.15 in . 30 cm (a) Power Swivel NOT USED (b) Power Swivel USED * Please adjust the wire length to avoid touching the...

Owners Guide
Page 6
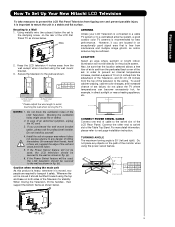
...avoid their disconnection when rotating the TV on its Table top stand. Located on one end to the swivel slot of the Table Top Stand Base. » The AC cord, power swivel cable and the signal cables can all be held together with your new Hitachi LCD Television AC CORD AND POWER ...SWIVEL CABLE INSTALLATION INSTRUCTION The AC cord and power swivel cable provided with Clamp #2. ³ Clamp #1 : Pass the AC cord through Clamp #1 and connect it to the TV. · Swivel slot on the LCD back panel. then pull the clamp...
...avoid their disconnection when rotating the TV on its Table top stand. Located on one end to the swivel slot of the Table Top Stand Base. » The AC cord, power swivel cable and the signal cables can all be held together with your new Hitachi LCD Television AC CORD AND POWER ...SWIVEL CABLE INSTALLATION INSTRUCTION The AC cord and power swivel cable provided with Clamp #2. ³ Clamp #1 : Pass the AC cord through Clamp #1 and connect it to the TV. · Swivel slot on the LCD back panel. then pull the clamp...
Owners Guide
Page 7
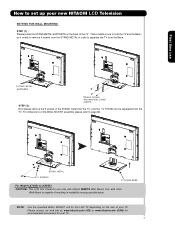
STAND METAL 5 SCREWS TV STAND BASE For Model L47V651 & L42V651 CAUTION- This LCD Flat Panel for use only with other Wall Mount is use How to set up your new HITACHI LCD Television SETTING FOR WALL MOUNTING STEP (1) : Please locate the STAND METAL SUPPORTS on the size of the TV . For dimensions of the STAND metal from...
STAND METAL 5 SCREWS TV STAND BASE For Model L47V651 & L42V651 CAUTION- This LCD Flat Panel for use only with other Wall Mount is use How to set up your new HITACHI LCD Television SETTING FOR WALL MOUNTING STEP (1) : Please locate the STAND METAL SUPPORTS on the size of the TV . For dimensions of the STAND metal from...

Owners Guide
Page 8
... the VHF or UHF antenna leads to screws of the TV and about 10 to the height of the room. Differences in a different section of the picture screen center. Plug the adapter into the antenna terminal on the screen. Consult your new HITACHI LCD Television VIEWING The best picture is recommended. 8 AIR / CABLE...
... the VHF or UHF antenna leads to screws of the TV and about 10 to the height of the room. Differences in a different section of the picture screen center. Plug the adapter into the antenna terminal on the screen. Consult your new HITACHI LCD Television VIEWING The best picture is recommended. 8 AIR / CABLE...
Owners Guide
Page 9
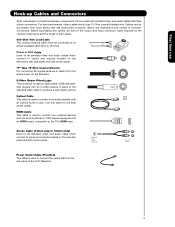
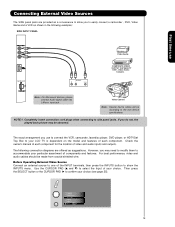
...phono connectors. Before purchasing any cables, be sure of the output and input connector types required by the various components and the length of the LCD Television. 9 S-Video (Super Video) Cable This connector is used to connect the swivel stand to produce a high quality picture. Phono or RCA...with shielded video and audio cables that sell audio/video products. "F" Type 75-Ohm Coaxial Antenna For connecting RF signals (antenna or cable TV) to the antenna jack on camcorders, VCRs and laserdisc players with an HDMI output connection to connect your external devices such as Set-...
...phono connectors. Before purchasing any cables, be sure of the output and input connector types required by the various components and the length of the LCD Television. 9 S-Video (Super Video) Cable This connector is used to connect the swivel stand to produce a high quality picture. Phono or RCA...with shielded video and audio cables that sell audio/video products. "F" Type 75-Ohm Coaxial Antenna For connecting RF signals (antenna or cable TV) to the antenna jack on camcorders, VCRs and laserdisc players with an HDMI output connection to connect your external devices such as Set-...
Owners Guide
Page 10
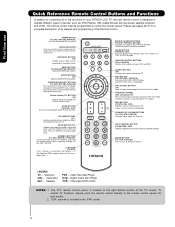
...control the device selected. LEGEND TV - Cable Box SAT - Digital Video Disc Player VCR - To control TV functions, please point the remote control directly at the remote control sensor for TV mode.) INFO BUTTON (TV, STB, CBL, PVR) Displays various information on your HITACHI LCD TV, the new remote control is... designed to show and change the Picture-in the PVR mode. 10 DAY/NIGHT BUTTON (TV) Toggles picture mode settings between ...
...control the device selected. LEGEND TV - Cable Box SAT - Digital Video Disc Player VCR - To control TV functions, please point the remote control directly at the remote control sensor for TV mode.) INFO BUTTON (TV, STB, CBL, PVR) Displays various information on your HITACHI LCD TV, the new remote control is... designed to show and change the Picture-in the PVR mode. 10 DAY/NIGHT BUTTON (TV) Toggles picture mode settings between ...
Owners Guide
Page 11
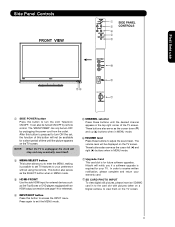
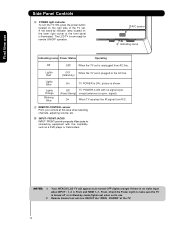
... in the top right corner of this button to access the INPUT menu. Hitachi will be available for your TV. It can only be turned ON/OFF by unplugging the power cord from ...the outlet. The "MAIN POWER" can also be turn OFF by remote control. After this button to turn the LCD...up (̆) buttons when in MENU mode. ቧ VOLUME level Press these buttons until the picture appears on the TV screen. Side Panel Controls FRONT VIEW ቢ SIDE PANEL ቦ CONTROLS ቧ ብ ባ First time...
... in the top right corner of this button to access the INPUT menu. Hitachi will be available for your TV. It can only be turned ON/OFF by unplugging the power cord from ...the outlet. The "MAIN POWER" can also be turn OFF by remote control. After this button to turn the LCD...up (̆) buttons when in MENU mode. ቧ VOLUME level Press these buttons until the picture appears on the TV screen. Side Panel Controls FRONT VIEW ቢ SIDE PANEL ቦ CONTROLS ቧ ብ ባ First time...
Owners Guide
Page 12
...power button located on the right side of the TV set is unplugged from R/C. ቪ REMOTE CONTROL sensor Point your remote at this capability, such as a DVD player or Camcorders. The LCD TV is illuminated. picture is no sync. NOTES: 1. On When TV receives the IR signal from AC line. Lights ...Red Lights Blue Lights Orange Blinking Blue OFF. When the TV set . signal). Your HITACHI LCD TV will appear to make sure the TV is turned off or in Stand-by mode (lights red) when not in use Side Panel Controls ቩ POWER light indicator ...
...power button located on the right side of the TV set is unplugged from R/C. ቪ REMOTE CONTROL sensor Point your remote at this capability, such as a DVD player or Camcorders. The LCD TV is illuminated. picture is no sync. NOTES: 1. On When TV receives the IR signal from AC line. Lights ...Red Lights Blue Lights Orange Blinking Blue OFF. When the TV set . signal). Your HITACHI LCD TV will appear to make sure the TV is turned off or in Stand-by mode (lights red) when not in use Side Panel Controls ቩ POWER light indicator ...
Owners Guide
Page 15
... menu. Use the CURSOR PAD (̆ and ̄) to select the Input of the INPUT terminals, then press the INPUTS button to one of your LCD TV is dependent on the model and features of components and features. Then press the SELECT button or the CURSOR PAD ̈ to side panel jacks...
... menu. Use the CURSOR PAD (̆ and ̄) to select the Input of the INPUT terminals, then press the INPUTS button to one of your LCD TV is dependent on the model and features of components and features. Then press the SELECT button or the CURSOR PAD ̈ to side panel jacks...
Owners Guide
Page 21
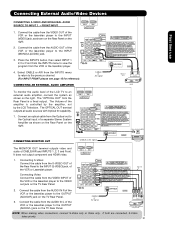
...player. 4. CONNECTING AN EXTERNAL AUDIO AMPLIFIER CABLE or Air signal Back of VCR VIDEOOUT AUDIOOUT OUTPUT VCR To monitor the audio level of the LCD TV to the INPUT (S-VIDEO) jack, of the Rear Panel to an external audio amplifier, connect the system as shown on the Rear Panel.... If both are connected, S-Video takes priority. 21 Connect the cable from the Rear Panel is controlled by the amplifier, not by the LCD Television. It does not output component and HDMI video. 1. Connecting External Audio/Video Devices First time use CONNECTING A VIDEO AND MONAURAL AUDIO SOURCE...
...player. 4. CONNECTING AN EXTERNAL AUDIO AMPLIFIER CABLE or Air signal Back of VCR VIDEOOUT AUDIOOUT OUTPUT VCR To monitor the audio level of the LCD TV to the INPUT (S-VIDEO) jack, of the Rear Panel to an external audio amplifier, connect the system as shown on the Rear Panel.... If both are connected, S-Video takes priority. 21 Connect the cable from the Rear Panel is controlled by the amplifier, not by the LCD Television. It does not output component and HDMI video. 1. Connecting External Audio/Video Devices First time use CONNECTING A VIDEO AND MONAURAL AUDIO SOURCE...

Owners Guide
Page 22
...top-box or satellite receiver (see page 33 for instructions on how to program the remote to control your cable box). To operate your LCD TV, select TV by pressing the Source button of the Source Select on how to program the remote to control your set -top-box or satellite receiver ... cable box, select SAT/CBL by pressing the Source button of the Source Select on the remote. The TV mode indicator will blink, indicating that the remote will now control your HITACHI LCD TV, the new remote control is designed to operate different types of the Source Select on how to program the...
...top-box or satellite receiver (see page 33 for instructions on how to program the remote to control your cable box). To operate your LCD TV, select TV by pressing the Source button of the Source Select on how to program the remote to control your set -top-box or satellite receiver ... cable box, select SAT/CBL by pressing the Source button of the Source Select on the remote. The TV mode indicator will blink, indicating that the remote will now control your HITACHI LCD TV, the new remote control is designed to operate different types of the Source Select on how to program the...

Owners Guide
Page 25
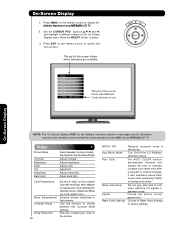
..., press this button to display the dialogue, narration, and/or sound effects of the LCD TV (see pages 26-27). HDMI 1 Select to choose side HDMI INPUT. Your local TV program guide denotes these programs as or . Ƹ GUIDE button [Cable Box (CBL), Satellite Receiver (SAT)/ ... on pages 29-30 for numeric entries. Program Information Program Run Time ANALOG CHANNELS Analog Channel Show Name 3:00PM- 3:30PM ST TV-G A 480i Air 8 KXYZ-HD 3:17PM Main Picture Source and channel indication Broadcast channel identification Clock Audio Broadcast Broadcast Rating Picture ...
..., press this button to display the dialogue, narration, and/or sound effects of the LCD TV (see pages 26-27). HDMI 1 Select to choose side HDMI INPUT. Your local TV program guide denotes these programs as or . Ƹ GUIDE button [Cable Box (CBL), Satellite Receiver (SAT)/ ... on pages 29-30 for numeric entries. Program Information Program Run Time ANALOG CHANNELS Analog Channel Show Name 3:00PM- 3:30PM ST TV-G A 480i Air 8 KXYZ-HD 3:17PM Main Picture Source and channel indication Broadcast channel identification Clock Audio Broadcast Broadcast Rating Picture ...

Owners Guide
Page 29
.... In SPLIT mode, press the CURSOR PAD ( ̇ or ̈ ) to normal viewing press the EXIT button. The Remote Control Picture-In-Picture (PIP) Your HITACHI LCD TV incorporates one program at right to view VCR program as a sub picture while viewing another program as main picture (CABLE/AIR Digital channel). ቢ PIP...
.... In SPLIT mode, press the CURSOR PAD ( ̇ or ̈ ) to normal viewing press the EXIT button. The Remote Control Picture-In-Picture (PIP) Your HITACHI LCD TV incorporates one program at right to view VCR program as a sub picture while viewing another program as main picture (CABLE/AIR Digital channel). ቢ PIP...
Owners Guide
Page 38
...less intense color with more reddish color. Video Audio Channel Manager Locks Timers Setup Power Swivel Move SEL Select This part of your HITACHI LCD TV. 2. Use this to use. Reduces conspicuous noise in the picture. The AUTO COLOR function automatically monitors and adjusts the color to... the CURSOR PAD (buttons ̆,̄,̇ and ̈) and highlight a different feature of background colors. Press EXIT on your HITACHI LCD TV. MPEG NR Auto Movie Mode Auto Color Black Side Panel Aspect Reset Video Settings Reduces mosquito noise in the picture. On-Screen Display...
...less intense color with more reddish color. Video Audio Channel Manager Locks Timers Setup Power Swivel Move SEL Select This part of your HITACHI LCD TV. 2. Use this to use. Reduces conspicuous noise in the picture. The AUTO COLOR function automatically monitors and adjusts the color to... the CURSOR PAD (buttons ̆,̄,̇ and ̈) and highlight a different feature of background colors. Press EXIT on your HITACHI LCD TV. MPEG NR Auto Movie Mode Auto Color Black Side Panel Aspect Reset Video Settings Reduces mosquito noise in the picture. On-Screen Display...

Owners Guide
Page 40
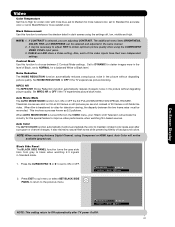
...Day (Dynamic) , Day (Normal) and Night mode. Day (Dynamic) is set the mode and return to the Video menu or press EXIT to your TV's performance. 1. Press EXIT to select the function settings. 3. Day ( Normal ) can independently customize each of color in the picture. Press MENU to ...VIDEO to main menu. 5. If RESET is selected, only the selected input will increase or decrease the brightness of the LCD panel but not the brightness of the LCD panel, this can be adjusted. 2. Contrast Use this function to choose from automatic picture settings to optimize your preference ...
...Day (Dynamic) , Day (Normal) and Night mode. Day (Dynamic) is set the mode and return to the Video menu or press EXIT to your TV's performance. 1. Press EXIT to select the function settings. 3. Day ( Normal ) can independently customize each of color in the picture. Press MENU to ...VIDEO to main menu. 5. If RESET is selected, only the selected input will increase or decrease the brightness of the LCD panel but not the brightness of the LCD panel, this can be adjusted. 2. Contrast Use this function to choose from automatic picture settings to optimize your preference ...
Owners Guide
Page 41
... MPEG NR to the previous menu. Black Side Panel The BLACK SIDE PANEL function turns the gray side bars from the VIDEO menu, your Hitachi LCD Television will not be selected and adjusted in the level of 30 frames or 60 fields like video. Press EXIT to quit menu or select... inputs have their own independent settings. Auto Color The AUTO COLOR function automatically monitors and adjusts the color to maintain constant color levels even after TV power On/Off. 41 The additional menu items BRIGHTNESS, COLOR, TINT, and SHARPNESS can be available (grayed out). It may be necessary to ...
... MPEG NR to the previous menu. Black Side Panel The BLACK SIDE PANEL function turns the gray side bars from the VIDEO menu, your Hitachi LCD Television will not be selected and adjusted in the level of 30 frames or 60 fields like video. Press EXIT to quit menu or select... inputs have their own independent settings. Auto Color The AUTO COLOR function automatically monitors and adjusts the color to maintain constant color levels even after TV power On/Off. 41 The additional menu items BRIGHTNESS, COLOR, TINT, and SHARPNESS can be available (grayed out). It may be necessary to ...

Owners Guide
Page 43
Press CURSOR PAD ̆ or ̄ to right balance of the LCD TV internal speakers. Balance This function will control the left to select menu item. Off : turns off the surround sound effect. Press CURSOR PAD ̇ or &#.... Normal Surround: : Provides the surround effect by locating two or more realistic audio environment. 1.- Audio Audio Video Audio Channel Manager Select AUDIO to adjust the TV to your preference and to enhance the low frequency audio performance of your speaker system. Wide surround enable users to all speakers. Move SEL Select...
Press CURSOR PAD ̆ or ̄ to right balance of the LCD TV internal speakers. Balance This function will control the left to select menu item. Off : turns off the surround sound effect. Press CURSOR PAD ̇ or &#.... Normal Surround: : Provides the surround effect by locating two or more realistic audio environment. 1.- Audio Audio Video Audio Channel Manager Select AUDIO to adjust the TV to your preference and to enhance the low frequency audio performance of your speaker system. Wide surround enable users to all speakers. Move SEL Select...

Owners Guide
Page 55
...see page 53). 1. When the INFO button is pressed, the Event Timer Icon will automatically operate the LCD TV viewing reservation of the MONTH. 9. AM AM Jan. 1 2007 Cable ------- For safety, the TV should be turned off when you change the channel or operate the menu after this function and the screen... Not Set Timers Set Event Timer OR ❑ Event1 : -- : -- A Ȟ✔ in the box means the Event is not set the channel the TV will appear. Use the CURSOR PAD ̈, ̆ or ̄ to highlight and select the YEAR. 10. AM AM Cable AM AM Cable AM AM...
...see page 53). 1. When the INFO button is pressed, the Event Timer Icon will automatically operate the LCD TV viewing reservation of the MONTH. 9. AM AM Jan. 1 2007 Cable ------- For safety, the TV should be turned off when you change the channel or operate the menu after this function and the screen... Not Set Timers Set Event Timer OR ❑ Event1 : -- : -- A Ȟ✔ in the box means the Event is not set the channel the TV will appear. Use the CURSOR PAD ̈, ̆ or ̄ to highlight and select the YEAR. 10. AM AM Cable AM AM Cable AM AM...


