
Owners Guide
Page 1
... THE DTV TRANSITION? Record the model name and serial number of the television. This information is located on the back of your LCD Television for L26D103 IMPORTANT SAFETY INSTRUCTIONS 3 THE REMOTE CONTROL ...12 FIRST TIME USE ...16-17 ON-SCREEN DISPLAY ...18 DVD OPERATION ...23-30 LIMITED WARRANTY ...39 READ THE ENCLOSED INSTRUCTIONS...
... THE DTV TRANSITION? Record the model name and serial number of the television. This information is located on the back of your LCD Television for L26D103 IMPORTANT SAFETY INSTRUCTIONS 3 THE REMOTE CONTROL ...12 FIRST TIME USE ...16-17 ON-SCREEN DISPLAY ...18 DVD OPERATION ...23-30 LIMITED WARRANTY ...39 READ THE ENCLOSED INSTRUCTIONS...
Owners Guide
Page 7
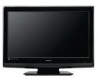
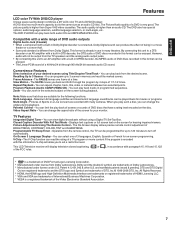
...of DVD discs that discs are trademarks of DVD Format/Logo Licensing Corporation. * Manufactured under U.S. ENGLISH Features LCD color TV With DVD/CD player Unique space saving design combines a 26" LCD color TV and a DVD/CD player. Repeat Playback - Zoom - Multi-Language - Parental Control - Closed Caption Decoder... can repeat chapter, track, title, sides or material between two selected points. V-Chip - You can play back from the remote control, the TV can limit the play such a disc, you can select one frame at a time. You can be programmed for the following...
...of DVD discs that discs are trademarks of DVD Format/Logo Licensing Corporation. * Manufactured under U.S. ENGLISH Features LCD color TV With DVD/CD player Unique space saving design combines a 26" LCD color TV and a DVD/CD player. Repeat Playback - Zoom - Multi-Language - Parental Control - Closed Caption Decoder... can repeat chapter, track, title, sides or material between two selected points. V-Chip - You can play back from the remote control, the TV can limit the play such a disc, you can select one frame at a time. You can be programmed for the following...
Owners Guide
Page 8
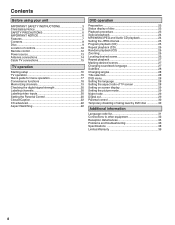
...SAFETY PRECAUTIONS 6 IMPORTANT NOTICE 6 Features 7 Contents 8 Disc 9 Location of controls 10 Remote control 12 Power source 13 Antenna connections 14 Cable TV connections 15 TV operation Starting setup 16 TV operation 16 Quick guide for menu operation 17 Convenience functions 18 Memorizing channels 19 Checking ... CD playback 24 Setting the JPEG interval 25 Program playback (CD 25 Repeat playback (CD 26 Random playback (CD 26 Zooming 26 Locating desired scene 26 Repeat playback 27 Marking desired scenes 27 Changing soundtrack language 27 Subtitles 28 Changing angles 28 ...
...SAFETY PRECAUTIONS 6 IMPORTANT NOTICE 6 Features 7 Contents 8 Disc 9 Location of controls 10 Remote control 12 Power source 13 Antenna connections 14 Cable TV connections 15 TV operation Starting setup 16 TV operation 16 Quick guide for menu operation 17 Convenience functions 18 Memorizing channels 19 Checking ... CD playback 24 Setting the JPEG interval 25 Program playback (CD 25 Repeat playback (CD 26 Random playback (CD 26 Zooming 26 Locating desired scene 26 Repeat playback 27 Marking desired scenes 27 Changing soundtrack language 27 Subtitles 28 Changing angles 28 ...

Owners Guide
Page 10
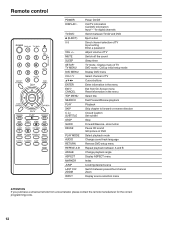
buttons and INPUT/ENTER button can be used to display the menu screen. CHANNEL / buttons, VOLUME +/- buttons CHANNEL /1 (PLAY) button CHANNEL /3 (STOP) button MENU button INPUT/ENTER button POWER button To display the menu screen. Location of controls Front Left side DISC slot Remote sensor POWER indicator EJECT button VOLUME +/- Press MENU button to select the desired setting during the menu screen operations. 10
buttons and INPUT/ENTER button can be used to display the menu screen. CHANNEL / buttons, VOLUME +/- buttons CHANNEL /1 (PLAY) button CHANNEL /3 (STOP) button MENU button INPUT/ENTER button POWER button To display the menu screen. Location of controls Front Left side DISC slot Remote sensor POWER indicator EJECT button VOLUME +/- Press MENU button to select the desired setting during the menu screen operations. 10
Owners Guide
Page 12
... angle Display ASPECT menu Index Locating desired scene Switch between TV/AV and DVD Eject a disc Direct channel selection of TV Input setting Enter a password Adjust volume of TV Cursor buttons Enter information in the menu Exit from a local retailer, please contact the remote manufacturer for digital channels Switch between present/last channel Zoom...
... angle Display ASPECT menu Index Locating desired scene Switch between TV/AV and DVD Eject a disc Direct channel selection of TV Input setting Enter a password Adjust volume of TV Cursor buttons Enter information in the menu Exit from a local retailer, please contact the remote manufacturer for digital channels Switch between present/last channel Zoom...

Owners Guide
Page 13
... 1 Open the battery compartment cover in the direction of a damaged battery if can become very hot and are dangerous. If the spring terminal in the remote control remains in contact with a side of the arrow. 2 Install two "AAA" batteries, paying 3 Replace the compartment cover. TO USE AC POWER ... use caution when inserting batteries to leak or burst. THIS COULD CAUSE FIRE, ELECTRICAL SHOCK, OR DAMAGE. Operation • Aim the remote control at both the LCD TV/DVD and the wall outlet. • The AC Cord has a grounding-type AC line plug. Read the battery warnings and use ...
... 1 Open the battery compartment cover in the direction of a damaged battery if can become very hot and are dangerous. If the spring terminal in the remote control remains in contact with a side of the arrow. 2 Install two "AAA" batteries, paying 3 Replace the compartment cover. TO USE AC POWER ... use caution when inserting batteries to leak or burst. THIS COULD CAUSE FIRE, ELECTRICAL SHOCK, OR DAMAGE. Operation • Aim the remote control at both the LCD TV/DVD and the wall outlet. • The AC Cord has a grounding-type AC line plug. Read the battery warnings and use ...

Owners Guide
Page 17
SLEEP To set the TV to turn off the sound. To confirm the sleep timer setting, press SLEEP and the remaining time will appear. ENGLISH DISPLAY Press DISPLAY to display the current information on the remote control. LAST CH This button allows you were watching. After the sleep timer is ...programmed, the display will appear briefly every ten minutes to the normal screen. The TV menu screen will be called in the same way as ...
SLEEP To set the TV to turn off the sound. To confirm the sleep timer setting, press SLEEP and the remaining time will appear. ENGLISH DISPLAY Press DISPLAY to display the current information on the remote control. LAST CH This button allows you were watching. After the sleep timer is ...programmed, the display will appear briefly every ten minutes to the normal screen. The TV menu screen will be called in the same way as ...

Owners Guide
Page 20
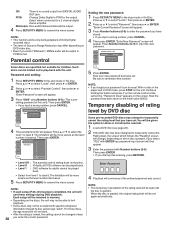
...which you to select the desired label for your password (4 digits) using Number buttons (0-9), then press ENTER. Your original remote control will be reset after "Scan" on the TV, select a channel, or press DISPLAY. Channel Labels Channel Number Channel Labels Label Clear 15-1 A >> 5 When ..."Channel", then press ▶ or ENTER. 2 Press ▲ or ▼ to select "Signal Meter". 3 Press ▶ or ENTER to "TV" and "Movie" if this restriction separately. Labeling channels Channel label appear with the channel number display each channel. Video 2 - The restriction applies to...
...which you to select the desired label for your password (4 digits) using Number buttons (0-9), then press ENTER. Your original remote control will be reset after "Scan" on the TV, select a channel, or press DISPLAY. Channel Labels Channel Number Channel Labels Label Clear 15-1 A >> 5 When ..."Channel", then press ▶ or ENTER. 2 Press ▲ or ▼ to select "Signal Meter". 3 Press ▶ or ENTER to "TV" and "Movie" if this restriction separately. Labeling channels Channel label appear with the channel number display each channel. Video 2 - The restriction applies to...

Owners Guide
Page 23
... bottom edges of the picture may be displayed by pressing ASPECT on the remote control. NOTE: • When connecting to other equipment, unplug the unit from the TV mode. • When using an amplifier, switch on the amplifier. 3 Press TV/DVD to operate a menu feature. NOTE: • Some High Definition and/or... broadcasts may not allow you to change to green. • Each time you turn the unit ON, the TV/DVD starts from the AC outlet. 2 Press POWER on the unit or on the remote control to "Reading" and then playback will display the size of standard 4:3 with a scanning rate of the...
... bottom edges of the picture may be displayed by pressing ASPECT on the remote control. NOTE: • When connecting to other equipment, unplug the unit from the TV mode. • When using an amplifier, switch on the amplifier. 3 Press TV/DVD to operate a menu feature. NOTE: • Some High Definition and/or... broadcasts may not allow you to change to green. • Each time you turn the unit ON, the TV/DVD starts from the AC outlet. 2 Press POWER on the unit or on the remote control to "Reading" and then playback will display the size of standard 4:3 with a scanning rate of the...
Owners Guide
Page 30
... • If you interrupt the entering, press RETURN. Now your password it can be more severe as the level number decreases. 5 Press SETUP/TV MENU to level 8. Continue holding the button and press 7 on the unit. Enter Password 4 Playback will appear. NOTE: • This temporary ...The parental control setting does not function. • Level 8 : Virtually all DVD software can be output in DVD mode, press STOP on the remote control at the same time. Press ▲ or ▼ to select the level 1 to PCM for the output. Setting the new password: 1 ...
... • If you interrupt the entering, press RETURN. Now your password it can be more severe as the level number decreases. 5 Press SETUP/TV MENU to level 8. Continue holding the button and press 7 on the unit. Enter Password 4 Playback will appear. NOTE: • This temporary ...The parental control setting does not function. • Level 8 : Virtually all DVD software can be output in DVD mode, press STOP on the remote control at the same time. Press ▲ or ▼ to select the level 1 to PCM for the output. Setting the new password: 1 ...
Owners Guide
Page 34
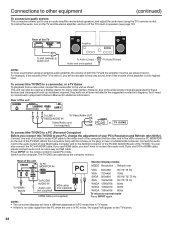
... to your PC, change the adjustment of your Multimedia computer and to the unit as VGA cable. Switch on the remote control to select PC mode. The TV/DVD can operate as a display device for additional information. Rear of the unit To LINE 1 VIDEO/AUDIO IN To Video/Audio OUT ...To VAR (VARIABLE) AUDIO OUT To Audio (L) Input Audio cord (not supplied) To Audio (R) Input NOTE: To hear sound when using the TV's remote control. However, due to the wide variety of signals generated by these devices and subsequent hook-up variations required, they have to connect the audio...
... to your PC, change the adjustment of your Multimedia computer and to the unit as VGA cable. Switch on the remote control to select PC mode. The TV/DVD can operate as a display device for additional information. Rear of the unit To LINE 1 VIDEO/AUDIO IN To Video/Audio OUT ...To VAR (VARIABLE) AUDIO OUT To Audio (L) Input Audio cord (not supplied) To Audio (R) Input NOTE: To hear sound when using the TV's remote control. However, due to the wide variety of signals generated by these devices and subsequent hook-up variations required, they have to connect the audio...
Owners Guide
Page 37
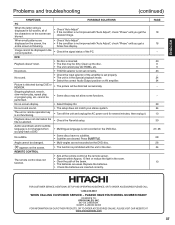
Stopping playback, search, slow-motion play, repeat play, or program play CD-ROMs, etc. The unit or remote operation key is flickering. No picture. • TV/DVD selector is not set properly. • The unit is in full-screen, all of the beam. • The batteries are blurred. No sound. ... of the PC. Playback does not start . • No disc is inserted. • The disc may not allow some functions. • Select Display On. REMOTE CONTROL The remote control does not function. • The function is prohibited with the unit or the disc. • Aim at the...
Stopping playback, search, slow-motion play, repeat play, or program play CD-ROMs, etc. The unit or remote operation key is flickering. No picture. • TV/DVD selector is not set properly. • The unit is in full-screen, all of the beam. • The batteries are blurred. No sound. ... of the PC. Playback does not start . • No disc is inserted. • The disc may not allow some functions. • Select Display On. REMOTE CONTROL The remote control does not function. • The function is prohibited with the unit or the disc. • Aim at the...
Owners Guide
Page 38
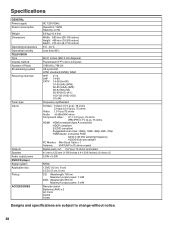
...) Height: 498 mm (19-5/8 inches) Depth: 214 mm (8-7/16 inches) 5˚C - 40˚C Less than 80% 26.01 inches (660.5 mm diagonal) Transmission TFT color LCD panel 1366 (H) x 768 (V) US system M ATSC standard (8VSB), QAM VHF UHF CATV 2-13 14-69 14-36 (A)-(W) 37-59 (AA)-(WW) 60-85 (AAA)-(ZZZ) ... NTSC 1.DVD (12 cm, 8 cm) 2.CD (12 cm, 8 cm) CD: Wavelength: 790 nm Maximum output power: 7 mW DVD: Wavelength: 655 nm Maximum output power: 5 mW Remote control Batteries (AAA) x 2 AC Cord Clamp Screw Designs and specifications are subject to change without notice. 38
...) Height: 498 mm (19-5/8 inches) Depth: 214 mm (8-7/16 inches) 5˚C - 40˚C Less than 80% 26.01 inches (660.5 mm diagonal) Transmission TFT color LCD panel 1366 (H) x 768 (V) US system M ATSC standard (8VSB), QAM VHF UHF CATV 2-13 14-69 14-36 (A)-(W) 37-59 (AA)-(WW) 60-85 (AAA)-(ZZZ) ... NTSC 1.DVD (12 cm, 8 cm) 2.CD (12 cm, 8 cm) CD: Wavelength: 790 nm Maximum output power: 7 mW DVD: Wavelength: 655 nm Maximum output power: 5 mW Remote control Batteries (AAA) x 2 AC Cord Clamp Screw Designs and specifications are subject to change without notice. 38


