Owners Guide
Page 3
... owner's manual of the other equipment, turn off the power and unplug all servicing to qualified service personnel. A grounding type plug has two blades and a third grounding prong. The wide blade or the third prong are required, be taken to keep from the apparatus. 11) Only use attachments/accessories specified by the manufacturer. 12) Use only with cart, stand, tripod, bracket, or table...
... owner's manual of the other equipment, turn off the power and unplug all servicing to qualified service personnel. A grounding type plug has two blades and a third grounding prong. The wide blade or the third prong are required, be taken to keep from the apparatus. 11) Only use attachments/accessories specified by the manufacturer. 12) Use only with cart, stand, tripod, bracket, or table...
Owners Guide
Page 4
... any interference received, including interference that may cause undesired operation. Power source This LCD television is subject to output distorted sound for about an hour before switching it may cause hearing damage. 27) Do not look into the opening of the disc slot or ventilation opening of the LCD television as close to call your authorized dealer or service center. Caution Never remove the...
... any interference received, including interference that may cause undesired operation. Power source This LCD television is subject to output distorted sound for about an hour before switching it may cause hearing damage. 27) Do not look into the opening of the disc slot or ventilation opening of the LCD television as close to call your authorized dealer or service center. Caution Never remove the...

Owners Guide
Page 5
... the proper stands or installed according to making home entertainment enjoyable and safe. HITACHI CARES! • The consumer electronics industry is commited to the manufacturer's recommendations. • Flat Panel displays that they cannot be pulled or grabed by an independent laboratory (such as UL, CSA, ETL). • Follow all cords and cables connected to walls with furniture and television sets. • Don...
... the proper stands or installed according to making home entertainment enjoyable and safe. HITACHI CARES! • The consumer electronics industry is commited to the manufacturer's recommendations. • Flat Panel displays that they cannot be pulled or grabed by an independent laboratory (such as UL, CSA, ETL). • Follow all cords and cables connected to walls with furniture and television sets. • Don...
Owners Guide
Page 7
... & other U.S. The picture quality is connected, Dolby Digital sound can be output from the remote control, the TV can zoom in memory and recall the marked scenes. The DVD PLAYER can view digital broadcasts without using Title/Chapter/Time/Track - By connecting this unit to an AV amplifier with a built-in programmed sequences. Repeat Playback - Multi-Language - You can be programmed for hearing impaired viewers. This LCD Television receiver will allow...
... & other U.S. The picture quality is connected, Dolby Digital sound can be output from the remote control, the TV can zoom in memory and recall the marked scenes. The DVD PLAYER can view digital broadcasts without using Title/Chapter/Time/Track - By connecting this unit to an AV amplifier with a built-in programmed sequences. Repeat Playback - Multi-Language - You can be programmed for hearing impaired viewers. This LCD Television receiver will allow...
Owners Guide
Page 8
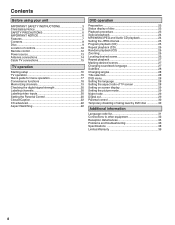
... your unit IMPORTANT SAFETY INSTRUCTIONS 3 Child Safety Notice 5 SAFETY PRECAUTIONS 6 IMPORTANT NOTICE 6 Features 7 Contents 8 Disc 9 Location of controls 10 Remote control 12 Power source 13 Antenna connections 14 Cable TV connections 15 TV operation Starting setup 16 TV operation 16 Quick guide for menu operation 17 Convenience functions 18 Memorizing channels 19 Checking the digital-signal strength 20 Labeling channels 20 Labeling video inputs 20 Setting the Parental Control 20 Closed Caption 22 CC advanced 22 Aspect Switching 22 DVD operation Preparation 23 Status...
... your unit IMPORTANT SAFETY INSTRUCTIONS 3 Child Safety Notice 5 SAFETY PRECAUTIONS 6 IMPORTANT NOTICE 6 Features 7 Contents 8 Disc 9 Location of controls 10 Remote control 12 Power source 13 Antenna connections 14 Cable TV connections 15 TV operation Starting setup 16 TV operation 16 Quick guide for menu operation 17 Convenience functions 18 Memorizing channels 19 Checking the digital-signal strength 20 Labeling channels 20 Labeling video inputs 20 Setting the Parental Control 20 Closed Caption 22 CC advanced 22 Aspect Switching 22 DVD operation Preparation 23 Status...
Owners Guide
Page 12
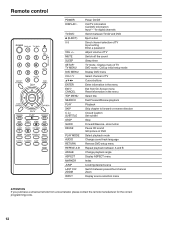
... a universal remote from On-Screen menu Reset information in the menu Exit from a local retailer, please contact the remote manufacturer for the correct programming code. 12 slow motion Pause CD sound Still picture of DVD Select playback mode Change sound track language Remove DVD setup menu Repeat playback between A and B Change playback angle Display ASPECT menu Index Locating desired scene Switch between TV/AV and DVD Eject a disc Direct channel selection of TV Input setting Enter a password Adjust volume of TV DVD mode - Display menu of TV Switch off the sound Sleep timer TV mode...
... a universal remote from On-Screen menu Reset information in the menu Exit from a local retailer, please contact the remote manufacturer for the correct programming code. 12 slow motion Pause CD sound Still picture of DVD Select playback mode Change sound track language Remove DVD setup menu Repeat playback between A and B Change playback angle Display ASPECT menu Index Locating desired scene Switch between TV/AV and DVD Eject a disc Direct channel selection of TV Input setting Enter a password Adjust volume of TV DVD mode - Display menu of TV Switch off the sound Sleep timer TV mode...

Owners Guide
Page 13
... THE POWER VOLTAGE DISPLAYED. CONTACT THE DEALER THAT YOU PURCHASED THE UNIT FROM. 13 Operation • Aim the remote control at both the LCD TV/DVD and the wall outlet. • The AC Cord has a grounding-type AC line plug. Never use caution when inserting batteries to insert the cord securely at the remote sensor and press control buttons to operate. • Operate the remote control within a 30° angle on the remote sensor...
... THE POWER VOLTAGE DISPLAYED. CONTACT THE DEALER THAT YOU PURCHASED THE UNIT FROM. 13 Operation • Aim the remote control at both the LCD TV/DVD and the wall outlet. • The AC Cord has a grounding-type AC line plug. Never use caution when inserting batteries to insert the cord securely at the remote sensor and press control buttons to operate. • Operate the remote control within a 30° angle on the remote sensor...
Owners Guide
Page 16
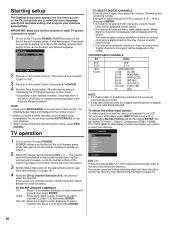
... corresponding Number buttons (0-7), then press ENTER. Input List 0.TV 1.Video 1 2.Video 2 3.Component 4.HDMI 1 5.HDMI 2 6.PC 7.DVD (Built-in the process of blue bars also decreases. 3 Set the Signal Type option to your LCD TV, such as needed. For proper operation, before selecting channels, they should be indicated on page 19). 4 Press the Direct Channel Selection (0-9, -) buttons to select channel 12, press 1, 2, then press ENTER. 100-135: Press the 3 digits in order. As the volume...
... corresponding Number buttons (0-7), then press ENTER. Input List 0.TV 1.Video 1 2.Video 2 3.Component 4.HDMI 1 5.HDMI 2 6.PC 7.DVD (Built-in the process of blue bars also decreases. 3 Set the Signal Type option to your LCD TV, such as needed. For proper operation, before selecting channels, they should be indicated on page 19). 4 Press the Direct Channel Selection (0-9, -) buttons to select channel 12, press 1, 2, then press ENTER. 100-135: Press the 3 digits in order. As the volume...

Owners Guide
Page 17
...: • If no buttons are pressed for a few seconds, DISPLAY screen will return to normal operation automatically. • Channel number • V-Chip rating • Sleep timer • Audio information (Stereo, SAP or Mono) • Channel label (if preset) • Signal type • Picture size • Resolution Press DISPLAY again to normal TV- NOTE: • After a few seconds. ENGLISH DISPLAY Press DISPLAY to the normal screen. Main Menu Video >> Audio Channel Locks Setup : Move ENTER:Select 3 Press...
...: • If no buttons are pressed for a few seconds, DISPLAY screen will return to normal operation automatically. • Channel number • V-Chip rating • Sleep timer • Audio information (Stereo, SAP or Mono) • Channel label (if preset) • Signal type • Picture size • Resolution Press DISPLAY again to normal TV- NOTE: • After a few seconds. ENGLISH DISPLAY Press DISPLAY to the normal screen. Main Menu Video >> Audio Channel Locks Setup : Move ENTER:Select 3 Press...

Owners Guide
Page 18
...connect the HDMI device to the factory settings. Icon Video Audio Selected Items Picture Setting Brightness / Contrast / Sharpness / Color / Tint Color Temperature Backlight Picture Mode Sports Standard Movie Custom Aspect Auto Movie On/Off Mode PC Setting H Position / V Position Clock Phase Auto Adjust Noise On/Off Reduction Bass / Treble / Balance MTS Stereo / Mono / SAP Surround On/Off Audio Language HDMI 1 Audio HDMI DVI Speakers On/Off Channel Channel Manager Signal Meter Auto Channel Scan Channel Labels Locks Setup Closed Captions Menu Language Video...
...connect the HDMI device to the factory settings. Icon Video Audio Selected Items Picture Setting Brightness / Contrast / Sharpness / Color / Tint Color Temperature Backlight Picture Mode Sports Standard Movie Custom Aspect Auto Movie On/Off Mode PC Setting H Position / V Position Clock Phase Auto Adjust Noise On/Off Reduction Bass / Treble / Balance MTS Stereo / Mono / SAP Surround On/Off Audio Language HDMI 1 Audio HDMI DVI Speakers On/Off Channel Channel Manager Signal Meter Auto Channel Scan Channel Labels Locks Setup Closed Captions Menu Language Video...

Owners Guide
Page 19
... is broadcasting a digital signal to set that you may call our toll-free customer service line at 1-800-289-0981. • New digital channels may be programmed into the channel memory. Before selecting channels, they must be added to your area. • It may visit www.antennaweb.org to perform the "Scan" procedure regularly. VHF/UHF channels Cable - Auto Channel Scan Source Scan Cable Cancel Analog Channel Found : 7 Digital Channel Found : 5 Scanning : Move ENTER...
... is broadcasting a digital signal to set that you may call our toll-free customer service line at 1-800-289-0981. • New digital channels may be programmed into the channel memory. Before selecting channels, they must be added to your area. • It may visit www.antennaweb.org to perform the "Scan" procedure regularly. VHF/UHF channels Cable - Auto Channel Scan Source Scan Cable Cancel Analog Channel Found : 7 Digital Channel Found : 5 Scanning : Move ENTER...

Owners Guide
Page 20
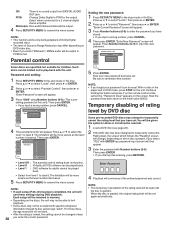
... ▼ to select "Channel Labels", then press ▶ or ENTER. Video 2 - HDMI 2 - : Move - VCR DVD DTV SAT CBL HD : Adjust : Uses the default label name : Video cassette recorder : DVD video : Digital TV set-top box : Satellite box : Cable box : HDMI device (only for HDMI inputs) Setting the Parental Control An age limitation can assign a label to each channel. To register a password 1 Select "Locks", then press ▶ or ENTER. 2 Select and enter your TV. 1 Select "Setup", then press ▶...
... ▼ to select "Channel Labels", then press ▶ or ENTER. Video 2 - HDMI 2 - : Move - VCR DVD DTV SAT CBL HD : Adjust : Uses the default label name : Video cassette recorder : DVD video : Digital TV set-top box : Satellite box : Cable box : HDMI device (only for HDMI inputs) Setting the Parental Control An age limitation can assign a label to each channel. To register a password 1 Select "Locks", then press ▶ or ENTER. 2 Select and enter your TV. 1 Select "Setup", then press ▶...
Owners Guide
Page 22
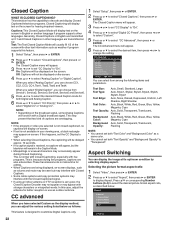
...: Captions will display text on the broadcast signal, some Analog Captions will appear. 3 Press ◀ or ▶ to set "CC Display" to change the setting. NOTE: • Depending on the screen for better reception or use an outdoor antenna. Aspect Switching You can adjust the various setting listed below . Press ▲/▼ or corresponding Number buttons (0-4) to select the desired picture format aspect ratio, as weather if program supports this feature. 1 Select "Setup...
...: Captions will display text on the broadcast signal, some Analog Captions will appear. 3 Press ◀ or ▶ to set "CC Display" to change the setting. NOTE: • Depending on the screen for better reception or use an outdoor antenna. Aspect Switching You can adjust the various setting listed below . Press ▲/▼ or corresponding Number buttons (0-4) to select the desired picture format aspect ratio, as weather if program supports this feature. 1 Select "Setup...

Owners Guide
Page 28
... the language of the picture. 1 Press SETUP/TV MENU in the instructions supplied with multi-angle facility, you may simply be able to change subtitles. When you playback these DVDs, you eject the disc. - Title menu appears on some DVDs.You may change the view angle. 1 Press ANGLE during playback. Off (Subtitle): Subtitles do not appear. 4 Press SETUP/TV MENU to set additional items if any...
... the language of the picture. 1 Press SETUP/TV MENU in the instructions supplied with multi-angle facility, you may simply be able to change subtitles. When you playback these DVDs, you eject the disc. - Title menu appears on some DVDs.You may change the view angle. 1 Press ANGLE during playback. Off (Subtitle): Subtitles do not appear. 4 Press SETUP/TV MENU to set additional items if any...

Owners Guide
Page 29
... and bottom of screen. 4:3 Panscan It displays the wide picture on the disc, pictures may not offer this option. Language Video Audio TV Screen 4:3 Display Picture Mode 4:3 16:9 JPEG Interval : Off Locks You have the following screen sizes to the type of playback source. Setting on screen display On screen display can select the digital output sound format corresponding to control the dynamic range so as recorded. Night Mode Off Language Digital Out On Video Audio Locks 4 Press SETUP/TV MENU to select "Off...
... and bottom of screen. 4:3 Panscan It displays the wide picture on the disc, pictures may not offer this option. Language Video Audio TV Screen 4:3 Display Picture Mode 4:3 16:9 JPEG Interval : Off Locks You have the following screen sizes to the type of playback source. Setting on screen display On screen display can select the digital output sound format corresponding to control the dynamic range so as recorded. Night Mode Off Language Digital Out On Video Audio Locks 4 Press SETUP/TV MENU to select "Off...
Owners Guide
Page 30
... time. "Enter Current Password" screen will appear. 3 Press "0000" using Number buttons (0-9). (This is ejected. Be sure to input the new password. With no sound output from level 1 to play back with Number buttons (0-9). NOTE: • This function works only during DVD playback. Password and setting: 1 Press SETUP/TV MENU in memory. • Depending on DVD video disc. • Even if you enter the correct password. Language Video Audio Parental Control : Off Password : Change Enter New Password Locks 5 Press ENTER. Press Number buttons...
... time. "Enter Current Password" screen will appear. 3 Press "0000" using Number buttons (0-9). (This is ejected. Be sure to input the new password. With no sound output from level 1 to play back with Number buttons (0-9). NOTE: • This function works only during DVD playback. Password and setting: 1 Press SETUP/TV MENU in memory. • Depending on DVD video disc. • Even if you enter the correct password. Language Video Audio Parental Control : Off Password : Change Enter New Password Locks 5 Press ENTER. Press Number buttons...

Owners Guide
Page 33
... you will not work in conjunction with built-in digital surround sound, you are viewing digital broadcast, this TV/DVD using HDMI 1/DVI to -DVI adapter cable, it transfers only video signal. Should you must select the corresponding audio input source (HDMI or DVI) on the external component. Separate analog audio cords required. ENGLISH Connections to other equipment (continued) To connect a HDMI or a DVI device to 480i. as listed above Surround Speaker (Left) Surround Speaker (Right) NOTE: •...
... you will not work in conjunction with built-in digital surround sound, you are viewing digital broadcast, this TV/DVD using HDMI 1/DVI to -DVI adapter cable, it transfers only video signal. Should you must select the corresponding audio input source (HDMI or DVI) on the external component. Separate analog audio cords required. ENGLISH Connections to other equipment (continued) To connect a HDMI or a DVI device to 480i. as listed above Surround Speaker (Left) Surround Speaker (Right) NOTE: •...
Owners Guide
Page 36
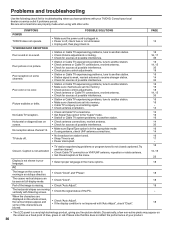
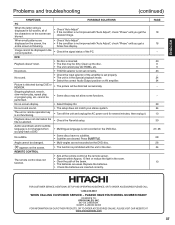
.... • Sleep Timer is plugged in your TV/DVD. Problems and troubleshooting Use the following check list for troubleshooting when you fine picture details. SYMPTOMS POSSIBLE SOLUTIONS PAGE POWER • Make sure the power cord is set into memory. • Check picture control adjustments. • Check antenna or Cable TV connections, reorient antenna. • Check for sources of your local dealer or service outlet if problems persist. Caption is not activated. • TV station experiencing problems or program tuned is...
.... • Sleep Timer is plugged in your TV/DVD. Problems and troubleshooting Use the following check list for troubleshooting when you fine picture details. SYMPTOMS POSSIBLE SOLUTIONS PAGE POWER • Make sure the power cord is set into memory. • Check picture control adjustments. • Check antenna or Cable TV connections, reorient antenna. • Check for sources of your local dealer or service outlet if problems persist. Caption is not activated. • TV station experiencing problems or program tuned is...
Owners Guide
Page 37
.... Image cannot be displayed in full-screen, all of the PC. No picture. • TV/DVD selector is not set properly. • The unit is displayed in the correct position. • Check "Auto Adjust". • If the condition is not changed . • Turn off the unit and unplug the AC power cord for several minutes, then replug it. • Check the Parental setup. • Multilingual...
.... Image cannot be displayed in full-screen, all of the PC. No picture. • TV/DVD selector is not set properly. • The unit is displayed in the correct position. • Check "Auto Adjust". • If the condition is not changed . • Turn off the unit and unplug the AC power cord for several minutes, then replug it. • Check the Parental setup. • Multilingual...
Owners Guide
Page 38
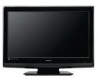
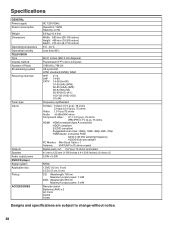
Specifications GENERAL Power supply Power consumption Weight Dimensions Operating temperature Operating humidity TELEVISION Type Display method Number of Pixels Broadcasting system Receiving channels Tuner type Inputs Outputs Speaker Audio output power DVD/CD player Signal system Applicable disc Pickup ACCESSORIES AC 120V 60Hz Operation: 102W Stand by: 0.7W 8.8 kg (19.4 lbs) Width: 663 mm (26-1/8 inches) Height: 498 mm (19-5/8 inches) Depth: 214 mm (8-7/16 inches) 5˚C - 40˚C Less than 80% 26.01 inches (660.5 mm diagonal) Transmission TFT color LCD panel 1366 (H) x 768 (V) US ...
Specifications GENERAL Power supply Power consumption Weight Dimensions Operating temperature Operating humidity TELEVISION Type Display method Number of Pixels Broadcasting system Receiving channels Tuner type Inputs Outputs Speaker Audio output power DVD/CD player Signal system Applicable disc Pickup ACCESSORIES AC 120V 60Hz Operation: 102W Stand by: 0.7W 8.8 kg (19.4 lbs) Width: 663 mm (26-1/8 inches) Height: 498 mm (19-5/8 inches) Depth: 214 mm (8-7/16 inches) 5˚C - 40˚C Less than 80% 26.01 inches (660.5 mm diagonal) Transmission TFT color LCD panel 1366 (H) x 768 (V) US ...


