

User Guide
Page 5
... heavy objects on the power cord • Damaging the cord • Placing near heaters • Do not position the power cord under the projector. Use special caution in damage as well as fire or electrical shock. • Pulling on the power cord • Placing heavy objects on the... or electrical shock could result in front of heavy objects on the power plug and insert a knife blade to enter the eyes. • This remote control is equipped with care. • Do not damage, cut, process or strongly twist the power cord. OUTPUT: 1mW CLASS 2 LASER PRODUCT RADIAZIONI...
... heavy objects on the power cord • Damaging the cord • Placing near heaters • Do not position the power cord under the projector. Use special caution in damage as well as fire or electrical shock. • Pulling on the power cord • Placing heavy objects on the... or electrical shock could result in front of heavy objects on the power plug and insert a knife blade to enter the eyes. • This remote control is equipped with care. • Do not damage, cut, process or strongly twist the power cord. OUTPUT: 1mW CLASS 2 LASER PRODUCT RADIAZIONI...

User Guide
Page 8
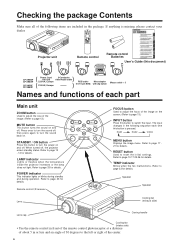
... cap Handle Cooling fan (intake side) • Use the remote control in the package. Press once to turn the power on . Checking the package Contents Make sure all of the projector rises and when the fan malfunctions. ZOOM MUTE MENU FOCUS INPUT... button Press this button is missing, please contact your dealer. VIDEO RGB LASER STANDBY/ON POSITION RESET MENU FREEZE MAGNIFY VOLUME OFF Projector unit Remote control Remote control Batteries User's Guide (this document) CP-X960W CP-X960E ( ) Po1w10eVra-CUoSrd vid3e-oC/Aonubdduioctcoarble c 220-UK, Europe RGB...
... cap Handle Cooling fan (intake side) • Use the remote control in the package. Press once to turn the power on . Checking the package Contents Make sure all of the projector rises and when the fan malfunctions. ZOOM MUTE MENU FOCUS INPUT... button Press this button is missing, please contact your dealer. VIDEO RGB LASER STANDBY/ON POSITION RESET MENU FREEZE MAGNIFY VOLUME OFF Projector unit Remote control Remote control Batteries User's Guide (this document) CP-X960W CP-X960E ( ) Po1w10eVra-CUoSrd vid3e-oC/Aonubdduioctcoarble c 220-UK, Europe RGB...

User Guide
Page 9
... IN jack (RGB) Stereo mini jack USB jack The mouse cursor can result in fire or electrical shock. Names and functions of each part (continued) Remote control photoreceptor Main power switch Used to turn the power on and off. : OFF : ON AC IN jack Used to the AC IN jack Make... into the AC IN jack as far as it will go. Caution Connecting to connect the accessory power cord. Incomplete connection can be controlled by remote control by connecting to a personal computer.
... IN jack (RGB) Stereo mini jack USB jack The mouse cursor can result in fire or electrical shock. Names and functions of each part (continued) Remote control photoreceptor Main power switch Used to turn the power on and off. : OFF : ON AC IN jack Used to the AC IN jack Make... into the AC IN jack as far as it will go. Caution Connecting to connect the accessory power cord. Incomplete connection can be controlled by remote control by connecting to a personal computer.
User Guide
Page 10
...type of image. • Execute auto adjust with the display of the application being run by pressing the VOL and VOL keys of the remote control, displaying the audio bar and moving display icon will change in the following sequence: (1) Reduce sub screen (2) Magnify sub screen (3)Off...Used to turn P in P (Picture In Picture: displays sub video signal images in P, audio input can operate POSITION. *3 Auto adjustment function The projector automatically adjusts 4 items (V. The timer is not displayed when no signal and when the RGB signal is outside the sync range. * MUTE button Applies ...
...type of image. • Execute auto adjust with the display of the application being run by pressing the VOL and VOL keys of the remote control, displaying the audio bar and moving display icon will change in the following sequence: (1) Reduce sub screen (2) Magnify sub screen (3)Off...Used to turn P in P (Picture In Picture: displays sub video signal images in P, audio input can operate POSITION. *3 Auto adjustment function The projector automatically adjusts 4 items (V. The timer is not displayed when no signal and when the RGB signal is outside the sync range. * MUTE button Applies ...

User Guide
Page 11
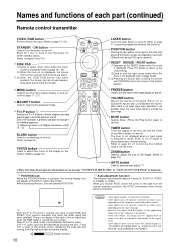
...an extended period, remove the batteries from the remote control. •Replace the batteries when remote control operation becomes difficult. •Do not place the remote control close to the cooling fan of the projector. • Do not disassemble the remote control in personal injury or pollution of the ... Also, do not mix new and old batteries. Caution Remote control usage cautions Do not drop the remote control or apply impact. •• Do not wet the remote control or place it to be used in the projector. The laser beam can cause vision problems. CAUTION LASER ...
...an extended period, remove the batteries from the remote control. •Replace the batteries when remote control operation becomes difficult. •Do not place the remote control close to the cooling fan of the projector. • Do not disassemble the remote control in personal injury or pollution of the ... Also, do not mix new and old batteries. Caution Remote control usage cautions Do not drop the remote control or apply impact. •• Do not wet the remote control or place it to be used in the projector. The laser beam can cause vision problems. CAUTION LASER ...

User Guide
Page 13
... message "Focus" will be displayed in P MUTE BLANK AUTO TIMER FOCUS ZOOM 7 4 1 Turn on the main power switch of the remote control to select the signal to be turned on even by pressing the STANDBY/ON button. 3 Remove the lens cap. 4 Use the ... input channel will disappear if any other equipment. 7 P r e s s e i t h e r t h e I N P U T bu t t o n o f t h e Example on-screen display projector or the VIDEO/RGB button of the projector [ I: ON]. • The Power indicator lights orange. 2 Press the STANDBY / ON button. • The Power indicator will blink green and then light...
... message "Focus" will be displayed in P MUTE BLANK AUTO TIMER FOCUS ZOOM 7 4 1 Turn on the main power switch of the remote control to select the signal to be turned on even by pressing the STANDBY/ON button. 3 Remove the lens cap. 4 Use the ... input channel will disappear if any other equipment. 7 P r e s s e i t h e r t h e I N P U T bu t t o n o f t h e Example on-screen display projector or the VIDEO/RGB button of the projector [ I: ON]. • The Power indicator lights orange. 2 Press the STANDBY / ON button. • The Power indicator will blink green and then light...

User Guide
Page 17
... 3 MENU 1, 3 1 RESET MENU FREEZE MAGNIFY VOLUME OFF P in P MUTE BLANK AUTO TIMER FOCUS ZOOM 3 1 Press the MENU ( ) buttons of the projector or the MENU button of the remote control. • The Menu screen will appear. (refer to page 18 - 21 for details.) 2 Press the MENU ( ) buttons of the...will be returned to be displayed in orange. 3 Adjust the selected menu item with the MENU ( ) buttons of the projector or the DISK PAD button of the remote control. • The selected menu item will be displayed in orange. Returning to the initial settings • Select the ...
... 3 MENU 1, 3 1 RESET MENU FREEZE MAGNIFY VOLUME OFF P in P MUTE BLANK AUTO TIMER FOCUS ZOOM 3 1 Press the MENU ( ) buttons of the projector or the MENU button of the remote control. • The Menu screen will appear. (refer to page 18 - 21 for details.) 2 Press the MENU ( ) buttons of the...will be returned to be displayed in orange. 3 Adjust the selected menu item with the MENU ( ) buttons of the projector or the DISK PAD button of the remote control. • The selected menu item will be displayed in orange. Returning to the initial settings • Select the ...

User Guide
Page 18
... IMAGE OPT. POSIT (V. PHASE H. POSITION) H. Adjustments and functions (continued) SET UP Images and display positions can be adjusted and move the MENU button of the projector or the DISK PAD button of the remote control to change the length of the bar display.
... IMAGE OPT. POSIT (V. PHASE H. POSITION) H. Adjustments and functions (continued) SET UP Images and display positions can be adjusted and move the MENU button of the projector or the DISK PAD button of the remote control to change the length of the bar display.

User Guide
Page 25
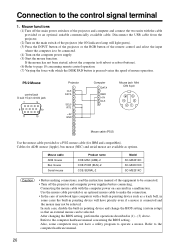
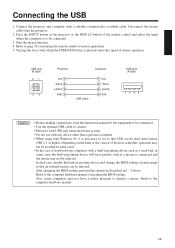
...not use with any device other than a personal computer. • When using with Windows 95, it is necessary to page 10, 26 concerning the remote control of notebook type computers with a suitable commercially available cable. 2. Refer to the computer hardware manual. 25 Refer to set so that an external ... select the input where the computer is connected and the mouse may not be selected. Connecting the USB 1. Press the INPUT button of the projector or the RGB 1/2 button of the host controller, operation may not be possible in some cases the built-in pointing device and change the...
...not use with any device other than a personal computer. • When using with Windows 95, it is necessary to page 10, 26 concerning the remote control of notebook type computers with a suitable commercially available cable. 2. Refer to the computer hardware manual. 25 Refer to set so that an external ... select the input where the computer is connected and the mouse may not be selected. Connecting the USB 1. Press the INPUT button of the projector or the RGB 1/2 button of the host controller, operation may not be possible in some cases the built-in pointing device and change the...
User Guide
Page 26
Disconnect the USB cable from the projector. (2) Turn on the main switch of the projector (the ON indicator lamp will have a utility program to page 10 concerning remote control operation. (7) Varying the force with which the DISK PAD button is connected and the mouse may not have priority even if... a mouse. Connecting the mouse cable with a built-in pointing device will light green). (3) Press the INPUT button of the projector or the RGB button of the remote control and select the input where the computer is to be connected. • Turn off the main power switches of the equipment...
Disconnect the USB cable from the projector. (2) Turn on the main switch of the projector (the ON indicator lamp will have a utility program to page 10 concerning remote control operation. (7) Varying the force with which the DISK PAD button is connected and the mouse may not have priority even if... a mouse. Connecting the mouse cable with a built-in pointing device will light green). (3) Press the INPUT button of the projector or the RGB button of the remote control and select the input where the computer is to be connected. • Turn off the main power switches of the equipment...

User Guide
Page 33
... approx. 20 min.) and then turn off automatically to set . Video is present but no audio. •No signal input. •The projector is not correctly connected. •The volume is not operating. Video is stopped and the interior becomes overheated, the power will turn the power ...Internal overheating. Remedy •Turn on the main power switch. •Plug the power cord into an AC power outlet. •Use the projector or remote control to allow cooling (the indicator will flash red. Wait approximately 20 min. and then turn off A lamp has not been inserted Firmly insert...
... approx. 20 min.) and then turn off automatically to set . Video is present but no audio. •No signal input. •The projector is not correctly connected. •The volume is not operating. Video is stopped and the interior becomes overheated, the power will turn the power ...Internal overheating. Remedy •Turn on the main power switch. •Plug the power cord into an AC power outlet. •Use the projector or remote control to allow cooling (the indicator will flash red. Wait approximately 20 min. and then turn off A lamp has not been inserted Firmly insert...

User Guide
Page 5
...dust, etc., on the power cord • Damaging the cord • Placing near heaters • Do not position the power cord under the projector. This can be impaired if the laser beam enters the eyes. OUTPUT: 1mW CLASS 2 LASER PRODUCT RADIAZIONI LASER NON GUARDARE NEL RAGGIO LUCE APPARECCHIO ...; Pulling on the power cord • Placing heavy objects on the power plug and insert a knife blade to enter the eyes. • This remote control is equipped with care. • Do not damage, cut, process or strongly twist the power cord. Especially pay attention if children are generated ...
...dust, etc., on the power cord • Damaging the cord • Placing near heaters • Do not position the power cord under the projector. This can be impaired if the laser beam enters the eyes. OUTPUT: 1mW CLASS 2 LASER PRODUCT RADIAZIONI LASER NON GUARDARE NEL RAGGIO LUCE APPARECCHIO ...; Pulling on the power cord • Placing heavy objects on the power plug and insert a knife blade to enter the eyes. • This remote control is equipped with care. • Do not damage, cut, process or strongly twist the power cord. Especially pay attention if children are generated ...
User Guide
Page 8
VIDEO RGB LASER STANDBY/ON POSITION RESET MENU FREEZE MAGNIFY VOLUME OFF Projector unit Remote control Remote control Batteries User's Guide (this document) CP-X958W CP-X960W CP-X958E CP-X960E ( ) Po1w10eVra-CUoSrd vid3e-oC/Aonubdduioctcoarble c 220-UK, Europe RGB cable ( ...turn the sound off . ZOOM MUTE MENU FOCUS INPUT STANDBY/ON LAMP POWER TEMP RESET LAMP indicator Lights or flashes when the temperature inside the projector increases or the lamp does not light. Refer to reset the initial settings. RGB1 RGB2 VIDEO MENU button Displays the image menu. RESET button...
VIDEO RGB LASER STANDBY/ON POSITION RESET MENU FREEZE MAGNIFY VOLUME OFF Projector unit Remote control Remote control Batteries User's Guide (this document) CP-X958W CP-X960W CP-X958E CP-X960E ( ) Po1w10eVra-CUoSrd vid3e-oC/Aonubdduioctcoarble c 220-UK, Europe RGB cable ( ...turn the sound off . ZOOM MUTE MENU FOCUS INPUT STANDBY/ON LAMP POWER TEMP RESET LAMP indicator Lights or flashes when the temperature inside the projector increases or the lamp does not light. Refer to reset the initial settings. RGB1 RGB2 VIDEO MENU button Displays the image menu. RESET button...

User Guide
Page 9
Names and functions of each part (continued) Remote control I/R receiver Main power switch Used to turn the power on and off. : OFF : ON AC IN jack Used to the AC IN jack Make ... R AUDIO IN jack (RGB) Stereo mini jack USB jack The mouse cursor can result in fire or electrical shock. Incomplete connection can be controlled by remote control by connecting to a personal computer.
Names and functions of each part (continued) Remote control I/R receiver Main power switch Used to turn the power on and off. : OFF : ON AC IN jack Used to the AC IN jack Make ... R AUDIO IN jack (RGB) Stereo mini jack USB jack The mouse cursor can result in fire or electrical shock. Incomplete connection can be controlled by remote control by connecting to a personal computer.

User Guide
Page 10
...the P in P function, signals are active. *1 (3) After the POSITION button has been pressed, the screen can operate POSITION. *3 Auto adjustment function The projector automatically adjusts 4 items (V. PHASE, H. In P in P, audio input can be moved upward, downward and to the left and right during freezing. or ... if a mouse is indicated. *4 Disk Pad method of operation • Move and select by pressing the VOL and VOL keys of the remote control, displaying the audio bar and moving display icon will change in the following sequence: (1) Reduce sub screen (2) Magnify sub screen (3)Off....
...the P in P function, signals are active. *1 (3) After the POSITION button has been pressed, the screen can operate POSITION. *3 Auto adjustment function The projector automatically adjusts 4 items (V. PHASE, H. In P in P, audio input can be moved upward, downward and to the left and right during freezing. or ... if a mouse is indicated. *4 Disk Pad method of operation • Move and select by pressing the VOL and VOL keys of the remote control, displaying the audio bar and moving display icon will change in the following sequence: (1) Reduce sub screen (2) Magnify sub screen (3)Off....

User Guide
Page 11
...impact. • Do not wet the remote control or place it to the service station. The laser beam can not execute when the initial display is "NO INPUT IS DETECTED" or "SYNC IS OUT OF RANGE" during automatic adjustment but this projector. When the Auto Adjust (AUTO) ...used for an extended period, remove the batteries from the remote control. • Replace the batteries when remote control operation becomes difficult. • Do not place the remote control close to the cooling fan of the projector. • Do not disassemble the remote control in malfunction. • When not to be used...
...impact. • Do not wet the remote control or place it to the service station. The laser beam can not execute when the initial display is "NO INPUT IS DETECTED" or "SYNC IS OUT OF RANGE" during automatic adjustment but this projector. When the Auto Adjust (AUTO) ...used for an extended period, remove the batteries from the remote control. • Replace the batteries when remote control operation becomes difficult. • Do not place the remote control close to the cooling fan of the projector. • Do not disassemble the remote control in malfunction. • When not to be used...

User Guide
Page 13
... FREEZE MAGNIFY VOLUME OFF P in P MUTE BLANK AUTO TIMER FOCUS ZOOM 7 4 1 Turn on the main power switch of the projector [ I N P U T bu t t o n o f t h e Example on-screen display projector or the VIDEO/RGB button of the remote control to select the signal to be displayed in the lower right part of the screen. 13 Refer to...
... FREEZE MAGNIFY VOLUME OFF P in P MUTE BLANK AUTO TIMER FOCUS ZOOM 7 4 1 Turn on the main power switch of the projector [ I N P U T bu t t o n o f t h e Example on-screen display projector or the VIDEO/RGB button of the remote control to select the signal to be displayed in the lower right part of the screen. 13 Refer to...

User Guide
Page 17
...• The selected menu item will be displayed in orange. 3 Adjust the selected menu item with the MENU ( ) buttons of the projector or the DISK PAD button of the remote control. • The selected menu item will be displayed in P MUTE BLANK AUTO TIMER FOCUS ZOOM 3 1 Press the MENU ( )...• The Menu screen will appear. (refer to page 18 - 21 for details.) 2 Press the MENU ( ) buttons of the projector or the DISK PAD button of the remote control to select the menu item to the initial settings. • Press the RESET button. 17 Adjustments and functions 1, 2, 3 VIDEO ...
...• The selected menu item will be displayed in orange. 3 Adjust the selected menu item with the MENU ( ) buttons of the projector or the DISK PAD button of the remote control. • The selected menu item will be displayed in P MUTE BLANK AUTO TIMER FOCUS ZOOM 3 1 Press the MENU ( )...• The Menu screen will appear. (refer to page 18 - 21 for details.) 2 Press the MENU ( ) buttons of the projector or the DISK PAD button of the remote control to select the menu item to the initial settings. • Press the RESET button. 17 Adjustments and functions 1, 2, 3 VIDEO ...

User Guide
Page 18
... and down. Adjustments and functions (continued) SET UP Images and display positions can be adjusted and move the MENU button of the projector or the DISK PAD button of the remote control to be adjusted from the SETUP menu. SETUP INPUT IMAGE OPT. PHASE H. Moves the image left and right. Eliminates blanking...
... and down. Adjustments and functions (continued) SET UP Images and display positions can be adjusted and move the MENU button of the projector or the DISK PAD button of the remote control to be adjusted from the SETUP menu. SETUP INPUT IMAGE OPT. PHASE H. Moves the image left and right. Eliminates blanking...
User Guide
Page 25
...remote control of notebook type computers with version OSR 2.1 or higher. In such case, disable the built-in pointing device and change the BIOS setting (system setup) so that USB can be connected. 3. After changing the BIOS setting, perform the operations described in some computers may not be selected. Connect the projector...not use with any device other than a personal computer. • When using with a suitable commercially available cable. USB jack (B type) 21 34 Projector +5V 1 -DATA 2 +DATA 3 GND 4 Computer USB cable 1 +5V 2 -DATA 3 +DATA 4 GND USB jack (A type) 1234...
...remote control of notebook type computers with version OSR 2.1 or higher. In such case, disable the built-in pointing device and change the BIOS setting (system setup) so that USB can be connected. 3. After changing the BIOS setting, perform the operations described in some computers may not be selected. Connect the projector...not use with any device other than a personal computer. • When using with a suitable commercially available cable. USB jack (B type) 21 34 Projector +5V 1 -DATA 2 +DATA 3 GND 4 Computer USB cable 1 +5V 2 -DATA 3 +DATA 4 GND USB jack (A type) 1234...


