

User Manual
Page 1
TECHNICAL REGULATORY NOTICES ENGLISH Liquid Crystal Projector CP-X380W USER'S MANUAL Please read this user's manual thoroughly to ensure correct usage through understanding.
TECHNICAL REGULATORY NOTICES ENGLISH Liquid Crystal Projector CP-X380W USER'S MANUAL Please read this user's manual thoroughly to ensure correct usage through understanding.

User Manual
Page 2
... 2 BEFORE USE 2 Contents of Package 2 Part Names 3 Loading the Batteries 5 Fixing the Handle 5 INSTALLATION 6 Installation of the Projector and Screen........6 Angle Adjustment 6 Cabling 7 Power Connection 8 Example of the Video Electronics Standard Association. Input Menu 13 Table 6. OSD Message... 20 Table 10. Indicator Message 21 Table 11. TRADEMARK ACKNOWLEDGMENT : PS/2, VGA and XGA are registered trademarks of Microsoft Corporation. Setup Menu 12 Table 5. Specifications 23 For "TECHNICAL" and "REGULATORY NOTICE", see ...
... 2 BEFORE USE 2 Contents of Package 2 Part Names 3 Loading the Batteries 5 Fixing the Handle 5 INSTALLATION 6 Installation of the Projector and Screen........6 Angle Adjustment 6 Cabling 7 Power Connection 8 Example of the Video Electronics Standard Association. Input Menu 13 Table 6. OSD Message... 20 Table 10. Indicator Message 21 Table 11. TRADEMARK ACKNOWLEDGMENT : PS/2, VGA and XGA are registered trademarks of Microsoft Corporation. Setup Menu 12 Table 5. Specifications 23 For "TECHNICAL" and "REGULATORY NOTICE", see ...
User Manual
Page 3
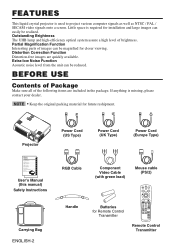
FEATURES This liquid crystal projector is required for installation and large images can easily be realized. BEFORE USE Contents of Package Make sure all of images can be magnified for ... aufmerksam. Outstanding Brightness The UHB lamp and high-efficiency optical system assure a high level of brightness. If anything is missing, please contact your dealer. Projector Liquid Crystal Projector CP-X380W USER'S MANUAL Please read this manual) Safety Instructions Carrying Bag ENGLISH-2 TECHNICAL PORTGÊS NORSK NEDERLANDS ESPAÑOL ITALIANO FRANÇ...
FEATURES This liquid crystal projector is required for installation and large images can easily be realized. BEFORE USE Contents of Package Make sure all of images can be magnified for ... aufmerksam. Outstanding Brightness The UHB lamp and high-efficiency optical system assure a high level of brightness. If anything is missing, please contact your dealer. Projector Liquid Crystal Projector CP-X380W USER'S MANUAL Please read this manual) Safety Instructions Carrying Bag ENGLISH-2 TECHNICAL PORTGÊS NORSK NEDERLANDS ESPAÑOL ITALIANO FRANÇ...

User Manual
Page 4
... Ring Remote Control Sensor Power Switch AC Inlet (to the Power Cord) Ventilation Openings (Intake) Foot Adjuster FRONT/LEFT VIEW OF THE PROJECTOR Lens Lens Cap Control Panel (Refer to P.9 "OPERATIONS") STANDBY/ON Button KEYSTONE Button Foot Adjuster Button Filter Cover ( ) Air Filter... and Intake for the Cooling Fan Rear Foot Adjuster REAR/RIGHT VIEW OF THE PROJECTOR INPUT Button LAMP Indicator TEMP Indicator POWER Indicator RESET Button MENU Button Ventilation Openings (exhaust) Terminal Panel (Refer below) S-VIDEO Terminal ...
... Ring Remote Control Sensor Power Switch AC Inlet (to the Power Cord) Ventilation Openings (Intake) Foot Adjuster FRONT/LEFT VIEW OF THE PROJECTOR Lens Lens Cap Control Panel (Refer to P.9 "OPERATIONS") STANDBY/ON Button KEYSTONE Button Foot Adjuster Button Filter Cover ( ) Air Filter... and Intake for the Cooling Fan Rear Foot Adjuster REAR/RIGHT VIEW OF THE PROJECTOR INPUT Button LAMP Indicator TEMP Indicator POWER Indicator RESET Button MENU Button Ventilation Openings (exhaust) Terminal Panel (Refer below) S-VIDEO Terminal ...

User Manual
Page 5
... remote control transmitter. • Do not wet the remote control transmitter or place it on any physical impact. WARNING • The laser pointer of the projector. • Do not disassemble the remote control transmitter. Take care not to click the left click function. Never look directly into the laser beam outlet...
... remote control transmitter. • Do not wet the remote control transmitter or place it on any physical impact. WARNING • The laser pointer of the projector. • Do not disassemble the remote control transmitter. Take care not to click the left click function. Never look directly into the laser beam outlet...

User Manual
Page 6
...extended period, remove the batteries from children and pets. • When not to the other handle hook in fire or electrical shock. If the projector should be dropped from the handle should obey the law in the remote control transmitter. Fix the other end of the handle, as indicated in... could cause battery cracking or leakage, which could result in the same way. 2 CAUTION • Make sure the handle is fixed before carrying the projector with this remote control transmitter. Buckle the end of the handle to be off, it could result in an injury, and continued use could result...
...extended period, remove the batteries from children and pets. • When not to the other handle hook in fire or electrical shock. If the projector should be dropped from the handle should obey the law in the remote control transmitter. Fix the other end of the handle, as indicated in... could cause battery cracking or leakage, which could result in the same way. 2 CAUTION • Make sure the handle is fixed before carrying the projector with this remote control transmitter. Buckle the end of the handle to be off, it could result in an injury, and continued use could result...

User Manual
Page 7
...Screen Refer to the drawing and table below are for determining of this unit with ventilation holes blocked. • Do not install LCD projector in a suitable environment according to instructions of the accompanying manual "SAFETY INSTRUCTIONS" and this manual. • When you fix this...otherwise, the projector could overturn or the fingers could damage the adjusters or cause the lock to adjust the projection angle. Connect the ground terminal of AC inlet of the screen size and projection distance. Angle Adjustment Use the foot adjusters on critical parts (i.e.LCD panel, Lens...
...Screen Refer to the drawing and table below are for determining of this unit with ventilation holes blocked. • Do not install LCD projector in a suitable environment according to instructions of the accompanying manual "SAFETY INSTRUCTIONS" and this manual. • When you fix this...otherwise, the projector could overturn or the fingers could damage the adjusters or cause the lock to adjust the projection angle. Connect the ground terminal of AC inlet of the screen size and projection distance. Angle Adjustment Use the foot adjusters on critical parts (i.e.LCD panel, Lens...
User Manual
Page 8
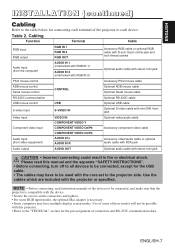
... to the table below for connecting each device. Table 2. Please read instruction manuals of the devices to be connected, and make sure that the projector is necessary. • Some computers may have to be used with this manual and the separate "SAFETY INSTRUCTIONS". • Before connecting, turn ...of these modes will not be connected, except for the pin assignment of some RGB input modes, the optional Mac adapter is compatible with the projector or specified. Use the cables which are included with the device. • Secure the screws on the connectors and tighten. • For...
... to the table below for connecting each device. Table 2. Please read instruction manuals of the devices to be connected, and make sure that the projector is necessary. • Some computers may have to be used with this manual and the separate "SAFETY INSTRUCTIONS". • Before connecting, turn ...of these modes will not be connected, except for the pin assignment of some RGB input modes, the optional Mac adapter is compatible with the projector or specified. Use the cables which are included with the device. • Secure the screws on the connectors and tighten. • For...
User Manual
Page 9
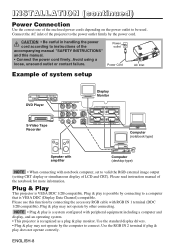
... (desktop type) NOTE • When connecting with peripheral equipment including a computer and display, and an operating system. • This projector is VESA DDC (Display Data Channel) compatible. Please read instruction manual of LCD and CRT). Avoid using a loose, unsound outlet or contact failure. Plug & play is a system configured with notebook computer, set...
... (desktop type) NOTE • When connecting with peripheral equipment including a computer and display, and an operating system. • This projector is VESA DDC (Display Data Channel) compatible. Please read instruction manual of LCD and CRT). Avoid using a loose, unsound outlet or contact failure. Plug & play is a system configured with notebook computer, set...
User Manual
Page 10
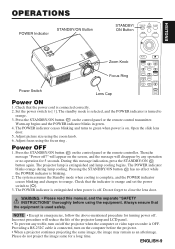
...WARNING • Please read this message indication, press the STANDBY/ON button again. Incorrect procedure will reduce the life of the projector lamp and LCD panel. • To prevent any operation or no effect while the POWER indicator is turned to orange. Providing a RS-232C...picture size using the focus ring . Power OFF 1. During this manual, and the separate "SAFETY INSTRUCTIONS" thoroughly before the projector. • When a projector continues projecting the same image, the image may remain as an afterimage. The POWER indicator blinks orange during lamp cooling. Always ...
...WARNING • Please read this message indication, press the STANDBY/ON button again. Incorrect procedure will reduce the life of the projector lamp and LCD panel. • To prevent any operation or no effect while the POWER indicator is turned to orange. Providing a RS-232C...picture size using the focus ring . Power OFF 1. During this manual, and the separate "SAFETY INSTRUCTIONS" thoroughly before the projector. • When a projector continues projecting the same image, the image may remain as an afterimage. The POWER indicator blinks orange during lamp cooling. Always ...

User Manual
Page 11
...is input. • Valid except for approximately 3 seconds when the input signal is performed from the supplied remote control transmitter or the projector control panel. Initialise Position Adjustment : Press the RESET button and the POSITION mode. Refer to clear frozen static images. MAGNIFY Set ... valid only when RGB signal is cleared automatically. • , , and buttons may be used from the sensor on the front of the projector, and within a range of approximately 5m from the control panel. FREEZE Set/Clear FREEZE Mode : Press the FREEZE button. NOTE •...
...is input. • Valid except for approximately 3 seconds when the input signal is performed from the supplied remote control transmitter or the projector control panel. Initialise Position Adjustment : Press the RESET button and the POSITION mode. Refer to clear frozen static images. MAGNIFY Set ... valid only when RGB signal is cleared automatically. • , , and buttons may be used from the sensor on the front of the projector, and within a range of approximately 5m from the control panel. FREEZE Set/Clear FREEZE Mode : Press the FREEZE button. NOTE •...
User Manual
Page 18
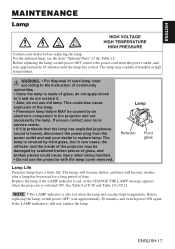
... red, replace the lamp. If the LAMP indicator is switched ON. NOTE • The LAMP indicator is covered by front glass, but in the projector and not necessarily the lamp. WARNING • For disposal of used for a long period of time. Before replacing the lamp, switch power OFF, ...wait approximately 20 minutes, and switch power ON again. Lamp Reflector Front glass Lamp Life Projector lamps have a finite life. The lamp is also red when the lamp unit reaches high temperature. See Table 9 of P.20 and Table 10 ...
... red, replace the lamp. If the LAMP indicator is switched ON. NOTE • The LAMP indicator is covered by front glass, but in the projector and not necessarily the lamp. WARNING • For disposal of used for a long period of time. Before replacing the lamp, switch power OFF, ...wait approximately 20 minutes, and switch power ON again. Lamp Reflector Front glass Lamp Life Projector lamps have a finite life. The lamp is also red when the lamp unit reaches high temperature. See Table 9 of P.20 and Table 10 ...

User Manual
Page 19
...removed. Replace the lamp cover in the diagram, and remove the lamp cover. 5. CAUTION • Ensure that the projector has cooled sufficiently, and gently turn the projector right-side up. Check that screws are tightened properly. When the lamp has been replaced after replacing the lamp. ... until the timer display is displayed, complete the following operation within ten minutes of the screwed lamp into the unit. 7. Switch the projector OFF, remove the power cord from the power outlet, and wait at least 45 minutes for approximately three seconds. Also steadily push the...
...removed. Replace the lamp cover in the diagram, and remove the lamp cover. 5. CAUTION • Ensure that the projector has cooled sufficiently, and gently turn the projector right-side up. Check that screws are tightened properly. When the lamp has been replaced after replacing the lamp. ... until the timer display is displayed, complete the following operation within ten minutes of the screwed lamp into the unit. 7. Switch the projector OFF, remove the power cord from the power outlet, and wait at least 45 minutes for approximately three seconds. Also steadily push the...

User Manual
Page 20
...8226; When the air filter is performed correctly. • Do not use detergents or chemicals other than those noted above (e.g. Switch the projector power supply OFF, and remove the power cord from the power outlet before beginning maintenance work . Contact your hands. Replacing the Air ...Filter Replace the air filter if contamination cannot be removed, or if it is switched OFF automatically to prevent the temperature rising inside the projector. the power supply is damaged. 1. benzene or thinners). • Do not use a soft cloth dampened with water, or water and...
...8226; When the air filter is performed correctly. • Do not use detergents or chemicals other than those noted above (e.g. Switch the projector power supply OFF, and remove the power cord from the power outlet before beginning maintenance work . Contact your hands. Replacing the Air ...Filter Replace the air filter if contamination cannot be removed, or if it is switched OFF automatically to prevent the temperature rising inside the projector. the power supply is damaged. 1. benzene or thinners). • Do not use a soft cloth dampened with water, or water and...
User Manual
Page 23
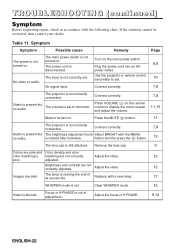
... color matching is still attached. Focus or H PHASE is set. Connect correctly. 7,8 The projector is turned on. Press VOLUME on the main power switch. Press the MUTE button. 11 The projector is Turn on the remote control or display the menu screen and adjust the volume. 7,8 ...11,15 Mute is not correctly connected. Table 11. The power cord is not correctly connected. Use the projector or remote control transmitter to minimum. No signal input. Adjust the video. 12 Images are not correctly adjusted. Video is present but The...
... color matching is still attached. Focus or H PHASE is set. Connect correctly. 7,8 The projector is turned on. Press VOLUME on the main power switch. Press the MUTE button. 11 The projector is Turn on the remote control or display the menu screen and adjust the volume. 7,8 ...11,15 Mute is not correctly connected. Table 11. The power cord is not correctly connected. Use the projector or remote control transmitter to minimum. No signal input. Adjust the video. 12 Images are not correctly adjusted. Video is present but The...

User Manual
Page 24
... others, consult your dealer. ENGLISH SPECIFICATIONS Table 12. NOTE • This specifications are subject to change without notice. Specifications Item Specification Product name Liquid crystal projector Liquid crystal panel Panel size Drive system Pixels 2.3 cm (0.9 type) TFT active matrix 786,432 pixels (1024 horizontal x 768 vertical) Lens Zoom lens F=1.7 ~ 2.1 f=36.8 ~ 47...
... others, consult your dealer. ENGLISH SPECIFICATIONS Table 12. NOTE • This specifications are subject to change without notice. Specifications Item Specification Product name Liquid crystal projector Liquid crystal panel Panel size Drive system Pixels 2.3 cm (0.9 type) TFT active matrix 786,432 pixels (1024 horizontal x 768 vertical) Lens Zoom lens F=1.7 ~ 2.1 f=36.8 ~ 47...

User Manual
Page 27
... Zoom out Zoom out Zoom out * Zoom out NOTE • Some computers may not be possible with this projector. • Be sure to check jack type, signal level, timing and resolution before connecting this projector to the number of computer signal Resolution H ×V 640 × 350 640 × 400 720 ×... VGA (60Hz) Mac13"mode VGA (72Hz) VGA (75Hz) VGA (85Hz) SVGA (56Hz) SVGA (60Hz) SVGA (72Hz) SVGA (75Hz) SVGA (85Hz) Mac16"mode XGA (60Hz) XGA (70Hz) XGA (75Hz) XGA (85Hz) SXGA (75Hz) SXGA (60Hz) SXGA (60Hz) SXGA (75Hz) Display mode Zoom in Zoom in Zoom in Zoom in Zoom in Zoom in Zoom...
... Zoom out Zoom out Zoom out * Zoom out NOTE • Some computers may not be possible with this projector. • Be sure to check jack type, signal level, timing and resolution before connecting this projector to the number of computer signal Resolution H ×V 640 × 350 640 × 400 720 ×... VGA (60Hz) Mac13"mode VGA (72Hz) VGA (75Hz) VGA (85Hz) SVGA (56Hz) SVGA (60Hz) SVGA (72Hz) SVGA (75Hz) SVGA (85Hz) Mac16"mode XGA (60Hz) XGA (70Hz) XGA (75Hz) XGA (85Hz) SXGA (75Hz) SXGA (60Hz) SXGA (60Hz) SXGA (75Hz) Display mode Zoom in Zoom in Zoom in Zoom in Zoom in Zoom in Zoom...
User Manual
Page 29
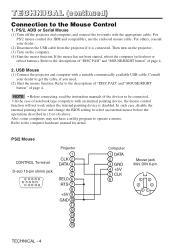
... connected. If the mouse has not been started, reboot the computer (soft reboot or reboot buttons). PS/2 Mouse CONTROL Terminal D-sub 15-pin shrink jack Projector 1 CLK 2 DATA 3 4 5 SEL0 6 RTS 7 8 +5V 9 GND 10 11 12 13 14 15 Computer 1 DATA 2 3 GND 4 +5V 5 CLK 6 Mouse jack Mini DIN 6-... have a utility program to the descriptions of "DISC PAD" and "MOUSE/RIGHT button" of page 4. 2. USB Mouse (1) Connect the projector and computer with a suitable commercially available USB cable. In such case, disable the internal pointing device and change the BIOS setting to select ...
... connected. If the mouse has not been started, reboot the computer (soft reboot or reboot buttons). PS/2 Mouse CONTROL Terminal D-sub 15-pin shrink jack Projector 1 CLK 2 DATA 3 4 5 SEL0 6 RTS 7 8 +5V 9 GND 10 11 12 13 14 15 Computer 1 DATA 2 3 GND 4 +5V 5 CLK 6 Mouse jack Mini DIN 6-... have a utility program to the descriptions of "DISC PAD" and "MOUSE/RIGHT button" of page 4. 2. USB Mouse (1) Connect the projector and computer with a suitable commercially available USB cable. In such case, disable the internal pointing device and change the BIOS setting to select ...
User Manual
Page 31
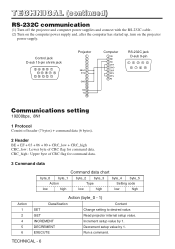
... EF + 03 + 06 + 00 + CRC_low + CRC_high CRC_low : Lower byte of CRC flag for command data. TECHNICAL (continued) RS-232C communication (1) Turn off the projector and computer power supplies and connect with the RS-232C cable. (2) Turn on the computer power supply and, after the computer has started up, turn... on the projector power supply. CRC_high : Upper byte of CRC flag for command data. 3 Command data Command data chart byte_0 byte_1 byte_2 byte_3 byte_4 byte_5 Action...
... EF + 03 + 06 + 00 + CRC_low + CRC_high CRC_low : Lower byte of CRC flag for command data. TECHNICAL (continued) RS-232C communication (1) Turn off the projector and computer power supplies and connect with the RS-232C cable. (2) Turn on the computer power supply and, after the computer has started up, turn... on the projector power supply. CRC_high : Upper byte of CRC flag for command data. 3 Command data Command data chart byte_0 byte_1 byte_2 byte_3 byte_4 byte_5 Action...

User Manual
Page 32
...Conversely, when the data length is lit. Ignore this data. • Commands are not accepted during other code. • The projector outputs test data when the power supply is switched ON, and when the lamp is shorter than indicated by the data length code, ...computer sends the default setting code Header + Command data ('06H'+'00H'+ type (2 bytes) +'00H'+'00H') to the projector. (2) The projector changes the specified setting to the default value. (3) The projector returns the response code '06H' to the computer. TECHNICAL - 7 TECHNICAL NOTE • Operation cannot be understood by...
...Conversely, when the data length is lit. Ignore this data. • Commands are not accepted during other code. • The projector outputs test data when the power supply is switched ON, and when the lamp is shorter than indicated by the data length code, ...computer sends the default setting code Header + Command data ('06H'+'00H'+ type (2 bytes) +'00H'+'00H') to the projector. (2) The projector changes the specified setting to the default value. (3) The projector returns the response code '06H' to the computer. TECHNICAL - 7 TECHNICAL NOTE • Operation cannot be understood by...


