Owners Guide
Page 1
PROJECTION COLOR TV 61SBX59B 53SBX59B OPERATING GUIDE IMPORTANT SAFEGUARDS 2-4 FIRST TIME USE 5-21 THE GENIUS REMOTE CONTROL SET UP CUSTOM VIDEO AUDIO THEATER INFO ULTRATEC BIT-MAP ON-SCREEN DISPLAY 22-33 34-64 USEFUL INFORMATION INDEX 65-69
PROJECTION COLOR TV 61SBX59B 53SBX59B OPERATING GUIDE IMPORTANT SAFEGUARDS 2-4 FIRST TIME USE 5-21 THE GENIUS REMOTE CONTROL SET UP CUSTOM VIDEO AUDIO THEATER INFO ULTRATEC BIT-MAP ON-SCREEN DISPLAY 22-33 34-64 USEFUL INFORMATION INDEX 65-69

Owners Guide
Page 2
...¥ This television is intended to alert the user to the presence of the television as improper changes or modifications not expressly approved by Hitachi America, Ltd. REFER SERVICING TO QUALIFIED SERVICE PERSONNEL. TO PREVENT ELECTRIC SHOCK, DO NOT USE THE TELEVISION S (POLARIZED) PLUG WITH AN...There are no user serviceable parts inside the television. ¥Model and serial numbers are not expressly approved by HITACHI could void the user s authority to operate the TV. Follow all warnings and instructions marked on this can expose you to very high voltages and other hazards. ...
...¥ This television is intended to alert the user to the presence of the television as improper changes or modifications not expressly approved by Hitachi America, Ltd. REFER SERVICING TO QUALIFIED SERVICE PERSONNEL. TO PREVENT ELECTRIC SHOCK, DO NOT USE THE TELEVISION S (POLARIZED) PLUG WITH AN...There are no user serviceable parts inside the television. ¥Model and serial numbers are not expressly approved by HITACHI could void the user s authority to operate the TV. Follow all warnings and instructions marked on this can expose you to very high voltages and other hazards. ...

Owners Guide
Page 4
... system should be sure the antenna system is in -Picture function, the sub-picture should be taken to restore normal operation by TV stations and cable companies, as well as contact with CATV reception). the television OFF and unplug it checked by your dealer or ... If replacement parts are NOT COVERED by a qualified service technician. 24. Upon completion of the video program material. 4 Note to call your HITACHI Factory Warranty. ¥ When using Picture-in safe operating condition. GROUND CLAMP ANTENNA LEAD IN WIRE ANTENNA DISCHARGE UNIT (NEC SECTION 810-20) ...
... system should be sure the antenna system is in -Picture function, the sub-picture should be taken to restore normal operation by TV stations and cable companies, as well as contact with CATV reception). the television OFF and unplug it checked by your dealer or ... If replacement parts are NOT COVERED by a qualified service technician. 24. Upon completion of the video program material. 4 Note to call your HITACHI Factory Warranty. ¥ When using Picture-in safe operating condition. GROUND CLAMP ANTENNA LEAD IN WIRE ANTENNA DISCHARGE UNIT (NEC SECTION 810-20) ...

Owners Guide
Page 5
... size batteries for the remote control. BOTTOM VIEW Lift up on tab to the (+) and (-) marks in the battery compartment. 4. POWER TV CABLE SAT PIP SWAP MOVE PIP CH HELP FRZ TV/CABLE/SAT VCR LST-CH AUDIO VOL MUTE CH INFO RECALL FAV CH GUIDE MENU EXIT L I G H C.S. ACCESSORIES Check to make...
... size batteries for the remote control. BOTTOM VIEW Lift up on tab to the (+) and (-) marks in the battery compartment. 4. POWER TV CABLE SAT PIP SWAP MOVE PIP CH HELP FRZ TV/CABLE/SAT VCR LST-CH AUDIO VOL MUTE CH INFO RECALL FAV CH GUIDE MENU EXIT L I G H C.S. ACCESSORIES Check to make...
Owners Guide
Page 6
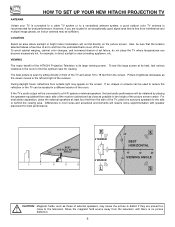
...if you are located in the room to the height of the picture screen center. Also, be sufficient. VIEWING The major benefit of the HITACHI Projection Television is its best, test various locations in an exceptionally good signal area that the location selected allows a free flow of air to.... For best stereo separation, place the external speakers at its large viewing screen. HOW TO SET UP YOUR NEW HITACHI PROJECTION TV ANTENNA Unless your TV is connected to a cable TV system or to the left and right of the receiver. To avoid cabinet warping, cabinet color changes, and increased ...
...if you are located in the room to the height of the picture screen center. Also, be sufficient. VIEWING The major benefit of the HITACHI Projection Television is its best, test various locations in an exceptionally good signal area that the location selected allows a free flow of air to.... For best stereo separation, place the external speakers at its large viewing screen. HOW TO SET UP YOUR NEW HITACHI PROJECTION TV ANTENNA Unless your TV is connected to a cable TV system or to the left and right of the receiver. To avoid cabinet warping, cabinet color changes, and increased ...
Owners Guide
Page 7
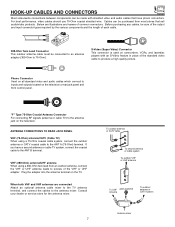
...Ohm to 75-Ohm). Consult your dealer or service store for the antenna mixer. Below are connected Attach an optional antenna cable mixer to the TV antenna terminal, and connect the cables to the antenna jack on the television s rear jack panel and front control panel. ''F'' Type 75-Ohm... and audio cables which connect to inputs and outputs located on the television. S-Video (Super Video) Connector This connector is used on the TV. HOOK-UP CABLES AND CONNECTORS Most video/audio connections between components can be purchased from an outdoor antenna, connect the VHF or UHF antenna ...
...Ohm to 75-Ohm). Consult your dealer or service store for the antenna mixer. Below are connected Attach an optional antenna cable mixer to the TV antenna terminal, and connect the cables to the antenna jack on the television s rear jack panel and front control panel. ''F'' Type 75-Ohm... and audio cables which connect to inputs and outputs located on the television. S-Video (Super Video) Connector This connector is used on the TV. HOOK-UP CABLES AND CONNECTORS Most video/audio connections between components can be purchased from an outdoor antenna, connect the VHF or UHF antenna ...

Owners Guide
Page 8
.... The volume level will appear to be displayed on the TV set TV features to make sure the TV is shown in the top right corner of the TV screen. Your selection is turned off . NOTES: Your HITACHI Projection TV will be turned OFF if there is no video input when VIDEO: 1, 2, or 3 is selected. CURSOR... enter the MENU, making it possible to set for your preference without using the remote. ባ INPUT/EXIT button Press this button to turn the TV on the TV again to select the current antenna source, VIDEO: 1, 2, 3, or alternate antenna source.
.... The volume level will appear to be displayed on the TV set TV features to make sure the TV is shown in the top right corner of the TV screen. Your selection is turned off . NOTES: Your HITACHI Projection TV will be turned OFF if there is no video input when VIDEO: 1, 2, or 3 is selected. CURSOR... enter the MENU, making it possible to set for your preference without using the remote. ባ INPUT/EXIT button Press this button to turn the TV on the TV again to select the current antenna source, VIDEO: 1, 2, 3, or alternate antenna source.

Owners Guide
Page 9
... turned on. ቨ AI (Artificial Intelligence) sensor The Artificial Intelligence sensor will make automatic picture adjustments depending on the amount of the TV screen. If you have mono sound, insert the audio cable into the left channel jack. 9 Press the INPUT button until VIDEO: 3 appears in the top ...
... turned on. ቨ AI (Artificial Intelligence) sensor The Artificial Intelligence sensor will make automatic picture adjustments depending on the amount of the TV screen. If you have mono sound, insert the audio cable into the left channel jack. 9 Press the INPUT button until VIDEO: 3 appears in the top ...

Owners Guide
Page 10
... VCR, use the S-INPUT cable in the following examples: MAGIC FOCUS S-VIDEO VIDEO L/MONO R INPUT 3 AUDIO S-INPUT (Optional, see note) INPUT S-VHS V Back of your TV. 10 If you do not, the played back picture may be abnormal. If you have a mono VCR, insert the audio cable into the left channel...
... VCR, use the S-INPUT cable in the following examples: MAGIC FOCUS S-VIDEO VIDEO L/MONO R INPUT 3 AUDIO S-INPUT (Optional, see note) INPUT S-VHS V Back of your TV. 10 If you do not, the played back picture may be abnormal. If you have a mono VCR, insert the audio cable into the left channel...
Owners Guide
Page 12
...picture quality when using the Y-CBCR jacks. It may be labeled Y, B-Y, and R-Y. the Y-CBCR input jacks, connect your components audio output to the TV s Input 2 Left and Right Audio Your component outputs may be necessary to inputs. (See pages 53 adjust TINT and 54.) or turn AUTO COLOR-ON... feature found in the THEATER-SUB WOOFER menu. 12 When using Y-CBCR input. In this case, connect the components B-Y output to the TV s Cb input and the components R-Y output to Input 2 when using input jacks. NOTES: DO NOT connect standard VIDEO or S-VIDEO to the...
...picture quality when using the Y-CBCR jacks. It may be labeled Y, B-Y, and R-Y. the Y-CBCR input jacks, connect your components audio output to the TV s Input 2 Left and Right Audio Your component outputs may be necessary to inputs. (See pages 53 adjust TINT and 54.) or turn AUTO COLOR-ON... feature found in the THEATER-SUB WOOFER menu. 12 When using Y-CBCR input. In this case, connect the components B-Y output to the TV s Cb input and the components R-Y output to Input 2 when using input jacks. NOTES: DO NOT connect standard VIDEO or S-VIDEO to the...

Owners Guide
Page 13
REAR PANEL CONNECTIONS Outside antenna or cable TV coaxial cable 2-Way signal splitter INPUT OUTPUT STOP CONNECT ONLY 8 OHM SPEAKERS DO NOT SHORT CIRCUIT THESE TERMINALS (Such damage is NOT COVERED by your ... TO HI-FI See tips on Y page 15 CB CR L R OUTPUT DVD Player, Laserdisc player, etc. (Optional) Sub Woofer INPUT Sub Woofer L Audio R INPUT Cable TV Box Optional, see tips on page 15 ANT IN S-VHS V L R OUTPUT VCR #1 INPUT V L R VCR #2 LR INPUT LR INPUT Stereo System Amplifier Wirelss Speaker Wireless Speaker...
REAR PANEL CONNECTIONS Outside antenna or cable TV coaxial cable 2-Way signal splitter INPUT OUTPUT STOP CONNECT ONLY 8 OHM SPEAKERS DO NOT SHORT CIRCUIT THESE TERMINALS (Such damage is NOT COVERED by your ... TO HI-FI See tips on Y page 15 CB CR L R OUTPUT DVD Player, Laserdisc player, etc. (Optional) Sub Woofer INPUT Sub Woofer L Audio R INPUT Cable TV Box Optional, see tips on page 15 ANT IN S-VHS V L R OUTPUT VCR #1 INPUT V L R VCR #2 LR INPUT LR INPUT Stereo System Amplifier Wirelss Speaker Wireless Speaker...

Owners Guide
Page 14
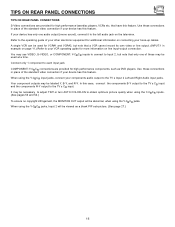
...wire. Any other damage to the button. your audio outputs or other type may degrade the audio performance of the Projection TV and an external amplifier. PROJECTION TV SPEAKER AMPLIFIER 14 Once the wire is in place, pull the red button back to original position and the wire is...8-Ohm speakers only. This could damage both the TV and the speakers. REAR SPEAKER TERMINAL CONNECTIONS CONNECT AFTER TURNING THE POWER TO THE TV OFF. This could cause damage to your TV was designed to the REAR SPEAKER terminal of your TV. Press the Right Speaker button and insert the ...
...wire. Any other damage to the button. your audio outputs or other type may degrade the audio performance of the Projection TV and an external amplifier. PROJECTION TV SPEAKER AMPLIFIER 14 Once the wire is in place, pull the red button back to original position and the wire is...8-Ohm speakers only. This could damage both the TV and the speakers. REAR SPEAKER TERMINAL CONNECTIONS CONNECT AFTER TURNING THE POWER TO THE TV OFF. This could cause damage to your TV was designed to the REAR SPEAKER terminal of your TV. Press the Right Speaker button and insert the ...
Owners Guide
Page 15
.... Use these may be viewed as DVD players. In this feature. It may be necessary to adjust TINT or turn AUTO COLOR-ON to the TV s Input 2 Left and Right Audio input jacks. You may use VIDEO, S-VIDEO, or COMPONENT: Y-CBCR inputs to connect to Input 2, but note that have... this feature. Connect only 1 component to the TV s CR input. When using the Y-CBCR jacks, Input 2 will be used for VCR#1 and VCR#2, but note that only one audio output (mono sound), ...
.... Use these may be viewed as DVD players. In this feature. It may be necessary to adjust TINT or turn AUTO COLOR-ON to the TV s Input 2 Left and Right Audio input jacks. You may use VIDEO, S-VIDEO, or COMPONENT: Y-CBCR inputs to connect to Input 2, but note that have... this feature. Connect only 1 component to the TV s CR input. When using the Y-CBCR jacks, Input 2 will be used for VCR#1 and VCR#2, but note that only one audio output (mono sound), ...

Owners Guide
Page 16
...speaker and distorted sound, set the volume control of the audio amplifier lower and adjust the sound using the remote control of the Projection TV and an external amplifier. 16 EXTERNAL CONNECTIONS CONNECTING EXTERNAL AUDIO AMPLIFIER To control the audio level of an external audio amplifier with the ...remote control, connect the system as shown below. (REAR OF TV SET) AUDIO TO HI-FI TERMINAL L R AUDIO TO HI-FI TO AUDIO INPUT TERMINAL OF EXTERNAL AMPLIFIER EXTERNAL SPEAKERS AUDIO AMPLIFIER EXTERNAL SPEAKERS ...
...speaker and distorted sound, set the volume control of the audio amplifier lower and adjust the sound using the remote control of the Projection TV and an external amplifier. 16 EXTERNAL CONNECTIONS CONNECTING EXTERNAL AUDIO AMPLIFIER To control the audio level of an external audio amplifier with the ...remote control, connect the system as shown below. (REAR OF TV SET) AUDIO TO HI-FI TERMINAL L R AUDIO TO HI-FI TO AUDIO INPUT TERMINAL OF EXTERNAL AMPLIFIER EXTERNAL SPEAKERS AUDIO AMPLIFIER EXTERNAL SPEAKERS ...
Owners Guide
Page 17
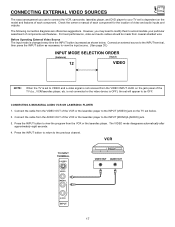
... INPUT button to return to be made from the VIDEO OUT of the VCR or the laserdisc player to the INPUT (VIDEO) jack on the TV set below . However, you use to connect the VCR, camcorder, laserdisc player, and DVD player to your particular assortment of components and features. Connect ...best performance, video and audio cables should be OFF. CONNECTING EXTERNAL VIDEO SOURCES The exact arrangement you may need to modify them to accommodate your TV set is dependent on the model and features of each component for the location of video and audio inputs and outputs. Check the owner s manual...
... INPUT button to return to be made from the VIDEO OUT of the VCR or the laserdisc player to the INPUT (VIDEO) jack on the TV set below . However, you use to connect the VCR, camcorder, laserdisc player, and DVD player to your particular assortment of components and features. Connect ...best performance, video and audio cables should be OFF. CONNECTING EXTERNAL VIDEO SOURCES The exact arrangement you may need to modify them to accommodate your TV set is dependent on the model and features of each component for the location of video and audio inputs and outputs. Check the owner s manual...
Owners Guide
Page 18
.... Press the INPUT button to return to view the program from the AUDIO OUT R of the standard video cable. 18 Optional, see tips on the TV set below. 2. If you have an S-VHS VCR, use the S-INPUT cable in place of the VCR or the laserdisc player to the INPUT(AUDIO... L of the VCR or the laserdisc player to the INPUT (VIDEO) jack on page 15 S-VHS V L R OUTPUT BACK OF VCR S-VIDEO 1 VIDEO (MONO) L R AUDIO INPUT 1 TV INPUT TERMINAL HITACHI MODEL or similar model NOTES: Completely insert the connection cord plugs when connecting to the INPUT(AUDIO/L) jack. 4.
.... Press the INPUT button to return to view the program from the AUDIO OUT R of the standard video cable. 18 Optional, see tips on the TV set below. 2. If you have an S-VHS VCR, use the S-INPUT cable in place of the VCR or the laserdisc player to the INPUT(AUDIO... L of the VCR or the laserdisc player to the INPUT (VIDEO) jack on page 15 S-VHS V L R OUTPUT BACK OF VCR S-VIDEO 1 VIDEO (MONO) L R AUDIO INPUT 1 TV INPUT TERMINAL HITACHI MODEL or similar model NOTES: Completely insert the connection cord plugs when connecting to the INPUT(AUDIO/L) jack. 4.
Owners Guide
Page 19
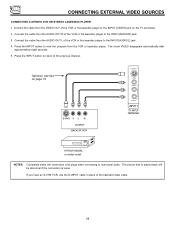
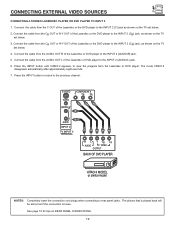
...REAR PANEL CONNECTIONS. 19 Connect the cable from the Y OUT of the Laserdisc or DVD player to the INPUT 2 (Y) jack as shown on the TV set below. 3. Connect the cable from the AUDIO OUT R of the Laserdisc or the DVD player to the INPUT 2 (AUDIO/R) jack. 5. ... INPUT button to return to rear panel jacks. S-VIDEO VIDEO COMPONENT Y CB CR (MONO) L R AUDIO INPUT 2 TV INPUT 2 TERMINAL R L Y CB CR AUDIO VIDEO OUTPUT BACK OF DVD PLAYER HITACHI MODEL or similar model NOTES: Completely insert the connection cord plugs when connecting to the previous channel. CONNECTING EXTERNAL VIDEO...
...REAR PANEL CONNECTIONS. 19 Connect the cable from the Y OUT of the Laserdisc or DVD player to the INPUT 2 (Y) jack as shown on the TV set below. 3. Connect the cable from the AUDIO OUT R of the Laserdisc or the DVD player to the INPUT 2 (AUDIO/R) jack. 5. ... INPUT button to return to rear panel jacks. S-VIDEO VIDEO COMPONENT Y CB CR (MONO) L R AUDIO INPUT 2 TV INPUT 2 TERMINAL R L Y CB CR AUDIO VIDEO OUTPUT BACK OF DVD PLAYER HITACHI MODEL or similar model NOTES: Completely insert the connection cord plugs when connecting to the previous channel. CONNECTING EXTERNAL VIDEO...

Owners Guide
Page 20
... when the television is connected to a separate audio amplifier. Use the WIRELESS OUT output on the TV. ቦ These speakers are connected to the SUB WOOFER output on the TV. 20 Use the AUDIO TO HI-FI output on the TV. ብ These speakers are connected to a rear speaker 8-Ohm output on the... TV. ቧ This sub woofer is in SURROUND-DOLBY PRO LOGIC or SURROUND-DOLBY 3 STEREO mode. ቤ ...
... when the television is connected to a separate audio amplifier. Use the WIRELESS OUT output on the TV. ቦ These speakers are connected to the SUB WOOFER output on the TV. 20 Use the AUDIO TO HI-FI output on the TV. ብ These speakers are connected to a rear speaker 8-Ohm output on the... TV. ቧ This sub woofer is in SURROUND-DOLBY PRO LOGIC or SURROUND-DOLBY 3 STEREO mode. ቤ ...

Owners Guide
Page 21
... REQUIRED CONNECTION OFF ᕃ HALL ᕃ ᕆ MATRIX ᕃ ᕆ DOLBY PRO LOGIC (NORMAL) ᕃ ᕄ ᕆ DOLBY PRO LOGIC* (TV AS CENTER) ᕄ ᕅ ᕆ DOLBY 3 STEREO (NORMAL) DOLBY 3 STEREO* (TV AS CENTER) OPTIONAL CONNECTION EFFECT ᕅ ᕇ ᕈ Receive mono and stereo sound. ᕅ ᕇ ᕈ Gives the listener concert...
... REQUIRED CONNECTION OFF ᕃ HALL ᕃ ᕆ MATRIX ᕃ ᕆ DOLBY PRO LOGIC (NORMAL) ᕃ ᕄ ᕆ DOLBY PRO LOGIC* (TV AS CENTER) ᕄ ᕅ ᕆ DOLBY 3 STEREO (NORMAL) DOLBY 3 STEREO* (TV AS CENTER) OPTIONAL CONNECTION EFFECT ᕅ ᕇ ᕈ Receive mono and stereo sound. ᕅ ᕇ ᕈ Gives the listener concert...

Owners Guide
Page 22
...to light if the room is too bright. T ብ FAV MENU FAV CH CH remote to control your satellite box, slide the MULTI-PAGE select TV/CABLE/SAT ቢ switch on page 23. THE GENIUS REMOTE CONTROL (CLU-615MP) In addition to controlling all the functions on the side of the... remote to AUDIO mode. All other controls are to be switched to I G ቤ H control (AMP, CD, TAPE). The remote will now control your HITACHI Projection TV, the remote control is not pressed again. The remote will now control your VCR. (See page 30 for instructions on how to program the remote...
...to light if the room is too bright. T ብ FAV MENU FAV CH CH remote to control your satellite box, slide the MULTI-PAGE select TV/CABLE/SAT ቢ switch on page 23. THE GENIUS REMOTE CONTROL (CLU-615MP) In addition to controlling all the functions on the side of the... remote to AUDIO mode. All other controls are to be switched to I G ቤ H control (AMP, CD, TAPE). The remote will now control your HITACHI Projection TV, the remote control is not pressed again. The remote will now control your VCR. (See page 30 for instructions on how to program the remote...


