
Owners Guide
Page 2
... avoid injury from it carefully and apply the knowledge you operate these units. caution when moving the cart/apparatus combination to HITACHI. Follow all warnings and instructions marked on or pinched particularly at plugs, convenience receptacles, and the point where they exit .... Important Safety Instructions SAFETY POINTS YOU SHOULD KNOW ABOUT type plug has two blades and a third grounding YOUR HITACHI LCD REAR PROJECTION prong. Protect the power cord from being walked on this apparatus during lightning storms or when unused for the mast and supporting structure, grounding...
... avoid injury from it carefully and apply the knowledge you operate these units. caution when moving the cart/apparatus combination to HITACHI. Follow all warnings and instructions marked on or pinched particularly at plugs, convenience receptacles, and the point where they exit .... Important Safety Instructions SAFETY POINTS YOU SHOULD KNOW ABOUT type plug has two blades and a third grounding YOUR HITACHI LCD REAR PROJECTION prong. Protect the power cord from being walked on this apparatus during lightning storms or when unused for the mast and supporting structure, grounding...

Owners Guide
Page 3
... material Public viewing of programs broadcast by TV stations and cable companies, as well as this can be placed on 120 volts 60 Hz, AC current. To prevent electric shock... the instructions, as video-on back side of a set-top box. Important Safety Instructions Power source This television is designed to operate on the television. Never connect the television to operate...be authorized by Macrovision Corporation, and is prohibited. FOR MORE INFORMATION, CALL 1-800-HITACHI. This product incorporates copyright protection technology that any objects on the top of the ...
... material Public viewing of programs broadcast by TV stations and cable companies, as well as this can be placed on 120 volts 60 Hz, AC current. To prevent electric shock... the instructions, as video-on back side of a set-top box. Important Safety Instructions Power source This television is designed to operate on the television. Never connect the television to operate...be authorized by Macrovision Corporation, and is prohibited. FOR MORE INFORMATION, CALL 1-800-HITACHI. This product incorporates copyright protection technology that any objects on the top of the ...

Owners Guide
Page 5
... at least 10cm (4 inches) from the wall. Make sure to place it may take about 10 to set up your new HITACHI Projection Television ANTENNA Unless your LCD Rear PTV against a wall, keep it should not be sufficient. To avoid cabinet warping, cabinet color changes, and increased chance of ...the TV, place the surround speakers to reduce the reflection or the TV can become stable, after the power has been turned on. NOTE: Your new...
... at least 10cm (4 inches) from the wall. Make sure to place it may take about 10 to set up your new HITACHI Projection Television ANTENNA Unless your LCD Rear PTV against a wall, keep it should not be sufficient. To avoid cabinet warping, cabinet color changes, and increased chance of ...the TV, place the surround speakers to reduce the reflection or the TV can become stable, after the power has been turned on. NOTE: Your new...
Owners Guide
Page 7
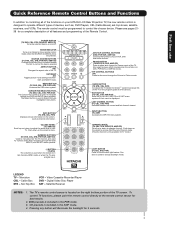
..., CBL, STB, PVR/VCR) The Cursor Pad is used to controlling all features and programming of your HITACHI LCD Rear Projection TV, the new remote control is included in DVD, PVR/VCR, or AMP/CD mode. CD precode is designed to operate different types of devices, such ... Control Buttons and Functions In addition to pause other devices. NUMERIC BUTTONS (TV, DVD, CBL, STB, PVR/VCR, AMP/CD) Used to mute. LEGEND TV - Set-Top-Box VCR - Pressing any button will illuminate the backlight for best results. 2. POWER BUTTON (TV, DVD, CBL, STB, PVR/VCR, AMP/CD) Turns the selected device on...
..., CBL, STB, PVR/VCR) The Cursor Pad is used to controlling all features and programming of your HITACHI LCD Rear Projection TV, the new remote control is included in DVD, PVR/VCR, or AMP/CD mode. CD precode is designed to operate different types of devices, such ... Control Buttons and Functions In addition to pause other devices. NUMERIC BUTTONS (TV, DVD, CBL, STB, PVR/VCR, AMP/CD) Used to mute. LEGEND TV - Set-Top-Box VCR - Pressing any button will illuminate the backlight for best results. 2. POWER BUTTON (TV, DVD, CBL, STB, PVR/VCR, AMP/CD) Turns the selected device on...

Owners Guide
Page 8
..., if it is set to a level 30 or less, the volume level will default to 30 when the TV is turned ON. ´ POWER button Press this button to turn the TV on the TV screen. These buttons also serve as the EXIT button when in MENU mode. » CHANNEL selector Press these buttons...;) buttons when in MENU mode. ¿ VOLUME level Press these buttons until the desired channel appears in the top right corner of the TV screen. When the TV power is turned OFF at the level it possible to your equipment's remote control at this area while using the remote. Press the INPUT button...
..., if it is set to a level 30 or less, the volume level will default to 30 when the TV is turned ON. ´ POWER button Press this button to turn the TV on the TV screen. These buttons also serve as the EXIT button when in MENU mode. » CHANNEL selector Press these buttons...;) buttons when in MENU mode. ¿ VOLUME level Press these buttons until the desired channel appears in the top right corner of the TV screen. When the TV power is turned OFF at the level it possible to your equipment's remote control at this area while using the remote. Press the INPUT button...

Owners Guide
Page 9
...See page 89-92 for Service LONG BLINKING (1 SEC CYCLE) COOL DOWN (FOR 6 MINUTES) (TV CAN ACCEPT REMOTE CONTROL AND SIDE BUTTONS) 2. If light is blinking, lamp cover is off during normal operation. POWER TEMP LAMP 3. If this indicator is lit, the optic unit is lit, the lamp has ... LED On. ¸ LAMP Indicator This light is blinking, the cooling fan has stopped. Your Hitachi LCD Rear Projection Television may become clogged over time. First time use Front Panel Controls ¾ POWER Light This light is not received from your digital camera, USB memory or memory card USB drive...
...See page 89-92 for Service LONG BLINKING (1 SEC CYCLE) COOL DOWN (FOR 6 MINUTES) (TV CAN ACCEPT REMOTE CONTROL AND SIDE BUTTONS) 2. If light is blinking, lamp cover is off during normal operation. POWER TEMP LAMP 3. If this indicator is lit, the optic unit is lit, the lamp has ... LED On. ¸ LAMP Indicator This light is blinking, the cooling fan has stopped. Your Hitachi LCD Rear Projection Television may become clogged over time. First time use Front Panel Controls ¾ POWER Light This light is not received from your digital camera, USB memory or memory card USB drive...

Owners Guide
Page 12
.... CableCARD is not installed ¸ CableCARD Slot This slot is for 12 additional CableCARD information. IMPORTANT: Please read the "Lamp Power Control" feature on the Internal Speakers Settings of all information on page 100 for the CableCARD that will be facing right as ...is available before installing the CableCARD. 1. Patent Nos. 4,631,603; 4,577,216; 4,819,098; 4,907,093; CableCARD slot. Rear Panel Connections First time use ¾ TV AS CENTER (INPUTS 1-4) These jacks are for limited viewing uses only. CableCARD™ (Top of U.S. With this service is installed...
.... CableCARD is not installed ¸ CableCARD Slot This slot is for 12 additional CableCARD information. IMPORTANT: Please read the "Lamp Power Control" feature on the Internal Speakers Settings of all information on page 100 for the CableCARD that will be facing right as ...is available before installing the CableCARD. 1. Patent Nos. 4,631,603; 4,577,216; 4,819,098; 4,907,093; CableCARD slot. Rear Panel Connections First time use ¾ TV AS CENTER (INPUTS 1-4) These jacks are for limited viewing uses only. CableCARD™ (Top of U.S. With this service is installed...

Owners Guide
Page 19
... 4,907,093; Each IR Mouse cable can use Connecting External Video Sources Your HITACHI LCD Rear Projection Television is setup, it allows your IR Mouse connector to control your equipment using your HITACHI remote control to the Rear Panel shown below. 2. CONNECTING EXTERNAL AUDIO/VIDEO COMPONENTS TO IR BLASTER FOR AV... the MENU button. 5. Follow the Setup procedure on pages 76-83. Video Audio TV Guide On Screen Channel Manager Locks Timers Setup Move SEL Select Setup Menu Preference Lamp Power Control Set The Inputs Set AV NET Set Closed Captions Set Monitor Out Upgrades Quick ...
... 4,907,093; Each IR Mouse cable can use Connecting External Video Sources Your HITACHI LCD Rear Projection Television is setup, it allows your IR Mouse connector to control your equipment using your HITACHI remote control to the Rear Panel shown below. 2. CONNECTING EXTERNAL AUDIO/VIDEO COMPONENTS TO IR BLASTER FOR AV... the MENU button. 5. Follow the Setup procedure on pages 76-83. Video Audio TV Guide On Screen Channel Manager Locks Timers Setup Move SEL Select Setup Menu Preference Lamp Power Control Set The Inputs Set AV NET Set Closed Captions Set Monitor Out Upgrades Quick ...

Owners Guide
Page 22
... return the picture to freeze the picture. The Remote Control How to Use the Remote to Control Your TV ቢ POWER button Press this button to turn the TV set on or off when the remote is in TV mode. (See page 21 for ቢ instructions on how to set the remote control to... TV mode.) ባ ቤ ብ ባ MODE Indicator Turns on or blinks to show remote control mode. ቤ SOURCE ACCESS...
... return the picture to freeze the picture. The Remote Control How to Use the Remote to Control Your TV ቢ POWER button Press this button to turn the TV set on or off when the remote is in TV mode. (See page 21 for ቢ instructions on how to set the remote control to... TV mode.) ባ ቤ ብ ባ MODE Indicator Turns on or blinks to show remote control mode. ቤ SOURCE ACCESS...

Owners Guide
Page 25
... digital still pictures from picture to navigate and select individual chosen photos. Please Enter Picture Number -- 6. Digital cameras with low battery power may show Picture Numbers in Thumbnail view, plus other information in individual photos. 3. Press the INPUTS button to view THUMBNAIL. 4. ... may not work with this input. 6. The maximum number of digital Photos that can be displayed is fully loaded, or because of the TV. 1. Press the SELECT button or CURSOR PAD ̈. Picture No. Next SEL Thumbnail [0-9] Jump The Remote Control 5. Use the CURSOR ...
... digital still pictures from picture to navigate and select individual chosen photos. Please Enter Picture Number -- 6. Digital cameras with low battery power may show Picture Numbers in Thumbnail view, plus other information in individual photos. 3. Press the INPUTS button to view THUMBNAIL. 4. ... may not work with this input. 6. The maximum number of digital Photos that can be displayed is fully loaded, or because of the TV. 1. Press the SELECT button or CURSOR PAD ̈. Picture No. Next SEL Thumbnail [0-9] Jump The Remote Control 5. Use the CURSOR ...

Owners Guide
Page 27
... GREEN to highlighted GREEN. Press it again to return to Favorite (FAV) channel mode. However, if it was set to 30 when the TV is turned off completely (MUTE). Press the channel (CH) wheel to switch to your favorite channel list by pressing and holding down the Channel... / Mute 8 Closed Captioning will default to AUTO (see page 84). Enter "0" first for the TV to select the desired channel. When the TV power is turned on and Closed Caption is set when the TV is GREEN. Use the CHANNEL SELECTOR buttons to answer the telephone, etc., press the VOL wheel down...
... GREEN to highlighted GREEN. Press it again to return to Favorite (FAV) channel mode. However, if it was set to 30 when the TV is turned off completely (MUTE). Press the channel (CH) wheel to switch to your favorite channel list by pressing and holding down the Channel... / Mute 8 Closed Captioning will default to AUTO (see page 84). Enter "0" first for the TV to select the desired channel. When the TV power is turned on and Closed Caption is set when the TV is GREEN. Use the CHANNEL SELECTOR buttons to answer the telephone, etc., press the VOL wheel down...

Owners Guide
Page 31
... into the remote. 2. Release the ENT button. The remote will remember the codes you have programmed until the batteries are for operating the TV. 31 NOTE: 1. After replacing the batteries repeat the entire programming procedure as shown on the remote control to position the LED light to ...the correct four digit preset code is ባ programmed for your cable box. Aim the remote control at the cable box and press the POWER button. The Remote Control The Remote Control for Cable Box Functions Operating the precoded function for your cable box. ቢ This remote is...
... into the remote. 2. Release the ENT button. The remote will remember the codes you have programmed until the batteries are for operating the TV. 31 NOTE: 1. After replacing the batteries repeat the entire programming procedure as shown on the remote control to position the LED light to ...the correct four digit preset code is ባ programmed for your cable box. Aim the remote control at the cable box and press the POWER button. The Remote Control The Remote Control for Cable Box Functions Operating the precoded function for your cable box. ቢ This remote is...

Owners Guide
Page 32
... receiver cannot be operated after performing the above . Aim the remote at the front of your set -top-box/satellite receiver and press the POWER button. When this occurs, the remote control is programmed for your set -top- The remote control will ባ flash 3 times if the...Receiver. ቢ PRE-CODED SET-TOP-BOX/SATELLITE RECEIVER buttons These buttons transmit the chosen pre-coded settop-box/satellite codes. ባ EXCLUSIVE TV buttons These buttons are removed from the from the remote control. To switch to set - ቢ top-box/satellite receiver as stated above ...
... receiver cannot be operated after performing the above . Aim the remote at the front of your set -top-box/satellite receiver and press the POWER button. When this occurs, the remote control is programmed for your set -top- The remote control will ባ flash 3 times if the...Receiver. ቢ PRE-CODED SET-TOP-BOX/SATELLITE RECEIVER buttons These buttons transmit the chosen pre-coded settop-box/satellite codes. ባ EXCLUSIVE TV buttons These buttons are removed from the from the remote control. To switch to set - ቢ top-box/satellite receiver as stated above ...

Owners Guide
Page 33
...at the front of the buttons exclusively for the DVD Player. ቢ PRECODED DVD Buttons These buttons transmit the chosen precoded DVD codes. ባ EXCLUSIVE TV Buttons These buttons are removed from the from the remote control. You will flash 3 times if ቢ the code was accepted. ባ 5. Hold...PLAYER CODE IS: NOTE: Refer to pages 37-38 for your DVD player. 7. Aim the remote control at the DVD player and press the POWER button. When this occurs, the remote control is designed to operate different types of your DVD player (refer to instruction manual of the DVD ...
...at the front of the buttons exclusively for the DVD Player. ቢ PRECODED DVD Buttons These buttons transmit the chosen precoded DVD codes. ባ EXCLUSIVE TV Buttons These buttons are removed from the from the remote control. You will flash 3 times if ቢ the code was accepted. ባ 5. Hold...PLAYER CODE IS: NOTE: Refer to pages 37-38 for your DVD player. 7. Aim the remote control at the DVD player and press the POWER button. When this occurs, the remote control is designed to operate different types of your DVD player (refer to instruction manual of the DVD ...
Owners Guide
Page 34
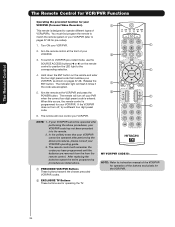
...chosen precoded VCR/PVR codes. Aim the remote control at the VCR/PVR and press the ባ POWER button. To switch to match the remote system of VCRs/PVRs. Aim the remote at the front of... the buttons exclusively for the VCR/PVR. ባ EXCLUSIVE TV Buttons These buttons are removed from the from the remote control. You must first program the remote to...as shown on the remote control to position the LED light to pages 37-38 for operating the TV. 34 The indicator light will turn off your PVR when the correct four digit preset code is...
...chosen precoded VCR/PVR codes. Aim the remote control at the VCR/PVR and press the ባ POWER button. To switch to match the remote system of VCRs/PVRs. Aim the remote at the front of... the buttons exclusively for the VCR/PVR. ባ EXCLUSIVE TV Buttons These buttons are removed from the from the remote control. You must first program the remote to...as shown on the remote control to position the LED light to pages 37-38 for operating the TV. 34 The indicator light will turn off your PVR when the correct four digit preset code is...

Owners Guide
Page 35
... pages 37-38 for the VCR/PVR. ቢ PRECODED AUDIO Buttons These buttons transmit the chosen precoded Audio component codes. ባ EXCLUSIVE TV Buttons These buttons are removed from the from the remote control. Hold down the ENT button on the remote and enter the four digit preset... the remote at the front of Audio component. Aim the remote control at the Audio component and press the POWER button. When this occurs, the remote control is programmed for operating the TV. 35 If the Audio component does not turn off , try a different four digit preset code. / ቢ ...
... pages 37-38 for the VCR/PVR. ቢ PRECODED AUDIO Buttons These buttons transmit the chosen precoded Audio component codes. ባ EXCLUSIVE TV Buttons These buttons are removed from the from the remote control. Hold down the ENT button on the remote and enter the four digit preset... the remote at the front of Audio component. Aim the remote control at the Audio component and press the POWER button. When this occurs, the remote control is programmed for operating the TV. 35 If the Audio component does not turn off , try a different four digit preset code. / ቢ ...

Owners Guide
Page 37
...HP 1972 Harley Davidson 0000 Harman/Kardon ......0038, 0081 Harwood 0072 Headquarter 0046 Hewlett Packard 1972 Hitachi 0000, 0041, 0042, 0105 Howard Computers............1972 Hughes Network Systems 0042 iBuy Power 1972 JVC 0067, 0041, 0008 Jensen 0041 KEC 0037, 0278 KLH 0072 Kenwood ......0041, 0067... 0699, 0769 Gateway 1073 Go Video ......0744, 0715, 0783 0833, 0869, 1075 Gradiente 0651 Greenhill 0717 Grundig 0705 Harman/Kardon 0702 Hitachi ..........0573, 0664, 0695 Hiteker 0672 IRT 0783 Initial 0717 Integra 0627 Hiteker 0672 JBL 0702 JVC......0623, 0558, 0867, 1901 KLH...
...HP 1972 Harley Davidson 0000 Harman/Kardon ......0038, 0081 Harwood 0072 Headquarter 0046 Hewlett Packard 1972 Hitachi 0000, 0041, 0042, 0105 Howard Computers............1972 Hughes Network Systems 0042 iBuy Power 1972 JVC 0067, 0041, 0008 Jensen 0041 KEC 0037, 0278 KLH 0072 Kenwood ......0041, 0067... 0699, 0769 Gateway 1073 Go Video ......0744, 0715, 0783 0833, 0869, 1075 Gradiente 0651 Greenhill 0717 Grundig 0705 Harman/Kardon 0702 Hitachi ..........0573, 0664, 0695 Hiteker 0672 IRT 0783 Initial 0717 Integra 0627 Hiteker 0672 JBL 0702 JVC......0623, 0558, 0867, 1901 KLH...

Owners Guide
Page 39
... exit from a menu. Lamp Temp Power On-Screen Display 39 Press the CURSOR buttons to navigate and highlight a different feature of the screen shows which Remote Control buttons to select. 3. This part of the On-Screen Display menu. On-Screen Display 1. Press MENU on your HITACHI LCD Rear Projection TV. 2. Press the SELECT button to...
... exit from a menu. Lamp Temp Power On-Screen Display 39 Press the CURSOR buttons to navigate and highlight a different feature of the screen shows which Remote Control buttons to select. 3. This part of the On-Screen Display menu. On-Screen Display 1. Press MENU on your HITACHI LCD Rear Projection TV. 2. Press the SELECT button to...
Owners Guide
Page 40
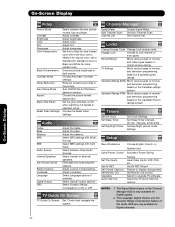
... Color Temperature Black Enhancement Contrast Mode Noise Reduction Auto Movie Mode Aspect Black Side Panel Reset Video Settings Select between stations. TV Ratings Block various types of the Audio OSD are only available for Digital signals. 2. Select Language options if available. Timers...channels. 40 Select SRS settings (Off, Wide, Normal) Select BBE settings (Off, Soft, Hard) Select between three Audio Sources. Automatic Power Saving Feature. The Signal Meter feature of movies and video types based on /off when watching 4:3 signals in the picture. Adjust sharpness....
... Color Temperature Black Enhancement Contrast Mode Noise Reduction Auto Movie Mode Aspect Black Side Panel Reset Video Settings Select between stations. TV Ratings Block various types of the Audio OSD are only available for Digital signals. 2. Select Language options if available. Timers...channels. 40 Select SRS settings (Off, Wide, Normal) Select BBE settings (Off, Soft, Hard) Select between three Audio Sources. Automatic Power Saving Feature. The Signal Meter feature of movies and video types based on /off when watching 4:3 signals in the picture. Adjust sharpness....

Owners Guide
Page 43
... EXPANDED/ZOOM1/ZOOM2 or 16:9 ZOOM. For example, it to the Day VIDEO mode. 1. NOTE: Vertical Position will return to factory conditions. The TV set will reset to the initial conditions as explained above. Reset Video Settings This function allows you to select when aspect style is selected in...picture with these modes. Reset Select "Yes" to fix the Video Menu Settings to the original factory Settings on all modes during the next power on /off Channel List, Volume level and Last-CH selection remains unchanged. Video Vertical Position This function allows you to Reset the Video ...
... EXPANDED/ZOOM1/ZOOM2 or 16:9 ZOOM. For example, it to the Day VIDEO mode. 1. NOTE: Vertical Position will return to factory conditions. The TV set will reset to the initial conditions as explained above. Reset Video Settings This function allows you to select when aspect style is selected in...picture with these modes. Reset Select "Yes" to fix the Video Menu Settings to the original factory Settings on all modes during the next power on /off Channel List, Volume level and Last-CH selection remains unchanged. Video Vertical Position This function allows you to Reset the Video ...


