
Owners Guide
Page 1
has determined that this product meets the Energy Star® guidelines for 50VG825, 55VG825, 60VG825 IMPORTANT SAFETY INSTRUCTIONS 2-3 FIRST TIME USE ...4-20 THE REMOTE CONTROL ...21-38 ON-SCREEN DISPLAY ...39-88 LAMP REPLACEMENT ...88-91 USEFUL INFORMATION...92-97 LICENSE AGREEMENT...98 APPENDIXES ...99-100 INDEX ...101 As an Energy Star® Partner, Hitachi, Ltd. LCD REAR PROJECTION TELEVISION Operating Guide for energy efficiency.
has determined that this product meets the Energy Star® guidelines for 50VG825, 55VG825, 60VG825 IMPORTANT SAFETY INSTRUCTIONS 2-3 FIRST TIME USE ...4-20 THE REMOTE CONTROL ...21-38 ON-SCREEN DISPLAY ...39-88 LAMP REPLACEMENT ...88-91 USEFUL INFORMATION...92-97 LICENSE AGREEMENT...98 APPENDIXES ...99-100 INDEX ...101 As an Energy Star® Partner, Hitachi, Ltd. LCD REAR PROJECTION TELEVISION Operating Guide for energy efficiency.

Owners Guide
Page 2
Important Safety Instructions SAFETY POINTS YOU SHOULD KNOW ABOUT type plug has two blades and a third grounding YOUR HITACHI LCD REAR PROJECTION prong. Protect the power cord from being walked on this discharge unit, connection to grounding electrodes and requirements for the... is intended to alert the user to the presence of the NEC that provides guidelines for long periods of the cabinet which will enable HITACHI to notify you promptly in any ventilation openings. built up static charges. READ BEFORE OPERATING EQUIPMENT Follow all instructions. 5. television. 1. Read...
Important Safety Instructions SAFETY POINTS YOU SHOULD KNOW ABOUT type plug has two blades and a third grounding YOUR HITACHI LCD REAR PROJECTION prong. Protect the power cord from being walked on this discharge unit, connection to grounding electrodes and requirements for the... is intended to alert the user to the presence of the NEC that provides guidelines for long periods of the cabinet which will enable HITACHI to notify you promptly in any ventilation openings. built up static charges. READ BEFORE OPERATING EQUIPMENT Follow all instructions. 5. television. 1. Read...

Owners Guide
Page 5
... the picture screen center. Since LCD Rear PTV incorporates a high pressure lamp to display an image, it may look unusual, or the lamp "goes out," (burns out). After extended use How to set up your new HITACHI Projection Television ANTENNA Unless your LCD Rear PTV against a wall, keep ...it should not be considered defective. 2. If you hear a "cracking" sound from the TV cabinet, it on the screen. An uneven surface might warp the ...
... the picture screen center. Since LCD Rear PTV incorporates a high pressure lamp to display an image, it may look unusual, or the lamp "goes out," (burns out). After extended use How to set up your new HITACHI Projection Television ANTENNA Unless your LCD Rear PTV against a wall, keep ...it should not be considered defective. 2. If you hear a "cracking" sound from the TV cabinet, it on the screen. An uneven surface might warp the ...

Owners Guide
Page 6
.... Before purchasing any cables, be sure of the output and input connector types required by the various components and the length of the LCD television. Consult your external devices such as Set-Top-Boxes or DVD players equipped with an S-Video feature in front of the corresponding ... jack on camcorders, VCRs and laserdisc players with an HDMI output connection to screws of common connectors. ANTENNA CONNECTIONS TO REAR JACK PANEL VHF (75-Ohm) antenna/CATV (Cable TV) When using a 300-Ohm twin lead from most stores that have an antenna, connect the coaxial cable to produce ...
.... Before purchasing any cables, be sure of the output and input connector types required by the various components and the length of the LCD television. Consult your external devices such as Set-Top-Boxes or DVD players equipped with an S-Video feature in front of the corresponding ... jack on camcorders, VCRs and laserdisc players with an HDMI output connection to screws of common connectors. ANTENNA CONNECTIONS TO REAR JACK PANEL VHF (75-Ohm) antenna/CATV (Cable TV) When using a 300-Ohm twin lead from most stores that have an antenna, connect the coaxial cable to produce ...
Owners Guide
Page 7
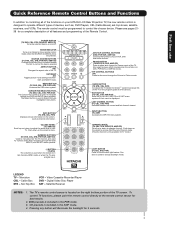
... Select button is used as , DVD Players, CBL (Cable Boxes), set-top-boxes, satellite receivers, and VCRs. EXIT BUTTON (TV, CBL, STB, PVR/VCR) Exits out of your HITACHI LCD Rear Projection TV, the new remote control is displayed. LEGEND TV - Satellite Receiver NOTES: 1. VCR precode is included in Set-Top-Box (STB) mode or when the...
... Select button is used as , DVD Players, CBL (Cable Boxes), set-top-boxes, satellite receivers, and VCRs. EXIT BUTTON (TV, CBL, STB, PVR/VCR) Exits out of your HITACHI LCD Rear Projection TV, the new remote control is displayed. LEGEND TV - Satellite Receiver NOTES: 1. VCR precode is included in Set-Top-Box (STB) mode or when the...

Owners Guide
Page 9
... input 1 ~ input 5 and the video signal is off , then the TV will trigger the temperature sensor to replace if LAMP still does not light by ìPower On " again. After 5 minutes, the lamp will turn off during normal operation. Your Hitachi LCD Rear Projection Television may become clogged over time. Check assembly condition of LAMP...
... input 1 ~ input 5 and the video signal is off , then the TV will trigger the temperature sensor to replace if LAMP still does not light by ìPower On " again. After 5 minutes, the lamp will turn off during normal operation. Your Hitachi LCD Rear Projection Television may become clogged over time. Check assembly condition of LAMP...

Owners Guide
Page 12
... for limited viewing uses only. CableCARD is not installed ¸ CableCARD Slot This slot is not authorized for stereo amplifiers with your LCD Television's remote control in TV mode. Patent Nos. 4,631,603; 4,577,216; 4,819,098; 4,907,093; CableCARD slot. Connect a coaxial cable to...facing right as Point of card faces right) Top faces Acquiring Data. Please wait. Rear Panel Connections First time use ¾ TV AS CENTER (INPUTS 1-4) These jacks are for viewing. The TV must be controlled by your external components can automatically be set as a center speaker...
... for limited viewing uses only. CableCARD is not installed ¸ CableCARD Slot This slot is not authorized for stereo amplifiers with your LCD Television's remote control in TV mode. Patent Nos. 4,631,603; 4,577,216; 4,819,098; 4,907,093; CableCARD slot. Connect a coaxial cable to...facing right as Point of card faces right) Top faces Acquiring Data. Please wait. Rear Panel Connections First time use ¾ TV AS CENTER (INPUTS 1-4) These jacks are for viewing. The TV must be controlled by your external components can automatically be set as a center speaker...

Owners Guide
Page 19
... INPUT 2 CAUTION Infrared Sensor IR Mouse Infrared Sensor VCR V L R OUTPUT DVD Player OUTPUT Y PB/CB PR/CR R L 4. Video Audio TV Guide On Screen Channel Manager Locks Timers Setup Move SEL Select Setup Menu Preference Lamp Power Control Set The Inputs Set AV NET Set Closed... Up Move SEL Set NOTE: 1. This feature helps to control your equipment using your HITACHI LCD Rear PTV Remote Control. Each IR Mouse cable can use Connecting External Video Sources Your HITACHI LCD Rear Projection Television is setup, it allows your IR Mouse connector to control your external Audio/Video...
... INPUT 2 CAUTION Infrared Sensor IR Mouse Infrared Sensor VCR V L R OUTPUT DVD Player OUTPUT Y PB/CB PR/CR R L 4. Video Audio TV Guide On Screen Channel Manager Locks Timers Setup Move SEL Select Setup Menu Preference Lamp Power Control Set The Inputs Set AV NET Set Closed... Up Move SEL Set NOTE: 1. This feature helps to control your equipment using your HITACHI LCD Rear PTV Remote Control. Each IR Mouse cable can use Connecting External Video Sources Your HITACHI LCD Rear Projection Television is setup, it allows your IR Mouse connector to control your external Audio/Video...

Owners Guide
Page 20
...VCR recording features. One IR Mouse cable can use Connecting External Video Sources Your HITACHI LCD Rear Projection Television is necessary for the TV Guide On ScreenTM system to work . 20 Video Audio TV Guide On Screen Channel Manager Locks Timers Setup Move SEL Select NOTE: The ...LINK setup between your external Audio/Video components to control. CableCARD™ (Top of U.S. First time use your HITACHI LCD Rear PTV Remote Control and the TV Guide On Screen system to control your cable box and VCR recording features. CABLE Apparatus Claims of card faces right...
...VCR recording features. One IR Mouse cable can use Connecting External Video Sources Your HITACHI LCD Rear Projection Television is necessary for the TV Guide On ScreenTM system to work . 20 Video Audio TV Guide On Screen Channel Manager Locks Timers Setup Move SEL Select NOTE: The ...LINK setup between your external Audio/Video components to control. CableCARD™ (Top of U.S. First time use your HITACHI LCD Rear PTV Remote Control and the TV Guide On Screen system to control your cable box and VCR recording features. CABLE Apparatus Claims of card faces right...
Owners Guide
Page 21
... the remote to control your PVR). Basic operation keys are grouped together in TV Mode by pressing the ̇ or ̈ button of the Source Access on the remote. To operate your LCD Rear Projection TV, point the remote control at the remote sensor of the PVR and select ...Automatic) 1. The Remote Control The Remote Control In addition to controlling all the functions on your HITACHI LCD Rear Projection TV, the new remote control is designed to operate different types of VCRs, CATV (Cable TV) converters, set-top-box, satellite receiver, DVD players, and other audio/video equipment with one ...
... the remote to control your PVR). Basic operation keys are grouped together in TV Mode by pressing the ̇ or ̈ button of the Source Access on the remote. To operate your LCD Rear Projection TV, point the remote control at the remote sensor of the PVR and select ...Automatic) 1. The Remote Control The Remote Control In addition to controlling all the functions on your HITACHI LCD Rear Projection TV, the new remote control is designed to operate different types of VCRs, CATV (Cable TV) converters, set-top-box, satellite receiver, DVD players, and other audio/video equipment with one ...

Owners Guide
Page 24
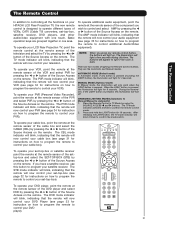
... CURSOR PAD toward desired direction and press the SELECT button to select. ቯ GUIDE button Press this button to access the Channel Guide of the LCD TV (see page 41. ቩ PICTURE-IN-PICTURE button See separate section on pages 28-30 for a description. ቪ MENU button The MENU ...for numeric entries. INPUT 2 Select to INPUT 1 YPBPR:1 480i 11:00PM INFO Input 5 Photo Input Cable Air Input 1 Move SEL Sel. PM ST TV-14 V Audio Broadcast Broadcast Rating Closed Captioning Day CC Off Cable 6 11:00PM Aspect Mode 16:9 Standard Main Picture Source Time When an S-VIDEO Input...
... CURSOR PAD toward desired direction and press the SELECT button to select. ቯ GUIDE button Press this button to access the Channel Guide of the LCD TV (see page 41. ቩ PICTURE-IN-PICTURE button See separate section on pages 28-30 for a description. ቪ MENU button The MENU ...for numeric entries. INPUT 2 Select to INPUT 1 YPBPR:1 480i 11:00PM INFO Input 5 Photo Input Cable Air Input 1 Move SEL Sel. PM ST TV-14 V Audio Broadcast Broadcast Rating Closed Captioning Day CC Off Cable 6 11:00PM Aspect Mode 16:9 Standard Main Picture Source Time When an S-VIDEO Input...

Owners Guide
Page 28
...modes (POP, PIP, SPLIT or SURF), depending on the channel list. 4. The Remote Control Picture-In-Picture (PIP) Your HITACHI LCD Rear PTV incorporates Two Tuner technology designed for limited viewing uses only. Use the connection diagram to the right to cycle through the ...faces right) Top faces AIR MONITOR OUT S I V I D E O V I D E O (MONO) (MONO) Y/ VIDEO PB PR (MONO) Y/ VIDEO PB PR (MONO) A L U D TV AS CENTER I O R AUDIO TO HI-FI INPUT 1 INPUT 2 INPUT 3 INPUT 4 OPTICAL OUT Digital Audio / G-LINK Upgrade Card HDMI INPUT 1 HDMI INPUT 2 CAUTION Audio Video OUTPUT...
...modes (POP, PIP, SPLIT or SURF), depending on the channel list. 4. The Remote Control Picture-In-Picture (PIP) Your HITACHI LCD Rear PTV incorporates Two Tuner technology designed for limited viewing uses only. Use the connection diagram to the right to cycle through the ...faces right) Top faces AIR MONITOR OUT S I V I D E O V I D E O (MONO) (MONO) Y/ VIDEO PB PR (MONO) Y/ VIDEO PB PR (MONO) A L U D TV AS CENTER I O R AUDIO TO HI-FI INPUT 1 INPUT 2 INPUT 3 INPUT 4 OPTICAL OUT Digital Audio / G-LINK Upgrade Card HDMI INPUT 1 HDMI INPUT 2 CAUTION Audio Video OUTPUT...

Owners Guide
Page 39
This part of the screen shows which Remote Control buttons to display the different features on your HITACHI LCD Rear Projection TV. 2. Lamp Temp Power On-Screen Display 39 Press MENU on the remote control to select. 3. Video Audio TV Guide On Screen Channel Manager Locks Timers Setup Move SEL Select This part of the On-Screen...
This part of the screen shows which Remote Control buttons to display the different features on your HITACHI LCD Rear Projection TV. 2. Lamp Temp Power On-Screen Display 39 Press MENU on the remote control to select. 3. Video Audio TV Guide On Screen Channel Manager Locks Timers Setup Move SEL Select This part of the On-Screen...

Owners Guide
Page 42
... when watching film based sources. If CONTRAST is turned ON from the VIDEO menu, your Hitachi LCD Rear Projection Television will activate the circuitry for this function to select the Picture Format Aspect Ratio. 1....Mode will be reconciled. Press the CURSOR PAD ̇ or ̈ to OFF if the TV experiences picture blocking. Contrast Mode Use this function to enhance Picture brightness in the level of Black ... be difficult to see. All video settings are independent of each of 30 frames or 60 fields like video. Use the CURSOR PAD ̆ or ̄ to highlight the ...
... when watching film based sources. If CONTRAST is turned ON from the VIDEO menu, your Hitachi LCD Rear Projection Television will activate the circuitry for this function to select the Picture Format Aspect Ratio. 1....Mode will be reconciled. Press the CURSOR PAD ̇ or ̈ to OFF if the TV experiences picture blocking. Contrast Mode Use this function to enhance Picture brightness in the level of Black ... be difficult to see. All video settings are independent of each of 30 frames or 60 fields like video. Use the CURSOR PAD ̆ or ̄ to highlight the ...

Owners Guide
Page 47
...postal code (CANADA) of your favorite shows using a Cable Box or VCR, you must first setup the LCD Rear PTV as shown on Page 20. To Setup the TV Guide On Screen System: 1. Press the SELECT button to highlight TV GUIDE ON SCREEN, then press the SELECT button. If using a VCR. Video Audio.... Use the CURSOR PAD ̆ and ̄ to highlight your choice, then press the SELECT button to this feature. 2. TV Guide On Screen TV Guide On Screen The TV Guide On-Screen system is located in your area. Once the setup process is complete, the program listings are automatically updated several...
...postal code (CANADA) of your favorite shows using a Cable Box or VCR, you must first setup the LCD Rear PTV as shown on Page 20. To Setup the TV Guide On Screen System: 1. Press the SELECT button to highlight TV GUIDE ON SCREEN, then press the SELECT button. If using a VCR. Video Audio.... Use the CURSOR PAD ̆ and ̄ to highlight your choice, then press the SELECT button to this feature. 2. TV Guide On Screen TV Guide On Screen The TV Guide On-Screen system is located in your area. Once the setup process is complete, the program listings are automatically updated several...

Owners Guide
Page 51
The TV Guide On Screen system setup is complete. On-Screen Display TV Guide On Screen Screen 22: Congratulations! Press the SELECT button to exit the Setup. NOTE: 1. Press the SELECT button to finalize. Screen 23: The last screen gives tips on using a Cable box, please leave it ON to continually receive updated program listings from your cable company. 2. The LCD Rear PTV should be in standby mode in order to continually receive updated program listings from your cable company. 51 If using the TV Guide On Screen system.
The TV Guide On Screen system setup is complete. On-Screen Display TV Guide On Screen Screen 22: Congratulations! Press the SELECT button to exit the Setup. NOTE: 1. Press the SELECT button to finalize. Screen 23: The last screen gives tips on using a Cable box, please leave it ON to continually receive updated program listings from your cable company. 2. The LCD Rear PTV should be in standby mode in order to continually receive updated program listings from your cable company. 51 If using the TV Guide On Screen system.

Owners Guide
Page 76
...AUTO LINK feature, it must be reset before AUTO LINK is used again. This is convenient when you want to record a movie with your TV as described above. 2. Set AV Net Use this feature to control your external Audio/Video equipment using REMOTE mode, any remote control button ...select. Press the SELECT button to highlight SETUP. 3. Use the CURSOR PAD ̇ or ̈ to highlight the AUTO LINK setting of your HITACHI LCD Rear PTV Remote Control. When using your choice. Press the SELECT button to highlight SET AV NET feature. Use the CURSOR PAD ̄ or CHANNEL ...
...AUTO LINK feature, it must be reset before AUTO LINK is used again. This is convenient when you want to record a movie with your TV as described above. 2. Set AV Net Use this feature to control your external Audio/Video equipment using REMOTE mode, any remote control button ...select. Press the SELECT button to highlight SETUP. 3. Use the CURSOR PAD ̇ or ̈ to highlight the AUTO LINK setting of your HITACHI LCD Rear PTV Remote Control. When using your choice. Press the SELECT button to highlight SET AV NET feature. Use the CURSOR PAD ̄ or CHANNEL ...

Owners Guide
Page 80
...VOL ̆ to check the response of 5 to 10 feet or 2 to this command. 13. at the learning AV NET sensor of the LCD TV (located at the lower right corner of the screen) AV Net Setup Wizard : A/V Receiver Setup at a distance of the device to 3 meters....Learns the command.... AV Net Setup Wizard : A/V Receiver Setup VOL̆ Transfer not completed! Brand Name Other Learning Mode VOL̆ Transfer was successful. Setup 5. TV Softkeys POWER CH̆ VOL̆ MUTE CH̄ VOL̄ AUDIO SOURCE 1 SOURCE 2 SOURCE 3 SOURCE 4 SOURCE 5 SOURCE 6 SOURCE 7 SOURCE 8 SOURCE...
...VOL ̆ to check the response of 5 to 10 feet or 2 to this command. 13. at the learning AV NET sensor of the LCD TV (located at the lower right corner of the screen) AV Net Setup Wizard : A/V Receiver Setup at a distance of the device to 3 meters....Learns the command.... AV Net Setup Wizard : A/V Receiver Setup VOL̆ Transfer not completed! Brand Name Other Learning Mode VOL̆ Transfer was successful. Setup 5. TV Softkeys POWER CH̆ VOL̆ MUTE CH̄ VOL̄ AUDIO SOURCE 1 SOURCE 2 SOURCE 3 SOURCE 4 SOURCE 5 SOURCE 6 SOURCE 7 SOURCE 8 SOURCE...

Owners Guide
Page 82
... Done 11. Setup 7. AV Net Setup Wizard : Custom Settings Custom settings Please choose the device you wish to learn . (Example: PLAY ̈ button). 10. TV Softkeys POWER ̇̇ ̈̈ MENU ̇̇ ̈ ̈̈ SELECT ̆ ̈ EXIT ̄ ̇ Move SEL Select Back...Settings Press and hold the ̈ "Play button" of the DVD remote control while pointing directly at the learning AV NET sensor of the LCD TV (located at the lower right corner of the screen) at a distance of the device to the next screen. AV Net Setup Wizard : Device...
... Done 11. Setup 7. AV Net Setup Wizard : Custom Settings Custom settings Please choose the device you wish to learn . (Example: PLAY ̈ button). 10. TV Softkeys POWER ̇̇ ̈̈ MENU ̇̇ ̈ ̈̈ SELECT ̆ ̈ EXIT ̄ ̇ Move SEL Select Back...Settings Press and hold the ̈ "Play button" of the DVD remote control while pointing directly at the learning AV NET sensor of the LCD TV (located at the lower right corner of the screen) at a distance of the device to the next screen. AV Net Setup Wizard : Device...
Owners Guide
Page 85
... Inputs Set AV NET Set Closed Captions Set Monitor Out Upgrades Set Stand-by Mode Move SEL Select TV Tuner Out: Select TV TUNER OUT to output the audio Setup Set Monitor Out and video signals of the Monitor Output. When...to MONITOR. Press EXIT to quit menu or select SET MONITOR OUT to return to change 2. On-Screen Display 85 When TV TUNER OUT is connected to the audio and video output of the chosen input source (CABLE, AIR, INPUT 1-5) to output...AUDIO OUT VARIABLE to have Audio volume that can control the volume output by the LCD Rear Projection TV Volume Up/Down.
... Inputs Set AV NET Set Closed Captions Set Monitor Out Upgrades Set Stand-by Mode Move SEL Select TV Tuner Out: Select TV TUNER OUT to output the audio Setup Set Monitor Out and video signals of the Monitor Output. When...to MONITOR. Press EXIT to quit menu or select SET MONITOR OUT to return to change 2. On-Screen Display 85 When TV TUNER OUT is connected to the audio and video output of the chosen input source (CABLE, AIR, INPUT 1-5) to output...AUDIO OUT VARIABLE to have Audio volume that can control the volume output by the LCD Rear Projection TV Volume Up/Down.


