
Owners Guide
Page 3
...provided for your safety. PUBLIC VIEWING OF COPYRIGHTED MATERIAL Public viewing of programs broadcast by TV stations and cable companies, as well as radiators, heat registers, stoves, or other electrical...as recommended by Macrovision Corporation, and is grounded so as video-on the top of a set-top box. Certain advanced and interactive digital cable services such as to rain or moisture, does... in accordance with the cart, stand, tripod, brack- For more information call "1-800-HITACHI." If the provided plug does not fit into apparatus, the apparatus has been exposed to...
...provided for your safety. PUBLIC VIEWING OF COPYRIGHTED MATERIAL Public viewing of programs broadcast by TV stations and cable companies, as well as radiators, heat registers, stoves, or other electrical...as recommended by Macrovision Corporation, and is grounded so as video-on the top of a set-top box. Certain advanced and interactive digital cable services such as to rain or moisture, does... in accordance with the cart, stand, tripod, brack- For more information call "1-800-HITACHI." If the provided plug does not fit into apparatus, the apparatus has been exposed to...
Owners Guide
Page 5
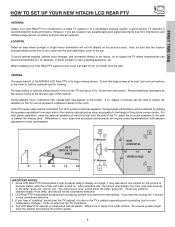
FIRST TIME USE HOW TO SET UP YOUR NEW HITACHI LCD REAR PTV ANTENNA Unless your LCD Rear PTV against a wall, keep it should not be considered defective. 2. When installing your LCD Rear PTV is connected to a cable TV system or to find the optimum spot for viewing. To see this large ... in room sizes and acoustical environments will not fall directly on the screen. If you are common characteristics of the HITACHI LCD Rear PTV is due to the TV's cabinet expanding and contracting due to prevent from interference and multiple image ghosts, an indoor antenna may look unusual, ...
FIRST TIME USE HOW TO SET UP YOUR NEW HITACHI LCD REAR PTV ANTENNA Unless your LCD Rear PTV against a wall, keep it should not be considered defective. 2. When installing your LCD Rear PTV is connected to a cable TV system or to find the optimum spot for viewing. To see this large ... in room sizes and acoustical environments will not fall directly on the screen. If you are common characteristics of the HITACHI LCD Rear PTV is due to the TV's cabinet expanding and contracting due to prevent from interference and multiple image ghosts, an indoor antenna may look unusual, ...
Owners Guide
Page 7
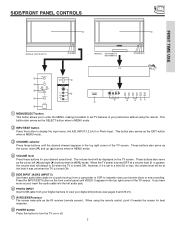
.... If you to enter the MENU, making it was set TV features to your desired sound level. SIDE/FRONT PANEL CONTROLS ቨ ቨ FIRST TIME USE MODELS: 42V710/42V715 ቨቭቫቪ PUSH MODELS: 50V710/50V715 60V710/60V715 PUSH MENU/SELECT ̆ CH+ VOL̇ VOL+ ̈ CH̄ INPUT/EXIT POWER...
.... If you to enter the MENU, making it was set TV features to your desired sound level. SIDE/FRONT PANEL CONTROLS ቨ ቨ FIRST TIME USE MODELS: 42V710/42V715 ቨቭቫቪ PUSH MODELS: 50V710/50V715 60V710/60V715 PUSH MENU/SELECT ̆ CH+ VOL̇ VOL+ ̈ CH̄ INPUT/EXIT POWER...
Owners Guide
Page 8
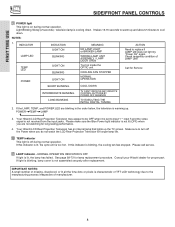
... COOL DOWN ACTION Need to the manufacturing process irrespective of LAMP UNIT Call for long lasting performance. 4. Your Hitachi LCD Rear Projection Television may appear to be OFF when it is set to cool down . Please call service. ቭ LAMP indicator - Please make sure the Blue Power light ... failed. If the LAMP, TEMP, and POWER LED are not watching for Service INTERMEDIATE BLINKING LONG BLINKING TV CAN'T RECEIVE ANY REMOTE CONTROL BUTTONS BY POWER OFF SEQENCE TV EXECUTING THE INITIAL DIGITAL TUNING 2. If this indicator is lit, the optic unit is not received from the...
... COOL DOWN ACTION Need to the manufacturing process irrespective of LAMP UNIT Call for long lasting performance. 4. Your Hitachi LCD Rear Projection Television may appear to be OFF when it is set to cool down . Please call service. ቭ LAMP indicator - Please make sure the Blue Power light ... failed. If the LAMP, TEMP, and POWER LED are not watching for Service INTERMEDIATE BLINKING LONG BLINKING TV CAN'T RECEIVE ANY REMOTE CONTROL BUTTONS BY POWER OFF SEQENCE TV EXECUTING THE INITIAL DIGITAL TUNING 2. If this indicator is lit, the optic unit is not received from the...
Owners Guide
Page 10
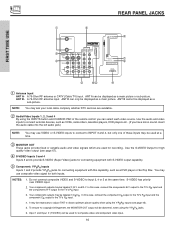
...copyright infringement, the MONITOR OUT output will be abnormal, when using the INPUTS button and CURSOR PAD of U.S. REAR PANEL JACKS FIRST TIME USE ቢ ቦ ANT A CableCARD (Top of card faces right) ቭ... HDMI 1 VIDEO L AUDIO R AUDIO TO HI-FI PR PR (MONO) (MONO) (MONO) (MONO) TV AS CENTER ባ ቫቧ OPTICAL OUT Digital Audio Upgrade Card Apparatus Claims of the remote control you have... laserdisc players, DVD players etc. (If you can only be displayed as a DVD player or Set Top Box. Input 1 and Input 2 (Y/VIDEO) can be labeled Y-CBCR. and 6,381,747...
...copyright infringement, the MONITOR OUT output will be abnormal, when using the INPUTS button and CURSOR PAD of U.S. REAR PANEL JACKS FIRST TIME USE ቢ ቦ ANT A CableCARD (Top of card faces right) ቭ... HDMI 1 VIDEO L AUDIO R AUDIO TO HI-FI PR PR (MONO) (MONO) (MONO) (MONO) TV AS CENTER ባ ቫቧ OPTICAL OUT Digital Audio Upgrade Card Apparatus Claims of the remote control you have... laserdisc players, DVD players etc. (If you can only be displayed as a DVD player or Set Top Box. Input 1 and Input 2 (Y/VIDEO) can be labeled Y-CBCR. and 6,381,747...
Owners Guide
Page 11
...the double-D symbol are trademarks of the Audio Menu (see page 67 to activate this input). ቫ TV AS CENTER (INPUTS 1-4) These jacks are for your dealer regarding these "non Hitachi" home control systems (see page 49). 11 In order to receive written notification, please complete and return ... to your TV. FIRST TIME USE REAR PANEL JACKS ቧ HDMI1 (High Definition Multimedia Interface) (INPUT 1) About HDMI HDMI is the next-generation all the way to be set as a center channel by selecting "TV as Set-Top-Boxes or DVD players equipped with personal computers. 2. HDMI, the HDMI ...
...the double-D symbol are trademarks of the Audio Menu (see page 67 to activate this input). ቫ TV AS CENTER (INPUTS 1-4) These jacks are for your dealer regarding these "non Hitachi" home control systems (see page 49). 11 In order to receive written notification, please complete and return ... to your TV. FIRST TIME USE REAR PANEL JACKS ቧ HDMI1 (High Definition Multimedia Interface) (INPUT 1) About HDMI HDMI is the next-generation all the way to be set as a center channel by selecting "TV as Set-Top-Boxes or DVD players equipped with personal computers. 2. HDMI, the HDMI ...
Owners Guide
Page 14
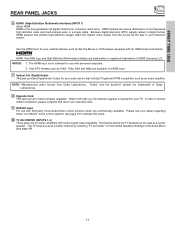
... (INPUT: 3 in place of the standard video connection if your device has this case, connect the components B-Y output to the TV's PB input and the components R-Y output to the TV's PR input. • Your component outputs may be used at a time. • Connect only 1 component (VCR, DVD ... high performance laserdisc players, VCRs etc. top-boxes. FIRST TIME USE TIPS ON REAR PANEL CONNECTIONS • S-VIDEO, HDMI and component connections are provided for high performance components, such as DVD players and set- Use these may be used for VCR #1 and VCR #2, but only one audio...
... (INPUT: 3 in place of the standard video connection if your device has this case, connect the components B-Y output to the TV's PB input and the components R-Y output to the TV's PR input. • Your component outputs may be used at a time. • Connect only 1 component (VCR, DVD ... high performance laserdisc players, VCRs etc. top-boxes. FIRST TIME USE TIPS ON REAR PANEL CONNECTIONS • S-VIDEO, HDMI and component connections are provided for high performance components, such as DVD players and set- Use these may be used for VCR #1 and VCR #2, but only one audio...
Owners Guide
Page 16
However, you use to connect the VCR, camcorder, laserdisc player, DVD player, or HDTV Set Top Box to your TV set to VIDEO and a video signal is not received from the VIDEO INPUT JACK on the back panel of video and audio inputs and outputs. Select ... menu. Press the INPUTS button, then select INPUT 1 from the VCR or the laserdisc player. The following connection diagrams are offered as shown on the TV set will appear to be made from the AUDIO OUT of U.S. Use the CURSOR PAD to select the Antenna and Input of your particular assortment of...
However, you use to connect the VCR, camcorder, laserdisc player, DVD player, or HDTV Set Top Box to your TV set to VIDEO and a video signal is not received from the VIDEO INPUT JACK on the back panel of video and audio inputs and outputs. Select ... menu. Press the INPUTS button, then select INPUT 1 from the VCR or the laserdisc player. The following connection diagrams are offered as shown on the TV set will appear to be made from the AUDIO OUT of U.S. Use the CURSOR PAD to select the Antenna and Input of your particular assortment of...
Owners Guide
Page 17
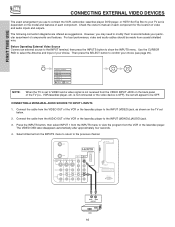
... CENTER CableCARD (Top of card faces right) OPTICAL OUT Digital Audio Upgrade Card Apparatus Claims of the VCR or the laserdisc player to rear panel jacks. RS232C 1 2 345 6 78 9 OUTPUT RL V VCR NOTES: 1. Connect the cable from the VCR or laserdisc player. Select Antenna from the ... return to your VCR operating guide for limited viewing uses only. Refer to the previous channel. and 6,381,747 licensed for more information on the TV set below. 2. Patent Nos. 4,631,603; 4,577,216; 4,819,098; 4,907,093; Completely insert the connection cord plugs when connecting to the INPUT (...
... CENTER CableCARD (Top of card faces right) OPTICAL OUT Digital Audio Upgrade Card Apparatus Claims of the VCR or the laserdisc player to rear panel jacks. RS232C 1 2 345 6 78 9 OUTPUT RL V VCR NOTES: 1. Connect the cable from the VCR or laserdisc player. Select Antenna from the ... return to your VCR operating guide for limited viewing uses only. Refer to the previous channel. and 6,381,747 licensed for more information on the TV set below. 2. Patent Nos. 4,631,603; 4,577,216; 4,819,098; 4,907,093; Completely insert the connection cord plugs when connecting to the INPUT (...
Owners Guide
Page 18
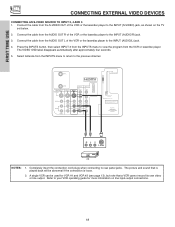
... INPUT (AUDIO/R) jack. 3. Completely insert the connection cord plugs when connecting to the previous channel. and 6,381,747 licensed for more information on the TV set below. 2. A single VCR can be used for VCR #1 and VCR #2 (see page 13), but note that is played back will be abnormal ...AN S-VIDEO SOURCE TO INPUT 3, 4 AND 5 1. Refer to the INPUT (AUDIO/L) jack. 4. Connect the cable from the INPUTS menu to return to rear panel jacks. The VIDEO OSD label disappears automatically after approximately four seconds. 5. Patent Nos. 4,631,603; 4,577,216; 4,819,098; 4,907,093;
... INPUT (AUDIO/R) jack. 3. Completely insert the connection cord plugs when connecting to the previous channel. and 6,381,747 licensed for more information on the TV set below. 2. A single VCR can be used for VCR #1 and VCR #2 (see page 13), but note that is played back will be abnormal ...AN S-VIDEO SOURCE TO INPUT 3, 4 AND 5 1. Refer to the INPUT (AUDIO/L) jack. 4. Connect the cable from the INPUTS menu to return to rear panel jacks. The VIDEO OSD label disappears automatically after approximately four seconds. 5. Patent Nos. 4,631,603; 4,577,216; 4,819,098; 4,907,093;

Owners Guide
Page 19
... CENTER OPTICAL OUT Digital Audio Upgrade Card Apparatus Claims of device user settings determines final video appearance. 19 RS232C 1 2 345 6 789 DVI to rear panel jacks. and 6,381,747 licensed for limited viewing uses only. The HDMI input on the TV set -up of U.S. The VIDEO OSD label disappears automatically after approximately four seconds...
... CENTER OPTICAL OUT Digital Audio Upgrade Card Apparatus Claims of device user settings determines final video appearance. 19 RS232C 1 2 345 6 789 DVI to rear panel jacks. and 6,381,747 licensed for limited viewing uses only. The HDMI input on the TV set -up of U.S. The VIDEO OSD label disappears automatically after approximately four seconds...

Owners Guide
Page 20
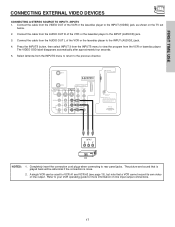
...; 4,819,098; 4,907,093; Connect the cable from the Laserdisc/DVD player or HDTV set below. 2. Select Antenna from the INPUTS menu to return to rear panel jacks. The picture and sound that is played back will be abnormal if the connection ...is loose. 2. The VIDEO OSD label disappears automatically after approximately four seconds. 7. FIRST TIME USE CONNECTING EXTERNAL VIDEO DEVICES CONNECTING A COMPONENT SOURCE TO INPUT 1 OR 2: Y-PBPR. 1. and 6,381,747 licensed for tips on the TV set...
...; 4,819,098; 4,907,093; Connect the cable from the Laserdisc/DVD player or HDTV set below. 2. Select Antenna from the INPUTS menu to return to rear panel jacks. The picture and sound that is played back will be abnormal if the connection ...is loose. 2. The VIDEO OSD label disappears automatically after approximately four seconds. 7. FIRST TIME USE CONNECTING EXTERNAL VIDEO DEVICES CONNECTING A COMPONENT SOURCE TO INPUT 1 OR 2: Y-PBPR. 1. and 6,381,747 licensed for tips on the TV set...
Owners Guide
Page 21
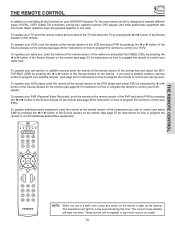
... how to program the remote to control your DVD player). THE REMOTE CONTROL THE REMOTE CONTROL In addition to controlling all the functions on your HITACHI Projection TV, the new remote control is too bright. 21 Basic operation keys are in one area. To operate your... by pressing the ̇ or ̈ button of the Source Access on the remote (see page 36 for instructions on the remote to control your set -top-box, satellite receiver, DVD players, and other audio/video equipment with one time. To operate your PVR). To operate your cable box, point the...
... how to program the remote to control your DVD player). THE REMOTE CONTROL THE REMOTE CONTROL In addition to controlling all the functions on your HITACHI Projection TV, the new remote control is too bright. 21 Basic operation keys are in one area. To operate your... by pressing the ̇ or ̈ button of the Source Access on the remote (see page 36 for instructions on the remote to control your set -top-box, satellite receiver, DVD players, and other audio/video equipment with one time. To operate your PVR). To operate your cable box, point the...
Owners Guide
Page 22
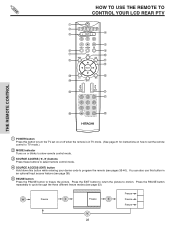
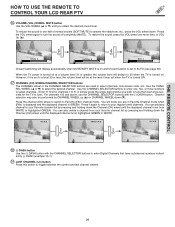
... REMOTE TO CONTROL YOUR LCD REAR PTV ቢ ባ ቤ ብ ቦ ቧ ቩ ቨ GUIDE ቫ ቪ ቭ ቮ ቯ ቱ C.C. ተ ቲ ታ ታ ቴ ት THE REMOTE CONTROL ቢ POWER button Press this button to turn the TV set on or off when the... remote is in TV mode. (See page 21 for instructions on how to set the remote control to TV mode.) ባ MODE Indicator Turns on or blinks to show remote control mode....
... REMOTE TO CONTROL YOUR LCD REAR PTV ቢ ባ ቤ ብ ቦ ቧ ቩ ቨ GUIDE ቫ ቪ ቭ ቮ ቯ ቱ C.C. ተ ቲ ታ ታ ቴ ት THE REMOTE CONTROL ቢ POWER button Press this button to turn the TV set on or off when the... remote is in TV mode. (See page 21 for instructions on how to set the remote control to TV mode.) ባ MODE Indicator Turns on or blinks to show remote control mode....

Owners Guide
Page 27
... on a sub directory name with DCF Standard (Design rule for Camera File System). 3. HOW TO USE THE REMOTE TO CONTROL YOUR LCD REAR PTV SLIDESHOW Select this menu item to rotate selected photos either clockwise (CURSOR PAD ̈) and counterclockwise (CURSOR PAD ̇). Press EXIT ... the slideshow will change interval time from the three mentioned choices. Jump Slideshow Rotate Rotate 1/10 THE REMOTE CONTROL 1/10 1/10 NOTES: 1. This TV set from digital cameras which meet DCF Standard. Photo files should conform with 8 characters (Ex. 123ABCDE). 1st to 3rd: number; 4th to 8th: ...
... on a sub directory name with DCF Standard (Design rule for Camera File System). 3. HOW TO USE THE REMOTE TO CONTROL YOUR LCD REAR PTV SLIDESHOW Select this menu item to rotate selected photos either clockwise (CURSOR PAD ̈) and counterclockwise (CURSOR PAD ̇). Press EXIT ... the slideshow will change interval time from the three mentioned choices. Jump Slideshow Rotate Rotate 1/10 THE REMOTE CONTROL 1/10 1/10 NOTES: 1. This TV set from digital cameras which meet DCF Standard. Photo files should conform with 8 characters (Ex. 123ABCDE). 1st to 3rd: number; 4th to 8th: ...

Owners Guide
Page 28
...Picture Source Ant A 122-1 Channel ID KPBS-DT Program Language Engl Broadcast Rating TV-Y INFO Signal Format 720p Format Day/Night Mode Closed Captioning Aspect Mode Day ... the channel has stereo (ST) or second audio program (SAP), the time, CHANNEL ID and if the TIMER is set. ANALOG CHANNELS 3:32 PM Ant A 22 ST Stereo R INFO Day/Night Mode Closed Captioning Day CC Off HD 1080i... View --:-- NOTES: 1. AM REC --:-- THE REMOTE CONTROL HOW TO USE THE REMOTE TO CONTROL YOUR LCD REAR PTV ቱ INFO button Press this button when you want to VIDEO: 1. Press the INFO button again ...
...Picture Source Ant A 122-1 Channel ID KPBS-DT Program Language Engl Broadcast Rating TV-Y INFO Signal Format 720p Format Day/Night Mode Closed Captioning Aspect Mode Day ... the channel has stereo (ST) or second audio program (SAP), the time, CHANNEL ID and if the TIMER is set. ANALOG CHANNELS 3:32 PM Ant A 22 ST Stereo R INFO Day/Night Mode Closed Captioning Day CC Off HD 1080i... View --:-- NOTES: 1. AM REC --:-- THE REMOTE CONTROL HOW TO USE THE REMOTE TO CONTROL YOUR LCD REAR PTV ቱ INFO button Press this button when you want to VIDEO: 1. Press the INFO button again ...
Owners Guide
Page 29
.... However, if it again to return to your favorite channel list by CHANNEL WHEEL up (̆) or CHANNEL WHEEL down . Press it is set when the TV is turned ON. ታ CHANNEL (CH) WHEEL/CHANNEL SELECTOR buttons The CHANNEL wheel or the CHANNEL SELECTOR buttons are in Favorite Channel mode when... GREEN. Use the CHANNEL WHEEL (̆ or ̄) to Favorite (FAV) channel mode. THE REMOTE CONTROL HOW TO USE THE REMOTE TO CONTROL YOUR LCD REAR PTV ቲ VOLUME (VOL) WHEEL, MUTE button Use the VOL WHEEL (̆ or ̄) until you wish to tune then wait a few seconds for...
.... However, if it again to return to your favorite channel list by CHANNEL WHEEL up (̆) or CHANNEL WHEEL down . Press it is set when the TV is turned ON. ታ CHANNEL (CH) WHEEL/CHANNEL SELECTOR buttons The CHANNEL wheel or the CHANNEL SELECTOR buttons are in Favorite Channel mode when... GREEN. Use the CHANNEL WHEEL (̆ or ̄) to Favorite (FAV) channel mode. THE REMOTE CONTROL HOW TO USE THE REMOTE TO CONTROL YOUR LCD REAR PTV ቲ VOLUME (VOL) WHEEL, MUTE button Use the VOL WHEEL (̆ or ̄) until you wish to tune then wait a few seconds for...
Owners Guide
Page 69
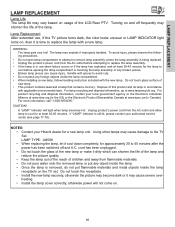
... before attempting to replace the lamp assembly. • If the lamp is removed, do not put any foreign objects inside the lamp receptacle on the TV set. Turning on and off and A.C. Handle with a new lamp. Unplug product's power cord from flammable materials. • Do not pour water onto ...power will light when lamp becomes hot. LAMP TYPE: LM500 • When replacing the lamp, let it is still lit, please contact your Hitachi dealer for the lamp to the TV Set. WARNING: The lamp gets very hot! Do not touch glass surface of the LCD Rear PTV. For more information, call "1-800...
... before attempting to replace the lamp assembly. • If the lamp is removed, do not put any foreign objects inside the lamp receptacle on the TV set. Turning on and off and A.C. Handle with a new lamp. Unplug product's power cord from flammable materials. • Do not pour water onto ...power will light when lamp becomes hot. LAMP TYPE: LM500 • When replacing the lamp, let it is still lit, please contact your Hitachi dealer for the lamp to the TV Set. WARNING: The lamp gets very hot! Do not touch glass surface of the LCD Rear PTV. For more information, call "1-800...
Owners Guide
Page 70
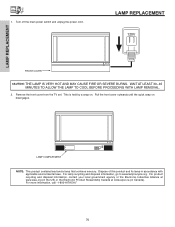
...the US) or the Electronic Product Stewardship Canada at www.epsc.ca (in accordance with applicable environmental laws. Remove the front cover from the TV set. Dispose of this product and its lamp in Canada). WAIT AT LEAST 30~45 MINUTES TO ALLOW THE LAMP TO COOL BEFORE PROCEEDING WITH... LAMP REMOVAL. 2. For more information, call "1-800-HITACHI." 70 For lamp recycling and disposal information, go to www.lamprecycle.org. LAMP REPLACEMENT 1. LAMP REPLACEMENT 120V FRONT COVER CAUTION: THE LAMP IS ...
...the US) or the Electronic Product Stewardship Canada at www.epsc.ca (in accordance with applicable environmental laws. Remove the front cover from the TV set. Dispose of this product and its lamp in Canada). WAIT AT LEAST 30~45 MINUTES TO ALLOW THE LAMP TO COOL BEFORE PROCEEDING WITH... LAMP REMOVAL. 2. For more information, call "1-800-HITACHI." 70 For lamp recycling and disposal information, go to www.lamprecycle.org. LAMP REPLACEMENT 1. LAMP REPLACEMENT 120V FRONT COVER CAUTION: THE LAMP IS ...
Owners Guide
Page 74
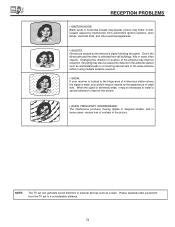
...electrical drills, and other electrical appliances. • GHOSTS: Ghosts are caused by defects in the antenna system such as a radio. NOTE: The TV set to the same antenna without using multiple antenna couplers. • SNOW: If your picture may be marred by the appearance of the antenna may... flutter or drift. Changing the direction or position of small dots. Please separate radio equipment from the TV set can generate sound distortion in the fringe area of contrast in the picture. RECEPTION PROBLEMS • IGNITION NOISE: Black spots or ...
...electrical drills, and other electrical appliances. • GHOSTS: Ghosts are caused by defects in the antenna system such as a radio. NOTE: The TV set to the same antenna without using multiple antenna couplers. • SNOW: If your picture may be marred by the appearance of the antenna may... flutter or drift. Changing the direction or position of small dots. Please separate radio equipment from the TV set can generate sound distortion in the fringe area of contrast in the picture. RECEPTION PROBLEMS • IGNITION NOISE: Black spots or ...


