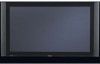
Owners Guide
Page 3
...capable of fire or electric shock, do not use of programs broadcast by U.S. Prevention of the plasma television as video games, stock market quotations, computer generated graphics, and other fixed (non-moving)...of receiving analog basic, digital basic and digital premium cable television programming by HITACHI could void the user's warranty. Use of the video program material. ...-screen displays such as this product in Canada). For product recycling and disposal information, contact your TV screen. Insert the power cord into a 120 volt 60 Hz outlet. Caution Never remove the back...
...capable of fire or electric shock, do not use of programs broadcast by U.S. Prevention of the plasma television as video games, stock market quotations, computer generated graphics, and other fixed (non-moving)...of receiving analog basic, digital basic and digital premium cable television programming by HITACHI could void the user's warranty. Use of the video program material. ...-screen displays such as this product in Canada). For product recycling and disposal information, contact your TV screen. Insert the power cord into a 120 volt 60 Hz outlet. Caution Never remove the back...
Owners Guide
Page 5
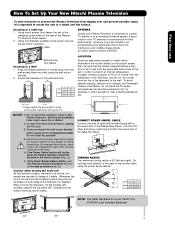
... their hands, head or face, etc.) against the edge of the Television for model 55HDT79 & 55HDX99 is not included (Optional). 42" 55" 5 Securing to a Wall 1. Using wood screws (... is moved, two people are located in fig. (b). CONNECT POWER SWIVEL CABLE Connect one end of the Plasma TV stand as shown below . 2. However, if you purchased the wall mount bracket option, please ask for ... performance. First time use How To Set Up Your New Hitachi Plasma Television To take measures to prevent the Plasma Television from tipping over and prevent possible injury it safely. ...
... their hands, head or face, etc.) against the edge of the Television for model 55HDT79 & 55HDX99 is not included (Optional). 42" 55" 5 Securing to a Wall 1. Using wood screws (... is moved, two people are located in fig. (b). CONNECT POWER SWIVEL CABLE Connect one end of the Plasma TV stand as shown below . 2. However, if you purchased the wall mount bracket option, please ask for ... performance. First time use How To Set Up Your New Hitachi Plasma Television To take measures to prevent the Plasma Television from tipping over and prevent possible injury it safely. ...

Owners Guide
Page 6
... the Base. so it needs to be remove to hold the TV and the Base ; Please access our web site at: www.hitachi.us/tv for recommended accessories for the Plasma TV depending on the back of your TV. This metal is use STAND PLATE METAL STEP (2): Please remove the 3 screws and the STAND ...PLATE metal from the TV, then put back only the screw to separate the TV from the STAND BASE. 4...
... the Base. so it needs to be remove to hold the TV and the Base ; Please access our web site at: www.hitachi.us/tv for recommended accessories for the Plasma TV depending on the back of your TV. This metal is use STAND PLATE METAL STEP (2): Please remove the 3 screws and the STAND ...PLATE metal from the TV, then put back only the screw to separate the TV from the STAND BASE. 4...
Owners Guide
Page 9
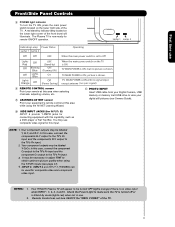
.../VCR, AMP/CD) Turns the selected device on or blinks to change channel. SOURCE ACCESS BUTTONS (TV, DVD, CBL, STB, PVR/VCR, AMP/CD) Changes the mode of your HITACHI Plasma TV, the new remote control is displayed. BUTTON (TV, CBL, STB, VCR) The CH+ or CH- DVD/VCR CONTROL BUTTONS (DVD, PVR/VCR, AMP...
.../VCR, AMP/CD) Turns the selected device on or blinks to change channel. SOURCE ACCESS BUTTONS (TV, DVD, CBL, STB, PVR/VCR, AMP/CD) Changes the mode of your HITACHI Plasma TV, the new remote control is displayed. BUTTON (TV, CBL, STB, VCR) The CH+ or CH- DVD/VCR CONTROL BUTTONS (DVD, PVR/VCR, AMP...
Owners Guide
Page 11
...When the main power switch on the lower right corner of the TV. 11 In this case, connect the components B-Y output to the TV's PB input and the components R-Y output to the TV's PR input. 2. Your HITACHI Plasma TV will illuminate. TV MAIN POWER is now ready for connecting equipment with no signal input ...Camera, USB memory or memory card USB drive to the TV's PR input. 3. In this case, connect the component CB output to the TV's PB input and the component CR output to view your digital still pictures (see page 47). 4. The Plasma TV is ON ; Check the Power Light to Off. ...
...When the main power switch on the lower right corner of the TV. 11 In this case, connect the components B-Y output to the TV's PB input and the components R-Y output to the TV's PR input. 2. Your HITACHI Plasma TV will illuminate. TV MAIN POWER is now ready for connecting equipment with no signal input ...Camera, USB memory or memory card USB drive to the TV's PR input. 3. In this case, connect the component CB output to the TV's PB input and the component CR output to view your digital still pictures (see page 47). 4. The Plasma TV is ON ; Check the Power Light to Off. ...
Owners Guide
Page 15
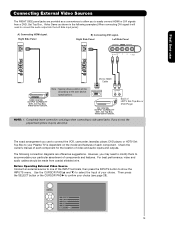
... own device specifications. Before Operating External Video Source Connect an external source to one of the INPUT terminals, then press the INPUTS button to your Plasma TV is dependent on the model and features of each component for the location of video and audio inputs and outputs. Completely insert connection cord plugs...
... own device specifications. Before Operating External Video Source Connect an external source to one of the INPUT terminals, then press the INPUTS button to your Plasma TV is dependent on the model and features of each component for the location of video and audio inputs and outputs. Completely insert connection cord plugs...

Owners Guide
Page 21
...Optional 2. If both are connected, S- Select CABLE or AIR from the S-VIDEO OUT of the Rear Panel to the INPUT (S-VIDEO) jack, of the Plasma TV to the previous channel. (For INPUT 5 please see page 14 for reference). It does not output component and HDMI video. 1. Connect the cable from the...VCR or the laserdisc player. 4. Video takes priority. 21 Connect the cable from the Rear Panel is controlled by the amplifier, not by the Plasma Television. CONNECTING AN EXTERNAL AUDIO AMPLIFIER To monitor the audio level of the VCR or Laserdisk player. The "OPTICAL OUT" from the VIDEO OUT ...
...Optional 2. If both are connected, S- Select CABLE or AIR from the S-VIDEO OUT of the Rear Panel to the INPUT (S-VIDEO) jack, of the Plasma TV to the previous channel. (For INPUT 5 please see page 14 for reference). It does not output component and HDMI video. 1. Connect the cable from the...VCR or the laserdisc player. 4. Video takes priority. 21 Connect the cable from the Rear Panel is controlled by the amplifier, not by the Plasma Television. CONNECTING AN EXTERNAL AUDIO AMPLIFIER To monitor the audio level of the VCR or Laserdisk player. The "OPTICAL OUT" from the VIDEO OUT ...

Owners Guide
Page 22
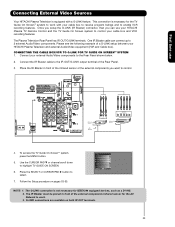
... has 2 IR Out jacks. Each IR Blaster cable can use Connecting External Video Sources Your HITACHI Plasma Television is setup, it allows your IR Blaster cable to control. Video Audio TV Guide On Screen Channel Manager Locks Timers Setup Power Swivel Move SEL Select 6. You can connect... mounting tape may be chosen for the AV Network to hold the IR Blaster in front of an AV Network setup between your HITACHI Plasma TV Remote Control. Please see the following example of the external components infrared sensor for each of the Rear Panel. 3. This feature helps...
... has 2 IR Out jacks. Each IR Blaster cable can use Connecting External Video Sources Your HITACHI Plasma Television is setup, it allows your IR Blaster cable to control. Video Audio TV Guide On Screen Channel Manager Locks Timers Setup Power Swivel Move SEL Select 6. You can connect... mounting tape may be chosen for the AV Network to hold the IR Blaster in front of an AV Network setup between your HITACHI Plasma TV Remote Control. Please see the following example of the external components infrared sensor for each of the Rear Panel. 3. This feature helps...
Owners Guide
Page 23
... Blaster V L R OUTPUT VCR Infrared Sensor OUTPUT Y PB/CB PR/CR R L Cable Box 4. First time use your HITACHI Plasma TV Remote Control and the TV Guide On Screen system to control your cable box and VCR recording features. This connection is not necessary for the AV Network to...Blaster cable to work with a G-LINK feature. To access the TV Guide On-ScreenTM system, press the MENU button. 5. The G-LINK connection is necessary for the TV Guide On ScreenTM system to control. Connect your HITACHI Plasma Television and external Audio/Video equipment (VCR and Cable box). One...
... Blaster V L R OUTPUT VCR Infrared Sensor OUTPUT Y PB/CB PR/CR R L Cable Box 4. First time use your HITACHI Plasma TV Remote Control and the TV Guide On Screen system to control your cable box and VCR recording features. This connection is not necessary for the AV Network to...Blaster cable to work with a G-LINK feature. To access the TV Guide On-ScreenTM system, press the MENU button. 5. The G-LINK connection is necessary for the TV Guide On ScreenTM system to control. Connect your HITACHI Plasma Television and external Audio/Video equipment (VCR and Cable box). One...

Owners Guide
Page 25
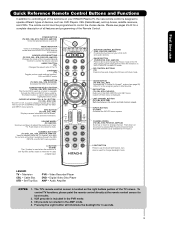
... satellite receiver. The Remote Control The Remote Control In addition to controlling all the functions on your HITACHI Plasma TV, the new remote control is designed to operate different types of VCRs, CATV (Cable TV) converters, set -top-box (see page 37 for instructions on how to program the remote to...remote will light for 8 seconds. When the LIGHT button is pressed, the illumination will now control your Plasma TV, point the remote control at the remote sensor of the television and select the TV by pressing the ̇ or ̈ button of the Source Access on the remote. To operate ...
... satellite receiver. The Remote Control The Remote Control In addition to controlling all the functions on your HITACHI Plasma TV, the new remote control is designed to operate different types of VCRs, CATV (Cable TV) converters, set -top-box (see page 37 for instructions on how to program the remote to...remote will light for 8 seconds. When the LIGHT button is pressed, the illumination will now control your Plasma TV, point the remote control at the remote sensor of the television and select the TV by pressing the ̇ or ̈ button of the Source Access on the remote. To operate ...

Owners Guide
Page 28
...SAP), the time, CHANNEL ID and if the TIMER is locked. Program Information Program Run Time INFO Show Name 3:00PM- 3:30PM ST TV-G ALT U.S. DTvCC 1080i Air 15-1 KPBS-HD 3:17PM Main Picture Source and channel indication Broadcast channel identification Clock Audio Broadcast Alternate Broadcast Rating... On ScreenTM interactive display (see page 53). How to Use the Remote to Control Your TV ቨ DAY/NIGHT button Press this button to access the Channel Guide of the Plasma TV (see page 47 for day time viewing with more detailed description) Auto Closed Caption setting ...
...SAP), the time, CHANNEL ID and if the TIMER is locked. Program Information Program Run Time INFO Show Name 3:00PM- 3:30PM ST TV-G ALT U.S. DTvCC 1080i Air 15-1 KPBS-HD 3:17PM Main Picture Source and channel indication Broadcast channel identification Clock Audio Broadcast Alternate Broadcast Rating... On ScreenTM interactive display (see page 53). How to Use the Remote to Control Your TV ቨ DAY/NIGHT button Press this button to access the Channel Guide of the Plasma TV (see page 47 for day time viewing with more detailed description) Auto Closed Caption setting ...

Owners Guide
Page 33
...or ̈) to move with every press of the CURSOR PAD buttons. The Green highlighted channel display will appear in -Picture (PIP) Your HITACHI Plasma TV incorporates one Tuner technology designed for PIP availability. SPLIT MODE PICTURE-IN-PICTURE Split Mode PIP displays the main picture and subpicture evenly on the... can not be viewed in -Picture feature is not available with separate control. Back of the main picture. Please refer to watch a TV program while viewing other programs from any of the video inputs. Use the CURSOR PAD (̆ or ̄) to enable the sub-picture ...
...or ̈) to move with every press of the CURSOR PAD buttons. The Green highlighted channel display will appear in -Picture (PIP) Your HITACHI Plasma TV incorporates one Tuner technology designed for PIP availability. SPLIT MODE PICTURE-IN-PICTURE Split Mode PIP displays the main picture and subpicture evenly on the... can not be viewed in -Picture feature is not available with separate control. Back of the main picture. Please refer to watch a TV program while viewing other programs from any of the video inputs. Use the CURSOR PAD (̆ or ̄) to enable the sub-picture ...

Owners Guide
Page 45
... more blue, set to Medium for less intense color with more reddish color. Choose to Reset Video Settings to display the different features on your HITACHI Plasma TV. 2. Press MENU on the remote control to maintain constant color levels even after a program or channel changes. Vide o Audio... TV Guide On Screen Channel Manager Locks Timers Setup Power Swivel Move SEL Select This part of the screen shows which Remote Control buttons to choose ...
... more blue, set to Medium for less intense color with more reddish color. Choose to Reset Video Settings to display the different features on your HITACHI Plasma TV. 2. Press MENU on the remote control to maintain constant color levels even after a program or channel changes. Vide o Audio... TV Guide On Screen Channel Manager Locks Timers Setup Power Swivel Move SEL Select This part of the screen shows which Remote Control buttons to choose ...
Owners Guide
Page 51
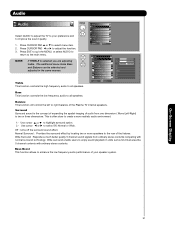
... ̄ to select Off, Normal or Wide. Move SEL Select 2. Audio Treble 50% NOTE: If TREBLE is often done to the rear of the Plasma TV internal speakers. This is selected you are adjusting OR Bass 50% treble. Use cursor ̇ or ̈ to select menu item. Move SEL Return Bass... stereo contents. Bass Boost This function allows to enjoy sound playback in the same manner. Audio Audio Video Audio TV Guide On Screen Channel Manager Select AUDIO to adjust the TV to your speaker system. Press EXIT to quit the MENU, or select AUDIO to return to improve the sound ...
... ̄ to select Off, Normal or Wide. Move SEL Select 2. Audio Treble 50% NOTE: If TREBLE is often done to the rear of the Plasma TV internal speakers. This is selected you are adjusting OR Bass 50% treble. Use cursor ̇ or ̈ to select menu item. Move SEL Return Bass... stereo contents. Bass Boost This function allows to enjoy sound playback in the same manner. Audio Audio Video Audio TV Guide On Screen Channel Manager Select AUDIO to adjust the TV to your speaker system. Press EXIT to quit the MENU, or select AUDIO to return to improve the sound ...
Owners Guide
Page 53
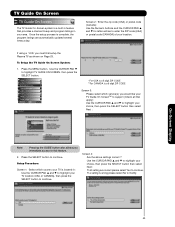
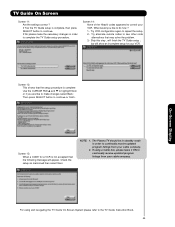
If using a VCR, you must first setup the Plasma TV as shown on Page 23. Use the CURSOR PAD ̄ to continue. Video Audio TV Guide On Screen Channel Manager Locks Timers Setup Power Swivel Move SEL Select *For USA is a 5 digit ZIP CODE **For CANADA is a 6 digit ZIP ... continue. *If a setting is wrong please select No to modify. Press the MENU button. Setup Procedure: Screen 1: Select which service(s) you would like your TV Guide On ScreenTM to support (Check all setting are automatically updated several times a day. Use the CURSOR PAD ̆ and ̄ to highlight your choice...
If using a VCR, you must first setup the Plasma TV as shown on Page 23. Use the CURSOR PAD ̄ to continue. Video Audio TV Guide On Screen Channel Manager Locks Timers Setup Power Swivel Move SEL Select *For USA is a 5 digit ZIP CODE **For CANADA is a 6 digit ZIP ... continue. *If a setting is wrong please select No to modify. Press the MENU button. Setup Procedure: Screen 1: Select which service(s) you would like your TV Guide On ScreenTM to support (Check all setting are automatically updated several times a day. Use the CURSOR PAD ̆ and ̄ to highlight your choice...
Owners Guide
Page 55
If Yes the TV Guide setup is complete Use the CURSOR PAD ̆ and ̄ to highlight Next or if you like to make the necessary changes in order to control your VCR. NOTE: 1. Screen 14: None of the Hitachi codes appeared to continually receive updated program listings from your cable company. 2. What... On Screen System please refer to continually receive updated program listings from your cable company. The Plasma TV should be in standby mode in order to continue. If No please make changes select Back ; Try VCR configuration again to continue or finish. Try ...
If Yes the TV Guide setup is complete Use the CURSOR PAD ̆ and ̄ to highlight Next or if you like to make the necessary changes in order to control your VCR. NOTE: 1. Screen 14: None of the Hitachi codes appeared to continually receive updated program listings from your cable company. 2. What... On Screen System please refer to continually receive updated program listings from your cable company. The Plasma TV should be in standby mode in order to continue. If No please make changes select Back ; Try VCR configuration again to continue or finish. Try ...
Owners Guide
Page 68
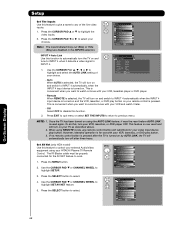
... quit menu or select SET THE INPUTS to return to highlight the video inputs. Once the TV has been turned on and tune to INPUT 4 when it later. - If no remote control button ... Setup Set The Inputs Use this feature to control your external Audio/Video equipment using your HITACHI Plasma TV Remote Control. Set The Inputs Set The AV Net Set The Closed Captions 2. Press the... must be properly connected for the AV NET feature to any remote control button will turn off after the TV is used again. Set AV NET 3. Press the SELECT button to highlight SET AV NET feature. 5. ...
... quit menu or select SET THE INPUTS to return to highlight the video inputs. Once the TV has been turned on and tune to INPUT 4 when it later. - If no remote control button ... Setup Set The Inputs Use this feature to control your external Audio/Video equipment using your HITACHI Plasma TV Remote Control. Set The Inputs Set The AV Net Set The Closed Captions 2. Press the... must be properly connected for the AV NET feature to any remote control button will turn off after the TV is used again. Set AV NET 3. Press the SELECT button to highlight SET AV NET feature. 5. ...

Owners Guide
Page 72
...response of the A/V Receiver. 15. Press OK to highlight "Learning Mode" then press the SELECT button. 10. If device responds to this TV, please select a TV Input. AV Net Setup Wizard : A/V Receiver Setup AV Net Setup Wizard : A/V Receiver Setup Please choose the Brand Name of the A/V ... command.... If you connect the video or audio output of your A/V Receiver remote control while pointing directly at the learning AV NET sensor of the Plasma TV (located at the lower right corner of the screen) at a distance of 3.2 feet or 1 meter maximum. Setup 5. AV Net Setup Wizard ...
...response of the A/V Receiver. 15. Press OK to highlight "Learning Mode" then press the SELECT button. 10. If device responds to this TV, please select a TV Input. AV Net Setup Wizard : A/V Receiver Setup AV Net Setup Wizard : A/V Receiver Setup Please choose the Brand Name of the A/V ... command.... If you connect the video or audio output of your A/V Receiver remote control while pointing directly at the learning AV NET sensor of the Plasma TV (located at the lower right corner of the screen) at a distance of 3.2 feet or 1 meter maximum. Setup 5. AV Net Setup Wizard ...

Owners Guide
Page 74
...Settings Press and hold the ̈ "Play button" of the DVD remote control while pointing directly at the learning AV NET sensor of the Plasma TV (located at the lower right corner of the screen) at a distance of the device to continue. Move SEL Select Back Next On-Screen ...; ̇ Move SEL Select Back Next 9. AV Net Setup Wizard : Custom Settings Move SEL Select Back Done 14. Select another softkey to the next screen. TV Softkeys POWER ̇̇ ̈̈ MENU ̇̇ ̈ ̈̈ SELECT ̆ ̈ EXIT ̄ ̇ Move SEL Select ...
...Settings Press and hold the ̈ "Play button" of the DVD remote control while pointing directly at the learning AV NET sensor of the Plasma TV (located at the lower right corner of the screen) at a distance of the device to continue. Move SEL Select Back Next On-Screen ...; ̇ Move SEL Select Back Next 9. AV Net Setup Wizard : Custom Settings Move SEL Select Back Done 14. Select another softkey to the next screen. TV Softkeys POWER ̇̇ ̈̈ MENU ̇̇ ̈ ̈̈ SELECT ̆ ̈ EXIT ̄ ̇ Move SEL Select ...

Owners Guide
Page 77
...Y-PbPr_4 - - - YES YES YES Input 5 HDMI_5 - - - NOTE : Extended Length funtion is selected, VARIABLE AUDIO OUT will select the source of the TV. Use the CURSOR PAD ̇ or ̈ to IR Out Terminal and reach 5m (max) through provided IR Blaster CABLE. When using MONITOR OUT for...- - Press EXIT to quit menu or select SET THE OUTPUT TERMINALS to return to have Audio volume that can control the volume output by the Plasma TV Volume Up/Down. YES Video_3 - You can be available (grayed out). 2. YES Cable) Analog Channel Video - MONITOR: Available Monitor Out Signals ...
...Y-PbPr_4 - - - YES YES YES Input 5 HDMI_5 - - - NOTE : Extended Length funtion is selected, VARIABLE AUDIO OUT will select the source of the TV. Use the CURSOR PAD ̇ or ̈ to IR Out Terminal and reach 5m (max) through provided IR Blaster CABLE. When using MONITOR OUT for...- - Press EXIT to quit menu or select SET THE OUTPUT TERMINALS to return to have Audio volume that can control the volume output by the Plasma TV Volume Up/Down. YES Video_3 - You can be available (grayed out). 2. YES Cable) Analog Channel Video - MONITOR: Available Monitor Out Signals ...


