Owners Guide
Page 2
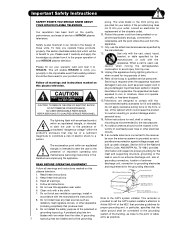
... Electric Code 2. Use only with the cart, stand, tripod, bracket, or table specified by the manufacturer. 12. Read these units. An outdoor antenna should be of cable 2 blades with the CAUTION: TO REDUCE THE RISK OF ELECTRIC SHOCK, DO NOT REMOVE COVER (OR BACK). plasma television. 1. proper grounding and, in particular, specifies that may be connected to HITACHI. Refer all warnings and instructions...
... Electric Code 2. Use only with the cart, stand, tripod, bracket, or table specified by the manufacturer. 12. Read these units. An outdoor antenna should be of cable 2 blades with the CAUTION: TO REDUCE THE RISK OF ELECTRIC SHOCK, DO NOT REMOVE COVER (OR BACK). plasma television. 1. proper grounding and, in particular, specifies that may be connected to HITACHI. Refer all warnings and instructions...
Owners Guide
Page 5
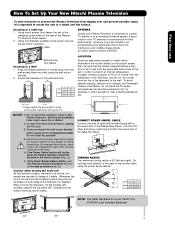
... lifted forward using the wall mount bracket. 2. Connect the other end (Arrow mark facing front)to mount the unit in . 38.1 cm 42.8 cm NOTE: The Table Top Stand for professional installer. C C D D 42" 10.59 in. 13.93 in. 27 cm 36 cm 55" 15 in. 16.85 in a stable and flat surface. First time use How To Set Up Your New Hitachi Plasma Television To...
... lifted forward using the wall mount bracket. 2. Connect the other end (Arrow mark facing front)to mount the unit in . 38.1 cm 42.8 cm NOTE: The Table Top Stand for professional installer. C C D D 42" 10.59 in. 13.93 in. 27 cm 36 cm 55" 15 in. 16.85 in a stable and flat surface. First time use How To Set Up Your New Hitachi Plasma Television To...

Owners Guide
Page 10
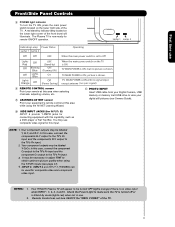
... on the 42" models. ቨ POWER button Television MAIN POWER button This power button is for the complete system, and must be turned ON/OFF by mode. NOTE: When the "MAIN POWER" button is located on the TV screen. NOTE: The Rear View of the TV screen. Press again to the claw. Thread the square hole with an HDMI output connection (see page 15 for stand-by remote control. These buttons also serve as...
... on the 42" models. ቨ POWER button Television MAIN POWER button This power button is for the complete system, and must be turned ON/OFF by mode. NOTE: When the "MAIN POWER" button is located on the TV screen. NOTE: The Rear View of the TV screen. Press again to the claw. Thread the square hole with an HDMI output connection (see page 15 for stand-by remote control. These buttons also serve as...
Owners Guide
Page 11
... 5. Your HITACHI Plasma TV will illuminate. Your component outputs may be used for connecting equipment with no signal input except antenna (no sync. INPUT 3, INPUT 4 and INPUT 5 (Y/VIDEO) can not turn the TV ON, press the main power switch located on the TV is set to view your digital still pictures (see page 47). 4. TV MAIN POWER is no picture is ON ; signal). ቪ REMOTE CONTROL sensor Point your remote at this area while using the Y-PBPR inputs (see Owners Guide...
... 5. Your HITACHI Plasma TV will illuminate. Your component outputs may be used for connecting equipment with no signal input except antenna (no sync. INPUT 3, INPUT 4 and INPUT 5 (Y/VIDEO) can not turn the TV ON, press the main power switch located on the TV is set to view your digital still pictures (see page 47). 4. TV MAIN POWER is no picture is ON ; signal). ቪ REMOTE CONTROL sensor Point your remote at this area while using the Y-PBPR inputs (see Owners Guide...

Owners Guide
Page 13
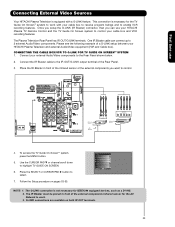
... the card to start cable service for this service is for your TV. Insert the CableCARD into the CableCARD slot. First time use Rear Panel Connections ቫ IEEE1394 (DV INPUT) (Only for HDX models) These jacks provide a digital interface for your external digital devices, such as a Digital VCR (DVHS), Set-Top-Box or Digital Camcorder by your local cable operator to gain access to chosen cable channels. Hitachi will display the following respective screens...
... the card to start cable service for this service is for your TV. Insert the CableCARD into the CableCARD slot. First time use Rear Panel Connections ቫ IEEE1394 (DV INPUT) (Only for HDX models) These jacks provide a digital interface for your external digital devices, such as a Digital VCR (DVHS), Set-Top-Box or Digital Camcorder by your local cable operator to gain access to chosen cable channels. Hitachi will display the following respective screens...
Owners Guide
Page 15
... location of each component. DIGITAL OUTPUT OUTPUT R L DVI DIGITAL OUTPUT CAPABILITY DVD , Set Top Box, Video Game Console. If you do not, the played back picture may need to confirm your particular assortment of HDTV Set-Top-Box or DVD Player NOTE: 1. Completely insert connection cord plugs when connecting to the own device specifications. The exact arrangement you use DVI to HDMI Cable Note : Special device cables will need to modify them to show the INPUTS menu. For best performance, video and audio cables should be abnormal. Use...
... location of each component. DIGITAL OUTPUT OUTPUT R L DVI DIGITAL OUTPUT CAPABILITY DVD , Set Top Box, Video Game Console. If you do not, the played back picture may need to confirm your particular assortment of HDTV Set-Top-Box or DVD Player NOTE: 1. Completely insert connection cord plugs when connecting to the own device specifications. The exact arrangement you use DVI to HDMI Cable Note : Special device cables will need to modify them to show the INPUTS menu. For best performance, video and audio cables should be abnormal. Use...

Owners Guide
Page 19
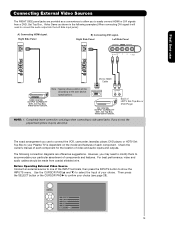
... HDTV set top box or DVD player. 5. Select CABLE or AIR from the AUDIO OUT L of the HDTV set top box or DVD player to the INPUT (AUDIO/L) jack as shown on the Rear Panel below. 4. The picture and sound that encrypts video signals when using a DVI to a display. 4. The HDMI input on the Rear panel below . 3. The connected digital output device controls the HDMI interface so proper setup of LR HDTV Set-Top-Box or OUTPUT DVD Player or HDTV Set-Top-Box or DVD Player 19 First time use Connecting External Video Sources CONNECTING A COMPONENT SOURCE WITH HDMI OR DVI CAPABILITY...
... HDTV set top box or DVD player. 5. Select CABLE or AIR from the AUDIO OUT L of the HDTV set top box or DVD player to the INPUT (AUDIO/L) jack as shown on the Rear Panel below. 4. The picture and sound that encrypts video signals when using a DVI to a display. 4. The HDMI input on the Rear panel below . 3. The connected digital output device controls the HDMI interface so proper setup of LR HDTV Set-Top-Box or OUTPUT DVD Player or HDTV Set-Top-Box or DVD Player 19 First time use Connecting External Video Sources CONNECTING A COMPONENT SOURCE WITH HDMI OR DVI CAPABILITY...

Owners Guide
Page 20
... connection is played back panel below. Press the INPUTS button, then select INPUT 4 from the INPUTS menu to view the program from the AUDIO OUT L of the Laserdisc/DVD player or HDTV set top box to the INPUT (AUDIO/L) jack. 6. Connect the cable from the AUDIO OUT R of the Laserdisc/DVD player or HDTV set top box. 7. Completely insert the connection cord Laserdisc/DVD player or HDTV set top box to rear panel jacks. CONNECTIONS. (For INPUT 5 please see page 14 for tips on the Rear The picture and sound...
... connection is played back panel below. Press the INPUTS button, then select INPUT 4 from the INPUTS menu to view the program from the AUDIO OUT L of the Laserdisc/DVD player or HDTV set top box to the INPUT (AUDIO/L) jack. 6. Connect the cable from the AUDIO OUT R of the Laserdisc/DVD player or HDTV set top box. 7. Completely insert the connection cord Laserdisc/DVD player or HDTV set top box to rear panel jacks. CONNECTIONS. (For INPUT 5 please see page 14 for tips on the Rear The picture and sound...
Owners Guide
Page 23
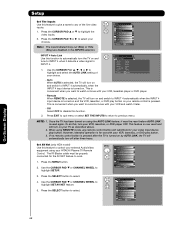
... to the Rear Panel shown below. 2. To access the TV Guide On-ScreenTM system, press the MENU button. 5. Video Audio TV Guide On Screen Channel Manager Locks Timers Setup Power Swivel Move SEL Select NOTE: 1. G-LINK connections are available on pages 53-55. First time use your HITACHI Plasma TV Remote Control and the TV Guide On Screen system to control. Connect the IR Blaster cable to the IR OUT/G-LINK output terminal of the external components you...
... to the Rear Panel shown below. 2. To access the TV Guide On-ScreenTM system, press the MENU button. 5. Video Audio TV Guide On Screen Channel Manager Locks Timers Setup Power Swivel Move SEL Select NOTE: 1. G-LINK connections are available on pages 53-55. First time use your HITACHI Plasma TV Remote Control and the TV Guide On Screen system to control. Connect the IR Blaster cable to the IR OUT/G-LINK output terminal of the external components you...

Owners Guide
Page 25
...; button of lighting the Remote Control buttons. To operate your set -top-box, satellite receiver, DVD players, and other audio/video equipment with one area. The PVR mode indicator will blink, indicating that the remote will now control your VCR (see page 39 for instructions on the remote. There are two modes of the Source Access on how to program the remote to Automatic) 1. CHANGING LIGHTING MODES (Automatic to Manual/Manual to control your DVD player, point the remote at the remote...
...; button of lighting the Remote Control buttons. To operate your set -top-box, satellite receiver, DVD players, and other audio/video equipment with one area. The PVR mode indicator will blink, indicating that the remote will now control your VCR (see page 39 for instructions on the remote. There are two modes of the Source Access on how to program the remote to Automatic) 1. CHANGING LIGHTING MODES (Automatic to Manual/Manual to control your DVD player, point the remote at the remote...

Owners Guide
Page 28
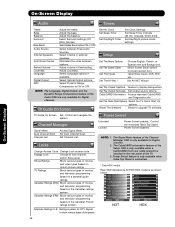
... INPUTS Closed Caption setting Audio Source Selection DIGITAL CHANNELS Digital Closed Caption This icon will start the On-Screen Display. Select to choose INPUT 4. Select to access your pictures from a Auto NOTE: 1. 2. PHOTO INPUT Select to choose INPUT 3. Select to INPUT 3 INFO Y-PBPR: 3 480i 3:17PM Input Signal Format NOTE: For automatic DAY/NIGHT picture mode Auto settings, see page 65. Select Night for settings changes). When a Component Video: Y-PbPr Input is set or adjusted by using the CURSOR PAD, except for day time viewing with Closed Captioning...
... INPUTS Closed Caption setting Audio Source Selection DIGITAL CHANNELS Digital Closed Caption This icon will start the On-Screen Display. Select to choose INPUT 4. Select to access your pictures from a Auto NOTE: 1. 2. PHOTO INPUT Select to choose INPUT 3. Select to INPUT 3 INFO Y-PBPR: 3 480i 3:17PM Input Signal Format NOTE: For automatic DAY/NIGHT picture mode Auto settings, see page 65. Select Night for settings changes). When a Component Video: Y-PbPr Input is set or adjusted by using the CURSOR PAD, except for day time viewing with Closed Captioning...

Owners Guide
Page 37
Aim the remote control at the set -top-box/satellite (STB) pre-coded mode, use the SOURCE ACCESS buttons (̇ or ̈) on page 42-43. The remote will ባ flash 3 times if the code was accepted. 5. If your set-top-box/satellite receiver cannot be operated after performing the above . After replacing the batteries repeat the entire programming procedure as shown on the remote control to position the LED light to the...
Aim the remote control at the set -top-box/satellite (STB) pre-coded mode, use the SOURCE ACCESS buttons (̇ or ̈) on page 42-43. The remote will ባ flash 3 times if the code was accepted. 5. If your set-top-box/satellite receiver cannot be operated after performing the above . After replacing the batteries repeat the entire programming procedure as shown on the remote control to position the LED light to the...

Owners Guide
Page 45
...reddish color. Color Management Color Decoding Auto Color White Balance Black Side Panel Aspect Reset Video Settings Adjust and balance individual colors to choose between 3 pictures modes; This part of Red, Green and Color according to quickly exit from a menu. Reduces conspicuous noise in light scenes. Color Tint Sharpness Color Temperature Black Enhancement Contrast Mode Noise Reduction Auto Movie Mode Adjust color. Choose the picture format aspect ratio. Use this function to maintain constant color levels even after a program or channel changes. The AUTO COLOR...
...reddish color. Color Management Color Decoding Auto Color White Balance Black Side Panel Aspect Reset Video Settings Adjust and balance individual colors to choose between 3 pictures modes; This part of Red, Green and Color according to quickly exit from a menu. Reduces conspicuous noise in light scenes. Color Tint Sharpness Color Temperature Black Enhancement Contrast Mode Noise Reduction Auto Movie Mode Adjust color. Choose the picture format aspect ratio. Use this function to maintain constant color levels even after a program or channel changes. The AUTO COLOR...
Owners Guide
Page 46
.... Adjust volume in the rear panel of the Channel Manager OSD is only available for Digital channels. Select Language options if available. Label Video Inputs, VCR, DVD, etc. Select Screen Saver options to block various types of movies and television programming based on the Canadian ratings system. Set Auto Channel Scan. NOTE: 1. Adjust the bass. Locks Change Access Code Change Lock access code. Select Optical Output options. TV Guide On Screen Set, Control and navigate the system Channel Manager Signal Meter Auto Channel Scan Channel List Access Signal Meter...
.... Adjust volume in the rear panel of the Channel Manager OSD is only available for Digital channels. Select Language options if available. Label Video Inputs, VCR, DVD, etc. Select Screen Saver options to block various types of movies and television programming based on the Canadian ratings system. Set Auto Channel Scan. NOTE: 1. Adjust the bass. Locks Change Access Code Change Lock access code. Select Optical Output options. TV Guide On Screen Set, Control and navigate the system Channel Manager Signal Meter Auto Channel Scan Channel List Access Signal Meter...

Owners Guide
Page 48
... Video settings are shot on it is ON. 3. Black Enhancement Use this special feature to match real life colors. 1. When film is turned ON from the VIDEO menu, your Hitachi Plasma Television will activate the circuitry for television viewing, the disparity between 2 Contrast Mode settings. Video Noise Reduction Auto Movie Mode Color Management Color Decoding Auto Color White Balance Black Side Panel Aspect Reset Video Settings Move SEL Select Low Off Off Off Video Color Management Set User Colors Magenta Red Yellow Green Cyan Blue Phase...
... Video settings are shot on it is ON. 3. Black Enhancement Use this special feature to match real life colors. 1. When film is turned ON from the VIDEO menu, your Hitachi Plasma Television will activate the circuitry for television viewing, the disparity between 2 Contrast Mode settings. Video Noise Reduction Auto Movie Mode Color Management Color Decoding Auto Color White Balance Black Side Panel Aspect Reset Video Settings Move SEL Select Low Off Off Off Video Color Management Set User Colors Magenta Red Yellow Green Cyan Blue Phase...
Owners Guide
Page 68
... VCR, laserdisc, or DVD player OFF. The IR Blaster cable must be properly connected for your VCR, laserdisc, or DVD play button on and switch to watch it detects a video signal to disable this , turn on your HITACHI Plasma TV Remote Control. Use the CURSOR PAD ̄ or CHANNEL WHEEL to control your external Audio/Video equipment using REMOTE mode, any of your choice. Set The Output Terminals Set The Quick Start Options Reset The Software Move SEL Select...
... VCR, laserdisc, or DVD player OFF. The IR Blaster cable must be properly connected for your VCR, laserdisc, or DVD play button on and switch to watch it detects a video signal to disable this , turn on your HITACHI Plasma TV Remote Control. Use the CURSOR PAD ̄ or CHANNEL WHEEL to control your external Audio/Video equipment using REMOTE mode, any of your choice. Set The Output Terminals Set The Quick Start Options Reset The Software Move SEL Select...

Owners Guide
Page 77
... to pass remote control signal to IR Out Terminal as is connected to have Audio volume that can control the volume output by the Plasma TV Volume Up/Down. YES YES YES Input 3 Y-PbPr_3 - - - Video Out Monitor Monitor Audio Out Fixed Variable TV Tuner Out Fixed Use To record currently viewed Video and Audio. YES YES YES Input4 Y-PbPr_4 - - - YES Y-PbPr_5 - - - Setup On-Screen Display Set The Output Terminals This feature will not be controlled by changing the volume of the...
... to pass remote control signal to IR Out Terminal as is connected to have Audio volume that can control the volume output by the Plasma TV Volume Up/Down. YES YES YES Input 3 Y-PbPr_3 - - - Video Out Monitor Monitor Audio Out Fixed Variable TV Tuner Out Fixed Use To record currently viewed Video and Audio. YES YES YES Input4 Y-PbPr_4 - - - YES Y-PbPr_5 - - - Setup On-Screen Display Set The Output Terminals This feature will not be controlled by changing the volume of the...

Owners Guide
Page 80
... right using the remote control. Use the CURSOR PAD ̇ or ̈ to the right. 3. Press the CURSOR PAD ̇ to rotate the TV to turn the plasma display left . 4. Exit the OSD menu system before upgrading. Press the CURSOR PAD ̈ to rotate the TV to unlock or lock the Power Swivel. Before using the power swivel feature. Video Audio TV Guide On Screen Channel Manager Locks Timers Setup Power Swivel...
... right using the remote control. Use the CURSOR PAD ̇ or ̈ to the right. 3. Press the CURSOR PAD ̇ to rotate the TV to turn the plasma display left . 4. Exit the OSD menu system before upgrading. Press the CURSOR PAD ̈ to rotate the TV to unlock or lock the Power Swivel. Before using the power swivel feature. Video Audio TV Guide On Screen Channel Manager Locks Timers Setup Power Swivel...
Owners Guide
Page 86
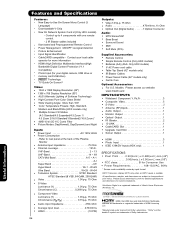
... specifications and dimensions for Consumer Use • Power Requirements 108-132VAC, 60Hz 1 Screen mode availability varies by input format HDTV Televisions display HDTV only when an HDTV source is a registered trademark of Dolby Laboratories. Models: Please access our website: www.hitachi.us/tv INPUTS/OUTPUTS • Wideband Component Y, Pb,Pr 3 • Composite Video 5 • S-Video 2 • Antenna (RF)Inputs 1 • Audio Output 1 • Monitor Output 1 • Optical Output 1 • IR Blaster 2 • G-LINK 1 • CableCARD Slot 1 • Upgrade Card...
... specifications and dimensions for Consumer Use • Power Requirements 108-132VAC, 60Hz 1 Screen mode availability varies by input format HDTV Televisions display HDTV only when an HDTV source is a registered trademark of Dolby Laboratories. Models: Please access our website: www.hitachi.us/tv INPUTS/OUTPUTS • Wideband Component Y, Pb,Pr 3 • Composite Video 5 • S-Video 2 • Antenna (RF)Inputs 1 • Audio Output 1 • Monitor Output 1 • Optical Output 1 • IR Blaster 2 • G-LINK 1 • CableCARD Slot 1 • Upgrade Card...
Owners Guide
Page 89
... AND CONDITIONS OF ANY DIFFERENT OR SUPPLEMENTARY LICENSE THAT MAY ACCOMPANY SUCH UPGRADE, (A) DO NOT USE ANY HITACHI-PROVIDED FLASH CARD OR OTHER MEDIA, (B) DO NOT INSTALL ANY HITACHI-PROVIDED UPGRADE SOFTWARE ON YOUR DTV, AND (C) PROMPTLY RETURN SUCH FLASH CARD OR OTHER MEDIA TO HITACHI. 5. You agree that accompany such Upgrade or other media to the Software and any intellectual property associated therewith, including any nonHitachi...
... AND CONDITIONS OF ANY DIFFERENT OR SUPPLEMENTARY LICENSE THAT MAY ACCOMPANY SUCH UPGRADE, (A) DO NOT USE ANY HITACHI-PROVIDED FLASH CARD OR OTHER MEDIA, (B) DO NOT INSTALL ANY HITACHI-PROVIDED UPGRADE SOFTWARE ON YOUR DTV, AND (C) PROMPTLY RETURN SUCH FLASH CARD OR OTHER MEDIA TO HITACHI. 5. You agree that accompany such Upgrade or other media to the Software and any intellectual property associated therewith, including any nonHitachi...


