Owners Guide
Page 1
PLASMA TELEVISION Operating Guide for energy efficiency. Updated 04.25.06 has determined that this product meets the Energy Star® guidelines for 42HDX62, 42HDX62A and 55HDX62 IMPORTANT SAFETY INSTRUCTIONS 2-3 FIRST TIME USE ...4-23 THE REMOTE CONTROL ...24-43 ON-SCREEN DISPLAY ...44-93 USEFUL INFORMATION...94-101 END USER LICENSE AGREEMENT FOR HITACHI DTV SOFTWARE 102 APPENDIXES ...103 INDEX ...104 As an Energy Star® Partner, Hitachi, Ltd.
PLASMA TELEVISION Operating Guide for energy efficiency. Updated 04.25.06 has determined that this product meets the Energy Star® guidelines for 42HDX62, 42HDX62A and 55HDX62 IMPORTANT SAFETY INSTRUCTIONS 2-3 FIRST TIME USE ...4-23 THE REMOTE CONTROL ...24-43 ON-SCREEN DISPLAY ...44-93 USEFUL INFORMATION...94-101 END USER LICENSE AGREEMENT FOR HITACHI DTV SOFTWARE 102 APPENDIXES ...103 INDEX ...104 As an Energy Star® Partner, Hitachi, Ltd.

Owners Guide
Page 2
... with a dry cloth. 7. recommended safety standards for the mast and supporting structure, grounding of the lead-in the vicinity of HITACHI plasma televisions. Section 810 of antenna- READ BEFORE OPERATING EQUIPMENT Follow all warnings and instructions marked on the quality, performance, and ease ...of service of overhead power lines or other . Televisions are YOUR HITACHI PLASMA TELEVISION provided for your outlet, consult an electrician for the grounding electrode. Follow all warnings. 4. The wide blade or the...
... with a dry cloth. 7. recommended safety standards for the mast and supporting structure, grounding of the lead-in the vicinity of HITACHI plasma televisions. Section 810 of antenna- READ BEFORE OPERATING EQUIPMENT Follow all warnings and instructions marked on the quality, performance, and ease ...of service of overhead power lines or other . Televisions are YOUR HITACHI PLASMA TELEVISION provided for your outlet, consult an electrician for the grounding electrode. Follow all warnings. 4. The wide blade or the...

Owners Guide
Page 3
...120 volts 60 Hz, AC current. Note • There are no user serviceable parts inside the plasma television. • Model and serial numbers are not expressly approved by your HITACHI Factory Warranty. Prevention of receiving analog basic, digital basic and digital premium cable television programming by ...and is required to 50 Hz, direct current, or anything other limited consumer uses only unless otherwise 3 A CableCARD provided by Hitachi America, Ltd. Never connect the plasma television to view encrypted digital programming. Important Safety Instructions Power source This...
...120 volts 60 Hz, AC current. Note • There are no user serviceable parts inside the plasma television. • Model and serial numbers are not expressly approved by your HITACHI Factory Warranty. Prevention of receiving analog basic, digital basic and digital premium cable television programming by ...and is required to 50 Hz, direct current, or anything other limited consumer uses only unless otherwise 3 A CableCARD provided by Hitachi America, Ltd. Never connect the plasma television to view encrypted digital programming. Important Safety Instructions Power source This...

Owners Guide
Page 4
... (-) marks in the battery compartment. 4. models: For optional accessories, please access our web site at: www.hitachi.us/tv Note: Please visit our website for optional accessories for the remote control and Simple Remote Control. Insert two...Press down and sliding the back cover off. 2. Match the batteries to remove. 3. First time use only with Hitachi 42HDX62 and 42HDX62A. MENU EXIT FAV CH INPUTS POWER ² IR Mouse Cable or G-LINK Cable ¾ ...1. HL02065). · Simple Remote Control Unit CLU-123S (Part No. This plasma television product is not recommended.
... (-) marks in the battery compartment. 4. models: For optional accessories, please access our web site at: www.hitachi.us/tv Note: Please visit our website for optional accessories for the remote control and Simple Remote Control. Insert two...Press down and sliding the back cover off. 2. Match the batteries to remove. 3. First time use only with Hitachi 42HDX62 and 42HDX62A. MENU EXIT FAV CH INPUTS POWER ² IR Mouse Cable or G-LINK Cable ¾ ...1. HL02065). · Simple Remote Control Unit CLU-123S (Part No. This plasma television product is not recommended.

Owners Guide
Page 5
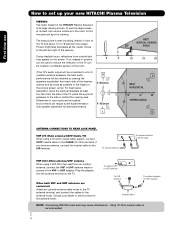
...11.8 inches) or more LOCATION Select an area where sunlight or bright indoor illumination will be used , the Plasma television should be lifted forward using the wall mount bracket. 2. If the Power Swivel feature will not fall... wood screws (two) fasten the set firmly in a stable and flat surface. Wire ANTENNA Unless your Plasma Television is connected to a cable TV system or to a centralized antenna system, a good outdoor color TV...time use How To Set Up Your New Hitachi Plasma Television To take measures to prevent the Plasma Display from the perforated back cover of the set.
...11.8 inches) or more LOCATION Select an area where sunlight or bright indoor illumination will be used , the Plasma television should be lifted forward using the wall mount bracket. 2. If the Power Swivel feature will not fall... wood screws (two) fasten the set firmly in a stable and flat surface. Wire ANTENNA Unless your Plasma Television is connected to a cable TV system or to a centralized antenna system, a good outdoor color TV...time use How To Set Up Your New Hitachi Plasma Television To take measures to prevent the Plasma Display from the perforated back cover of the set.
Owners Guide
Page 6
..., connect the coaxial cable to the antenna mixer. Picture brightness decreases as possible to the height of the receiver. Consult your new HITACHI Plasma Television VIEWING The major benefit of the TV and about 10 to 18 feet from the side of the room. Differences in the ...performance. Using 75-Ohm coaxial cable is its best, test various locations in room sizes and acoustical environments will be located in front of the HITACHI Plasma Television is recommended. 6 If the TV's audio output will be connected to a Hi-Fi system's external speakers, the best audio performance ...
..., connect the coaxial cable to the antenna mixer. Picture brightness decreases as possible to the height of the receiver. Consult your new HITACHI Plasma Television VIEWING The major benefit of the TV and about 10 to 18 feet from the side of the room. Differences in the ...performance. Using 75-Ohm coaxial cable is its best, test various locations in room sizes and acoustical environments will be located in front of the HITACHI Plasma Television is recommended. 6 If the TV's audio output will be connected to a Hi-Fi system's external speakers, the best audio performance ...

Owners Guide
Page 7
...3.8mm STEREO MINI-PLUG 2 RCA TYPE PLUGS IR Mouse Cable/G-LINK Cable (Provided) Connect the IR Mouse to the IR Blaster output of the Plasma television. Power Swivel Cable (Provided with 42" models only) This cable is used to connect your external devices such as Set-Top-Boxes or ...names of an audio amplifeier (not included). 7 Cables can be made with an S-Video feature in front of the corresponding IR window of the Plasma Television. For best performance, video cables should use Most video/audio connections between components can be connected to an antenna adapter (300-Ohm to ...
...3.8mm STEREO MINI-PLUG 2 RCA TYPE PLUGS IR Mouse Cable/G-LINK Cable (Provided) Connect the IR Mouse to the IR Blaster output of the Plasma television. Power Swivel Cable (Provided with 42" models only) This cable is used to connect your external devices such as Set-Top-Boxes or ...names of an audio amplifeier (not included). 7 Cables can be made with an S-Video feature in front of the corresponding IR window of the Plasma Television. For best performance, video cables should use Most video/audio connections between components can be connected to an antenna adapter (300-Ohm to ...
Owners Guide
Page 8
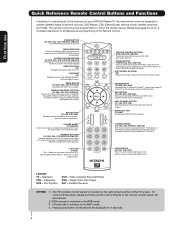
... BUTTON (TV,PVR/VCR, DVD, AMP/CD) Press to Select/Activate highlighted menu items. INFO BUTTON (TV, STB, CBL, PVR) Displays various information on your HITACHI Plasma TV, the new remote control is used as , DVD Players, CBL (Cable Boxes), set-top-boxes, satellite receivers, and VCRs. Cable Box STB - The remote...
... BUTTON (TV,PVR/VCR, DVD, AMP/CD) Press to Select/Activate highlighted menu items. INFO BUTTON (TV, STB, CBL, PVR) Displays various information on your HITACHI Plasma TV, the new remote control is used as , DVD Players, CBL (Cable Boxes), set-top-boxes, satellite receivers, and VCRs. Cable Box STB - The remote...

Owners Guide
Page 9
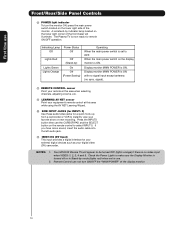
... stand-by mode. ባ MENU/SELECT button This button allows you to enter the MENU, making it possible to set TV features to turn the Plasma Television ON/OFF. These buttons also serve as the SELECT button when in MENU mode. NOTE: The Rear View of the TV screen.
... stand-by mode. ባ MENU/SELECT button This button allows you to enter the MENU, making it possible to set TV features to turn the Plasma Television ON/OFF. These buttons also serve as the SELECT button when in MENU mode. NOTE: The Rear View of the TV screen.
Owners Guide
Page 10
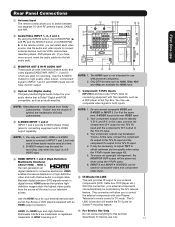
...1, 2, 3, 4 and 5. Indicating Lamp Power Status Off Off Lights Red Lights Green Lights Orange Off (Stand-by mode (lights red) when not in use. 2. Your HITACHI Plasma TV will illuminate. When the main power switch on the display monitor is ON. Press the INPUTS button then use Front/Rear/Side Panel Controls... the audio cable into the left audio jack. ቭ IEEE1394 (DV Input) This input provides a digital interface for remote ON/OFF operation. The Plasma TV is set to OFF. First time use the CURSOR PAD and the SELECT button on the remote control to select INPUT 5. Check the Power...
...1, 2, 3, 4 and 5. Indicating Lamp Power Status Off Off Lights Red Lights Green Lights Orange Off (Stand-by mode (lights red) when not in use. 2. Your HITACHI Plasma TV will illuminate. When the main power switch on the display monitor is ON. Press the INPUTS button then use Front/Rear/Side Panel Controls... the audio cable into the left audio jack. ቭ IEEE1394 (DV Input) This input provides a digital interface for remote ON/OFF operation. The Plasma TV is set to OFF. First time use the CURSOR PAD and the SELECT button on the remote control to select INPUT 5. Check the Power...
Owners Guide
Page 11
... Guide On ScreenTM recording feature. trademarks of Dolby Laboratories. ቦ S-VIDEO INPUT 1 and 2 INPUT 1 and 2 provide S-VIDEO (Super Video) jacks for connecting equipment with your Plasma Television's remote control in digital format, HDMI assures that is of high-definition video and multi-channel audio in a single cable. The HDMI input is...
... Guide On ScreenTM recording feature. trademarks of Dolby Laboratories. ቦ S-VIDEO INPUT 1 and 2 INPUT 1 and 2 provide S-VIDEO (Super Video) jacks for connecting equipment with your Plasma Television's remote control in digital format, HDMI assures that is of high-definition video and multi-channel audio in a single cable. The HDMI input is...

Owners Guide
Page 14
... made from coaxial shielded wire. Check the owner's manual of your choice (see page 27). Use the CURSOR PAD (̆ and ̄) to accommodate your Plasma TV is dependent on the Ferrite ferrite core near the Photo Input Core or IEEE 1394 Input as shown. 2. The exact arrangement you to pinch...
... made from coaxial shielded wire. Check the owner's manual of your choice (see page 27). Use the CURSOR PAD (̆ and ̄) to accommodate your Plasma TV is dependent on the Ferrite ferrite core near the Photo Input Core or IEEE 1394 Input as shown. 2. The exact arrangement you to pinch...

Owners Guide
Page 20
IEEE 1394 allows the plasma television and the external device to communicate with IEEE1394 capability, such as VCR play, rewind, fast forward, stop, etc.) from your TV On-Screen Display. ...
IEEE 1394 allows the plasma television and the external device to communicate with IEEE1394 capability, such as VCR play, rewind, fast forward, stop, etc.) from your TV On-Screen Display. ...

Owners Guide
Page 21
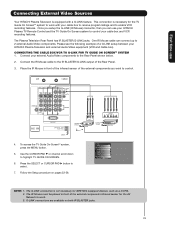
... 5 1. Connect the Cable and/or Air cables / G-LINK 3. If both are connected, SVideo takes priority. 21 Connect the cable from the VIDEO OUT of the Plasma TV to the INPUT (VIDEO) jack, as shown on the right. 2. Connect the cable from the Optical out to the VIDEO out jack on the... AUDIO OUT of CABLE/AIR and INPUTS 1, 2, 3, 4 and 5. Connecting Video: Connect the cable from the Rear Panel is controlled by the amplifier, not by the Plasma Television. VCR or other external components 3.
... 5 1. Connect the Cable and/or Air cables / G-LINK 3. If both are connected, SVideo takes priority. 21 Connect the cable from the VIDEO OUT of the Plasma TV to the INPUT (VIDEO) jack, as shown on the right. 2. Connect the cable from the Optical out to the VIDEO out jack on the... AUDIO OUT of CABLE/AIR and INPUTS 1, 2, 3, 4 and 5. Connecting Video: Connect the cable from the Rear Panel is controlled by the amplifier, not by the Plasma Television. VCR or other external components 3.
Owners Guide
Page 22
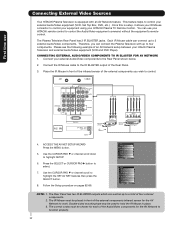
... Up Move SEL Return NOTE: 1. Connect the IR Mouse cable to the IR BLASTER output of an AV Network setup between your Hitachi Plasma Television and external Audio/Video equipment (VCR and DVD Player). Use the CURSOR PAD ̄ or channel scroll down to highlight the...the external components you can use Connecting External Video Sources Your HITACHI Plasma Television is setup, it allows your IR Mouse connector to control your equipment using your HITACHI Plasma TV Remote Control. First time use your HITACHI remote control to control the Audio/Video equipment command without the ...
... Up Move SEL Return NOTE: 1. Connect the IR Mouse cable to the IR BLASTER output of an AV Network setup between your Hitachi Plasma Television and external Audio/Video equipment (VCR and DVD Player). Use the CURSOR PAD ̄ or channel scroll down to highlight the...the external components you can use Connecting External Video Sources Your HITACHI Plasma Television is setup, it allows your IR Mouse connector to control your equipment using your HITACHI Plasma TV Remote Control. First time use your HITACHI remote control to control the Audio/Video equipment command without the ...
Owners Guide
Page 23
... and external Audio/Video equipment (VCR and Cable box). One IR Mouse cable can use Connecting External Video Sources Your HITACHI Plasma Television is equipped with your cable box to receive program listings and to the Rear Panel shown below. 2. Please see the ... Connect the IR Mouse cable to work with a G-LINK feature. Connect your external Audio/Video components to enable VCR recording features. First time use your HITACHI Plasma TV Remote Control and the TV Guide On Screen system to control. / G-LINK Infrared Sensor IR Mouse V L R OUTPUT VCR Infrared Sensor OUTPUT ...
... and external Audio/Video equipment (VCR and Cable box). One IR Mouse cable can use Connecting External Video Sources Your HITACHI Plasma Television is equipped with your cable box to receive program listings and to the Rear Panel shown below. 2. Please see the ... Connect the IR Mouse cable to work with a G-LINK feature. Connect your external Audio/Video components to enable VCR recording features. First time use your HITACHI Plasma TV Remote Control and the TV Guide On Screen system to control. / G-LINK Infrared Sensor IR Mouse V L R OUTPUT VCR Infrared Sensor OUTPUT ...
Owners Guide
Page 24
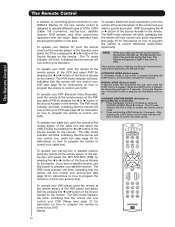
...sensor of the television and select the TV by pressing the ̇ or ̈ button of the Source Access on the remote. To operate your Plasma TV, point the remote control at the remote sensor of the VCR and select PVR by pressing the ̇ or ̈ button of the ...indicator will blink, indicating that the remote will light up. The Remote Control The Remote Control In addition to controlling all the functions on your HITACHI Plasma TV, the new remote control is designed to control your DVD player). 24 The PVR mode indicator will blink, indicating that the remote will light...
...sensor of the television and select the TV by pressing the ̇ or ̈ button of the Source Access on the remote. To operate your Plasma TV, point the remote control at the remote sensor of the VCR and select PVR by pressing the ̇ or ̈ button of the ...indicator will blink, indicating that the remote will light up. The Remote Control The Remote Control In addition to controlling all the functions on your HITACHI Plasma TV, the new remote control is designed to control your DVD player). 24 The PVR mode indicator will blink, indicating that the remote will light...
Owners Guide
Page 27
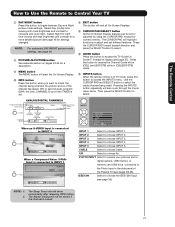
.... ቪ MENU button The MENU button will start the On-Screen Display. ቫ INFO button Press this button to access the Channel Guide of the Plasma TV (see pages 28-29). INPUT 3 Select to choose Cable. The Sleep Timer info will also cycle through the Inputs menu items. Then press the...
.... ቪ MENU button The MENU button will start the On-Screen Display. ቫ INFO button Press this button to access the Channel Guide of the Plasma TV (see pages 28-29). INPUT 3 Select to choose Cable. The Sleep Timer info will also cycle through the Inputs menu items. Then press the...
Owners Guide
Page 32
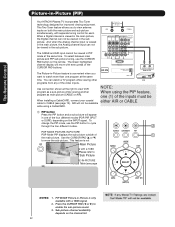
... Press the PIP button and a sub-picture will not be viewed in one program at the same time. PIP MODE Picture-in -Picture (PIP) Your HITACHI Plasma TV incorporates Two Tuner technology designed for each. The Remote Control Picture-in -Picture is only available with separate tuning control for improved viewing enjoyment.
... Press the PIP button and a sub-picture will not be viewed in one program at the same time. PIP MODE Picture-in -Picture (PIP) Your HITACHI Plasma TV incorporates Two Tuner technology designed for each. The Remote Control Picture-in -Picture is only available with separate tuning control for improved viewing enjoyment.

Owners Guide
Page 43
...; ቧ ቨ ቩ ᕃ POWER button Press Power button to turn the sound off completely (MUTE). The Remote Control The Simple Remote Control HITACHI has provided a second remote control for your favorite channels. ቨ INPUTS button Pressing the INPUTS button repeatedly will cycle through the input items (see example... FAV CH button to access your convenience. To restore the sound, press the MUTE button one half of normal volume (SOFT MUTE) to turn the Plasma Television ON or OFF. ባ CH+ (̆) and CH- (̄) Press the CH+ (̆) up or CH- (̄) down or VOL+ ...
...; ቧ ቨ ቩ ᕃ POWER button Press Power button to turn the sound off completely (MUTE). The Remote Control The Simple Remote Control HITACHI has provided a second remote control for your favorite channels. ቨ INPUTS button Pressing the INPUTS button repeatedly will cycle through the input items (see example... FAV CH button to access your convenience. To restore the sound, press the MUTE button one half of normal volume (SOFT MUTE) to turn the Plasma Television ON or OFF. ባ CH+ (̆) and CH- (̄) Press the CH+ (̆) up or CH- (̄) down or VOL+ ...


