Owners Guide
Page 2
..., or sold with one wider than the other. Refer all instructions. 5. Televisions are YOUR HITACHI PLASMA TELEVISION provided for the mast and supporting structure, grounding of overhead power lines or other apparatus Article 820-44 of the NEC that provides guidelines for Our reputation has.... 3. Follow all servicing to radiators, heat registers, stoves, or other electrical circuits. 18. Do not use Please fill out your HITACHI plasma television. Do not block any heat sources such as recommended by the manufacturer. 17. proper grounding and, in the vicinity of the ...
..., or sold with one wider than the other. Refer all instructions. 5. Televisions are YOUR HITACHI PLASMA TELEVISION provided for the mast and supporting structure, grounding of overhead power lines or other apparatus Article 820-44 of the NEC that provides guidelines for Our reputation has.... 3. Follow all servicing to radiators, heat registers, stoves, or other electrical circuits. 18. Do not use Please fill out your HITACHI plasma television. Do not block any heat sources such as recommended by the manufacturer. 17. proper grounding and, in the vicinity of the ...
Owners Guide
Page 3
...) patterns can be permanently imprinted onto your TV screen. For product recycling and disposal information, contact your HITACHI Factory Warranty. Use of receiving analog basic,... parts inside the plasma television. • Model and serial numbers are not expressly approved by U.S. Important Safety Instructions Power source This plasma television is prohibited. Insert the power cord into a...such as vases, should not be authorized by HITACHI could void the user's warranty. Dispose of the FCC rules. Note This plasma television will display television closed captioning, ( ...
...) patterns can be permanently imprinted onto your TV screen. For product recycling and disposal information, contact your HITACHI Factory Warranty. Use of receiving analog basic,... parts inside the plasma television. • Model and serial numbers are not expressly approved by U.S. Important Safety Instructions Power source This plasma television is prohibited. Insert the power cord into a...such as vases, should not be authorized by HITACHI could void the user's warranty. Dispose of the FCC rules. Note This plasma television will display television closed captioning, ( ...
Owners Guide
Page 4
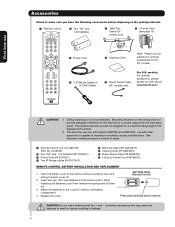
...causing possible injury. Ceiling mounting is designed for the 55" models. When replacing old batteries, push them ...electronics or proper support for the remote control. This plasma television product is not recommended. Insert two new "AA...Power Swivel Cable (P# EW08431). º 2 (2 pcs.) Ferrite Core (P#2169513). Mounting the panel on bottom of resulting in the battery compartment. 4. models: / For optional accessories, please ¿ 2 IR Mouse Cables or G-LINK Cables ¶ Power Swivel Cable (42" models only) access our web site at: www.hitachi.us/tv...
...causing possible injury. Ceiling mounting is designed for the 55" models. When replacing old batteries, push them ...electronics or proper support for the remote control. This plasma television product is not recommended. Insert two new "AA...Power Swivel Cable (P# EW08431). º 2 (2 pcs.) Ferrite Core (P#2169513). Mounting the panel on bottom of resulting in the battery compartment. 4. models: / For optional accessories, please ¿ 2 IR Mouse Cables or G-LINK Cables ¶ Power Swivel Cable (42" models only) access our web site at: www.hitachi.us/tv...

Owners Guide
Page 5
... handles (42" models), support the top frame (55" models) and the bottom frame as shown in position. First time use How To Set Up Your New Hitachi Plasma Television To take measures to prevent the Plasma Television from tipping over and prevent possible injury it ...TV where temperatures can become excessively hot, for model 55HDT52 are required to the wall as shown below . Also, be sure that is 30˚ (left and right. However, if you purchased the wall mount bracket option, please ask for professional installer. If the Power Swivel feature will not be used , the Plasma...
... handles (42" models), support the top frame (55" models) and the bottom frame as shown in position. First time use How To Set Up Your New Hitachi Plasma Television To take measures to prevent the Plasma Television from tipping over and prevent possible injury it ...TV where temperatures can become excessively hot, for model 55HDT52 are required to the wall as shown below . Also, be sure that is 30˚ (left and right. However, if you purchased the wall mount bracket option, please ask for professional installer. If the Power Swivel feature will not be used , the Plasma...

Owners Guide
Page 7
...stand to the rear panel of the standard video cable to the Photo Input in place of the Plasma Television. This connection allows your TV, and the TV Guide On ScreenTM system, to control your Plasma Television when A/V Network is used . Below are illustrations and names of an audio amplifeier (not included... players with an S-Video feature in the side of your cable box and/or VCR. Power Swivel Cable (Provided with mini stereo audio jack to the IR Blaster output of the Plasma television. Hook-up Cables and Connectors First time use 75-Ohm coaxial shielded wire. Phono ...
...stand to the rear panel of the standard video cable to the Photo Input in place of the Plasma Television. This connection allows your TV, and the TV Guide On ScreenTM system, to control your Plasma Television when A/V Network is used . Below are illustrations and names of an audio amplifeier (not included... players with an S-Video feature in the side of your cable box and/or VCR. Power Swivel Cable (Provided with mini stereo audio jack to the IR Blaster output of the Plasma television. Hook-up Cables and Connectors First time use 75-Ohm coaxial shielded wire. Phono ...

Owners Guide
Page 8
... devices. Also used to adjust the audio level of your TV. GUIDE BUTTON (TV, STB, CBL, PVR) Accesses the TV Guide On ScreenTM system (see pages 23-41 for a complete description of all of the functions on your HITACHI Plasma TV, the new remote control is only available for numeric entry.... Video Cassette Recorder/Player DVD - Digital Video Disc Player SAT - POWER BUTTON (TV, DVD, CBL, STB, PVR/VCR, AMP/CD) Turns the selected device on the wheel to operate different types of the TV. To control TV functions, please point the remote control directly at the remote control sensor ...
... devices. Also used to adjust the audio level of your TV. GUIDE BUTTON (TV, STB, CBL, PVR) Accesses the TV Guide On ScreenTM system (see pages 23-41 for a complete description of all of the functions on your HITACHI Plasma TV, the new remote control is only available for numeric entry.... Video Cassette Recorder/Player DVD - Digital Video Disc Player SAT - POWER BUTTON (TV, DVD, CBL, STB, PVR/VCR, AMP/CD) Turns the selected device on the wheel to operate different types of the TV. To control TV functions, please point the remote control directly at the remote control sensor ...
Owners Guide
Page 9
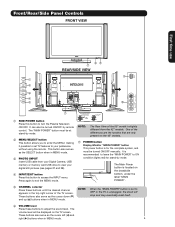
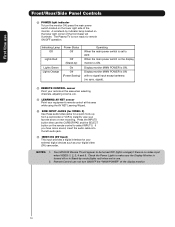
.... NOTE: When the "MAIN POWER" button is set TV features to your digital still pictures (see pages 27 and 28). ብ INPUT/EXIT button Press this button to turn the Plasma Television ON/OFF. Front/Rear/Side Panel Controls FRONT VIEW First time use CURSOR PHOTO INPUT POWER ቢ CH+ CH- ቦ VOL ...;) and right (̈) buttons when in MENU mode. ቤ PHOTO INPUT Insert USB cable from the 42" models. One of the 55" model is located on the TV screen. It can also be turned ON/OFF by mode. ባ MENU/SELECT button This button allows you to enter the MENU, making...
.... NOTE: When the "MAIN POWER" button is set TV features to your digital still pictures (see pages 27 and 28). ብ INPUT/EXIT button Press this button to turn the Plasma Television ON/OFF. Front/Rear/Side Panel Controls FRONT VIEW First time use CURSOR PHOTO INPUT POWER ቢ CH+ CH- ቦ VOL ...;) and right (̈) buttons when in MENU mode. ቤ PHOTO INPUT Insert USB cable from the 42" models. One of the 55" model is located on the TV screen. It can also be turned ON/OFF by mode. ባ MENU/SELECT button This button allows you to enter the MENU, making...
Owners Guide
Page 10
...OFF the "MAIN POWER" of the monitor. If you have mono sound, insert the audio cable into the left audio jack. ቭ IEEE1394 (DV Input) This input provides a digital interface for remote ON/OFF operation. Display monitor MAIN POWER is ON. Your HITACHI Plasma TV will illuminate. ...Remote Control can not turn the monitor ON, press the main power switch located on the lower right corner of the front bezel will appear to instantly ...
...OFF the "MAIN POWER" of the monitor. If you have mono sound, insert the audio cable into the left audio jack. ቭ IEEE1394 (DV Input) This input provides a digital interface for remote ON/OFF operation. Display monitor MAIN POWER is ON. Your HITACHI Plasma TV will illuminate. ...Remote Control can not turn the monitor ON, press the main power switch located on the lower right corner of the front bezel will appear to instantly ...
Owners Guide
Page 12
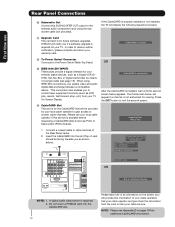
... on page 101 for viewing. Press the EXIT button to the Power Swivel Table Top Stand. Call your cable operator and give them the information from your TV. CableCARD is installed ቮ To Power Swivel Connector Connects to exit the second screen. This connection also ...Rear Panel Connections ቫ Subwoofer Out Connect this service is available before requesting a CableCARD (also known as Point of Deployment (POD) module). HITACHI will display the following respective screens. ቭ Upgrade Card This card slot is for your cable provider CableCARD(tm): 123-456-789-1 Host...
... on page 101 for viewing. Press the EXIT button to the Power Swivel Table Top Stand. Call your cable operator and give them the information from your TV. CableCARD is installed ቮ To Power Swivel Connector Connects to exit the second screen. This connection also ...Rear Panel Connections ቫ Subwoofer Out Connect this service is available before requesting a CableCARD (also known as Point of Deployment (POD) module). HITACHI will display the following respective screens. ቭ Upgrade Card This card slot is for your cable provider CableCARD(tm): 123-456-789-1 Host...

Owners Guide
Page 21
... to control your external Audio/Video components to hold the IR Mouse in front of the infrared sensor of an AV Network setup between your Hitachi Plasma TV Remote Control. Follow the Setup procedure on pages 79-86. You can connect up to a total of the Rear Panel. 3. Use the ...Video equipment (VCR and DVD Player). CONNECTING EXTERNAL AUDIO/VIDEO COMPONENTS TO IR BLASTER FOR AV NETWORK 1. Video Audio TV Guide On Screen Channel Manager Locks Timers Setup Power Swivel Move SEL Select Setup Menu Preference Screen Saver Set The Inputs Set AV NET Set Closed Captions Set Monitor ...
... to control your external Audio/Video components to hold the IR Mouse in front of the infrared sensor of an AV Network setup between your Hitachi Plasma TV Remote Control. Follow the Setup procedure on pages 79-86. You can connect up to a total of the Rear Panel. 3. Use the ...Video equipment (VCR and DVD Player). CONNECTING EXTERNAL AUDIO/VIDEO COMPONENTS TO IR BLASTER FOR AV NETWORK 1. Video Audio TV Guide On Screen Channel Manager Locks Timers Setup Power Swivel Move SEL Select Setup Menu Preference Screen Saver Set The Inputs Set AV NET Set Closed Captions Set Monitor ...
Owners Guide
Page 22
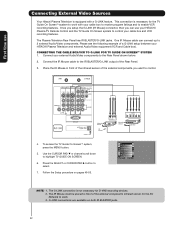
.... Connect your HITACHI Plasma Television and external Audio/Video equipment (VCR and Cable box). Please see the following example of the Rear Panel. 3. Follow the Setup procedure on both IR BLASTER jacks. 22 Video Audio TV Guide On Screen Channel Manager Locks Timers Setup Power Swivel Move SEL... components to the Rear Panel shown below. 2. G-LINK connections are available on pages 49-53. First time use your HITACHI Plasma TV Remote Control and the TV Guide On Screen system to control your cable box and VCR recording features. This connection is not necessary for the...
.... Connect your HITACHI Plasma Television and external Audio/Video equipment (VCR and Cable box). Please see the following example of the Rear Panel. 3. Follow the Setup procedure on both IR BLASTER jacks. 22 Video Audio TV Guide On Screen Channel Manager Locks Timers Setup Power Swivel Move SEL... components to the Rear Panel shown below. 2. G-LINK connections are available on pages 49-53. First time use your HITACHI Plasma TV Remote Control and the TV Guide On Screen system to control your cable box and VCR recording features. This connection is not necessary for the...

Owners Guide
Page 24
.... Press the PAUSE button repeatedly to motion. The Remote Control How to Use the Remote to Control Your TV ቢ POWER button Press this button to turn the TV set on or off when the remote is in TV mode. (See page 23 for ቢ instructions on how to set the remote control to... TV mode.) ባ ቤ ብ ባ MODE Indicator Turns on or blinks to show remote control mode. ቤ SOURCE ACCESS...
.... Press the PAUSE button repeatedly to motion. The Remote Control How to Use the Remote to Control Your TV ቢ POWER button Press this button to turn the TV set on or off when the remote is in TV mode. (See page 23 for ቢ instructions on how to set the remote control to... TV mode.) ባ ቤ ብ ባ MODE Indicator Turns on or blinks to show remote control mode. ቤ SOURCE ACCESS...

Owners Guide
Page 27
... for viewing digital still pictures from picture to view THUMBNAIL. 4. Digital photos recorded on a DVD-RAM disc may not work with low battery power may show Picture Numbers in Thumbnail view, plus other information in the left on some digital cameras. Please wait 1 or 2 minutes before checking...Air Input 1 Move SEL Sel. 2. Picture No. Contrast will decrease automatically if stationary images such as digital still photos are left side panel of the TV. 1. Certain types of digital cameras may not work with this Photo Input. 6. Use the CURSOR PAD buttons ̆, ̄, ̇ or ̈...
... for viewing digital still pictures from picture to view THUMBNAIL. 4. Digital photos recorded on a DVD-RAM disc may not work with low battery power may show Picture Numbers in Thumbnail view, plus other information in the left on some digital cameras. Please wait 1 or 2 minutes before checking...Air Input 1 Move SEL Sel. 2. Picture No. Contrast will decrease automatically if stationary images such as digital still photos are left side panel of the TV. 1. Certain types of digital cameras may not work with this Photo Input. 6. Use the CURSOR PAD buttons ̆, ̄, ̇ or ̈...

Owners Guide
Page 29
...the first device on the menu list. 3. If a fifth device is in playback or recording. 6. TV IN/OUT functions are compatible with digital interface capabilities. IEEE1394 DVHS1 DEVICE NAME, BRAND NAME POWER TV TV RESET Move STD SEL Select 00:00:00 Counter:-00:03:31 1. Not all devices with IEEE1394 ... connected, it will be used. Device not detected The Remote Control When an IEEE1394 device is Cable IEEE1394 DVHS1 DEVICE NAME, BRAND NAME POWER TV TV RESET Move STD SEL Select 00:00:00 Counter:-00:03:31 NOTES: 1. Press INPUT button, CURSOR PAD and SELECT button to highlight...
...the first device on the menu list. 3. If a fifth device is in playback or recording. 6. TV IN/OUT functions are compatible with digital interface capabilities. IEEE1394 DVHS1 DEVICE NAME, BRAND NAME POWER TV TV RESET Move STD SEL Select 00:00:00 Counter:-00:03:31 1. Not all devices with IEEE1394 ... connected, it will be used. Device not detected The Remote Control When an IEEE1394 device is Cable IEEE1394 DVHS1 DEVICE NAME, BRAND NAME POWER TV TV RESET Move STD SEL Select 00:00:00 Counter:-00:03:31 NOTES: 1. Press INPUT button, CURSOR PAD and SELECT button to highlight...

Owners Guide
Page 30
... by (-) DASH (example 15-1). ት BACKLIGHT button Press this button to highlighted GREEN. Press it was set to WHITE. Enter "0" first for the TV to Favorite (FAV) channel mode. Press the channel (CH) wheel to switch to tune. You can add any channel to your regular tuned channels. Cable...to 9, or simply press the single digit channel you are used to 30 when the TV is set when the TV is turned ON. ቴ (-) DASH button Use the (-) DASH button with the (-) DASH button. When the TV power is GREEN. To restore the sound, press the VOL wheel one half of the ...
... by (-) DASH (example 15-1). ት BACKLIGHT button Press this button to highlighted GREEN. Press it was set to WHITE. Enter "0" first for the TV to Favorite (FAV) channel mode. Press the channel (CH) wheel to switch to tune. You can add any channel to your regular tuned channels. Cable...to 9, or simply press the single digit channel you are used to 30 when the TV is set when the TV is turned ON. ቴ (-) DASH button Use the (-) DASH button with the (-) DASH button. When the TV power is GREEN. To restore the sound, press the VOL wheel one half of the ...
Owners Guide
Page 34
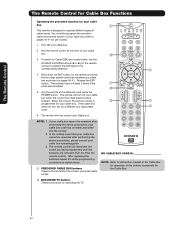
...operated after performing the above procedures, please consult your cable box operating guide. 3. NOTE: 1. Aim the remote control at the cable box and press the POWER button. If the cable box does not turn off , try a different four digit preset code. ቢ / ቢ ቢ 6. MY CABLE BOX... occurs, the remote control is entered. The remote will remember the codes you have programmed until the batteries are for operating the TV. 34 In the unlikely event that matches your Cable box. The Remote Control The Remote Control for Cable Box Functions Operating the ...
...operated after performing the above procedures, please consult your cable box operating guide. 3. NOTE: 1. Aim the remote control at the cable box and press the POWER button. If the cable box does not turn off , try a different four digit preset code. ቢ / ቢ ቢ 6. MY CABLE BOX... occurs, the remote control is entered. The remote will remember the codes you have programmed until the batteries are for operating the TV. 34 In the unlikely event that matches your Cable box. The Remote Control The Remote Control for Cable Box Functions Operating the ...
Owners Guide
Page 35
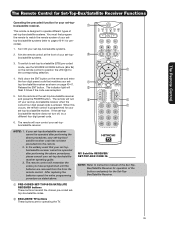
... the remote control at the set-top-box/satellite receiver and press the POWER button. Aim the remote at the front of your set -top- ባ...Control The Remote Control for Set-Top-Box/Satellite Receiver Functions Operating the precoded function for operating the TV. 35 Turn ON your set -top-box/ satellite receiver code has not been precoded into the .../SATELLITE RECEIVER buttons These buttons transmit the chosen pre-coded settop-box/satellite codes. ባ EXCLUSIVE TV buttons These buttons are removed from the from the remote control. After replacing the batteries repeat the ...
... the remote control at the set-top-box/satellite receiver and press the POWER button. Aim the remote at the front of your set -top- ባ...Control The Remote Control for Set-Top-Box/Satellite Receiver Functions Operating the precoded function for operating the TV. 35 Turn ON your set -top-box/ satellite receiver code has not been precoded into the .../SATELLITE RECEIVER buttons These buttons transmit the chosen pre-coded settop-box/satellite codes. ባ EXCLUSIVE TV buttons These buttons are removed from the from the remote control. After replacing the batteries repeat the ...
Owners Guide
Page 36
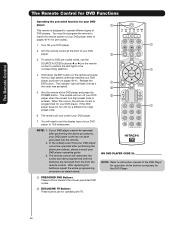
... buttons (̇ or ̈) on pages 40-41. The indicator light will remember the codes you have programmed until the batteries are for operating the TV. 36 You will need to set the display type of your DVD player operating guide. 3. NOTE: 1. The Remote Control The Remote Control for DVD ... These buttons are removed from the from the remote control. Aim the remote control at the DVD player and press the POWER button. If your DVD player cannot be operated after performing the above procedures, please consult your DVD player (refer to operate different types of DVD...
... buttons (̇ or ̈) on pages 40-41. The indicator light will remember the codes you have programmed until the batteries are for operating the TV. 36 You will need to set the display type of your DVD player operating guide. 3. NOTE: 1. The Remote Control The Remote Control for DVD ... These buttons are removed from the from the remote control. Aim the remote control at the DVD player and press the POWER button. If your DVD player cannot be operated after performing the above procedures, please consult your DVD player (refer to operate different types of DVD...
Owners Guide
Page 37
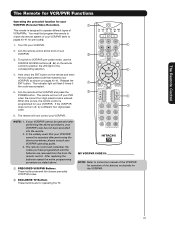
...use the SOURCE ACCESS buttons (̇ , ̈) on pages 40-41. Aim the remote control at the VCR/PVR and press the ባ POWER button. Aim the remote at the front of VCRs/PVRs. After replacing the batteries repeat the entire programming procedure as shown on the remote control...4706; This remote is entered. The Remote Control The Remote for VCR/PVR Functions Operating the precoded function for the VCR/PVR. ባ EXCLUSIVE TV Buttons These buttons are removed from the from the remote control. Turn ON your VCR/PVR code has not been precoded into the remote. 2. ...
...use the SOURCE ACCESS buttons (̇ , ̈) on pages 40-41. Aim the remote control at the VCR/PVR and press the ባ POWER button. Aim the remote at the front of VCRs/PVRs. After replacing the batteries repeat the entire programming procedure as shown on the remote control...4706; This remote is entered. The Remote Control The Remote for VCR/PVR Functions Operating the precoded function for the VCR/PVR. ባ EXCLUSIVE TV Buttons These buttons are removed from the from the remote control. Turn ON your VCR/PVR code has not been precoded into the remote. 2. ...
Owners Guide
Page 38
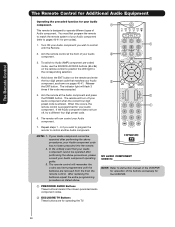
...control your Audio component you wish to control ቢ with the Remote. 2. Aim the remote control at the Audio component and press the POWER button. Aim the remote at the front of Audio component. The remote will remember the codes you wish to program the remote to control another... the buttons exclusively for the VCR/PVR. ቢ PRECODED AUDIO Buttons These buttons transmit the chosen precoded Audio component codes. ባ EXCLUSIVE TV Buttons These buttons are removed from the from the remote control. Hold down the ENT button on the remote and enter the four digit preset...
...control your Audio component you wish to control ቢ with the Remote. 2. Aim the remote control at the Audio component and press the POWER button. Aim the remote at the front of Audio component. The remote will remember the codes you wish to program the remote to control another... the buttons exclusively for the VCR/PVR. ቢ PRECODED AUDIO Buttons These buttons transmit the chosen precoded Audio component codes. ባ EXCLUSIVE TV Buttons These buttons are removed from the from the remote control. Hold down the ENT button on the remote and enter the four digit preset...


