
Owners Guide
Page 14
... page 22). The VIDEO OSD label disappears automatically after approximately four seconds. 4. However, you use to connect the VCR, camcorder, laserdisc player, DVD player, or HDTV Set Top Box to select the Antenna and Input of your choice.
... page 22). The VIDEO OSD label disappears automatically after approximately four seconds. 4. However, you use to connect the VCR, camcorder, laserdisc player, DVD player, or HDTV Set Top Box to select the Antenna and Input of your choice.

Owners Guide
Page 17
...VIDEO PB HDMI 1 VIDEO L AUDIO R AUDIO TO HI-FI PR PR (MONO) (MONO) (MONO) (MONO) RS232C 1 2 345 6 789 HDMI Cable HDMI Output DVD Player or HDTV STB ANT A To Converter ANT B MONITOR OUT S-VIDEO INPUT 4 INPUT 3 INPUT 2 Y/ VIDEO PB INPUT 1 Y/ VIDEO PB HDMI 1 VIDEO L AUDIO R AUDIO TO HI-FI ... rear panel jacks. The connected digital output device controls the HDMI interface so proper set-up of video contents. 3. Select Antenna from the HDTV set below. The picture and sound that encrypts video signals when using a component with DVI output, you also have to connect the AUDIO ...
...VIDEO PB HDMI 1 VIDEO L AUDIO R AUDIO TO HI-FI PR PR (MONO) (MONO) (MONO) (MONO) RS232C 1 2 345 6 789 HDMI Cable HDMI Output DVD Player or HDTV STB ANT A To Converter ANT B MONITOR OUT S-VIDEO INPUT 4 INPUT 3 INPUT 2 Y/ VIDEO PB INPUT 1 Y/ VIDEO PB HDMI 1 VIDEO L AUDIO R AUDIO TO HI-FI ... rear panel jacks. The connected digital output device controls the HDMI interface so proper set-up of video contents. 3. Select Antenna from the HDTV set below. The picture and sound that encrypts video signals when using a component with DVI output, you also have to connect the AUDIO ...

Owners Guide
Page 18
...jack. 6. Connect the cable from the CR/PR OUT or R-Y OUT of the laserdisc/DVD player or HDTV set top box to the INPUT (PB) jack. 3. Connect the cable from the CB/PB OUT or ... INPUT 2 from the INPUTS menu to view the program from the Y OUT of the Laserdisc/DVD player or HDTV set top box to the INPUT (Y) jack, as shown on REAR PANEL CONNECTIONS. 18 Select Antenna from the ...AUDIO OUT R of the Laserdisc/DVD player or HDTV set top box to the previous channel. Connect the cable from the INPUTS menu to return to the INPUT...
...jack. 6. Connect the cable from the CR/PR OUT or R-Y OUT of the laserdisc/DVD player or HDTV set top box to the INPUT (PB) jack. 3. Connect the cable from the CB/PB OUT or ... INPUT 2 from the INPUTS menu to view the program from the Y OUT of the Laserdisc/DVD player or HDTV set top box to the INPUT (Y) jack, as shown on REAR PANEL CONNECTIONS. 18 Select Antenna from the ...AUDIO OUT R of the Laserdisc/DVD player or HDTV set top box to the previous channel. Connect the cable from the INPUTS menu to return to the INPUT...
Owners Guide
Page 21
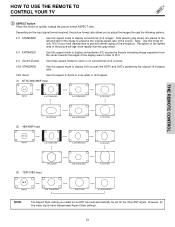
...; ASPECT button Press this aspect mode to display conventional (4:3) images. Depending on conventional (4:3) sources. 16:9 STANDARD Use this aspect mode to display 16:9 sources like HDTV and DVD's preserving the original 16:9 aspect ratio. 16:9 Zoom Use this aspect to Zoom-in once while in the lighted area of the picture...
...; ASPECT button Press this aspect mode to display conventional (4:3) images. Depending on conventional (4:3) sources. 16:9 STANDARD Use this aspect mode to display 16:9 sources like HDTV and DVD's preserving the original 16:9 aspect ratio. 16:9 Zoom Use this aspect to Zoom-in once while in the lighted area of the picture...


