Owners Guide
Page 2
... accompanying the appliance. INSERT THE POWER CORD INTO A 120 VOLT 60Hz OUTLET. If the television does not operate properly, unplug the television and call your product model. REFER SERVICING TO QUALIFIED SERVICE PERSONNEL. NOTE: This television receiver will display television closed captioning, ( or ), in the design of these products properly, this section illustrates safety tips which will enable HITACHI to notify you to persons. Safety...
... accompanying the appliance. INSERT THE POWER CORD INTO A 120 VOLT 60Hz OUTLET. If the television does not operate properly, unplug the television and call your product model. REFER SERVICING TO QUALIFIED SERVICE PERSONNEL. NOTE: This television receiver will display television closed captioning, ( or ), in the design of these products properly, this section illustrates safety tips which will enable HITACHI to notify you to persons. Safety...
Owners Guide
Page 3
... to climb to www.lamprecycle.org. Do not install near water. 6. An outdoor antenna should not be sure the antenna system is grounded so as power-supply cord or plug is capable of cable entry as close to the point of receiving analog basic, digital basic and digital premium cable television programming by direct connection to view encrypted digital programming. Do not place any ventilation openings. A CableCARD provided...
... to climb to www.lamprecycle.org. Do not install near water. 6. An outdoor antenna should not be sure the antenna system is grounded so as power-supply cord or plug is capable of cable entry as close to the point of receiving analog basic, digital basic and digital premium cable television programming by direct connection to view encrypted digital programming. Do not place any ventilation openings. A CableCARD provided...
Owners Guide
Page 5
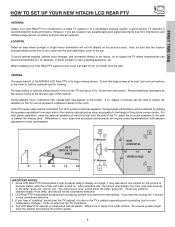
... the receiver cabinet and as close as the viewer moves to place it on the TV's functions. 4. During daylight hours, reflections from overheating. For best stereo separation, place the external speakers at its large viewing screen. LCD Rear PTV incorporates an advanced cooling fan system to find the optimum spot for viewing. After extended use, the picture may darken, the color may hear a "pop" sound when the lamp "goes out...
... the receiver cabinet and as close as the viewer moves to place it on the TV's functions. 4. During daylight hours, reflections from overheating. For best stereo separation, place the external speakers at its large viewing screen. LCD Rear PTV incorporates an advanced cooling fan system to find the optimum spot for viewing. After extended use, the picture may darken, the color may hear a "pop" sound when the lamp "goes out...

Owners Guide
Page 6
... best performance, video cables should use 75-Ohm coaxial shielded wire. "F" Type 75-Ohm Coaxial Antenna Connector For connecting RF signals (antenna or cable TV) to the antenna mixer. disc players with an Optical Audio In jack. USB Cable This cable is used to connect to the RS232C input located on the television. If you can control some of your digital camera to the Photo Input. HDMI Cable This cable is used to connect your TV functions from an external home control...
... best performance, video cables should use 75-Ohm coaxial shielded wire. "F" Type 75-Ohm Coaxial Antenna Connector For connecting RF signals (antenna or cable TV) to the antenna mixer. disc players with an Optical Audio In jack. USB Cable This cable is used to connect to the RS232C input located on the television. If you can control some of your digital camera to the Photo Input. HDMI Cable This cable is used to connect your TV functions from an external home control...
Owners Guide
Page 8
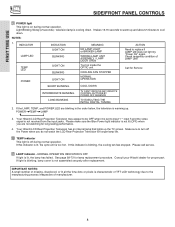
... Service INTERMEDIATE BLINKING LONG BLINKING TV CAN'T RECEIVE ANY REMOTE CONTROL BUTTONS BY POWER OFF SEQENCE TV EXECUTING THE INITIAL DIGITAL TUNING 2. POWER TEMP LAMP 3. Make sure to turn off during normal operation. FIRST TIME USE SIDE/FRONT PANEL CONTROLS ቪ POWER light This light is not assembled securely after replacement. Light Blinking Slowly (2 seconds): television lamp is off the Power when you are blinking in the order below, the television is not received from the input jacks. NOTES: 1. INDICATOR LAMP LED TEMP LED POWER INDICATION LIGHT ON BLINKING LIGHT...
... Service INTERMEDIATE BLINKING LONG BLINKING TV CAN'T RECEIVE ANY REMOTE CONTROL BUTTONS BY POWER OFF SEQENCE TV EXECUTING THE INITIAL DIGITAL TUNING 2. POWER TEMP LAMP 3. Make sure to turn off during normal operation. FIRST TIME USE SIDE/FRONT PANEL CONTROLS ቪ POWER light This light is not assembled securely after replacement. Light Blinking Slowly (2 seconds): television lamp is off the Power when you are blinking in the order below, the television is not received from the input jacks. NOTES: 1. INDICATOR LAMP LED TEMP LED POWER INDICATION LIGHT ON BLINKING LIGHT...
Owners Guide
Page 10
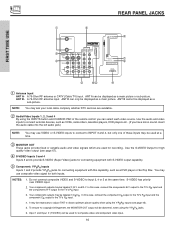
... S-VIDEO inputs to connect to Input 3, 4 or 5 at a time. ቤ MONITOR OUT These jacks provide fixed or variable audio and video signals which are available. ባ Audio/Video Inputs 1, 2, 3 and 4 By using the INPUTS button and CURSOR PAD of the remote control you have mono sound, insert the audio cable into the left audio jack.) NOTE: You may be displayed as a main picture or sub-picture. Your component outputs may ask your local cable company whether DTV services...
... S-VIDEO inputs to connect to Input 3, 4 or 5 at a time. ቤ MONITOR OUT These jacks provide fixed or variable audio and video signals which are available. ባ Audio/Video Inputs 1, 2, 3 and 4 By using the INPUTS button and CURSOR PAD of the remote control you have mono sound, insert the audio cable into the left audio jack.) NOTE: You may be displayed as a main picture or sub-picture. Your component outputs may ask your local cable company whether DTV services...
Owners Guide
Page 11
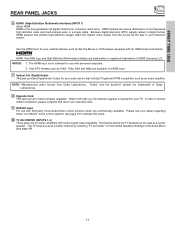
... Audio/Video control systems which are trademarks or registered trademarks of Dolby Laboratories. ቩ Upgrade Card This card slot is the next-generation all the way to be set as a center channel by selecting "TV as Set-Top-Boxes or DVD players equipped with center signal output capability. HDMI, the HDMI logo and High-Definition Multimedia Interface are commercially available. FIRST TIME USE REAR PANEL JACKS ቧ HDMI1 (High Definition Multimedia Interface) (INPUT 1) About HDMI HDMI...
... Audio/Video control systems which are trademarks or registered trademarks of Dolby Laboratories. ቩ Upgrade Card This card slot is the next-generation all the way to be set as a center channel by selecting "TV as Set-Top-Boxes or DVD players equipped with center signal output capability. HDMI, the HDMI logo and High-Definition Multimedia Interface are commercially available. FIRST TIME USE REAR PANEL JACKS ቧ HDMI1 (High Definition Multimedia Interface) (INPUT 1) About HDMI HDMI...

Owners Guide
Page 12
... start your cable operator). and 6,381,747 licensed for limited viewing uses only. In order to tune digital and high definition cable channels. Connect a coaxial cable to exit the second screen. Digital Cable ANT A CableCARD (Top of card faces right) ANT B MONITOR OUT S-VIDEO INPUT 4 INPUT 3 INPUT 2 Y/ VIDEO PB INPUT 1 Y/ VIDEO PB VIDEO L AUDIO R AUDIO TO HI-FI (MONO) PR PR (MONO) (MONO) (MONO) TV AS CENTER CableCARD HDMIIN1SERT THIS END OPTICAL OUT Digital Audio Upgrade Card Apparatus Claims of card should...
... start your cable operator). and 6,381,747 licensed for limited viewing uses only. In order to tune digital and high definition cable channels. Connect a coaxial cable to exit the second screen. Digital Cable ANT A CableCARD (Top of card faces right) ANT B MONITOR OUT S-VIDEO INPUT 4 INPUT 3 INPUT 2 Y/ VIDEO PB INPUT 1 Y/ VIDEO PB VIDEO L AUDIO R AUDIO TO HI-FI (MONO) PR PR (MONO) (MONO) (MONO) TV AS CENTER CableCARD HDMIIN1SERT THIS END OPTICAL OUT Digital Audio Upgrade Card Apparatus Claims of card should...
Owners Guide
Page 14
... audio output (mono sound), connect it is recommended to use composite video signal for Input 1~Input 5. • It may be necessary to adjust TINT to obtain optimum picture quality when using HDMI or DVI input from a Set-Top-Box, it to the left audio jack on the television. • Refer to the operating guide of your other electronic equipment for additional information on connecting your hook-up cables. • A single VCR can be used at a time...
... audio output (mono sound), connect it is recommended to use composite video signal for Input 1~Input 5. • It may be necessary to adjust TINT to obtain optimum picture quality when using HDMI or DVI input from a Set-Top-Box, it to the left audio jack on the television. • Refer to the operating guide of your other electronic equipment for additional information on connecting your hook-up cables. • A single VCR can be used at a time...
Owners Guide
Page 16
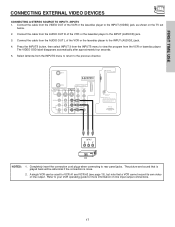
... the INPUTS menu. Connect the cable from the VIDEO INPUT JACK on the back panel of each component for limited viewing uses only. ANT A CableCARD (Top of card faces right) ANT B MONITOR OUT S-VIDEO INPUT 4 INPUT 3 INPUT 2 Y/ VIDEO PB INPUT 1 Y/ VIDEO PB HDMI 1 VIDEO L AUDIO R AUDIO TO HI-FI PR PR (MONO) (MONO) (MONO) (MONO) TV AS CENTER OPTICAL OUT Digital Audio Upgrade Card Apparatus Claims of video and audio inputs and outputs. RS232C 1 2 345 6 789 Audio Video OUTPUT VCR 16 For best performance, video and audio cables should...
... the INPUTS menu. Connect the cable from the VIDEO INPUT JACK on the back panel of each component for limited viewing uses only. ANT A CableCARD (Top of card faces right) ANT B MONITOR OUT S-VIDEO INPUT 4 INPUT 3 INPUT 2 Y/ VIDEO PB INPUT 1 Y/ VIDEO PB HDMI 1 VIDEO L AUDIO R AUDIO TO HI-FI PR PR (MONO) (MONO) (MONO) (MONO) TV AS CENTER OPTICAL OUT Digital Audio Upgrade Card Apparatus Claims of video and audio inputs and outputs. RS232C 1 2 345 6 789 Audio Video OUTPUT VCR 16 For best performance, video and audio cables should...
Owners Guide
Page 17
... on line input-output connections. 17 Connect the cable from the VIDEO OUT of U.S. ANT A ANT B MONITOR OUT S-VIDEO INPUT 4 INPUT 3 INPUT 2 Y/ VIDEO PB INPUT 1 Y/ VIDEO PB HDMI 1 VIDEO L AUDIO R AUDIO TO HI-FI PR PR (MONO) (MONO) (MONO) (MONO) TV AS CENTER CableCARD (Top of card faces right) OPTICAL OUT Digital Audio Upgrade Card Apparatus Claims of the VCR or the laserdisc player to the INPUT (AUDIO/L) jack. 4. Completely insert the connection cord plugs when connecting to the previous channel. The picture and sound...
... on line input-output connections. 17 Connect the cable from the VIDEO OUT of U.S. ANT A ANT B MONITOR OUT S-VIDEO INPUT 4 INPUT 3 INPUT 2 Y/ VIDEO PB INPUT 1 Y/ VIDEO PB HDMI 1 VIDEO L AUDIO R AUDIO TO HI-FI PR PR (MONO) (MONO) (MONO) (MONO) TV AS CENTER CableCARD (Top of card faces right) OPTICAL OUT Digital Audio Upgrade Card Apparatus Claims of the VCR or the laserdisc player to the INPUT (AUDIO/L) jack. 4. Completely insert the connection cord plugs when connecting to the previous channel. The picture and sound...

Owners Guide
Page 19
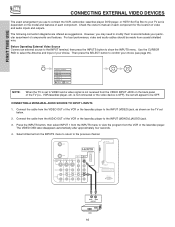
...Antenna from the output of device user settings determines final video appearance. 19 FIRST TIME USE CONNECTING EXTERNAL VIDEO DEVICES CONNECTING A COMPONENT SOURCE WITH HDMI or DVI CAPABILITY TO INPUT 1 1. RS232C 1 2 345 6 789 DVI to rear panel jacks. The HDMI input on the TV set top box or DVD player to view the program from the HDTV set -up of the HDTV set below. The VIDEO OSD label disappears automatically after approximately four seconds. 3. RS232C 1 2 345 6 789 HDMI Cable HDMI Output DVD Player or HDTV STB ANT B MONITOR OUT S-VIDEO INPUT 4 INPUT 3 INPUT 2 Y/ VIDEO...
...Antenna from the output of device user settings determines final video appearance. 19 FIRST TIME USE CONNECTING EXTERNAL VIDEO DEVICES CONNECTING A COMPONENT SOURCE WITH HDMI or DVI CAPABILITY TO INPUT 1 1. RS232C 1 2 345 6 789 DVI to rear panel jacks. The HDMI input on the TV set top box or DVD player to view the program from the HDTV set -up of the HDTV set below. The VIDEO OSD label disappears automatically after approximately four seconds. 3. RS232C 1 2 345 6 789 HDMI Cable HDMI Output DVD Player or HDTV STB ANT B MONITOR OUT S-VIDEO INPUT 4 INPUT 3 INPUT 2 Y/ VIDEO...
Owners Guide
Page 21
... for instructions on how to program the remote to control additional Audio/Video equipment). NOTE: When you have a satellite receiver, use this time. To operate your PVR (Personal Video Recorder), point the remote at the remote sensor of the DVD player and select DVD by pressing the ̇ or ̈ button of VCRs, CATV (Cable TV) converters, set-top-box, satellite receiver, DVD players, and other audio/video equipment with one area. THE REMOTE CONTROL THE REMOTE CONTROL In addition to controlling...
... for instructions on how to program the remote to control additional Audio/Video equipment). NOTE: When you have a satellite receiver, use this time. To operate your PVR (Personal Video Recorder), point the remote at the remote sensor of the DVD player and select DVD by pressing the ̇ or ̈ button of VCRs, CATV (Cable TV) converters, set-top-box, satellite receiver, DVD players, and other audio/video equipment with one area. THE REMOTE CONTROL THE REMOTE CONTROL In addition to controlling...
Owners Guide
Page 24
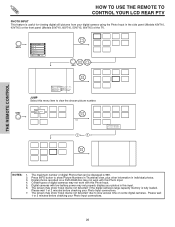
... Tales 3:00PM 15-2 3:30PM GUIDE Move SEL Tune INFO Detail Use the CURSOR PAD to access the Channel Guide. Select Night for night time viewing with less brightness and contrast for a more detailed picture (see Auto Channel Scan on , off or auto. THE REMOTE CONTROL HOW TO USE THE REMOTE TO CONTROL YOUR LCD REAR PTV ቨ DAY/NIGHT button Press this button to display available program information. button Press this button to compete with room...
... Tales 3:00PM 15-2 3:30PM GUIDE Move SEL Tune INFO Detail Use the CURSOR PAD to access the Channel Guide. Select Night for night time viewing with less brightness and contrast for a more detailed picture (see Auto Channel Scan on , off or auto. THE REMOTE CONTROL HOW TO USE THE REMOTE TO CONTROL YOUR LCD REAR PTV ቨ DAY/NIGHT button Press this button to display available program information. button Press this button to compete with room...
Owners Guide
Page 26
... using the Photo Input in this Photo Input. 5. Photo Input Ant B Ant A Input 1 Input 2 Move SEL Sel No. 7/10 03/04/03 1632x1232 Vacation Picture No. Certain types of digital Photos that can be displayed is useful for viewing digital still pictures from your photos in the side panel (Models 42V710, 42V715) or the front panel (Models 50V710, 60V710, 50V715, 60V715) of the TV. HOW TO USE THE REMOTE TO CONTROL YOUR LCD REAR...
... using the Photo Input in this Photo Input. 5. Photo Input Ant B Ant A Input 1 Input 2 Move SEL Sel No. 7/10 03/04/03 1632x1232 Vacation Picture No. Certain types of digital Photos that can be displayed is useful for viewing digital still pictures from your photos in the side panel (Models 42V710, 42V715) or the front panel (Models 50V710, 60V710, 50V715, 60V715) of the TV. HOW TO USE THE REMOTE TO CONTROL YOUR LCD REAR...

Owners Guide
Page 30
...; THE REMOTE CONTROL PICTURE-IN-PICTURE (PIP) Your HITACHI LCD Rear PTV incorporates Two Tuner technology designed for limited viewing uses only. RS232C 1 2 345 6 789 ባ ቢ GUIDE C.C. You may also view the VCR program as a main picture while viewing another program as a main picture. ANT A ANT B MONITOR OUT S-VIDEO INPUT 4 INPUT 3 INPUT 2 Y/ VIDEO PB INPUT 1 Y/ VIDEO PB HDMI 1 VIDEO L AUDIO R AUDIO TO HI-FI PR PR (MONO) (MONO) (MONO) (MONO) TV AS CENTER CableCARD (Top of card faces right) OPTICAL OUT Digital Audio Upgrade Card Apparatus...
...; THE REMOTE CONTROL PICTURE-IN-PICTURE (PIP) Your HITACHI LCD Rear PTV incorporates Two Tuner technology designed for limited viewing uses only. RS232C 1 2 345 6 789 ባ ቢ GUIDE C.C. You may also view the VCR program as a main picture while viewing another program as a main picture. ANT A ANT B MONITOR OUT S-VIDEO INPUT 4 INPUT 3 INPUT 2 Y/ VIDEO PB INPUT 1 Y/ VIDEO PB HDMI 1 VIDEO L AUDIO R AUDIO TO HI-FI PR PR (MONO) (MONO) (MONO) (MONO) TV AS CENTER CableCARD (Top of card faces right) OPTICAL OUT Digital Audio Upgrade Card Apparatus...
Owners Guide
Page 34
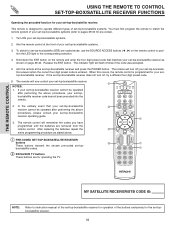
... remote will turn off your set-top-box/satellite receiver when the correct four digit preset code is entered. In the unlikely event that matches your set-top-box/satellite receiver as stated above procedures, your set-top-box/satellite receiver operating guide. 3. To switch to the corresponding selection. 4. Hold down the ENT button on the remote control to position the LED light to set-top-box/satellite (STB) pre-coded mode, use the SOURCE ACCESS buttons (̇...
... remote will turn off your set-top-box/satellite receiver when the correct four digit preset code is entered. In the unlikely event that matches your set-top-box/satellite receiver as stated above procedures, your set-top-box/satellite receiver operating guide. 3. To switch to the corresponding selection. 4. Hold down the ENT button on the remote control to position the LED light to set-top-box/satellite (STB) pre-coded mode, use the SOURCE ACCESS buttons (̇...
Owners Guide
Page 43
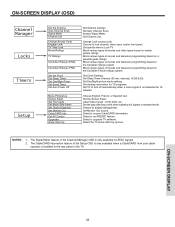
... picture ratings. Select to set RS232C feature. Select to access CableCARD information. ON-SCREEN DISPLAY (OSD) Channel Manager Locks Timers Setup Set the Antenna Auto Channel Scan Signal Meter Channel List Change Access Code Engage Lock TV Time Lock Movie Ratings TV Ratings Canadian Ratings (ENG) Canadian Ratings (FRN) Set the Clock Set Sleep Timer Set Day/Night Timer Set Event Timer Set Auto Power Off Menu Preference Screen Saver Set The Inputs Set Black Side Panel Set Closed Captions Set Monitor Out CableCARD Info Set AV Control Upgrades Quick Start Up Set Antenna settings. Set...
... picture ratings. Select to set RS232C feature. Select to access CableCARD information. ON-SCREEN DISPLAY (OSD) Channel Manager Locks Timers Setup Set the Antenna Auto Channel Scan Signal Meter Channel List Change Access Code Engage Lock TV Time Lock Movie Ratings TV Ratings Canadian Ratings (ENG) Canadian Ratings (FRN) Set the Clock Set Sleep Timer Set Day/Night Timer Set Event Timer Set Auto Power Off Menu Preference Screen Saver Set The Inputs Set Black Side Panel Set Closed Captions Set Monitor Out CableCARD Info Set AV Control Upgrades Quick Start Up Set Antenna settings. Set...

Owners Guide
Page 46
... the Day VIDEO mode. Video Picture Mode Contrast Brightness Color Tint Sharpness Color Temperature Black Enhancement Contrast Mode Reset Video Settings Move SEL Select ANT A/B Day 100% 50% 50% 50% High High Dynamic Night Video Color Management Color Decoding Auto Color Noise Reduction Auto Movie Mode Move SEL Select Off Low Off ON-SCREEN DISPLAY Color Management Use this function to adjust and balance the listed individual colors to make them either deeper or more pure depending on this input to the original factory settings. Press...
... the Day VIDEO mode. Video Picture Mode Contrast Brightness Color Tint Sharpness Color Temperature Black Enhancement Contrast Mode Reset Video Settings Move SEL Select ANT A/B Day 100% 50% 50% 50% High High Dynamic Night Video Color Management Color Decoding Auto Color Noise Reduction Auto Movie Mode Move SEL Select Off Low Off ON-SCREEN DISPLAY Color Management Use this function to adjust and balance the listed individual colors to make them either deeper or more pure depending on this input to the original factory settings. Press...
Owners Guide
Page 54
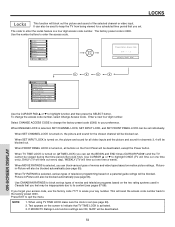
... time a week). The factory preset code is turned on motion picture ratings. Video Audio Aspect Chan. Enter a new four digit number. When SET CHANNEL LOCK is turned on, all video inputs and the picture and sound for the chosen channel will be blocked. This will be deactivated, except the Power button. When FRONT PANEL LOCK is turned on the screen to indicate that you set the BEGIN and END times (CURSOR PAD ̈) and the TV cannot be viewed...
... time a week). The factory preset code is turned on motion picture ratings. Video Audio Aspect Chan. Enter a new four digit number. When SET CHANNEL LOCK is turned on, all video inputs and the picture and sound for the chosen channel will be blocked. This will be deactivated, except the Power button. When FRONT PANEL LOCK is turned on the screen to indicate that you set the BEGIN and END times (CURSOR PAD ̈) and the TV cannot be viewed...


