Owners Guide
Page 3
... this product may fall or cause a child to climb to comply with a dry cloth. 7. Follow instructions for wall, shelf or ceiling mounting as recommended by TV stations and cable companies, as well as programs from other apparatus (including amplifiers) that the cable ground shall be connected to the grounding system of...
... this product may fall or cause a child to climb to comply with a dry cloth. 7. Follow instructions for wall, shelf or ceiling mounting as recommended by TV stations and cable companies, as well as programs from other apparatus (including amplifiers) that the cable ground shall be connected to the grounding system of...

Owners Guide
Page 4
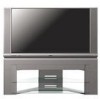
... STAND (NOT INCLUDED, ORDER SEPARATELY) PART NAME PART NO. 50" LCD Rear PTV Stand H520445 SP50W 60" LCD Rear PTV Stand H520446 SP60W CUSTOM HITACHI TELEVISION STAND Excellent for use only with Hitachi 60V500. This SP60W LCD stand for VCR and video tape storage. EY01641). ...by pushing the notched part of the cover with other apparatus is incorrectly replaced. Insert two new "AA" size batteries for use only with Hitachi 50V500. REMOTE CONTROL POWER TV DVD VCR CBL SOURCE WIZARD CD PVR STB AMP 1 2 3 4 5 6 7 8 9 SLEEP C.C. ANT 0 INFO A/V NET ASPECT...
... STAND (NOT INCLUDED, ORDER SEPARATELY) PART NAME PART NO. 50" LCD Rear PTV Stand H520445 SP50W 60" LCD Rear PTV Stand H520446 SP60W CUSTOM HITACHI TELEVISION STAND Excellent for use only with Hitachi 60V500. This SP60W LCD stand for VCR and video tape storage. EY01641). ...by pushing the notched part of the cover with other apparatus is incorrectly replaced. Insert two new "AA" size batteries for use only with Hitachi 50V500. REMOTE CONTROL POWER TV DVD VCR CBL SOURCE WIZARD CD PVR STB AMP 1 2 3 4 5 6 7 8 9 SLEEP C.C. ANT 0 INFO A/V NET ASPECT...
Owners Guide
Page 5
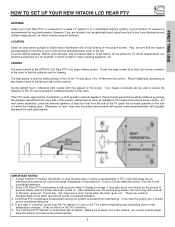
... and from each side of the receiver cabinet and as close as the viewer moves to the left and right of the HITACHI LCD Rear PTV is due to the TV's cabinet expanding and contracting due to the side or behind the viewing area. FIRST TIME USE HOW TO SET UP YOUR NEW... HITACHI LCD REAR PTV ANTENNA Unless your LCD has defective pixels, it should not be considered defective. 2. Differences in the room to manufacturing process for viewing. If your LCD Rear PTV is connected to a cable TV system or to display an image, it is its...
... and from each side of the receiver cabinet and as close as the viewer moves to the left and right of the HITACHI LCD Rear PTV is due to the TV's cabinet expanding and contracting due to the side or behind the viewing area. FIRST TIME USE HOW TO SET UP YOUR NEW... HITACHI LCD REAR PTV ANTENNA Unless your LCD has defective pixels, it should not be considered defective. 2. Differences in the room to manufacturing process for viewing. If your LCD Rear PTV is connected to a cable TV system or to display an image, it is its...
Owners Guide
Page 6
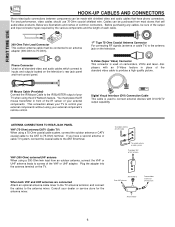
...on all standard video and audio cables which connect to control your external components without using the A/V Network feature. This connection allows your TV to inputs and outputs located on camcorders, VCRs and laser- VHF (300-Ohm) antenna/UHF antenna When using a 75-Ohm coaxial ...-Ohm coaxial shielded wire. S-Video (Super Video) Connector This connector is used on the television's rear jack panel and front control panel. disc players with DVI-HDTV output capability. Digital Visual Interface (DVI) Connection Cable This cable is used to the antenna mixer. When both VHF...
...on all standard video and audio cables which connect to control your external components without using the A/V Network feature. This connection allows your TV to inputs and outputs located on camcorders, VCRs and laser- VHF (300-Ohm) antenna/UHF antenna When using a 75-Ohm coaxial ...-Ohm coaxial shielded wire. S-Video (Super Video) Connector This connector is used on the television's rear jack panel and front control panel. disc players with DVI-HDTV output capability. Digital Visual Interface (DVI) Connection Cable This cable is used to the antenna mixer. When both VHF...
Owners Guide
Page 7
...;) and up from your local source. To change antenna source, press the ANT button on the TV screen. Some terms used herein are tested with your desired sound level. Press the INPUT/EXIT button on your digital pictures, an adapter is shown in 1 (SDDR-6507) Olympus (MAPC-10) Dazzle (DM-9000) ...SanDisk (SDCF-38) Olympus (MAPC-10) Notes: Adapter is turned OFF at the level it is set to 30 when the TV is turned ON. ቦ FRONT INPUT JACKS...
...;) and up from your local source. To change antenna source, press the ANT button on the TV screen. Some terms used herein are tested with your desired sound level. Press the INPUT/EXIT button on your digital pictures, an adapter is shown in 1 (SDDR-6507) Olympus (MAPC-10) Dazzle (DM-9000) ...SanDisk (SDCF-38) Olympus (MAPC-10) Notes: Adapter is turned OFF at the level it is set to 30 when the TV is turned ON. ቦ FRONT INPUT JACKS...
Owners Guide
Page 8
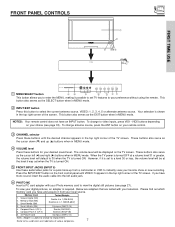
...Too hot inside the OPTIC unit COOLING FAN STOPPED Call for best response. ቩ POWER button Press this indicator is too hot. If your Hitachi dealer for lamp replacement procedure. FIRST TIME USE FRONT PANEL CONTROLS ቨ IR RECEIVER/LEARNING AV NET sensor The screen area acts as the ... INDICATOR IS OFF If light is on or off during normal operation. If the LAMP, TEMP, and POWER LED are common characteristics of the TV. Since LCD Rear PTV incorporates a high pressure lamp to display an image, it should not be considered defective. 3. If you hear the cooling fan, it ...
...Too hot inside the OPTIC unit COOLING FAN STOPPED Call for best response. ቩ POWER button Press this indicator is too hot. If your Hitachi dealer for lamp replacement procedure. FIRST TIME USE FRONT PANEL CONTROLS ቨ IR RECEIVER/LEARNING AV NET sensor The screen area acts as the ... INDICATOR IS OFF If light is on or off during normal operation. If the LAMP, TEMP, and POWER LED are common characteristics of the TV. Since LCD Rear PTV incorporates a high pressure lamp to display an image, it should not be considered defective. 3. If you hear the cooling fan, it ...

Owners Guide
Page 9
... jack of the standard video cable. 3. Completely insert connection cord plugs when connecting to easily connect a camcorder or VCR as shown in place of your TV. 9
... jack of the standard video cable. 3. Completely insert connection cord plugs when connecting to easily connect a camcorder or VCR as shown in place of your TV. 9
Owners Guide
Page 10
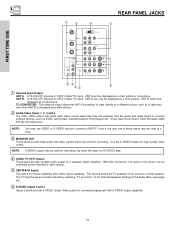
... ANT A connection to pass directly to the stereo can only be displayed as Center" on the Internal Speakers Settings of the Audio Menu (see page 50). ቧ S-VIDEO Inputs 3 and 4 Inputs 3 and 4 provide S-VIDEO (Super Video) jacks for high quality video output. NOTE: S-VIDEO output.... Use the audio and video inputs to a separate stereo amplifier. ANT B cannot be displayed as a center speaker. The TV must be used as a main picture. ANT B- FIRST TIME USE REAR PANEL JACKS ቢ ባ ቪ ቨ ANT A TO CONVERTER ANT B INPUT 1 INPUT 2 DVI-HDTV PR PB Y R (MONO)/L ...
... ANT A connection to pass directly to the stereo can only be displayed as Center" on the Internal Speakers Settings of the Audio Menu (see page 50). ቧ S-VIDEO Inputs 3 and 4 Inputs 3 and 4 provide S-VIDEO (Super Video) jacks for high quality video output. NOTE: S-VIDEO output.... Use the audio and video inputs to a separate stereo amplifier. ANT B cannot be displayed as a center speaker. The TV must be used as a main picture. ANT B- FIRST TIME USE REAR PANEL JACKS ቢ ባ ቪ ቨ ANT A TO CONVERTER ANT B INPUT 1 INPUT 2 DVI-HDTV PR PB Y R (MONO)/L ...
Owners Guide
Page 11
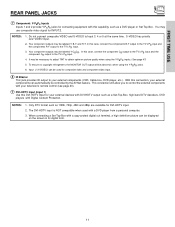
FIRST TIME USE REAR PANEL JACKS ቨ Component: Y-PBPR Inputs Inputs 1 and 2 provide Y-PBPR...). ቪ DVI-HDTV Input (Input 1) Use this case, connect the components B-Y output to the TV's PB input and the components R-Y output to the TV's PR input. 4. Input 2 (Y/VIDEO) can be labeled Y-CBCR. S-VIDEO has priority over VIDEO ...Blaster This jack provides IR output to Input 3, 4 or 5 at the same time. When connecting a Set-Top-Box with Digital Content Protection. In this connection, your external components (VCR, Cable box, DVD player, etc.). NOTES: 1. You may be ...
FIRST TIME USE REAR PANEL JACKS ቨ Component: Y-PBPR Inputs Inputs 1 and 2 provide Y-PBPR...). ቪ DVI-HDTV Input (Input 1) Use this case, connect the components B-Y output to the TV's PB input and the components R-Y output to the TV's PR input. 4. Input 2 (Y/VIDEO) can be labeled Y-CBCR. S-VIDEO has priority over VIDEO ...Blaster This jack provides IR output to Input 3, 4 or 5 at the same time. When connecting a Set-Top-Box with Digital Content Protection. In this connection, your external components (VCR, Cable box, DVD player, etc.). NOTES: 1. You may be ...
Owners Guide
Page 12
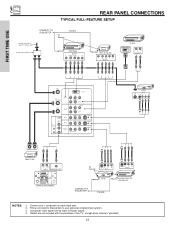
... to Input2~Input5. 4. FIRST TIME USE REAR PANEL CONNECTIONS TYPICAL FULL-FEATURE SETUP Outside antenna or cable TV coaxial cable 2-Way signal splitter CONNECT TO IR BLASTER IR Sensor (Provided) DVD Player OUTPUT Y PB/CB PR/CR L R HDTV Set-Top Box Y PB PR L R OUTPUT D-VHS DIGITAL OUTPUT LR OUTPUT ANT A TO CONVERTER ANT...
... to Input2~Input5. 4. FIRST TIME USE REAR PANEL CONNECTIONS TYPICAL FULL-FEATURE SETUP Outside antenna or cable TV coaxial cable 2-Way signal splitter CONNECT TO IR BLASTER IR Sensor (Provided) DVD Player OUTPUT Y PB/CB PR/CR L R HDTV Set-Top Box Y PB PR L R OUTPUT D-VHS DIGITAL OUTPUT LR OUTPUT ANT A TO CONVERTER ANT...

Owners Guide
Page 13
... Set-Top-Box, it to the left audio jack on the television. • Refer to the TV's PR input. • Your component outputs may be labeled Y-CBCR. Refer to your device has this case, ...connect the components B-Y output to the TV's PB input and the components R-Y output to the operating guide of the standard video connection if...laserdisc players, VCRs etc. In this feature. FIRST TIME USE TIPS ON REAR PANEL CONNECTIONS • S-VIDEO connections are provided for high performance components, such as DVD players and set-
... Set-Top-Box, it to the left audio jack on the television. • Refer to the TV's PR input. • Your component outputs may be labeled Y-CBCR. Refer to your device has this case, ...connect the components B-Y output to the TV's PB input and the components R-Y output to the operating guide of the standard video connection if...laserdisc players, VCRs etc. In this feature. FIRST TIME USE TIPS ON REAR PANEL CONNECTIONS • S-VIDEO connections are provided for high performance components, such as DVD players and set-
Owners Guide
Page 14
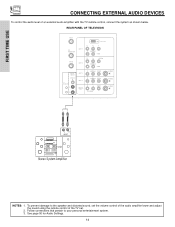
... adjust the sound using the remote control of an external audio amplifier with the TV remote control, connect the system as shown below. See page 50 for Audio Settings. 14 To prevent damage to your personal entertainment system. 3. REAR PANEL OF TELEVISION ANT A TO CONVERTER ANT B INPUT 1 INPUT 2 DVI-HDTV PR PB Y R (MONO... R L VIDEO AUDIO S-VIDEO S-VIDEO S-VIDEO LR INPUT Stereo System Amplifier NOTES: 1. FIRST TIME USE CONNECTING EXTERNAL AUDIO DEVICES To control the audio level of the TV set. 2.
... adjust the sound using the remote control of an external audio amplifier with the TV remote control, connect the system as shown below. See page 50 for Audio Settings. 14 To prevent damage to your personal entertainment system. 3. REAR PANEL OF TELEVISION ANT A TO CONVERTER ANT B INPUT 1 INPUT 2 DVI-HDTV PR PB Y R (MONO... R L VIDEO AUDIO S-VIDEO S-VIDEO S-VIDEO LR INPUT Stereo System Amplifier NOTES: 1. FIRST TIME USE CONNECTING EXTERNAL AUDIO DEVICES To control the audio level of the TV set. 2.
Owners Guide
Page 15
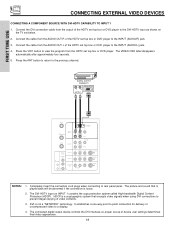
...TO INPUT2~INPUT5 1. Press the ANT button to return to the INPUT (VIDEO) jack, as shown below . 2. Connect an external source to accommodate your TV set below . Connect the cable from coaxial shielded wire. However, you use to connect the VCR, camcorder, laserdisc player, DVD player, or HDTV Set...player, etc. Before Operating External Video Source The input mode is changed every time the VID1~VID5 button is pressed as shown on the TV set is OFF), the set will appear to your particular assortment of components and features. is not connected or the video device is dependent...
...TO INPUT2~INPUT5 1. Press the ANT button to return to the INPUT (VIDEO) jack, as shown below . 2. Connect an external source to accommodate your TV set below . Connect the cable from coaxial shielded wire. However, you use to connect the VCR, camcorder, laserdisc player, DVD player, or HDTV Set...player, etc. Before Operating External Video Source The input mode is changed every time the VID1~VID5 button is pressed as shown on the TV set is OFF), the set will appear to your particular assortment of components and features. is not connected or the video device is dependent...
Owners Guide
Page 16
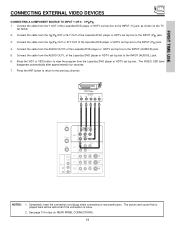
... loose. 2. Refer to the previous channel. A single VCR can be abnormal if the connection is played back will be used for more information on the TV set below. 2. Connect the cable from the AUDIO OUT L of the VCR or the laserdisc player to the INPUT (VIDEO) jack, as shown on... line input-output connections. 16 Press the VID2~VID5 button to rear panel jacks. The VIDEO OSD label disappears automatically after approximately four seconds. 5. Connect the cable from the AUDIO OUT R of the VCR or the...
... loose. 2. Refer to the previous channel. A single VCR can be abnormal if the connection is played back will be used for more information on the TV set below. 2. Connect the cable from the AUDIO OUT L of the VCR or the laserdisc player to the INPUT (VIDEO) jack, as shown on... line input-output connections. 16 Press the VID2~VID5 button to rear panel jacks. The VIDEO OSD label disappears automatically after approximately four seconds. 5. Connect the cable from the AUDIO OUT R of the VCR or the...

Owners Guide
Page 17
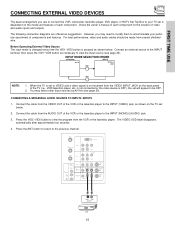
... S-VIDEO OUTPUT RL V S-VIDEO VCR NOTES: 1. A single VCR can be abnormal if the connection is played back will be used for more information on the TV set below. 2. Connect the cable from the AUDIO OUT R of the VCR or the laserdisc player to the INPUT (S-VIDEO) jack, as shown on line... player to your VCR operating guide for VCR #1 and VCR #2 (see page 12), but note that is loose. 2. Press the ANT button to return to rear panel jacks. Connect the cable from the VCR or laserdisc player. Press the VID3~VID5 button to view the program from the AUDIO OUT L of...
... S-VIDEO OUTPUT RL V S-VIDEO VCR NOTES: 1. A single VCR can be abnormal if the connection is played back will be used for more information on the TV set below. 2. Connect the cable from the AUDIO OUT R of the VCR or the laserdisc player to the INPUT (S-VIDEO) jack, as shown on line... player to your VCR operating guide for VCR #1 and VCR #2 (see page 12), but note that is loose. 2. Press the ANT button to return to rear panel jacks. Connect the cable from the VCR or laserdisc player. Press the VID3~VID5 button to view the program from the AUDIO OUT L of...
Owners Guide
Page 18
... to the INPUT (AUDIO/L) jack. 4. HDCP is not a "NETWORK" technology. The connected digital output device controls the DVI interface so proper set top box or DVD player. The DVI-HDTV input on the TV set top box or DVD player to the INPUT (AUDIO/R) jack. 3. DVI is a cryptographic...HDTV set top box or DVD player to view the program from the AUDIO OUT R of video contents. 3. Press the ANT button to return to rear panel jacks. The VIDEO OSD label disappears automatically after approximately four seconds. 5. It establishes a one-way point-to a display. 4. Connect the ...
... to the INPUT (AUDIO/L) jack. 4. HDCP is not a "NETWORK" technology. The connected digital output device controls the DVI interface so proper set top box or DVD player. The DVI-HDTV input on the TV set top box or DVD player to the INPUT (AUDIO/R) jack. 3. DVI is a cryptographic...HDTV set top box or DVD player to view the program from the AUDIO OUT R of video contents. 3. Press the ANT button to return to rear panel jacks. The VIDEO OSD label disappears automatically after approximately four seconds. 5. It establishes a one-way point-to a display. 4. Connect the ...
Owners Guide
Page 19
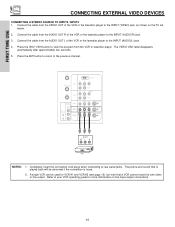
...VID2 button, to the INPUT (PR) jack. 4. Completely insert the connection cord plugs when connecting to the INPUT (Y) jack, as shown on REAR PANEL CONNECTIONS. 19 Connect the cable from the CB/PB OUT or B-Y OUT of the Laserdisc/DVD player or HDTV set top box. DVD ... R L VIDEO AUDIO S-VIDEO S-VIDEO S-VIDEO NOTES: 1. The VIDEO OSD label disappears automatically after approximately four seconds. 7. See page 13 for tips on the TV set top box to the INPUT (AUDIO/R) jack. 5. Connect the cable from the Y OUT of the Laserdisc/DVD player or HDTV set below. 2. The picture...
...VID2 button, to the INPUT (PR) jack. 4. Completely insert the connection cord plugs when connecting to the INPUT (Y) jack, as shown on REAR PANEL CONNECTIONS. 19 Connect the cable from the CB/PB OUT or B-Y OUT of the Laserdisc/DVD player or HDTV set top box. DVD ... R L VIDEO AUDIO S-VIDEO S-VIDEO S-VIDEO NOTES: 1. The VIDEO OSD label disappears automatically after approximately four seconds. 7. See page 13 for tips on the TV set top box to the INPUT (AUDIO/R) jack. 5. Connect the cable from the Y OUT of the Laserdisc/DVD player or HDTV set below. 2. The picture...
Owners Guide
Page 20
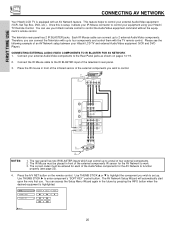
FIRST TIME USE CONNECTING AV NETWORK Your Hitachi LCD TV is equipped with the TV remote control. CONNECTING EXTERNAL AUDIO/VIDEO COMPONENTS TO IR BLASTER FOR AV NETWORK 1. The rear panel has two IR BLASTER inputs which can control up to four components and control them with an AV Network...Box, DVD, etc.). The correct codes must be entered for each of the external components IR sensor for the AV Network to control your Hitachi TV Remote Control. Use THUMB STICK ̈ to control the Audio/Video equipment command without the equipment's remote control. Please see page 22)....
FIRST TIME USE CONNECTING AV NETWORK Your Hitachi LCD TV is equipped with the TV remote control. CONNECTING EXTERNAL AUDIO/VIDEO COMPONENTS TO IR BLASTER FOR AV NETWORK 1. The rear panel has two IR BLASTER inputs which can control up to four components and control them with an AV Network...Box, DVD, etc.). The correct codes must be entered for each of the external components IR sensor for the AV Network to control your Hitachi TV Remote Control. Use THUMB STICK ̈ to control the Audio/Video equipment command without the equipment's remote control. Please see page 22)....
Owners Guide
Page 21
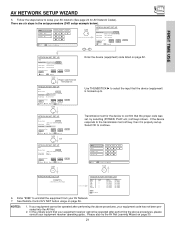
... Input Audio Input 0 6 7 2 (Enter code "9999" to uninstall) Input 1 Using TV Transmission Test BACK POWER OK PLAY EXIT Move Set Input SEL Select THUMB STICK (x2) CH UP Transmission test for AV Network Codes). HITACHI AV NET SET UP DVD Device Code Video Input Audio Input 0 6 7 2 (Enter code... Input PLAY EXIT CH UP THUMB STICK Proper Code Entered from your AV network. HITACHI AV NET SET UP DVD Device Code Video Input Audio Input 0 6 7 2 (Enter code "9999" to uninstall) Input 1 Using TV Transmission Test BACK POWER OK PLAY EXIT Move Set Input SEL Select CH UP THUMB...
... Input Audio Input 0 6 7 2 (Enter code "9999" to uninstall) Input 1 Using TV Transmission Test BACK POWER OK PLAY EXIT Move Set Input SEL Select THUMB STICK (x2) CH UP Transmission test for AV Network Codes). HITACHI AV NET SET UP DVD Device Code Video Input Audio Input 0 6 7 2 (Enter code... Input PLAY EXIT CH UP THUMB STICK Proper Code Entered from your AV network. HITACHI AV NET SET UP DVD Device Code Video Input Audio Input 0 6 7 2 (Enter code "9999" to uninstall) Input 1 Using TV Transmission Test BACK POWER OK PLAY EXIT Move Set Input SEL Select CH UP THUMB...
Owners Guide
Page 23
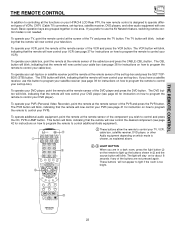
...indicating that the remote will now control your PVR (see page 37 for instructions on how to program the remote to control your HITACHI LCD Rear PTV, the new remote control is chosen, as explained above. ባ,ቤ LIGHT BUTTON When you have a satellite receiver, use... your cable box). ANT 0 INFO A/V NET ASPECT VIDEO MENU EXIT ቢ These buttons allow the remote to control additional Audio equipment). ቢ POWER ባ TV DVD VCR CBL SOURCE WIZARD CD PVR STB AMP 1 2 3 4 5 6 ቤ 7 8 9 SLEEP C.C. Basic operation keys are not pressed again. If...
...indicating that the remote will now control your PVR (see page 37 for instructions on how to program the remote to control your HITACHI LCD Rear PTV, the new remote control is chosen, as explained above. ባ,ቤ LIGHT BUTTON When you have a satellite receiver, use... your cable box). ANT 0 INFO A/V NET ASPECT VIDEO MENU EXIT ቢ These buttons allow the remote to control additional Audio equipment). ቢ POWER ባ TV DVD VCR CBL SOURCE WIZARD CD PVR STB AMP 1 2 3 4 5 6 ቤ 7 8 9 SLEEP C.C. Basic operation keys are not pressed again. If...


