
Owners Guide
Page 1
LCD REAR PROJECTION TELEVISION 50V500 60V500A OPERATING GUIDE IMPORTANT SAFETY INSTRUCTIONS 2-3 FIRST TIME USE THE REMOTE CONTROL 4-22 Page 7 updated 01/09/04 23-43 Video Audio Aspect Chan. has determined that this product meets the ENERGY STAR® guidelines for energy efficiency. Manager Locks Setup Move SEL Sel ON-SCREEN DISPLAY 44-68 USEFUL INFORMATION INDEX 69-80 As an ENERGY STAR® Partner, Hitachi, Ltd.
LCD REAR PROJECTION TELEVISION 50V500 60V500A OPERATING GUIDE IMPORTANT SAFETY INSTRUCTIONS 2-3 FIRST TIME USE THE REMOTE CONTROL 4-22 Page 7 updated 01/09/04 23-43 Video Audio Aspect Chan. has determined that this product meets the ENERGY STAR® guidelines for energy efficiency. Manager Locks Setup Move SEL Sel ON-SCREEN DISPLAY 44-68 USEFUL INFORMATION INDEX 69-80 As an ENERGY STAR® Partner, Hitachi, Ltd.

Owners Guide
Page 4
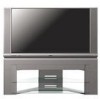
...50" LCD Rear PTV Stand H520445 SP50W 60" LCD Rear PTV Stand H520446 SP60W CUSTOM HITACHI TELEVISION STAND Excellent for use only with Hitachi 50V500. Use with other apparatus is capable of resulting in the battery compartment. HL01829). 2. Open the battery cover of the remote control...2. 3. Insert two new "AA" size batteries for use only with Hitachi 60V500. REMOTE CONTROL POWER TV DVD VCR CBL SOURCE WIZARD CD PVR STB AMP 1 2 3 4 5 6 7 8 9 SLEEP C.C. REMOTE CONTROL BATTERY INSTALLATION AND REPLACEMENT 1. Two IR Mouse Cables (Part No. EY01641...
...50" LCD Rear PTV Stand H520445 SP50W 60" LCD Rear PTV Stand H520446 SP60W CUSTOM HITACHI TELEVISION STAND Excellent for use only with Hitachi 50V500. Use with other apparatus is capable of resulting in the battery compartment. HL01829). 2. Open the battery cover of the remote control...2. 3. Insert two new "AA" size batteries for use only with Hitachi 60V500. REMOTE CONTROL POWER TV DVD VCR CBL SOURCE WIZARD CD PVR STB AMP 1 2 3 4 5 6 7 8 9 SLEEP C.C. REMOTE CONTROL BATTERY INSTALLATION AND REPLACEMENT 1. Two IR Mouse Cables (Part No. EY01641...
Owners Guide
Page 6
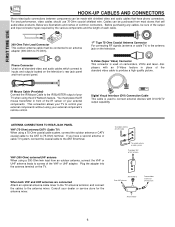
...is used on the television's rear jack panel and front control panel. You must be connected to an antenna adapter (300-Ohm to the antenna jack on the TV. Plug the adapter into the ...antenna terminal on the television. "F" Type 75-Ohm Coaxial Antenna Connector For connecting RF signals (antenna or cable TV) to 75-Ohm). Digital... your external component's remote control. disc players with DVI-HDTV output capability. If you have phono connectors.
...is used on the television's rear jack panel and front control panel. You must be connected to an antenna adapter (300-Ohm to the antenna jack on the TV. Plug the adapter into the ...antenna terminal on the television. "F" Type 75-Ohm Coaxial Antenna Connector For connecting RF signals (antenna or cable TV) to 75-Ohm). Digital... your external component's remote control. disc players with DVI-HDTV output capability. If you have phono connectors.
Owners Guide
Page 7
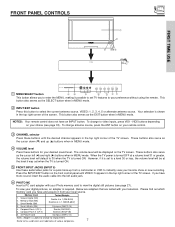
...appears in the top right corner of various companies. 7 To change antenna source, press the ANT button on the TV screen. Press the INPUT/EXIT button on your remote control. ቤ CHANNEL selector Press these buttons for improvement. Please find out which memory card you have an INPUT button... Flash I (CF I) 5. This button also serves as the cursor left audio jack. ቧ PHOTO MC Insert a PC card adapter with your digital pictures, an adapter is turned ON. Smart Media (SM) 4. To view your television. These buttons also serve as the SELECT button when in MENU...
...appears in the top right corner of various companies. 7 To change antenna source, press the ANT button on the TV screen. Press the INPUT/EXIT button on your remote control. ቤ CHANNEL selector Press these buttons for improvement. Please find out which memory card you have an INPUT button... Flash I (CF I) 5. This button also serves as the cursor left audio jack. ቧ PHOTO MC Insert a PC card adapter with your digital pictures, an adapter is turned ON. Smart Media (SM) 4. To view your television. These buttons also serve as the SELECT button when in MENU...
Owners Guide
Page 8
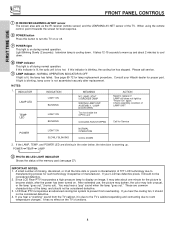
...status of the TV. You may look unusual, or the lamp "goes out," (burns out). LCD Rear PTV incorporates an advanced cooling fan system to prevent from the TV cabinet, it... pixels, it may take about 2 minutes to manufacturing process for proper part. If your Hitachi dealer for such technology irrespective of the lamp, and should not be considered defective. 3. ...this indicator is lit, the optic unit is on during normal operation. NOTES: 1. When using the remote control, point it should not be considered defective. 4. NORMAL OPERATION INDICATOR IS OFF If light is cooling ...
...status of the TV. You may look unusual, or the lamp "goes out," (burns out). LCD Rear PTV incorporates an advanced cooling fan system to prevent from the TV cabinet, it... pixels, it may take about 2 minutes to manufacturing process for proper part. If your Hitachi dealer for such technology irrespective of the lamp, and should not be considered defective. 3. ...this indicator is lit, the optic unit is on during normal operation. NOTES: 1. When using the remote control, point it should not be considered defective. 4. NORMAL OPERATION INDICATOR IS OFF If light is cooling ...
Owners Guide
Page 11
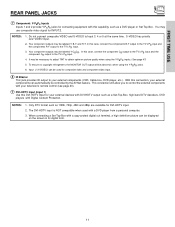
... can be labeled Y-CBCR. The DVI-HDTV input is NOT compatible when used for INPUT:2. Do not connect composite VIDEO and S-VIDEO to the TV's PR input. 3. Only DTV format such as a DVD player or Set Top Box. You may be used with a DVD player from a... players with Digital Content Protection. S-VIDEO has priority over VIDEO input. 2. FIRST TIME USE REAR PANEL JACKS ቨ Component: Y-PBPR Inputs Inputs 1 and 2 provide Y-PBPR jacks for connecting equipment with this capability, such as 1080i, 720p, 480i and 480p are available for your television's remote control (see page...
... can be labeled Y-CBCR. The DVI-HDTV input is NOT compatible when used for INPUT:2. Do not connect composite VIDEO and S-VIDEO to the TV's PR input. 3. Only DTV format such as a DVD player or Set Top Box. You may be used with a DVD player from a... players with Digital Content Protection. S-VIDEO has priority over VIDEO input. 2. FIRST TIME USE REAR PANEL JACKS ቨ Component: Y-PBPR Inputs Inputs 1 and 2 provide Y-PBPR jacks for connecting equipment with this capability, such as 1080i, 720p, 480i and 480p are available for your television's remote control (see page...
Owners Guide
Page 14
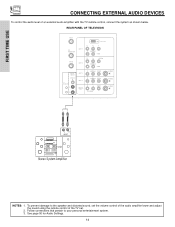
To prevent damage to your personal entertainment system. 3. See page 50 for Audio Settings. 14 FIRST TIME USE CONNECTING EXTERNAL AUDIO DEVICES To control the audio level of the TV set. 2. REAR PANEL OF TELEVISION ANT A TO CONVERTER ANT B INPUT 1 INPUT 2 DVI-HDTV PR PB Y R (MONO)/L... Stereo System Amplifier NOTES: 1. Follow connections that pertain to the speaker and distorted sound, set the volume control of the audio amplifier lower and adjust the sound using the remote control of an external audio amplifier with the TV remote control, connect the system as shown below.
To prevent damage to your personal entertainment system. 3. See page 50 for Audio Settings. 14 FIRST TIME USE CONNECTING EXTERNAL AUDIO DEVICES To control the audio level of the TV set. 2. REAR PANEL OF TELEVISION ANT A TO CONVERTER ANT B INPUT 1 INPUT 2 DVI-HDTV PR PB Y R (MONO)/L... Stereo System Amplifier NOTES: 1. Follow connections that pertain to the speaker and distorted sound, set the volume control of the audio amplifier lower and adjust the sound using the remote control of an external audio amplifier with the TV remote control, connect the system as shown below.
Owners Guide
Page 20
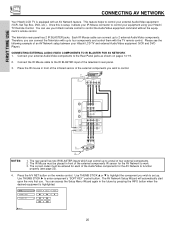
...Box, DVD, etc.). Connect your external Audio/Video components to the Rear Panel jacks as shown on the remote control. You can use . This feature helps to work. 3. Therefore, you wish to control. Use THUMB STICK ̆ or ̄ to highlight the ...your Hitachi remote control to control the Audio/Video equipment command without the equipment's remote control. FIRST TIME USE CONNECTING AV NETWORK Your Hitachi LCD TV is setup, it allows your IR Mouse connector to control your equipment using your Hitachi TV Remote Control. Once this is equipped with the TV remote control. ...
...Box, DVD, etc.). Connect your external Audio/Video components to the Rear Panel jacks as shown on the remote control. You can use . This feature helps to work. 3. Therefore, you wish to control. Use THUMB STICK ̆ or ̄ to highlight the ...your Hitachi remote control to control the Audio/Video equipment command without the equipment's remote control. FIRST TIME USE CONNECTING AV NETWORK Your Hitachi LCD TV is setup, it allows your IR Mouse connector to control your equipment using your Hitachi TV Remote Control. Once this is equipped with the TV remote control. ...
Owners Guide
Page 21
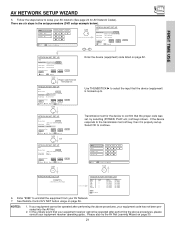
HITACHI AV NET SET UP DVD Device Code Video Input Audio Input 0 6 7 2 (Enter code "9999" to continue. See Remote Control A/V NET button usage on page 30. 21 NOTES: 1. Please also try the AV Net Learning Wizard on page 26. In the unlikely event that your ... DVD Device Code Video Input Audio Input 0 6 7 2 (Enter code "9999" to select the input that the proper code was set up to uninstall) Input 1 Using TV Transmission Test BACK POWER OK PLAY EXIT Move Set Input SEL Select THUMB STICK (x2) CH UP Transmission test for AV Network Codes). Use THUMBSTICK...
HITACHI AV NET SET UP DVD Device Code Video Input Audio Input 0 6 7 2 (Enter code "9999" to continue. See Remote Control A/V NET button usage on page 30. 21 NOTES: 1. Please also try the AV Net Learning Wizard on page 26. In the unlikely event that your ... DVD Device Code Video Input Audio Input 0 6 7 2 (Enter code "9999" to select the input that the proper code was set up to uninstall) Input 1 Using TV Transmission Test BACK POWER OK PLAY EXIT Move Set Input SEL Select THUMB STICK (x2) CH UP Transmission test for AV Network Codes). Use THUMBSTICK...
Owners Guide
Page 23
... to operate different types of VCRs, CATV (Cable TV) converters, set -top-box). The DVD button will blink, indicating that the remote will not appear to light if the room is not needed. To operate your HITACHI LCD Rear PTV, the new remote control is chosen, as explained above. ባ,ቤ ...LIGHT BUTTON When you wish to control and press the CD, PVR or AMP button. This button will blink, indicating that the remote will now control your DVD player (see page ...
... to operate different types of VCRs, CATV (Cable TV) converters, set -top-box). The DVD button will blink, indicating that the remote will not appear to light if the room is not needed. To operate your HITACHI LCD Rear PTV, the new remote control is chosen, as explained above. ባ,ቤ ...LIGHT BUTTON When you wish to control and press the CD, PVR or AMP button. This button will blink, indicating that the remote will now control your DVD player (see page ...

Owners Guide
Page 24
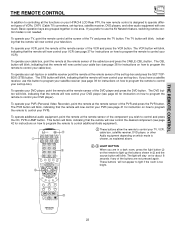
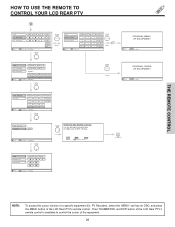
..., use this button to turn the TV set on or off when the remote is in TV mode (see page 23 for instructions on how to set the remote control to TV mode). ባ TV button When the TV button is pressed, it will blink, to indicate the remote is in TV mode. ቤ VCR button When ... receiver (see page 39). ቧ DVD button When the DVD button is pressed, it will blink to indicate the remote is in STB mode (see page 40). 24 HOW TO USE THE REMOTE TO CONTROL YOUR LCD REAR PTV ቶ 23 POWER TV DVD VCR CBL SOURCE WIZARD CD PVR STB AMP 1 2 3 4 5 6 7 8 9 SLEEP C.C.
..., use this button to turn the TV set on or off when the remote is in TV mode (see page 23 for instructions on how to set the remote control to TV mode). ባ TV button When the TV button is pressed, it will blink, to indicate the remote is in TV mode. ቤ VCR button When ... receiver (see page 39). ቧ DVD button When the DVD button is pressed, it will blink to indicate the remote is in STB mode (see page 40). 24 HOW TO USE THE REMOTE TO CONTROL YOUR LCD REAR PTV ቶ 23 POWER TV DVD VCR CBL SOURCE WIZARD CD PVR STB AMP 1 2 3 4 5 6 7 8 9 SLEEP C.C.

Owners Guide
Page 25
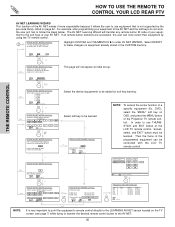
...the TV to tune. Channel selection may not receive some channels if you are used when the remote control is in Set-Top-Box (STB) mode. ቭ INFO button Press this button when you wish to tune then wait a few seconds for channels 1 to 9, or simply press the single digit ... and (-) DASH button Press this button to quickly turn the Closed Caption feature on your TV, then enter the remaining two numbers using the number buttons. THE REMOTE CONTROL HOW TO USE THE REMOTE TO CONTROL YOUR LCD REAR PTV ቨ PVR (Personal Video Recorder) button When pressed, this button will blink to...
...the TV to tune. Channel selection may not receive some channels if you are used when the remote control is in Set-Top-Box (STB) mode. ቭ INFO button Press this button when you wish to tune then wait a few seconds for channels 1 to 9, or simply press the single digit ... and (-) DASH button Press this button to quickly turn the Closed Caption feature on your TV, then enter the remaining two numbers using the number buttons. THE REMOTE CONTROL HOW TO USE THE REMOTE TO CONTROL YOUR LCD REAR PTV ቨ PVR (Personal Video Recorder) button When pressed, this button will blink to...
Owners Guide
Page 26
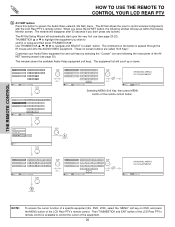
...button of the AV NET learning wizard (see page 20-22). When you press the AV NET button, the following the instructions of the LCD Rear PTV's remote control. The command on the button is available to select button. VCR PV Recorder AV Receiver POWER CH ̄ CH ̆ MENU THUMB STICK... Move AV NET Return NOTE: To access the cursor function of the remote control button. DVD Cable Box Photo MC ACCESS Move THUMB STICK THUMB STICK A See Page 27 VCR PV Recorder AV Receiver POWER CH ̄ CH ̆ MENU TV/VCR b MORE.. The AV Net allows the user to access the...
...button of the AV NET learning wizard (see page 20-22). When you press the AV NET button, the following the instructions of the LCD Rear PTV's remote control. The command on the button is available to select button. VCR PV Recorder AV Receiver POWER CH ̄ CH ̆ MENU THUMB STICK... Move AV NET Return NOTE: To access the cursor function of the remote control button. DVD Cable Box Photo MC ACCESS Move THUMB STICK THUMB STICK A See Page 27 VCR PV Recorder AV Receiver POWER CH ̄ CH ̆ MENU TV/VCR b MORE.. The AV Net allows the user to access the...
Owners Guide
Page 27
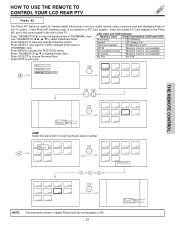
... Cable Box Photo MC ACCESS A THUMB STICK 1/10 5/10 2/10 6/10 3/10 7/10 4/10 8/10 9/10 10/10 THUMB THUMB STICK STICK SELECT THE REMOTE CONTROL MENU THUMB STICK SELECT No. 7/10 03/04/03 1632x1232 Picture No. Date Resolution 1/10 5/10 2/10 6/10 3/10 7/10 4/10 8/10 9/10 10... once again to switch enlarged photo back to be displayed is useful for viewing digital still pictures from your digital camera using a memory card and displaying them on the TV screen. HOW TO USE THE REMOTE TO CONTROL YOUR LCD REAR PTV Photo MC The Photo MC feature is 500. 27 No. 7/10 03...
... Cable Box Photo MC ACCESS A THUMB STICK 1/10 5/10 2/10 6/10 3/10 7/10 4/10 8/10 9/10 10/10 THUMB THUMB STICK STICK SELECT THE REMOTE CONTROL MENU THUMB STICK SELECT No. 7/10 03/04/03 1632x1232 Picture No. Date Resolution 1/10 5/10 2/10 6/10 3/10 7/10 4/10 8/10 9/10 10... once again to switch enlarged photo back to be displayed is useful for viewing digital still pictures from your digital camera using a memory card and displaying them on the TV screen. HOW TO USE THE REMOTE TO CONTROL YOUR LCD REAR PTV Photo MC The Photo MC feature is 500. 27 No. 7/10 03...
Owners Guide
Page 28
...be first placed on a main directory with a "dcim" file name format. 2. This TV set displays only digital pictures from the three mentioned choices. THE REMOTE CONTROL HOW TO USE THE REMOTE TO CONTROL YOUR LCD REAR PTV SLIDESHOW Select this menu item to rotate selected photos either clockwise (THUMBSTICK ̈) and...System). 3. After 30 seconds, the slideshow will change interval time from VGA (640 x 480) up to change interval time from digital cameras which meet DCF Standard. Press EXIT to highlight Slideshow item. Photo file names modified on a computer should be displayed on a...
...be first placed on a main directory with a "dcim" file name format. 2. This TV set displays only digital pictures from the three mentioned choices. THE REMOTE CONTROL HOW TO USE THE REMOTE TO CONTROL YOUR LCD REAR PTV SLIDESHOW Select this menu item to rotate selected photos either clockwise (THUMBSTICK ̈) and...System). 3. After 30 seconds, the slideshow will change interval time from VGA (640 x 480) up to change interval time from digital cameras which meet DCF Standard. Press EXIT to highlight Slideshow item. Photo file names modified on a computer should be displayed on a...
Owners Guide
Page 29
...REMOTE CONTROL HOW TO USE THE REMOTE TO CONTROL YOUR LCD REAR PTV B VCR PV Recorder AV Receiver POWER CH ̆ Move INFO Device Setting CH ̄ MENU TV/VCR b INFO GUIDE MORE.. VCR PV Recorder AV Receiver POWER CH ̄ CH ̆ MENU THUMB STICK 1 2 3 TV...INFO Device Setting NOTE: To access the cursor function of the LCD Rear PTV's remote control. MORE Move SEL Select VCR POWER CH ̆ CH ̄... CH ̄ 3 6 9 - Then THUMBSTICK and EXIT button of the LCD Rear PTV's remote control is available to manually learn or modify your AV NET soft keys. MENU INFO GUIDE...
...REMOTE CONTROL HOW TO USE THE REMOTE TO CONTROL YOUR LCD REAR PTV B VCR PV Recorder AV Receiver POWER CH ̆ Move INFO Device Setting CH ̄ MENU TV/VCR b INFO GUIDE MORE.. VCR PV Recorder AV Receiver POWER CH ̄ CH ̆ MENU THUMB STICK 1 2 3 TV...INFO Device Setting NOTE: To access the cursor function of the LCD Rear PTV's remote control. MORE Move SEL Select VCR POWER CH ̆ CH ̄... CH ̄ 3 6 9 - Then THUMBSTICK and EXIT button of the LCD Rear PTV's remote control is available to manually learn or modify your AV NET soft keys. MENU INFO GUIDE...
Owners Guide
Page 30
... (equipment) to be controlled with the LCD TV remote control. Yes HITACHI AV NET WIZARD (Learning) No Transfer not completed! Then the menu of the programmed equipment can now control their equipment by the pre-code library, listed on OSD, and press the MENU button of the Projection TV remote control. BACK Move OK SEL...EXIT SEL Select NOTE: BACK It is not supported by using the TV remote control. Try again? DVD), select the "MENU" soft key on page 22. HOW TO USE THE REMOTE TO CONTROL YOUR LCD REAR PTV THE REMOTE CONTROL AV NET LEARNING WIZARD This function of the AV NET makes it ...
... (equipment) to be controlled with the LCD TV remote control. Yes HITACHI AV NET WIZARD (Learning) No Transfer not completed! Then the menu of the programmed equipment can now control their equipment by the pre-code library, listed on OSD, and press the MENU button of the Projection TV remote control. BACK Move OK SEL...EXIT SEL Select NOTE: BACK It is not supported by using the TV remote control. Try again? DVD), select the "MENU" soft key on page 22. HOW TO USE THE REMOTE TO CONTROL YOUR LCD REAR PTV THE REMOTE CONTROL AV NET LEARNING WIZARD This function of the AV NET makes it ...
Owners Guide
Page 31
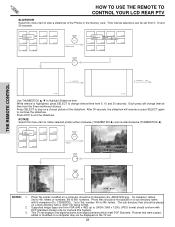
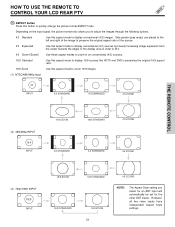
HOW TO USE THE REMOTE TO CONTROL YOUR LCD REAR PTV ቱ ASPECT button Press this aspect mode to zoom 16:9 images. (1) NTSC/480i/480p Input 4:3 INPUT 4:3 STANDARD 4:3 EXPANDED 4:3 ZOOM1 THE REMOTE CONTROL (2) 480i/480p INPUT 16:9 INPUT 16:9 ZOOM 16:9 STANDARD 4:3 ZOOM2 4:3 STANDARD 4:3 EXPANDED 4:3 ZOOM1 (3) 720p/1080i INPUT 16:9 INPUT 16:9 ZOOM 16:9 STANDARD 16...
HOW TO USE THE REMOTE TO CONTROL YOUR LCD REAR PTV ቱ ASPECT button Press this aspect mode to zoom 16:9 images. (1) NTSC/480i/480p Input 4:3 INPUT 4:3 STANDARD 4:3 EXPANDED 4:3 ZOOM1 THE REMOTE CONTROL (2) 480i/480p INPUT 16:9 INPUT 16:9 ZOOM 16:9 STANDARD 4:3 ZOOM2 4:3 STANDARD 4:3 EXPANDED 4:3 ZOOM1 (3) 720p/1080i INPUT 16:9 INPUT 16:9 ZOOM 16:9 STANDARD 16...
Owners Guide
Page 32
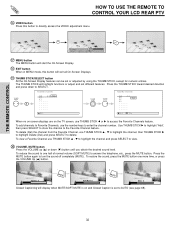
THE REMOTE CONTROL HOW TO USE THE REMOTE TO CONTROL YOUR LCD REAR PTV ቲ VIDEO button Press this button will highlight functions or adjust and set to AUTO (see page 68). 32 The THUMB STICK will exit ... When in MENU mode, this button to delete. Del Move SEL Tune When no on-screen displays are on and Closed Caption is on the TV screen, use THUMB STICK ̆ , ̄ to highlight the channel and press SELECT to access the Favorite Channels feature. To add channels to Favorite Channels...
THE REMOTE CONTROL HOW TO USE THE REMOTE TO CONTROL YOUR LCD REAR PTV ቲ VIDEO button Press this button will highlight functions or adjust and set to AUTO (see page 68). 32 The THUMB STICK will exit ... When in MENU mode, this button to delete. Del Move SEL Tune When no on-screen displays are on and Closed Caption is on the TV screen, use THUMB STICK ̆ , ̄ to highlight the channel and press SELECT to access the Favorite Channels feature. To add channels to Favorite Channels...
Owners Guide
Page 33
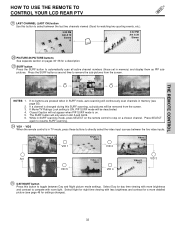
...time viewing with less brightness and contrast for a more brightness and contrast to toggle between Day and Night picture mode settings. If Movie/TV Ratings Lock setting is on. The SURF button will be deactivated. Select Day for day time viewing with room light. Stereo ST/...time to directly select the video input sources between the five video inputs. SURF SURF NOTES: 1. 2. 3. 4. 5. 6. THE REMOTE CONTROL HOW TO USE THE REMOTE TO CONTROL YOUR LCD REAR PTV 1 LAST CHANNEL (LAST CH) button Use this button to select between the last two channels viewed (Good for watching two ...
...time viewing with less brightness and contrast for a more brightness and contrast to toggle between Day and Night picture mode settings. If Movie/TV Ratings Lock setting is on. The SURF button will be deactivated. Select Day for day time viewing with room light. Stereo ST/...time to directly select the video input sources between the five video inputs. SURF SURF NOTES: 1. 2. 3. 4. 5. 6. THE REMOTE CONTROL HOW TO USE THE REMOTE TO CONTROL YOUR LCD REAR PTV 1 LAST CHANNEL (LAST CH) button Use this button to select between the last two channels viewed (Good for watching two ...


