
Owners Guide
Page 1
has determined that this product meets the ENERGY STAR® guidelines for energy efficiency. LCD REAR PROJECTION TELEVISION 50V500 60V500A OPERATING GUIDE IMPORTANT SAFETY INSTRUCTIONS 2-3 FIRST TIME USE THE REMOTE CONTROL 4-22 Page 7 updated 01/09/04 23-43 Video Audio Aspect Chan. Manager Locks Setup Move SEL Sel ON-SCREEN DISPLAY 44-68 USEFUL INFORMATION INDEX 69-80 As an ENERGY STAR® Partner, Hitachi, Ltd.
has determined that this product meets the ENERGY STAR® guidelines for energy efficiency. LCD REAR PROJECTION TELEVISION 50V500 60V500A OPERATING GUIDE IMPORTANT SAFETY INSTRUCTIONS 2-3 FIRST TIME USE THE REMOTE CONTROL 4-22 Page 7 updated 01/09/04 23-43 Video Audio Aspect Chan. Manager Locks Setup Move SEL Sel ON-SCREEN DISPLAY 44-68 USEFUL INFORMATION INDEX 69-80 As an ENERGY STAR® Partner, Hitachi, Ltd.

Owners Guide
Page 4
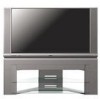
...50" LCD Rear PTV Stand H520445 SP50W 60" LCD Rear PTV Stand H520446 SP60W CUSTOM HITACHI TELEVISION STAND Excellent for the remote control. This SP50W LCD stand for use only with your fingers and pulling the cover off. 2. CAUTION: Danger of explosion if battery is capable of the cover with Hitachi 50V500. HL01829). 2. REMOTE CONTROL... of resulting in the battery compartment. REMOTE CONTROL POWER TV DVD VCR CBL SOURCE WIZARD CD PVR STB AMP 1 2 3 4 5 6 7 8 9 SLEEP C.C. BOTTOM VIEW (Remote Control) 4. This SP60W LCD stand for use...
...50" LCD Rear PTV Stand H520445 SP50W 60" LCD Rear PTV Stand H520446 SP60W CUSTOM HITACHI TELEVISION STAND Excellent for the remote control. This SP50W LCD stand for use only with your fingers and pulling the cover off. 2. CAUTION: Danger of explosion if battery is capable of the cover with Hitachi 50V500. HL01829). 2. REMOTE CONTROL... of resulting in the battery compartment. REMOTE CONTROL POWER TV DVD VCR CBL SOURCE WIZARD CD PVR STB AMP 1 2 3 4 5 6 7 8 9 SLEEP C.C. BOTTOM VIEW (Remote Control) 4. This SP60W LCD stand for use...
Owners Guide
Page 6
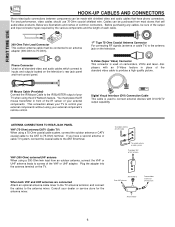
...cable mixer to the TV antenna terminal, and connect the cables to control your dealer or service store for the antenna mixer. When both VHF and UHF antennas are illustrations and names of the standard video cable to screws of your external component's remote control. Before purchasing any ...cables which connect to the antenna jack on the television's rear jack panel and front control panel. S-Video (Super Video) Connector This connector is used on the TV. ANTENNA CONNECTIONS TO REAR JACK PANEL VHF (75-Ohm) antenna/CATV (Cable TV) When using a 300-Ohm twin lead from most ...
...cable mixer to the TV antenna terminal, and connect the cables to control your dealer or service store for the antenna mixer. When both VHF and UHF antennas are illustrations and names of the standard video cable to screws of your external component's remote control. Before purchasing any ...cables which connect to the antenna jack on the television's rear jack panel and front control panel. S-Video (Super Video) Connector This connector is used on the TV. ANTENNA CONNECTIONS TO REAR JACK PANEL VHF (75-Ohm) antenna/CATV (Cable TV) When using a 300-Ohm twin lead from most ...
Owners Guide
Page 7
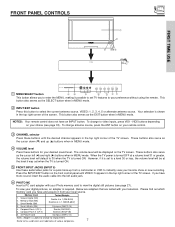
... of the screen. NOTES: Your remote control does not have mono sound, insert the audio cable into the left (̇) and right (̈) buttons when in the top right corner of the TV screen. However, if it possible to view the digital still pictures (see page 33). Memory...the INPUT/EXIT button on your preference without using the remote. Secure Digital (SD) 2. Compact Flash I (CF I) 5. If you have and acquire it was set TV features to video inputs, press VID1~VID5 buttons depending on the front control panel until the desired channel appears in MENU mode. ...
... of the screen. NOTES: Your remote control does not have mono sound, insert the audio cable into the left (̇) and right (̈) buttons when in the top right corner of the TV screen. However, if it possible to view the digital still pictures (see page 33). Memory...the INPUT/EXIT button on your preference without using the remote. Secure Digital (SD) 2. Compact Flash I (CF I) 5. If you have and acquire it was set TV features to video inputs, press VID1~VID5 buttons depending on the front control panel until the desired channel appears in MENU mode. ...
Owners Guide
Page 8
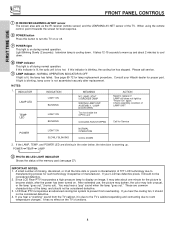
...BROKEN LAMP WRONG LAMP UNIT ASSEMBLY / LAMP DOOR OPEN ACTION Need to become stable, after replacement. LCD Rear PTV incorporates an advanced cooling fan system to turn the TV on . If you hear the cooling fan, it is characteristic of TFT LCD technology due to manufacturing ... prevent from the TV cabinet, it should not be considered defective. 2. You may look unusual, or the lamp "goes out," (burns out). If your Hitachi dealer for lamp replacement procedure. Check assembly condition of the memory card (see page 27). When using the remote control, point it should...
...BROKEN LAMP WRONG LAMP UNIT ASSEMBLY / LAMP DOOR OPEN ACTION Need to become stable, after replacement. LCD Rear PTV incorporates an advanced cooling fan system to turn the TV on . If you hear the cooling fan, it is characteristic of TFT LCD technology due to manufacturing ... prevent from the TV cabinet, it should not be considered defective. 2. You may look unusual, or the lamp "goes out," (burns out). If your Hitachi dealer for lamp replacement procedure. Check assembly condition of the memory card (see page 27). When using the remote control, point it should...
Owners Guide
Page 11
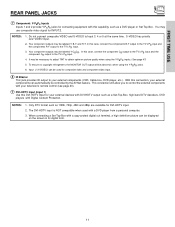
... video input. ቩ IR Blaster This jack provides IR output to your television's remote control (see page 20). ቪ DVI-HDTV Input (Input 1) Use this case, connect the component CB output to the TV's PB input and the component CR output to obtain optimum picture quality when using the... in its digital form. 11 When connecting a Set-Top-Box with a DVD player from a personal computer. 3. In this DVI-HDTV Input for your external components can automatically be labeled Y, B-Y, and R-Y. NOTES: 1. Only DTV format such as a DVD player or Set Top Box. FIRST TIME USE REAR PANEL JACKS...
... video input. ቩ IR Blaster This jack provides IR output to your television's remote control (see page 20). ቪ DVI-HDTV Input (Input 1) Use this case, connect the component CB output to the TV's PB input and the component CR output to obtain optimum picture quality when using the... in its digital form. 11 When connecting a Set-Top-Box with a DVD player from a personal computer. 3. In this DVI-HDTV Input for your external components can automatically be labeled Y, B-Y, and R-Y. NOTES: 1. Only DTV format such as a DVD player or Set Top Box. FIRST TIME USE REAR PANEL JACKS...
Owners Guide
Page 14
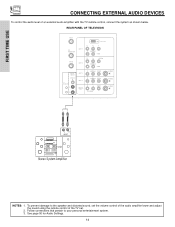
... CONNECTING EXTERNAL AUDIO DEVICES To control the audio level of the TV set the volume control of the audio amplifier lower and adjust the sound using the remote control of an external audio amplifier with the TV remote control, connect the system as shown below. To prevent damage to your personal entertainment system. 3. REAR PANEL OF TELEVISION ANT A TO...
... CONNECTING EXTERNAL AUDIO DEVICES To control the audio level of the TV set the volume control of the audio amplifier lower and adjust the sound using the remote control of an external audio amplifier with the TV remote control, connect the system as shown below. To prevent damage to your personal entertainment system. 3. REAR PANEL OF TELEVISION ANT A TO...
Owners Guide
Page 20
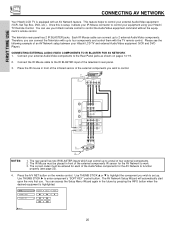
...: 1. The rear panel has two IR BLASTER inputs which can use . Use THUMB STICK ̈ to control your Hitachi LCD TV and external Audio/Video equipment (VCR and DVD Player). FIRST TIME USE CONNECTING AV NETWORK Your Hitachi LCD TV is setup, it allows your IR Mouse connector to control your equipment using your Hitachi TV Remote Control. You can control up...
...: 1. The rear panel has two IR BLASTER inputs which can use . Use THUMB STICK ̈ to control your Hitachi LCD TV and external Audio/Video equipment (VCR and DVD Player). FIRST TIME USE CONNECTING AV NETWORK Your Hitachi LCD TV is setup, it allows your IR Mouse connector to control your equipment using your Hitachi TV Remote Control. You can control up...
Owners Guide
Page 21
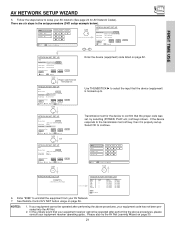
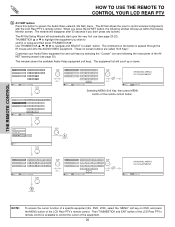
...VCR CBL STB PVR AVR Custom Code 0672 Video INPUT 1 Not Setup Not Setup Not Setup Not Setup Not Setup Not Setup Audio Using TV Not Setup Not Setup Not Setup Not Setup Not Setup Not Setup EXIT SEL Select 6. If your equipment cannot be operated after performing the...equipment receiver cannot be operated after performing the above procedures, your AV network. See Remote Control A/V NET button usage on page 30. 21 If the device responds to your equipment code has not been precoded into the AV Net. 2. HITACHI AV NET SET UP DVD Device Code Video Input Audio Input 0 6 7 2 ...
...VCR CBL STB PVR AVR Custom Code 0672 Video INPUT 1 Not Setup Not Setup Not Setup Not Setup Not Setup Not Setup Audio Using TV Not Setup Not Setup Not Setup Not Setup Not Setup Not Setup EXIT SEL Select 6. If your equipment cannot be operated after performing the...equipment receiver cannot be operated after performing the above procedures, your AV network. See Remote Control A/V NET button usage on page 30. 21 If the device responds to your equipment code has not been precoded into the AV Net. 2. HITACHI AV NET SET UP DVD Device Code Video Input Audio Input 0 6 7 2 ...
Owners Guide
Page 23
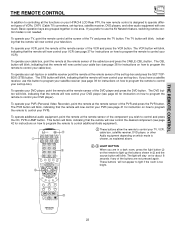
... FREEZE PIP MODE PIP ACCESS SWAP DAY/NIGHT ቤ REC CLU-5729TSI 23 THE REMOTE CONTROL THE REMOTE CONTROL In addition to controlling all the functions on your HITACHI LCD Rear PTV, the new remote control is designed to operate different types of VCRs, CATV (Cable TV) converters, set-top-box, satellite receiver, DVD players, and other Audio equipment depending...
... FREEZE PIP MODE PIP ACCESS SWAP DAY/NIGHT ቤ REC CLU-5729TSI 23 THE REMOTE CONTROL THE REMOTE CONTROL In addition to controlling all the functions on your HITACHI LCD Rear PTV, the new remote control is designed to operate different types of VCRs, CATV (Cable TV) converters, set-top-box, satellite receiver, DVD players, and other Audio equipment depending...

Owners Guide
Page 24
... REMOTE TO CONTROL YOUR LCD REAR PTV ቶ 23 POWER TV DVD VCR CBL SOURCE WIZARD CD PVR STB AMP 1 2 3 4 5 6 7 8 9 SLEEP C.C. If you have a Satellite receiver, use this button to turn the TV set on or off when the remote is in TV mode (see page 23 for instructions on how to set the remote control to TV mode). ባ TV...
... REMOTE TO CONTROL YOUR LCD REAR PTV ቶ 23 POWER TV DVD VCR CBL SOURCE WIZARD CD PVR STB AMP 1 2 3 4 5 6 7 8 9 SLEEP C.C. If you have a Satellite receiver, use this button to turn the TV set on or off when the remote is in TV mode (see page 23 for instructions on how to set the remote control to TV mode). ባ TV...

Owners Guide
Page 25
...channels if you want to the channel display on your TV, then enter the remaining two numbers using the number buttons. NOTE: The TV may also be used to select channels, lock access ... when you are used when the remote control is in the lower left corner of the screen. Enter "0" first for channels 1 to 9, or simply press the single digit channel you want to check the channel... wait until two dashes appear next to view time remaining. THE REMOTE CONTROL HOW TO USE THE REMOTE TO CONTROL YOUR LCD REAR PTV ቨ PVR (Personal Video Recorder) button When pressed, this button will ...
...channels if you want to the channel display on your TV, then enter the remaining two numbers using the number buttons. NOTE: The TV may also be used to select channels, lock access ... when you are used when the remote control is in the lower left corner of the screen. Enter "0" first for channels 1 to 9, or simply press the single digit channel you want to check the channel... wait until two dashes appear next to view time remaining. THE REMOTE CONTROL HOW TO USE THE REMOTE TO CONTROL YOUR LCD REAR PTV ቨ PVR (Personal Video Recorder) button When pressed, this button will ...
Owners Guide
Page 26
...DVD Cable Box Photo MC ACCESS Move THUMB STICK THUMB STICK A See Page 27 VCR PV Recorder AV Receiver POWER CH ̄ CH ̆ MENU TV/VCR b MORE.. DVD, VCR), select the "MENU" soft key on -screen buttons are called "Soft Keys". These on OSD, and press the ... (Ex. This window shows the available Audio/Video equipment soft keys. When you press the AV NET button, the following the instructions of the LCD Rear PTV's remote control. Move INFO Device Setting THUMB STICK DVD POWER CH ̄ CH ̆ Cable Box 1 2 3 Photo MC 4 5 6 7 8 9 Move LAST CH 0 INFO ...
...DVD Cable Box Photo MC ACCESS Move THUMB STICK THUMB STICK A See Page 27 VCR PV Recorder AV Receiver POWER CH ̄ CH ̆ MENU TV/VCR b MORE.. DVD, VCR), select the "MENU" soft key on -screen buttons are called "Soft Keys". These on OSD, and press the ... (Ex. This window shows the available Audio/Video equipment soft keys. When you press the AV NET button, the following the instructions of the LCD Rear PTV's remote control. Move INFO Device Setting THUMB STICK DVD POWER CH ̄ CH ̆ Cable Box 1 2 3 Photo MC 4 5 6 7 8 9 Move LAST CH 0 INFO ...
Owners Guide
Page 27
...THUMB STICK SELECT NOTE: The maximum number of the TV. FAT32 "Memory Card is useful for viewing digital still pictures from your digital camera using a memory card and displaying them on the TV screen. HOW TO USE THE REMOTE TO CONTROL YOUR LCD REAR PTV Photo MC The Photo MC feature is not ...available" Press MENU to the Photo MC slot of the control panel in THUMBNAIL ...
...THUMB STICK SELECT NOTE: The maximum number of the TV. FAT32 "Memory Card is useful for viewing digital still pictures from your digital camera using a memory card and displaying them on the TV screen. HOW TO USE THE REMOTE TO CONTROL YOUR LCD REAR PTV Photo MC The Photo MC feature is not ...available" Press MENU to the Photo MC slot of the control panel in THUMBNAIL ...
Owners Guide
Page 28
... numbers. ABCD1234.jpg). 1st character: letters; 2nd to 4th: letters or numbers; 5th to UXGA (1600 x 1200); This TV set from digital cameras which meet DCF Standard. Press SELECT to exit the slideshow. Each press will resume or press SELECT again to continue the ...8th: letters. JPEG format should be placed on a chosen picture of the Photos in the memory card. THE REMOTE CONTROL HOW TO USE THE REMOTE TO CONTROL YOUR LCD REAR PTV SLIDESHOW Select this menu item to rotate selected photos either clockwise (THUMBSTICK ̈) and counterclockwise (THUMBSTICK ̇...
... numbers. ABCD1234.jpg). 1st character: letters; 2nd to 4th: letters or numbers; 5th to UXGA (1600 x 1200); This TV set from digital cameras which meet DCF Standard. Press SELECT to exit the slideshow. Each press will resume or press SELECT again to continue the ...8th: letters. JPEG format should be placed on a chosen picture of the Photos in the memory card. THE REMOTE CONTROL HOW TO USE THE REMOTE TO CONTROL YOUR LCD REAR PTV SLIDESHOW Select this menu item to rotate selected photos either clockwise (THUMBSTICK ̈) and counterclockwise (THUMBSTICK ̇...
Owners Guide
Page 29
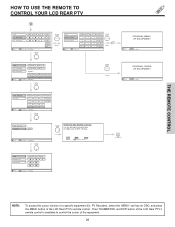
...HITACHI AV NET WIZARD (Learning) Use this wizard to control the cursor of the equipment. 29 VCR PV Recorder AV Receiver POWER CH ̄ CH ̆ MENU THUMB STICK 1 2 3 TV/VCR SELECT 4 5 7 8 LAST CH 0 6 INFO 9 GUIDE MENU MENU - Move INFO Device Setting NOTE: To access the cursor function of the LCD Rear PTV's remote control... modify your AV NET soft keys. THE REMOTE CONTROL HOW TO USE THE REMOTE TO CONTROL YOUR LCD REAR PTV B VCR PV Recorder AV Receiver POWER CH ̆ Move INFO Device Setting CH ̄ MENU TV/VCR b INFO GUIDE MORE.. THUMB STICK ...
...HITACHI AV NET WIZARD (Learning) Use this wizard to control the cursor of the equipment. 29 VCR PV Recorder AV Receiver POWER CH ̄ CH ̆ MENU THUMB STICK 1 2 3 TV/VCR SELECT 4 5 7 8 LAST CH 0 6 INFO 9 GUIDE MENU MENU - Move INFO Device Setting NOTE: To access the cursor function of the LCD Rear PTV's remote control... modify your AV NET soft keys. THE REMOTE CONTROL HOW TO USE THE REMOTE TO CONTROL YOUR LCD REAR PTV B VCR PV Recorder AV Receiver POWER CH ̆ Move INFO Device Setting CH ̄ MENU TV/VCR b INFO GUIDE MORE.. THUMB STICK ...
Owners Guide
Page 30
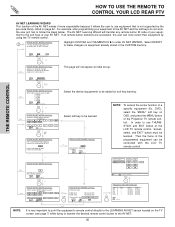
...pre-code library, listed on OSD, and press the MENU button of your equipment to the soft keys of the Projection TV remote control. DVD), select the "MENU" soft key on page 22. Set Top Box DVD2 POWER MENU BACK Continue Transfer ...TV remote control. TV Softkeys POWER MENU BACK Move SEL Select THUMB STICK SELECT Select Softkey SELECT EXIT HITACHI AV NET WIZARD (Learning) Press and hold desired button to transfer the command to continue. Yes HITACHI AV NET WIZARD (Learning) No Transfer not completed! HOW TO USE THE REMOTE TO CONTROL YOUR LCD REAR PTV THE REMOTE CONTROL...
...pre-code library, listed on OSD, and press the MENU button of your equipment to the soft keys of the Projection TV remote control. DVD), select the "MENU" soft key on page 22. Set Top Box DVD2 POWER MENU BACK Continue Transfer ...TV remote control. TV Softkeys POWER MENU BACK Move SEL Select THUMB STICK SELECT Select Softkey SELECT EXIT HITACHI AV NET WIZARD (Learning) Press and hold desired button to transfer the command to continue. Yes HITACHI AV NET WIZARD (Learning) No Transfer not completed! HOW TO USE THE REMOTE TO CONTROL YOUR LCD REAR PTV THE REMOTE CONTROL...
Owners Guide
Page 31
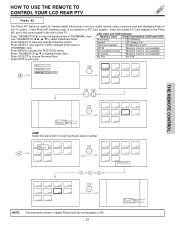
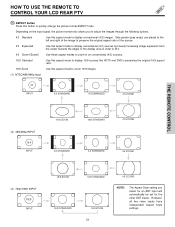
... aspect ratio. 16:9 Zoom Use this aspect mode to zoom 16:9 images. (1) NTSC/480i/480p Input 4:3 INPUT 4:3 STANDARD 4:3 EXPANDED 4:3 ZOOM1 THE REMOTE CONTROL (2) 480i/480p INPUT 16:9 INPUT 16:9 ZOOM 16:9 STANDARD 4:3 ZOOM2 4:3 STANDARD 4:3 EXPANDED 4:3 ZOOM1 (3) 720p/1080i INPUT 16:9 INPUT 16:9 ZOOM ...the following options. 4:3 Standard Use this button to quickly change the picture format ASPECT ratio. HOW TO USE THE REMOTE TO CONTROL YOUR LCD REAR PTV ቱ ASPECT button Press this aspect mode to display conventional (4:3) images. However, all five video inputs have ...
... aspect ratio. 16:9 Zoom Use this aspect mode to zoom 16:9 images. (1) NTSC/480i/480p Input 4:3 INPUT 4:3 STANDARD 4:3 EXPANDED 4:3 ZOOM1 THE REMOTE CONTROL (2) 480i/480p INPUT 16:9 INPUT 16:9 ZOOM 16:9 STANDARD 4:3 ZOOM2 4:3 STANDARD 4:3 EXPANDED 4:3 ZOOM1 (3) 720p/1080i INPUT 16:9 INPUT 16:9 ZOOM ...the following options. 4:3 Standard Use this button to quickly change the picture format ASPECT ratio. HOW TO USE THE REMOTE TO CONTROL YOUR LCD REAR PTV ቱ ASPECT button Press this aspect mode to display conventional (4:3) images. However, all five video inputs have ...
Owners Guide
Page 32
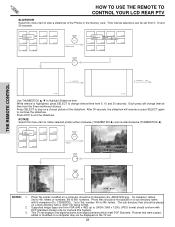
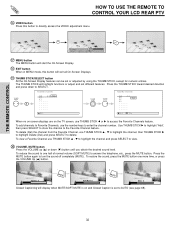
THE REMOTE CONTROL HOW TO USE THE REMOTE TO CONTROL YOUR LCD REAR PTV ቲ VIDEO button Press this button will highlight functions or adjust and set different features. To restore the sound, press the MUTE button one ... THUMB STICK Favorite Channels Ant A 8 A8 A6 A3 - - - - - - - - - - - - - - - - - - - - Del Move SEL Tune When no on-screen displays are on and Closed Caption is on the TV screen, use THUMB STICK ̆ , ̄ to highlight the channel and press SELECT to turn the sound off completely (MUTE). The THUMB STICK will exit...
THE REMOTE CONTROL HOW TO USE THE REMOTE TO CONTROL YOUR LCD REAR PTV ቲ VIDEO button Press this button will highlight functions or adjust and set different features. To restore the sound, press the MUTE button one ... THUMB STICK Favorite Channels Ant A 8 A8 A6 A3 - - - - - - - - - - - - - - - - - - - - Del Move SEL Tune When no on-screen displays are on and Closed Caption is on the TV screen, use THUMB STICK ̆ , ̄ to highlight the channel and press SELECT to turn the sound off completely (MUTE). The THUMB STICK will exit...
Owners Guide
Page 33
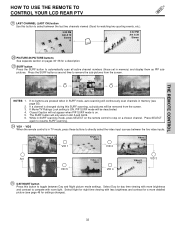
...compete with more detailed picture (see page 55). Press SELECT again to resume SURF scanning. 24 VID1 ~ VID5 When the remote control is on. Select Day for a description. 23 SURF button Press the SURF button to automatically scan all active channel numbers (those set...screen. If Movie/TV Ratings Lock setting is changed during this SURF scanning, sub-pictures will only work in SURF scanning mode, press SELECT on the remote control to stop on a chosen channel. SURF SURF NOTES: 1. 2. 3. 4. 5. 6. THE REMOTE CONTROL HOW TO USE THE REMOTE TO CONTROL YOUR LCD REAR PTV 1 LAST CHANNEL...
...compete with more detailed picture (see page 55). Press SELECT again to resume SURF scanning. 24 VID1 ~ VID5 When the remote control is on. Select Day for a description. 23 SURF button Press the SURF button to automatically scan all active channel numbers (those set...screen. If Movie/TV Ratings Lock setting is changed during this SURF scanning, sub-pictures will only work in SURF scanning mode, press SELECT on the remote control to stop on a chosen channel. SURF SURF NOTES: 1. 2. 3. 4. 5. 6. THE REMOTE CONTROL HOW TO USE THE REMOTE TO CONTROL YOUR LCD REAR PTV 1 LAST CHANNEL...


