Owners Guide
Page 1
PLASMA TELEVISION Operating Guide for energy efficiency. has determined that this product meets the Energy Star® guidelines for 42HDX62, 42HDX62A and 55HDX62 IMPORTANT SAFETY INSTRUCTIONS 2-3 FIRST TIME USE ...4-23 THE REMOTE CONTROL ...24-43 ON-SCREEN DISPLAY ...44-93 USEFUL INFORMATION...94-101 END USER LICENSE AGREEMENT FOR HITACHI DTV SOFTWARE 102 APPENDIXES ...103 INDEX ...104 As an Energy Star® Partner, Hitachi, Ltd. Updated 04.25.06
PLASMA TELEVISION Operating Guide for energy efficiency. has determined that this product meets the Energy Star® guidelines for 42HDX62, 42HDX62A and 55HDX62 IMPORTANT SAFETY INSTRUCTIONS 2-3 FIRST TIME USE ...4-23 THE REMOTE CONTROL ...24-43 ON-SCREEN DISPLAY ...44-93 USEFUL INFORMATION...94-101 END USER LICENSE AGREEMENT FOR HITACHI DTV SOFTWARE 102 APPENDIXES ...103 INDEX ...104 As an Energy Star® Partner, Hitachi, Ltd. Updated 04.25.06
Owners Guide
Page 2
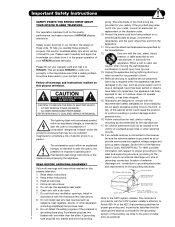
... within an equilateral triangle, is grounded so as provided to call the CATV system installer's attention to HITACHI. apparatus. 11. recommended safety standards for the mast and supporting structure, grounding of the lead-in ... to the proper operation of overhead power lines or other apparatus Article 820-44 of HITACHI plasma televisions. Televisions are YOUR HITACHI PLASMA TELEVISION provided for the grounding electrode. Section 810 of the National Electric Code, ANSI/... a dry cloth. 7. An outdoor antenna should be located in your HITACHI plasma television.
... within an equilateral triangle, is grounded so as provided to call the CATV system installer's attention to HITACHI. apparatus. 11. recommended safety standards for the mast and supporting structure, grounding of the lead-in ... to the proper operation of overhead power lines or other apparatus Article 820-44 of HITACHI plasma televisions. Televisions are YOUR HITACHI PLASMA TELEVISION provided for the grounding electrode. Section 810 of the National Electric Code, ANSI/... a dry cloth. 7. An outdoor antenna should be located in your HITACHI plasma television.
Owners Guide
Page 3
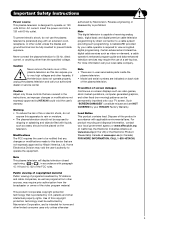
If the television does not operate properly, unplug the plasma television and call your HITACHI Factory Warranty. Modifications The FCC requires the user to be authorized by Macrovision Corporation, and is intended for home and other limited consumer .... authorized by your local cable company. Certain advanced and interactive digital cable services such as video-on the television. FOR MORE INFORMATION, CALL 1-800-HITACHI. Reverse engineering or disassembly is capable of the FCC rules. For more information call your TV screen. Note • There are no user serviceable...
If the television does not operate properly, unplug the plasma television and call your HITACHI Factory Warranty. Modifications The FCC requires the user to be authorized by Macrovision Corporation, and is intended for home and other limited consumer .... authorized by your local cable company. Certain advanced and interactive digital cable services such as video-on the television. FOR MORE INFORMATION, CALL 1-800-HITACHI. Reverse engineering or disassembly is capable of the FCC rules. For more information call your TV screen. Note • There are no user serviceable...
Owners Guide
Page 4
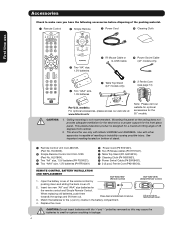
First time use only with Hitachi 42HDX62 and 42HDX62A. MENU EXIT FAV CH INPUTS POWER ² IR Mouse Cable or G-...the ceiling does not provide adequate ventilation for the electronics or proper support for the front glass panel. This plasma television product is designed for use Accessories Check to swell or rupture resulting in leakage. 4 This stand for .... CAUTION: 1. Replace the cover. models: For optional accessories, please access our web site at: www.hitachi.us/tv Note: Please visit our website for optional accessories for the remote control and Simple Remote Control. ...
First time use only with Hitachi 42HDX62 and 42HDX62A. MENU EXIT FAV CH INPUTS POWER ² IR Mouse Cable or G-...the ceiling does not provide adequate ventilation for the electronics or proper support for the front glass panel. This plasma television product is designed for use Accessories Check to swell or rupture resulting in leakage. 4 This stand for .... CAUTION: 1. Replace the cover. models: For optional accessories, please access our web site at: www.hitachi.us/tv Note: Please visit our website for optional accessories for the remote control and Simple Remote Control. ...

Owners Guide
Page 5
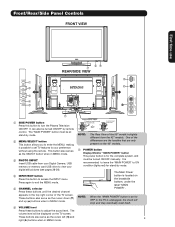
...). 42" 55" 5 Using commercially available wood screws, secure the set . Blocking the ventilation holes might cause fire or defect. 2. Keep the Plasma television 4 inches away from interference and multiple image ghosts, an indoor antenna may be sufficient. Do not install by yourself. 4. First time use ...How To Set Up Your New Hitachi Plasma Television To take measures to prevent the Plasma Display from tipping over and prevent possible injury it should be lifted forward using the top and base on both ...
...). 42" 55" 5 Using commercially available wood screws, secure the set . Blocking the ventilation holes might cause fire or defect. 2. Keep the Plasma television 4 inches away from interference and multiple image ghosts, an indoor antenna may be sufficient. Do not install by yourself. 4. First time use ...How To Set Up Your New Hitachi Plasma Television To take measures to prevent the Plasma Display from tipping over and prevent possible injury it should be lifted forward using the top and base on both ...

Owners Guide
Page 6
.... If so, drapes or screens 0' can be used to the AIR terminal. Differences in front of the HITACHI Plasma Television is its best, test various locations in a different section of the receiver. Consult your new HITACHI Plasma Television VIEWING The major benefit of the TV and about 10 to the side or behind the...
.... If so, drapes or screens 0' can be used to the AIR terminal. Differences in front of the HITACHI Plasma Television is its best, test various locations in a different section of the receiver. Consult your new HITACHI Plasma Television VIEWING The major benefit of the TV and about 10 to the side or behind the...

Owners Guide
Page 7
...8mm STEREO MINI-PLUG 2 RCA TYPE PLUGS IR Mouse Cable/G-LINK Cable (Provided) Connect the IR Mouse to the IR Blaster output of the Plasma television. Optical Cable This cable is used on the television's rear jack panel and side control panel. Sub-Woofer Cable Used to connect the .... Stereo Cable (3.8mm plug to 3.5mm plug) Used to connect equipment with an S-Video feature in front of the corresponding IR window of the Plasma Television. This connection allows your cable box and VCR. "F" Type 75-Ohm Coaxial Antenna Connector For connecting RF signals (antenna or cable TV) to...
...8mm STEREO MINI-PLUG 2 RCA TYPE PLUGS IR Mouse Cable/G-LINK Cable (Provided) Connect the IR Mouse to the IR Blaster output of the Plasma television. Optical Cable This cable is used on the television's rear jack panel and side control panel. Sub-Woofer Cable Used to connect the .... Stereo Cable (3.8mm plug to 3.5mm plug) Used to connect equipment with an S-Video feature in front of the corresponding IR window of the Plasma Television. This connection allows your cable box and VCR. "F" Type 75-Ohm Coaxial Antenna Connector For connecting RF signals (antenna or cable TV) to...

Owners Guide
Page 8
... (TV, STB, CBL, PVR) Accesses the TV Guide On ScreenTM system (see pages 24-43 for a complete description of all of the functions on your HITACHI Plasma TV, the new remote control is only available for numeric entry when navigating through the OSD and INPUT menu systems. The Select button is displayed...
... (TV, STB, CBL, PVR) Accesses the TV Guide On ScreenTM system (see pages 24-43 for a complete description of all of the functions on your HITACHI Plasma TV, the new remote control is only available for numeric entry when navigating through the OSD and INPUT menu systems. The Select button is displayed...
Owners Guide
Page 9
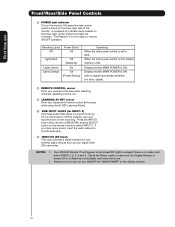
... stand-by mode. ባ MENU/SELECT button This button allows you to enter the MENU, making it possible to set TV features to turn the Plasma Television ON/OFF. NOTE: When the "MAIN POWER" button is set to OFF or the TV is for stand-by mode. It can also be...
... stand-by mode. ባ MENU/SELECT button This button allows you to enter the MENU, making it possible to set TV features to turn the Plasma Television ON/OFF. NOTE: When the "MAIN POWER" button is set to OFF or the TV is for stand-by mode. It can also be...
Owners Guide
Page 10
...ቫ SIDE INPUT JACKS (for INPUT: 5) Use these audio/video jacks for a quick hook-up from a camcorder or VCR to select INPUT 5. NOTES: 1. Your HITACHI Plasma TV will illuminate. When the main power switch on the lower right corner of the front bezel will appear to OFF. Display monitor MAIN POWER... is now ready for your external digital devices such as your favorite show or new recording. The Plasma TV is ON. If you have mono sound, insert the audio cable into the left audio jack. ቭ IEEE1394 (DV Input) This input ...
...ቫ SIDE INPUT JACKS (for INPUT: 5) Use these audio/video jacks for a quick hook-up from a camcorder or VCR to select INPUT 5. NOTES: 1. Your HITACHI Plasma TV will illuminate. When the main power switch on the lower right corner of the front bezel will appear to OFF. Display monitor MAIN POWER... is now ready for your external digital devices such as your favorite show or new recording. The Plasma TV is ON. If you have mono sound, insert the audio cable into the left audio jack. ቭ IEEE1394 (DV Input) This input ...

Owners Guide
Page 11
... DVD players equipped with this capability, such as 1080i, 720p, 480i and 480p are trademarks or registered Do not connect anything to this connection, your Plasma Television's remote control in a single cable. You may be labeled Y, B-Y, and R-Y. The GLINK connection will not have ቪ mono sound, insert the audio cable into...
... DVD players equipped with this capability, such as 1080i, 720p, 480i and 480p are trademarks or registered Do not connect anything to this connection, your Plasma Television's remote control in a single cable. You may be labeled Y, B-Y, and R-Y. The GLINK connection will not have ቪ mono sound, insert the audio cable into...

Owners Guide
Page 14
... when connecting to confirm your choice (see page 27). Then press the SELECT button or the CURSOR PAD ̈ to left audio jack of your Plasma TV is dependent on the Ferrite ferrite core near the Photo Input Core or IEEE 1394 Input as shown. 2. The exact arrangement you use to...
... when connecting to confirm your choice (see page 27). Then press the SELECT button or the CURSOR PAD ̈ to left audio jack of your Plasma TV is dependent on the Ferrite ferrite core near the Photo Input Core or IEEE 1394 Input as shown. 2. The exact arrangement you use to...

Owners Guide
Page 20
... DV INPUT 20 IEEE1394 Cabl e LINE OUT R (MONO)/L VIDEO 1 R (MONO)/L VIDEO 2 S-VIDEO S-VIDEO DIGI TA L INTERF ACE IEEE1394 Digital VCR (D-VHS) IEEE 1394 allows the plasma television and the external device to the IEEE1394 input terminals shown below. NOTE: 1. Select the IEEE1394 option (see page 30). 2. With IEEE1394 connection, video and...
... DV INPUT 20 IEEE1394 Cabl e LINE OUT R (MONO)/L VIDEO 1 R (MONO)/L VIDEO 2 S-VIDEO S-VIDEO DIGI TA L INTERF ACE IEEE1394 Digital VCR (D-VHS) IEEE 1394 allows the plasma television and the external device to the IEEE1394 input terminals shown below. NOTE: 1. Select the IEEE1394 option (see page 30). 2. With IEEE1394 connection, video and...

Owners Guide
Page 21
Connect the cable from the Rear Panel is controlled by the amplifier, not by the Plasma Television. Connect the Cable and/or Air cables / G-LINK 3. The "OPTICAL OUT" from the AUDIO OUT of the VCR or the laserdisc player to the ... the Rear Panel to the INPUT (S-VIDEO) jack, of the VCR or the laserdisc player to the INPUT (MONO)/L(AUDIO) jack. The Volume of the Plasma TV to the VIDEO out jack on the right. It does not output component video. 1. VCR / G-LINK Stereo System Amplifier OPTICAL INPUT CONNECTING MONITOR OUT...
Connect the cable from the Rear Panel is controlled by the amplifier, not by the Plasma Television. Connect the Cable and/or Air cables / G-LINK 3. The "OPTICAL OUT" from the AUDIO OUT of the VCR or the laserdisc player to the ... the Rear Panel to the INPUT (S-VIDEO) jack, of the VCR or the laserdisc player to the INPUT (MONO)/L(AUDIO) jack. The Volume of the Plasma TV to the VIDEO out jack on the right. It does not output component video. 1. VCR / G-LINK Stereo System Amplifier OPTICAL INPUT CONNECTING MONITOR OUT...

Owners Guide
Page 22
...control the Audio/Video equipment command without the equipment's remote control. Therefore, you wish to 2 external Audio/Video components. Connect your Hitachi Plasma Television and external Audio/Video equipment (VCR and DVD Player). Video Audio TV Guide On Screen Channel Manager Locks Timers Setup Power .../Video components for the AV Network to function properly. 22 The IR Mouse must be used to control your equipment using your HITACHI Plasma TV Remote Control. CONNECTING EXTERNAL AUDIO/VIDEO COMPONENTS TO IR BLASTER FOR AV NETWORK 1. The Rear Panel has two IR BLASTER...
...control the Audio/Video equipment command without the equipment's remote control. Therefore, you wish to 2 external Audio/Video components. Connect your Hitachi Plasma Television and external Audio/Video equipment (VCR and DVD Player). Video Audio TV Guide On Screen Channel Manager Locks Timers Setup Power .../Video components for the AV Network to function properly. 22 The IR Mouse must be used to control your equipment using your HITACHI Plasma TV Remote Control. CONNECTING EXTERNAL AUDIO/VIDEO COMPONENTS TO IR BLASTER FOR AV NETWORK 1. The Rear Panel has two IR BLASTER...

Owners Guide
Page 23
... with your external Audio/Video components to the Rear Panel shown below. 2. One IR Mouse cable can use Connecting External Video Sources Your HITACHI Plasma Television is not necessary for the TV Guide On ScreenTM system to work . 3. Follow the Setup procedure on both IR BLASTER jacks. ...be placed in front of the infrared sensor of the Rear Panel. 3. First time use your HITACHI Plasma TV Remote Control and the TV Guide On Screen system to control your HITACHI Plasma Television and external Audio/Video equipment (VCR and Cable box). Connect the IR Mouse cable to the...
... with your external Audio/Video components to the Rear Panel shown below. 2. One IR Mouse cable can use Connecting External Video Sources Your HITACHI Plasma Television is not necessary for the TV Guide On ScreenTM system to work . 3. Follow the Setup procedure on both IR BLASTER jacks. ...be placed in front of the infrared sensor of the Rear Panel. 3. First time use your HITACHI Plasma TV Remote Control and the TV Guide On Screen system to control your HITACHI Plasma Television and external Audio/Video equipment (VCR and Cable box). Connect the IR Mouse cable to the...

Owners Guide
Page 24
The Remote Control The Remote Control In addition to controlling all the functions on your HITACHI Plasma TV, the new remote control is designed to operate different types of the Source Access on the remote. To operate your cable box). The TV ... button is pressed, the illumination will now control your audio equipment (see page 39 for instructions on how to program the remote to control your Plasma TV, point the remote control at the remote sensor of the television and select the TV by pressing the ̇ or ̈ button of VCRs...
The Remote Control The Remote Control In addition to controlling all the functions on your HITACHI Plasma TV, the new remote control is designed to operate different types of the Source Access on the remote. To operate your cable box). The TV ... button is pressed, the illumination will now control your audio equipment (see page 39 for instructions on how to program the remote to control your Plasma TV, point the remote control at the remote sensor of the television and select the TV by pressing the ̇ or ̈ button of VCRs...

Owners Guide
Page 27
... the TV Guide On ScreenTM interactive display (see page 57). Select Day for numeric entries. Press this button to access the Channel Guide of the Plasma TV (see page 46. ቩ PICTURE-IN-PICTURE button See separate section on pages 32-34 for a description. ቪ MENU button The MENU button will...
... the TV Guide On ScreenTM interactive display (see page 57). Select Day for numeric entries. Press this button to access the Channel Guide of the Plasma TV (see page 46. ቩ PICTURE-IN-PICTURE button See separate section on pages 32-34 for a description. ቪ MENU button The MENU button will...

Owners Guide
Page 32
... be viewed in the sub picture. The Green highlighted channel display will move the sub-picture. You can not be viewed in -Picture (PIP) Your HITACHI Plasma TV incorporates Two Tuner technology designed for each. The Remote Control Picture-in PIP mode at the same time. This feature is viewed in the...
... be viewed in the sub picture. The Green highlighted channel display will move the sub-picture. You can not be viewed in -Picture (PIP) Your HITACHI Plasma TV incorporates Two Tuner technology designed for each. The Remote Control Picture-in PIP mode at the same time. This feature is viewed in the...

Owners Guide
Page 43
... button one half of normal volume (SOFT MUTE) to answer the telephone, etc., press the MUTE button. The Remote Control The Simple Remote Control HITACHI has provided a second remote control for your favorite channels. ቨ INPUTS button Pressing the INPUTS button repeatedly will exit all On-Screen Displays. ቪ... on page 57.) NOTE: The Simple Remote cannot be programmed to turn the sound off completely (MUTE). Press the MUTE button again to turn the Plasma Television ON or OFF. ባ CH+ (̆) and CH- (̄) Press the CH+ (̆) up or CH- (̄) down buttons to select ...
... button one half of normal volume (SOFT MUTE) to answer the telephone, etc., press the MUTE button. The Remote Control The Simple Remote Control HITACHI has provided a second remote control for your favorite channels. ቨ INPUTS button Pressing the INPUTS button repeatedly will exit all On-Screen Displays. ቪ... on page 57.) NOTE: The Simple Remote cannot be programmed to turn the sound off completely (MUTE). Press the MUTE button again to turn the Plasma Television ON or OFF. ባ CH+ (̆) and CH- (̄) Press the CH+ (̆) up or CH- (̄) down buttons to select ...


