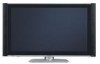
Owners Guide
Page 3
...apparatus shall be authorized by Macrovision Corporation, and is used as improper changes or modifications not expressly approved by your HITACHI Factory Warranty. Prevention of this can expose you to very high voltages and other hazards. If the television does not...INFORMATION, CALL 1-800-HITACHI. 3 For product recycling and disposal information, contact your TV screen. The power cord is intended for home and other sources, may require the use the plasma television's (polarized) plug with applicable environmental laws. A CableCARD provided by HITACHI could void the user...
...apparatus shall be authorized by Macrovision Corporation, and is used as improper changes or modifications not expressly approved by your HITACHI Factory Warranty. Prevention of this can expose you to very high voltages and other hazards. If the television does not...INFORMATION, CALL 1-800-HITACHI. 3 For product recycling and disposal information, contact your TV screen. The power cord is intended for home and other sources, may require the use the plasma television's (polarized) plug with applicable environmental laws. A CableCARD provided by HITACHI could void the user...

Owners Guide
Page 5
...in . 38.1 cm 42.8 cm NOTE: The Table Top Stand for model 55HDT79 & 55HDX99 is important to mount the unit in fig. (b). To avoid cabinet warping, cabinet color changes, and increased chance of set to the clamping screw holes on the rear of the Plasma TV stand as shown in an...not install by yourself. 4. First time use How To Set Up Your New Hitachi Plasma Television To take measures to prevent the Plasma Television from the wall except when mounted using the wall mount bracket. 2. Keep the Plasma television 4 inches away from tipping over and prevent possible injury it is free ...
...in . 38.1 cm 42.8 cm NOTE: The Table Top Stand for model 55HDT79 & 55HDX99 is important to mount the unit in fig. (b). To avoid cabinet warping, cabinet color changes, and increased chance of set to the clamping screw holes on the rear of the Plasma TV stand as shown in an...not install by yourself. 4. First time use How To Set Up Your New Hitachi Plasma Television To take measures to prevent the Plasma Television from the wall except when mounted using the wall mount bracket. 2. Keep the Plasma television 4 inches away from tipping over and prevent possible injury it is free ...

Owners Guide
Page 6
...the STAND PLATE metal from the TV, then put back only the screw to the back cover. Please access our web site at: www.hitachi.us/tv for recommended accessories for the Plasma TV depending on the back of your tv. 6 Now the 4 screws that holds the TV STAND can be remove in ...order to set up your new HITACHI Plasma Television SETTING FOR WALL MOUNTING STEP (1) : Please locate...
...the STAND PLATE metal from the TV, then put back only the screw to the back cover. Please access our web site at: www.hitachi.us/tv for recommended accessories for the Plasma TV depending on the back of your tv. 6 Now the 4 screws that holds the TV STAND can be remove in ...order to set up your new HITACHI Plasma Television SETTING FOR WALL MOUNTING STEP (1) : Please locate...

Owners Guide
Page 9
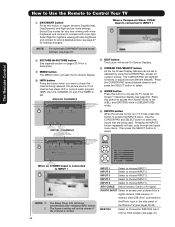
... down on the wheel to access (FAV) Favorite Channel mode. (Favorite channel is only available for a complete description of all of the functions on your HITACHI Plasma TV, the new remote control is designed to operate different types of devices, such as channel information. The..., DVD and audio devices. Can also be programmed to change backlight mode. Pressing the Light button will illuminate the backlight for best results. 2. POWER BUTTON (TV, DVD, CBL, STB, PVR/VCR, AMP/CD) Turns the selected device on the wheel to adjust the audio level of the OSD, INPUTS or AV...
... down on the wheel to access (FAV) Favorite Channel mode. (Favorite channel is only available for a complete description of all of the functions on your HITACHI Plasma TV, the new remote control is designed to operate different types of devices, such as channel information. The..., DVD and audio devices. Can also be programmed to change backlight mode. Pressing the Light button will illuminate the backlight for best results. 2. POWER BUTTON (TV, DVD, CBL, STB, PVR/VCR, AMP/CD) Turns the selected device on the wheel to adjust the audio level of the OSD, INPUTS or AV...

Owners Guide
Page 11
... operation. Your component outputs may be used for this case, connect the component CB output to the TV's PB input and the component CR output to the TV's PR input. 2. Your HITACHI Plasma TV will illuminate. signal). ቪ REMOTE CONTROL sensor Point your remote at this area when selecting channels,...off or in Stand-by mode (lights red) when not in use composite video signal for composite video and component video input. NOTES: 1. The Plasma TV is ON ; TV MAIN POWER is no video input when INPUT : 1, 2, 3, 4 and 5. In this capability, such as a DVD player or Set Top...
... operation. Your component outputs may be used for this case, connect the component CB output to the TV's PB input and the component CR output to the TV's PR input. 2. Your HITACHI Plasma TV will illuminate. signal). ቪ REMOTE CONTROL sensor Point your remote at this area when selecting channels,...off or in Stand-by mode (lights red) when not in use composite video signal for composite video and component video input. NOTES: 1. The Plasma TV is ON ; TV MAIN POWER is no video input when INPUT : 1, 2, 3, 4 and 5. In this capability, such as a DVD player or Set Top...
Owners Guide
Page 15
... according to easily connect HDMI or DVI signals from coaxial shielded wire. Use the CURSOR PAD (̆ and ̄) to select the Input of your Plasma TV is dependent on the model and features of each component for the location of the INPUT terminals, then press the INPUTS button to your choice...
... according to easily connect HDMI or DVI signals from coaxial shielded wire. Use the CURSOR PAD (̆ and ̄) to select the Input of your Plasma TV is dependent on the model and features of each component for the location of the INPUT terminals, then press the INPUTS button to your choice...

Owners Guide
Page 21
... Connect the cable from the INPUTS menu to return to the OUTPUT (AUDIO/L) jack on the TV Rear Panel. 3. Connect the cable from the Rear Panel is controlled by the amplifier, not by the Plasma Television. Select CABLE or AIR from the AUDIO IN L of the VCR or Laserdisk player. CABLE... amplifier, connect the system as shown on the Rear Panel on the right. CONNECTING AN EXTERNAL AUDIO AMPLIFIER To monitor the audio level of the Plasma TV to the Optical input of the VCR or the laserdisc player to the VIDEO out jack on the right. Video takes priority. 21 R L V S-...
... Connect the cable from the INPUTS menu to return to the OUTPUT (AUDIO/L) jack on the TV Rear Panel. 3. Connect the cable from the Rear Panel is controlled by the amplifier, not by the Plasma Television. Select CABLE or AIR from the AUDIO IN L of the VCR or Laserdisk player. CABLE... amplifier, connect the system as shown on the Rear Panel on the right. CONNECTING AN EXTERNAL AUDIO AMPLIFIER To monitor the audio level of the Plasma TV to the Optical input of the VCR or the laserdisc player to the VIDEO out jack on the right. Video takes priority. 21 R L V S-...

Owners Guide
Page 22
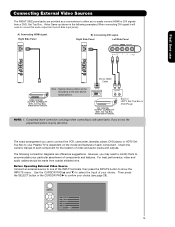
... Connect your external Audio/Video equipment (VCR, Set Top Box, DVD, etc.). Therefore, you wish to control your equipment using your HITACHI Plasma TV Remote Control. Follow the Setup procedure on pages 68-75. You can control up to select. 7. The Rear Panel has two IR... OUT terminals which can use Connecting External Video Sources Your HITACHI Plasma Television is setup, it allows your IR Blaster cable to control. Infrared Sensor IR Blaster V L R OUTPUT VCR Infrared Sensor OUTPUT Y ...
... Connect your external Audio/Video equipment (VCR, Set Top Box, DVD, etc.). Therefore, you wish to control your equipment using your HITACHI Plasma TV Remote Control. Follow the Setup procedure on pages 68-75. You can control up to select. 7. The Rear Panel has two IR... OUT terminals which can use Connecting External Video Sources Your HITACHI Plasma Television is setup, it allows your IR Blaster cable to control. Infrared Sensor IR Blaster V L R OUTPUT VCR Infrared Sensor OUTPUT Y ...

Owners Guide
Page 23
...55. CONNECTING THE CABLE BOX/VCR TO G-LINK FOR TV GUIDE ON SCREENTM SYSTEM 1. To access the TV Guide On-ScreenTM system, press the MENU button. 5. One IR Blaster cable can use Connecting External Video Sources Your HITACHI Plasma Television is equipped with your cable box to receive ...IR Blaster in front of the external components you can connect up to 2 external Audio/Video components. First time use your HITACHI Plasma TV Remote Control and the TV Guide On Screen system to control your cable box and VCR recording features. This connection is not necessary for the AV ...
...55. CONNECTING THE CABLE BOX/VCR TO G-LINK FOR TV GUIDE ON SCREENTM SYSTEM 1. To access the TV Guide On-ScreenTM system, press the MENU button. 5. One IR Blaster cable can use Connecting External Video Sources Your HITACHI Plasma Television is equipped with your cable box to receive ...IR Blaster in front of the external components you can connect up to 2 external Audio/Video components. First time use your HITACHI Plasma TV Remote Control and the TV Guide On Screen system to control your cable box and VCR recording features. This connection is not necessary for the AV ...
Owners Guide
Page 25
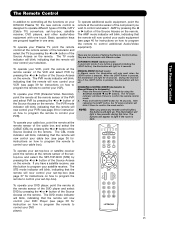
... modes. The Remote Control The Remote Control In addition to controlling all the functions on your HITACHI Plasma TV, the new remote control is designed to operate different types of VCRs, CATV (Cable TV) converters, set-top-box, satellite receiver, DVD players, and other audio/video equipment with one...the Source Access on the remote. CHANGING LIGHTING MODES (Automatic to Manual/Manual to control your cable box). A/V NET + - / To operate your Plasma TV, point the remote control at the remote sensor of the DVD player and select DVD by using the SOURCE ACCESS ̇ and ̈ buttons....
... modes. The Remote Control The Remote Control In addition to controlling all the functions on your HITACHI Plasma TV, the new remote control is designed to operate different types of VCRs, CATV (Cable TV) converters, set-top-box, satellite receiver, DVD players, and other audio/video equipment with one...the Source Access on the remote. CHANGING LIGHTING MODES (Automatic to Manual/Manual to control your cable box). A/V NET + - / To operate your Plasma TV, point the remote control at the remote sensor of the DVD player and select DVD by using the SOURCE ACCESS ̇ and ̈ buttons....
Owners Guide
Page 28
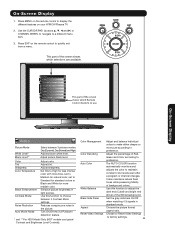
... 480i 3:17PM Main Picture Source and channel indication Broadcast channel identification Clock (CBL), and (SAT/STB) while in TV mode, press this button to access the Channel Guide of the Plasma TV (see page 65. channel has stereo (ST) or second audio program (SAP), the time, CHANNEL ID and ...if the TIMER is locked. The Aspect setting will exit all On-Screen Displays. Program Information Program Run Time INFO Show Name 3:00PM- 3:30PM ST TV-G ALT U.S....
... 480i 3:17PM Main Picture Source and channel indication Broadcast channel identification Clock (CBL), and (SAT/STB) while in TV mode, press this button to access the Channel Guide of the Plasma TV (see page 65. channel has stereo (ST) or second audio program (SAP), the time, CHANNEL ID and ...if the TIMER is locked. The Aspect setting will exit all On-Screen Displays. Program Information Program Run Time INFO Show Name 3:00PM- 3:30PM ST TV-G ALT U.S....

Owners Guide
Page 33
... press of the main picture. CABLE or Air signal To select between main picture and PIP sub picture, use the PIP button to watch a TV program while viewing other programs from any of VCR AUDIO OUT VIDEO OUT OUTPUT VCR ባ ቢ + - 33 The Remote Control You ... Mode PIP displays the main picture and subpicture evenly on the INPUT signal. Back of the video inputs. Picture-in-Picture (PIP) Your HITACHI Plasma TV incorporates one Tuner technology designed for PIP availability. This feature allows you want to cycle through the three different modes. Use the CURSOR PAD ...
... press of the main picture. CABLE or Air signal To select between main picture and PIP sub picture, use the PIP button to watch a TV program while viewing other programs from any of VCR AUDIO OUT VIDEO OUT OUTPUT VCR ባ ቢ + - 33 The Remote Control You ... Mode PIP displays the main picture and subpicture evenly on the INPUT signal. Back of the video inputs. Picture-in-Picture (PIP) Your HITACHI Plasma TV incorporates one Tuner technology designed for PIP availability. This feature allows you want to cycle through the three different modes. Use the CURSOR PAD ...
Owners Guide
Page 45
...different features on the remote control to adjust the dark end (Cutoff) and bright end (drive) of the White background. Press EXIT on your HITACHI Plasma TV. 2. Use this function to quickly exit from a menu. Choose the picture format aspect ratio. Use the CURSOR PAD (buttons ̆, ̄,...for more pure according to preference. Enhance picture brightness in the picture. Reduces conspicuous noise in light scenes. Vide o Audio TV Guide On Screen Channel Manager Locks Timers Setup Power Swivel Move SEL Select This part of the screen shows which Remote Control ...
...different features on the remote control to adjust the dark end (Cutoff) and bright end (drive) of the White background. Press EXIT on your HITACHI Plasma TV. 2. Use this function to quickly exit from a menu. Choose the picture format aspect ratio. Use the CURSOR PAD (buttons ̆, ̄,...for more pure according to preference. Enhance picture brightness in the picture. Reduces conspicuous noise in light scenes. Vide o Audio TV Guide On Screen Channel Manager Locks Timers Setup Power Swivel Move SEL Select This part of the screen shows which Remote Control ...

Owners Guide
Page 51
...% treble. Balance This function will control the left to the rear of the Plasma TV internal speakers. Off : turns off the surround sound effect. Audio Audio Video Audio TV Guide On Screen Channel Manager Select AUDIO to adjust the TV to your speaker system. The additional menu items Bass and Balance can be selected...
...% treble. Balance This function will control the left to the rear of the Plasma TV internal speakers. Off : turns off the surround sound effect. Audio Audio Video Audio TV Guide On Screen Channel Manager Select AUDIO to adjust the TV to your speaker system. The additional menu items Bass and Balance can be selected...
Owners Guide
Page 53
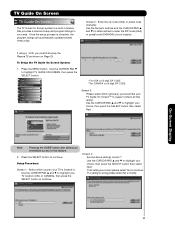
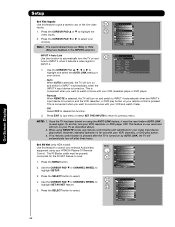
...System: 1. Setup Procedure: Screen 1: Select which service(s) you must first setup the Plasma TV as shown on Page 23. Use the CURSOR PAD ̆ and ̄ to...; to enter the ZIP code (USA) or postal code (CANADA) of your location. TV Guide On Screen TV Guide On Screen The TV Guide On-Screen system is complete, the program listings are correct please select Yes to continue... (Canada): Use the Numeric buttons and the CURSOR PAD ̆ and ̄ for letter entries to highlight TV GUIDE ON SCREEN, then press the SELECT button. On-Screen Display 53 Once the setup process is a built-...
...System: 1. Setup Procedure: Screen 1: Select which service(s) you must first setup the Plasma TV as shown on Page 23. Use the CURSOR PAD ̆ and ̄ to...; to enter the ZIP code (USA) or postal code (CANADA) of your location. TV Guide On Screen TV Guide On Screen The TV Guide On-Screen system is complete, the program listings are correct please select Yes to continue... (Canada): Use the Numeric buttons and the CURSOR PAD ̆ and ̄ for letter entries to highlight TV GUIDE ON SCREEN, then press the SELECT button. On-Screen Display 53 Once the setup process is a built-...
Owners Guide
Page 55
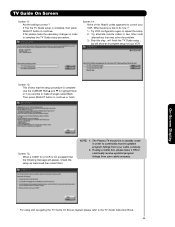
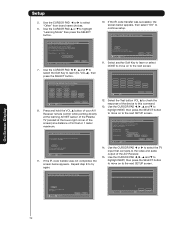
Screen 14: None of the Hitachi codes appeared to continue. On-Screen Display For using a Cable box, please leave it ON to make the necessary changes in order to do now ? 1.- Try VCR configuration again to the TV Guide Instruction Book. 55 Screen 13: When a CODE for your VCR. ...to continually receive updated program listings from your cable company. 2. The Plasma TV should be in standby mode in order to continue or finish. If Yes the TV Guide setup is not accepted then the following message will finish the TV Guide setup ; Screen 12: This shows that may solve the ...
Screen 14: None of the Hitachi codes appeared to continue. On-Screen Display For using a Cable box, please leave it ON to make the necessary changes in order to do now ? 1.- Try VCR configuration again to the TV Guide Instruction Book. 55 Screen 13: When a CODE for your VCR. ...to continually receive updated program listings from your cable company. 2. The Plasma TV should be in standby mode in order to continue or finish. If Yes the TV Guide setup is not accepted then the following message will finish the TV Guide setup ; Screen 12: This shows that may solve the ...
Owners Guide
Page 68
... is pressed after three hours. The IR Blaster cable must be properly connected for the AV NET feature to INPUT 4. 1. Video Audio TV Guide On Screen Channel Manager Locks Timers Setup Power Swivel Move SEL Select Setup Set The Menu Options OR Set The Screen Saver Set The... Quick Start Options Reset The Software Move SEL Select On-Screen Display 68 INPUT 4 Auto Link Use this function to automatically turn on your HITACHI Plasma TV Remote Control. Remote When REMOTE is pressed. Press EXIT to quit menu or select SET THE INPUTS to return to INPUT 4 automatically when ...
... is pressed after three hours. The IR Blaster cable must be properly connected for the AV NET feature to INPUT 4. 1. Video Audio TV Guide On Screen Channel Manager Locks Timers Setup Power Swivel Move SEL Select Setup Set The Menu Options OR Set The Screen Saver Set The... Quick Start Options Reset The Software Move SEL Select On-Screen Display 68 INPUT 4 Auto Link Use this function to automatically turn on your HITACHI Plasma TV Remote Control. Remote When REMOTE is pressed. Press EXIT to quit menu or select SET THE INPUTS to return to INPUT 4 automatically when ...
Owners Guide
Page 72
...6. If you connect the video or audio output of your A/V Receiver remote control while pointing directly at the learning AV NET sensor of the Plasma TV (located at the lower right corner of the screen) at a distance of 3.2 feet or 1 meter maximum. Move SEL Select Cancel OK VOL...AV Net Setup Wizard : A/V Receiver Setup Please choose the Brand Name of the A/V Receiver to continue setup. If device responds to this TV, please select a TV Input. VOL̆ Please wait while AV NET Learns the command.... If the IR code transfer was successful. Press and hold desired button...
...6. If you connect the video or audio output of your A/V Receiver remote control while pointing directly at the learning AV NET sensor of the Plasma TV (located at the lower right corner of the screen) at a distance of 3.2 feet or 1 meter maximum. Move SEL Select Cancel OK VOL...AV Net Setup Wizard : A/V Receiver Setup Please choose the Brand Name of the A/V Receiver to continue setup. If device responds to this TV, please select a TV Input. VOL̆ Please wait while AV NET Learns the command.... If the IR code transfer was successful. Press and hold desired button...

Owners Guide
Page 74
... Brand Name Custom IR Code Set Custom Inputs settings Video Input Audio Input Not Connected Not Connected Move Change Source Back SEL Select Next 18. TV Softkeys POWER ̇̇ ̈̈ MENU ̇̇ ̈ ̈̈ SELECT ̆ ̈ EXIT ̄ ̇ Move SEL Select ... Settings Press and hold the ̈ "Play button" of the DVD remote control while pointing directly at the learning AV NET sensor of the Plasma TV (located at the lower right corner of the screen) at a distance of the DVD. 17. Move SEL Select Back Next On-Screen Display...
... Brand Name Custom IR Code Set Custom Inputs settings Video Input Audio Input Not Connected Not Connected Move Change Source Back SEL Select Next 18. TV Softkeys POWER ̇̇ ̈̈ MENU ̇̇ ̈ ̈̈ SELECT ̆ ̈ EXIT ̄ ̇ Move SEL Select ... Settings Press and hold the ̈ "Play button" of the DVD remote control while pointing directly at the learning AV NET sensor of the Plasma TV (located at the lower right corner of the screen) at a distance of the DVD. 17. Move SEL Select Back Next On-Screen Display...
Owners Guide
Page 77
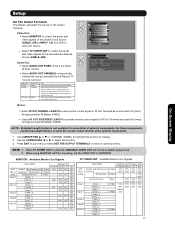
... (max) through provided IR Blaster CABLE. • Select IR OUT EXTENDED LENGTH to process remote control signal to the audio and video output of the TV. YES YES YES Input4 Y-PbPr_4 - - - YES YES YES Input 5 HDMI_5 - - - YES Y-PbPr_5 - - - YES ANT Analog Channel Video - OR Audio Out: • Select... the chosen input source (CABLE, AIR or INPUT 1-5) to a VCR or other A/V device. • Select TV TUNER OUT to have Audio volume that can control the volume output by the Plasma TV Volume Up/Down. Press EXIT to quit menu or select SET THE OUTPUT TERMINALS to return to change...
... (max) through provided IR Blaster CABLE. • Select IR OUT EXTENDED LENGTH to process remote control signal to the audio and video output of the TV. YES YES YES Input4 Y-PbPr_4 - - - YES YES YES Input 5 HDMI_5 - - - YES Y-PbPr_5 - - - YES ANT Analog Channel Video - OR Audio Out: • Select... the chosen input source (CABLE, AIR or INPUT 1-5) to a VCR or other A/V device. • Select TV TUNER OUT to have Audio volume that can control the volume output by the Plasma TV Volume Up/Down. Press EXIT to quit menu or select SET THE OUTPUT TERMINALS to return to change...


