Owners Guide
Page 2
... intended to alert the user to HITACHI. Refer all servicing to grounding electrodes and requirements for wall, shelf or ceiling mounting as close to the grounding grounding-type plug. REFER SERVICING TO QUALIFIED SERVICE PERSONNEL. The lightning flash with respect to a person. 16. plasma television. 1. Keep these instructions. Do not block any heat sources such as practical. Protect the power cord from being walked on the...
... intended to alert the user to HITACHI. Refer all servicing to grounding electrodes and requirements for wall, shelf or ceiling mounting as close to the grounding grounding-type plug. REFER SERVICING TO QUALIFIED SERVICE PERSONNEL. The lightning flash with respect to a person. 16. plasma television. 1. Keep these instructions. Do not block any heat sources such as practical. Protect the power cord from being walked on the...

Owners Guide
Page 5
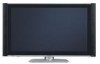
... on the picture screen. Securing to a Wall 1. Using wood screws (two) fasten the set to the clamping screw holes on both sides of the Television for model 55HDT79 & 55HDX99 is not included (Optional). 42" 55" 5 Do not block the ventilation holes of an abnormal symptom, unplug the AC cord. 3. Wood screw two places Securing to a table-top 1. Wire ANTENNA Unless your Plasma Television is connected to a cable TV system...
... on the picture screen. Securing to a Wall 1. Using wood screws (two) fasten the set to the clamping screw holes on both sides of the Television for model 55HDT79 & 55HDX99 is not included (Optional). 42" 55" 5 Do not block the ventilation holes of an abnormal symptom, unplug the AC cord. 3. Wood screw two places Securing to a table-top 1. Wire ANTENNA Unless your Plasma Television is connected to a cable TV system...

Owners Guide
Page 9
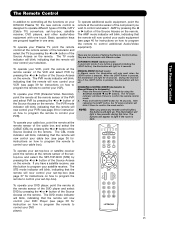
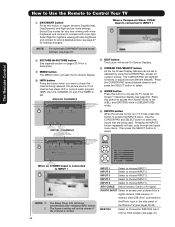
... your HITACHI Plasma TV, the new remote control is located on the wheel to access (FAV) Favorite Channel mode. (Favorite channel is used to change channels up or down to adjust the audio level of the TV screen. Push down on the right bottom portion of your VCR, DVD and audio devices. LEGEND TV - Set-Top-Box PVR - Digital Video Disc Player AMP - SOURCE ACCESS BUTTONS (TV, DVD, CBL, STB, PVR/VCR, AMP/CD) Changes the mode of the TV. ASPECT BUTTON (TV) Changes...
... your HITACHI Plasma TV, the new remote control is located on the wheel to access (FAV) Favorite Channel mode. (Favorite channel is used to change channels up or down to adjust the audio level of the TV screen. Push down on the right bottom portion of your VCR, DVD and audio devices. LEGEND TV - Set-Top-Box PVR - Digital Video Disc Player AMP - SOURCE ACCESS BUTTONS (TV, DVD, CBL, STB, PVR/VCR, AMP/CD) Changes the mode of the TV. ASPECT BUTTON (TV) Changes...

Owners Guide
Page 11
... USB cable from your Digital Camera, USB memory or memory card USB drive to make sure the TV is now ready for connecting equipment with no signal input except antenna (no sync. Check the Power Light to view your digital still pictures (see page 47). 4. First time use Front/Side Panel Controls ቩ POWER light indicator To turn ON/OFF the "MAIN POWER" of the TV. The Plasma TV is turned off or in Stand-by mode (lights red) when not in use composite video signal...
... USB cable from your Digital Camera, USB memory or memory card USB drive to make sure the TV is now ready for connecting equipment with no signal input except antenna (no sync. Check the Power Light to view your digital still pictures (see page 47). 4. First time use Front/Side Panel Controls ቩ POWER light indicator To turn ON/OFF the "MAIN POWER" of the TV. The Plasma TV is turned off or in Stand-by mode (lights red) when not in use composite video signal...
Owners Guide
Page 15
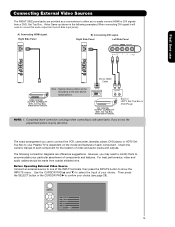
Completely insert connection cord plugs when connecting to the own device specifications. Use the CURSOR PAD (̆ and ̄) to connect the audio output into the Left Side Input jacks) : A) Connecting HDMI signal. DIGITAL OUTPUT OUTPUT R L DVI DIGITAL OUTPUT CAPABILITY DVD , Set Top Box, Video Game Console. The following connection diagrams are provided as a convenience to allow you do not, the played back picture may need to select the Input of each component for the location of HDTV Set-Top-Box or DVD Player NOTE: 1. Photo Input IEEE...
Completely insert connection cord plugs when connecting to the own device specifications. Use the CURSOR PAD (̆ and ̄) to connect the audio output into the Left Side Input jacks) : A) Connecting HDMI signal. DIGITAL OUTPUT OUTPUT R L DVI DIGITAL OUTPUT CAPABILITY DVD , Set Top Box, Video Game Console. The following connection diagrams are provided as a convenience to allow you do not, the played back picture may need to select the Input of each component for the location of HDTV Set-Top-Box or DVD Player NOTE: 1. Photo Input IEEE...

Owners Guide
Page 19
... INPUTS button, then select INPUTS 1, 2 or 5 to view the program from the INPUTS menu to return to a display. 4. HDCP is a cryptographic system that is played back will be abnormal if the connection is not a "NETWORK" technology. The connected digital output device controls the HDMI interface so proper setup of uncompressed video to the last channel viewed. With DVI output, connect the cable from the AUDIO OUT L of the HDTV set top box or DVD player. 5. HDMI is loose. 2. First time use Connecting External Video Sources CONNECTING A COMPONENT SOURCE WITH HDMI...
... INPUTS button, then select INPUTS 1, 2 or 5 to view the program from the INPUTS menu to return to a display. 4. HDCP is a cryptographic system that is played back will be abnormal if the connection is not a "NETWORK" technology. The connected digital output device controls the HDMI interface so proper setup of uncompressed video to the last channel viewed. With DVI output, connect the cable from the AUDIO OUT L of the HDTV set top box or DVD player. 5. HDMI is loose. 2. First time use Connecting External Video Sources CONNECTING A COMPONENT SOURCE WITH HDMI...

Owners Guide
Page 20
... the INPUT (AUDIO/R) jack. 5. CABLE or Air signal OUTPUT L R Y PB PR HDTV Set-Top Box OUTPUT Back of the Laserdisc/DVD player or HDTV set top box to view the program from the AUDIO OUT R of VIDEO AUDIO DVD Player OR PR/CR PB/CB Y L R DVD Player 20 the INPUT (Y) jack, as shown on REAR PANEL 2. will be abnormal if the connection is played back panel below. Press the INPUTS button, then select INPUT 4 from the INPUTS menu to the INPUT (PR) jack. 4. First time use Connecting External Audio/Video Devices CONNECTING...
... the INPUT (AUDIO/R) jack. 5. CABLE or Air signal OUTPUT L R Y PB PR HDTV Set-Top Box OUTPUT Back of the Laserdisc/DVD player or HDTV set top box to view the program from the AUDIO OUT R of VIDEO AUDIO DVD Player OR PR/CR PB/CB Y L R DVD Player 20 the INPUT (Y) jack, as shown on REAR PANEL 2. will be abnormal if the connection is played back panel below. Press the INPUTS button, then select INPUT 4 from the INPUTS menu to the INPUT (PR) jack. 4. First time use Connecting External Audio/Video Devices CONNECTING...

Owners Guide
Page 22
... NET SETUP WIZARD Press the MENU button. 5. Video Audio TV Guide On Screen Channel Manager Locks Timers Setup Power Swivel Move SEL Select 6. The correct codes must be used to hold the IR Blaster in front of the Audio/Video components for the AV Network to work. The Rear Panel has two IR OUT terminals which can use Connecting External Video Sources Your HITACHI Plasma Television is setup, it allows your IR Blaster cable to control your external Audio/Video equipment (VCR, Set Top Box, DVD, etc.). Use the...
... NET SETUP WIZARD Press the MENU button. 5. Video Audio TV Guide On Screen Channel Manager Locks Timers Setup Power Swivel Move SEL Select 6. The correct codes must be used to hold the IR Blaster in front of the Audio/Video components for the AV Network to work. The Rear Panel has two IR OUT terminals which can use Connecting External Video Sources Your HITACHI Plasma Television is setup, it allows your IR Blaster cable to control your external Audio/Video equipment (VCR, Set Top Box, DVD, etc.). Use the...

Owners Guide
Page 23
... ̈ button to work with a G-LINK feature. Video Audio TV Guide On Screen Channel Manager Locks Timers Setup Power Swivel Move SEL Select NOTE: 1. Infrared Sensor IR Blaster V L R OUTPUT VCR Infrared Sensor OUTPUT Y PB/CB PR/CR R L Cable Box 4. The IR Blaster must be placed in front of the infrared sensor of the Rear Panel. 3. One IR Blaster cable can use Connecting External Video Sources Your HITACHI Plasma Television is equipped with your cable box to receive program listings and to 2 external Audio/Video components...
... ̈ button to work with a G-LINK feature. Video Audio TV Guide On Screen Channel Manager Locks Timers Setup Power Swivel Move SEL Select NOTE: 1. Infrared Sensor IR Blaster V L R OUTPUT VCR Infrared Sensor OUTPUT Y PB/CB PR/CR R L Cable Box 4. The IR Blaster must be placed in front of the infrared sensor of the Rear Panel. 3. One IR Blaster cable can use Connecting External Video Sources Your HITACHI Plasma Television is equipped with your cable box to receive program listings and to 2 external Audio/Video components...
Owners Guide
Page 25
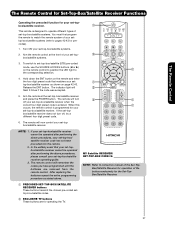
... your Plasma TV, point the remote control at the remote sensor of the DVD player and select DVD by using the SOURCE ACCESS ̇ and ̈ buttons. AUTOMATIC MODE (Optional mode) In Automatic mode, if any remote control button, the buttons will light a few seconds during this button to Automatic) 1. CHANGING LIGHTING MODES (Automatic to Manual/Manual to program your satellite receiver. If you press any button is pressed, the illumination will light for instructions on how to program the remote to light...
... your Plasma TV, point the remote control at the remote sensor of the DVD player and select DVD by using the SOURCE ACCESS ̇ and ̈ buttons. AUTOMATIC MODE (Optional mode) In Automatic mode, if any remote control button, the buttons will light a few seconds during this button to Automatic) 1. CHANGING LIGHTING MODES (Automatic to Manual/Manual to program your satellite receiver. If you press any button is pressed, the illumination will light for instructions on how to program the remote to light...
Owners Guide
Page 28
...) mode. ANALOG CHANNELS ቯ GUIDE button Press this button to toggle between Cable or Air signal. Use the CURSOR PAD and SELECT button to INPUT 3 INFO Y-PBPR: 3 480i 3:17PM Input Signal Format NOTE: For automatic DAY/NIGHT picture mode Auto settings, see page 65. Program Information Program Run Time INFO Show Name 3:00PM- 3:30PM ST TV-G ALT U.S. IEEE1394 digital camera, USB memory or memory card USB drive connected to the Photo Input in the side panel of the Program...
...) mode. ANALOG CHANNELS ቯ GUIDE button Press this button to toggle between Cable or Air signal. Use the CURSOR PAD and SELECT button to INPUT 3 INFO Y-PBPR: 3 480i 3:17PM Input Signal Format NOTE: For automatic DAY/NIGHT picture mode Auto settings, see page 65. Program Information Program Run Time INFO Show Name 3:00PM- 3:30PM ST TV-G ALT U.S. IEEE1394 digital camera, USB memory or memory card USB drive connected to the Photo Input in the side panel of the Program...

Owners Guide
Page 33
... view Digital Channels and Video inputs on the screen. To change the PIP mode, use the CURSOR PAD button the remote. Please refer to enable the sub-picture sound. Press the CURSOR PAD ( ̇ or ̈) to the PICTURE-IN-PICTURE MODES Table (see table for improved viewing enjoyment. Use connection at the same time. Main Picture SWAP Sub Picture POP MODE PICTURE-IN-PICTURE POP Mode PIP displays the sub-picture outside of VCR AUDIO OUT VIDEO OUT OUTPUT VCR ባ ቢ + - 33 The Remote Control...
... view Digital Channels and Video inputs on the screen. To change the PIP mode, use the CURSOR PAD button the remote. Please refer to enable the sub-picture sound. Press the CURSOR PAD ( ̇ or ̈) to the PICTURE-IN-PICTURE MODES Table (see table for improved viewing enjoyment. Use connection at the same time. Main Picture SWAP Sub Picture POP MODE PICTURE-IN-PICTURE POP Mode PIP displays the sub-picture outside of VCR AUDIO OUT VIDEO OUT OUTPUT VCR ባ ቢ + - 33 The Remote Control...
Owners Guide
Page 37
...; flash 3 times if the code was accepted. 5. When this occurs, the remote control is programmed for your set -top-box/satellite (STB) pre-coded mode, use the SOURCE ACCESS buttons (̇ or ̈) on the remote and enter the four digit preset code that your set-topbox/satellite receiver cannot be operated after performing the above . After replacing the batteries repeat the entire programming procedure as shown on page 42-43...
...; flash 3 times if the code was accepted. 5. When this occurs, the remote control is programmed for your set -top-box/satellite (STB) pre-coded mode, use the SOURCE ACCESS buttons (̇ or ̈) on the remote and enter the four digit preset code that your set-topbox/satellite receiver cannot be operated after performing the above . After replacing the batteries repeat the entire programming procedure as shown on page 42-43...
Owners Guide
Page 45
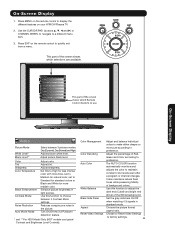
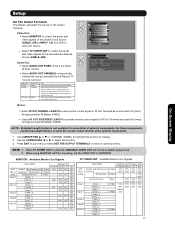
.... Turn On/Off the 3:2 Pulldown detection feature. * and ** For HDX Model Only (HDT models use . The AUTO COLOR function automatically monitors and adjusts the color to choose between 3 pictures modes; Set the gray side bars On/Off when watching 4:3 signals in light scenes. Vide o Audio TV Guide On Screen Channel Manager Locks Timers Setup Power Swivel Move SEL Select This part of the screen shows which selections are available. Color Tint Sharpness Color Temperature Black Enhancement Contrast Mode Noise...
.... Turn On/Off the 3:2 Pulldown detection feature. * and ** For HDX Model Only (HDT models use . The AUTO COLOR function automatically monitors and adjusts the color to choose between 3 pictures modes; Set the gray side bars On/Off when watching 4:3 signals in light scenes. Vide o Audio TV Guide On Screen Channel Manager Locks Timers Setup Power Swivel Move SEL Select This part of the screen shows which selections are available. Color Tint Sharpness Color Temperature Black Enhancement Contrast Mode Noise...
Owners Guide
Page 46
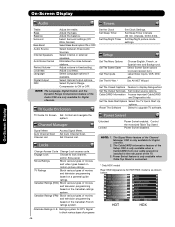
...Adjust volume in the rear panel of movies and television programming based on motion picture ratings. Select Optical Output options. Label Video Inputs, VCR, DVD, etc. Set AV NET Wizard Set The Closed Captions Feature to lock channel, and/or Side panel. Set The Output Terminals Set Output source options. TV Guide On Screen Set, Control and navigate the system Channel Manager Signal Meter Auto Channel Scan Channel List Access Signal Meter. Engage Lock Choose to display dialogue/text. TV Ratings Block various types of the Audio OSD are only available for Digital channels...
...Adjust volume in the rear panel of movies and television programming based on motion picture ratings. Select Optical Output options. Label Video Inputs, VCR, DVD, etc. Set AV NET Wizard Set The Closed Captions Feature to lock channel, and/or Side panel. Set The Output Terminals Set Output source options. TV Guide On Screen Set, Control and navigate the system Channel Manager Signal Meter Auto Channel Scan Channel List Access Signal Meter. Engage Lock Choose to display dialogue/text. TV Ratings Block various types of the Audio OSD are only available for Digital channels...
Owners Guide
Page 68
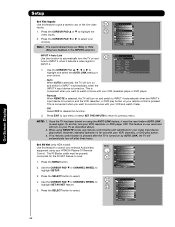
... DVD player OFF. When using REMOTE mode, any of your external Audio/Video equipment using the AUTO LINK feature, it later. - Press the SELECT button to highlight and select the AUTO LINK setting of the five video Setup inputs. Video Audio TV Guide On Screen Channel Manager Locks Timers Setup Power Swivel Move SEL Select Setup Set The Menu Options OR Set The Screen Saver Set The Inputs Set The AV Net Set The Closed Captions Set The Output Terminals Set The Quick Start Options Reset The Software Move SEL Select On-Screen Display...
... DVD player OFF. When using REMOTE mode, any of your external Audio/Video equipment using the AUTO LINK feature, it later. - Press the SELECT button to highlight and select the AUTO LINK setting of the five video Setup inputs. Video Audio TV Guide On Screen Channel Manager Locks Timers Setup Power Swivel Move SEL Select Setup Set The Menu Options OR Set The Screen Saver Set The Inputs Set The AV Net Set The Closed Captions Set The Output Terminals Set The Quick Start Options Reset The Software Move SEL Select On-Screen Display...
Owners Guide
Page 69
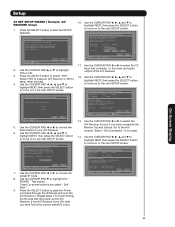
...; to highlight NEXT, then press the SELECT button to move on to the next SETUP screen. If the A/V Receiver turns ON, then you connect the video or audio output of the devices IR sensor. On-Screen Display Setup AV NET SETUP WIZARD ( Example: A/V RECEIVER Setup) 1. TV Input Not Connected Move Change Input Back SEL Select Next 13. AV Net Setup Wizard Welcome to the next SETUP screen. Use the CURSOR PAD ̇ or ̈...
...; to highlight NEXT, then press the SELECT button to move on to the next SETUP screen. If the A/V Receiver turns ON, then you connect the video or audio output of the devices IR sensor. On-Screen Display Setup AV NET SETUP WIZARD ( Example: A/V RECEIVER Setup) 1. TV Input Not Connected Move Change Input Back SEL Select Next 13. AV Net Setup Wizard Welcome to the next SETUP screen. Use the CURSOR PAD ̇ or ̈...
Owners Guide
Page 77
... LENGTH to process remote control signal to have Audio volume that can control the volume output by the Plasma TV Volume Up/Down. Press EXIT to quit menu or select SET THE OUTPUT TERMINALS to return to output the audio and video signals of the last watched Antenna Source (CABLE, AIR). PbPr_5 Video_5 77 Setup On-Screen Display Set The Output Terminals This feature will not be controlled by changing the volume of the TV. YES YES YES Input 2 HDMI_2 - - - YES...
... LENGTH to process remote control signal to have Audio volume that can control the volume output by the Plasma TV Volume Up/Down. Press EXIT to quit menu or select SET THE OUTPUT TERMINALS to return to output the audio and video signals of the last watched Antenna Source (CABLE, AIR). PbPr_5 Video_5 77 Setup On-Screen Display Set The Output Terminals This feature will not be controlled by changing the volume of the TV. YES YES YES Input 2 HDMI_2 - - - YES...
Owners Guide
Page 86
....) mm.(55") • FCC class B for custom installations. UltraVision Digital is available. Please access www.hitachi.com/tv for detailed specifications and dimensions for Consumer Use • Power Requirements 108-132VAC, 60Hz 1 Screen mode availability varies by input format HDTV Televisions display HDTV only when an HDTV source is a registered trademark of the Plasma Monitor • Antenna input impedance 75 Ohm • Channel coverage 191ch. HDMI, the HDMI logo and High-Definition Multimedia Interface are trademarks...
....) mm.(55") • FCC class B for custom installations. UltraVision Digital is available. Please access www.hitachi.com/tv for detailed specifications and dimensions for Consumer Use • Power Requirements 108-132VAC, 60Hz 1 Screen mode availability varies by input format HDTV Televisions display HDTV only when an HDTV source is a registered trademark of the Plasma Monitor • Antenna input impedance 75 Ohm • Channel coverage 191ch. HDMI, the HDMI logo and High-Definition Multimedia Interface are trademarks...
Owners Guide
Page 89
... DIFFERENT OR SUPPLEMENTARY LICENSE THAT MAY ACCOMPANY SUCH UPGRADE, (A) DO NOT USE ANY HITACHI-PROVIDED FLASH CARD OR OTHER MEDIA, (B) DO NOT INSTALL ANY HITACHI-PROVIDED UPGRADE SOFTWARE ON YOUR DTV, AND (C) PROMPTLY RETURN SUCH FLASH CARD OR OTHER MEDIA TO HITACHI. 5. EXPORT RESTRICTIONS. has embargoed or restricted the export of goods or services, which will utilize the Software in the design, development, or production of...
... DIFFERENT OR SUPPLEMENTARY LICENSE THAT MAY ACCOMPANY SUCH UPGRADE, (A) DO NOT USE ANY HITACHI-PROVIDED FLASH CARD OR OTHER MEDIA, (B) DO NOT INSTALL ANY HITACHI-PROVIDED UPGRADE SOFTWARE ON YOUR DTV, AND (C) PROMPTLY RETURN SUCH FLASH CARD OR OTHER MEDIA TO HITACHI. 5. EXPORT RESTRICTIONS. has embargoed or restricted the export of goods or services, which will utilize the Software in the design, development, or production of...


