

Owners Guide
Page 1
...Center) & Plasma Display Monitor 32HDT55 42HDT55 50HDT55 OPERATING GUIDE Video Audio Ch. Manager Locks Setup Move SEL Sel IMPORTANT SAFETY INSTRUCTIONS 2-3 FIRST TIME USE 4-23 THE REMOTE CONTROL 24-41 ON-SCREEN DISPLAY USING THE RGB INPUT OF THE PLASMA TV 42-65 66-75 USEFUL INFORMATION INDEX... 76-84 Manager Locks Setup Move SEL Sel STB POWER TV CBL VCR SOURCE WIZARDTAPE CD 2 AMP 3 6 DVD 1 5 9 INFO 4 8 MODE 7 0 ASPECT A/V NET SLEEP EXIT CH SELECT ANT TV/RGB MENU LAST CH GUIDE/TV SCHD VID 4 VID 5 VOL MUTE SVCS VCR PLUS+ VID 2 VID 1 ...
...Center) & Plasma Display Monitor 32HDT55 42HDT55 50HDT55 OPERATING GUIDE Video Audio Ch. Manager Locks Setup Move SEL Sel IMPORTANT SAFETY INSTRUCTIONS 2-3 FIRST TIME USE 4-23 THE REMOTE CONTROL 24-41 ON-SCREEN DISPLAY USING THE RGB INPUT OF THE PLASMA TV 42-65 66-75 USEFUL INFORMATION INDEX... 76-84 Manager Locks Setup Move SEL Sel STB POWER TV CBL VCR SOURCE WIZARDTAPE CD 2 AMP 3 6 DVD 1 5 9 INFO 4 8 MODE 7 0 ASPECT A/V NET SLEEP EXIT CH SELECT ANT TV/RGB MENU LAST CH GUIDE/TV SCHD VID 4 VID 5 VOL MUTE SVCS VCR PLUS+ VID 2 VID 1 ...
Owners Guide
Page 3
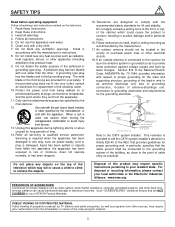
...are NOT COVERED by the manufacturer, or sold with a dry cloth. 7. Only use this apparatus during lightning storms or when unused for your HITACHI Factory Warranty. Refer all warnings. 4. Heed all servicing to Article 820-40 of the NEC that produce heat. 9. Do not block any ... sources, may require specific instructions pertaining to the point of overhead power lines or other . Do not use the attachments/accessories specified by TV stations and cable companies, as well as to rain or moisture, does not operate normally, or has been dropped. 15. A grounding ...
...are NOT COVERED by the manufacturer, or sold with a dry cloth. 7. Only use this apparatus during lightning storms or when unused for your HITACHI Factory Warranty. Refer all warnings. 4. Heed all servicing to Article 820-40 of the NEC that produce heat. 9. Do not block any ... sources, may require specific instructions pertaining to the point of overhead power lines or other . Do not use the attachments/accessories specified by TV stations and cable companies, as well as to rain or moisture, does not operate normally, or has been dropped. 15. A grounding ...
Owners Guide
Page 4
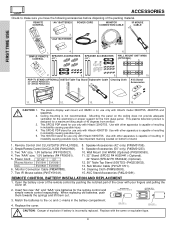
... battery is for a maximum tilting angle of the cover with the same or equivalent type. 4 Replace with your fingers and pulling the cover off. 2. PDP TV STAND (OPTIONAL) 50STD3 Table Top Stand 32" (SPD32 P#H520441) C 42" (SPD42 P#H520442) B A C« B« A« C B A C« B« A&#... "AAA" size, 1.5V batteries (P# FR00061). 5. REMOTE CONTROL BATTERY INSTALLATION AND REPLACEMENT 1. This 50STD3 stand for use only with Hitachi 42HDT55 Use with Hitachi 32HDT55. Remote Control Unit CLU-5726TSI (P# HL01826). 2. Monitor Connection Cable (P#EW07883). 7.
... battery is for a maximum tilting angle of the cover with the same or equivalent type. 4 Replace with your fingers and pulling the cover off. 2. PDP TV STAND (OPTIONAL) 50STD3 Table Top Stand 32" (SPD32 P#H520441) C 42" (SPD42 P#H520442) B A C« B« A« C B A C« B« A&#... "AAA" size, 1.5V batteries (P# FR00061). 5. REMOTE CONTROL BATTERY INSTALLATION AND REPLACEMENT 1. This 50STD3 stand for use only with Hitachi 42HDT55 Use with Hitachi 32HDT55. Remote Control Unit CLU-5726TSI (P# HL01826). 2. Monitor Connection Cable (P#EW07883). 7.

Owners Guide
Page 5
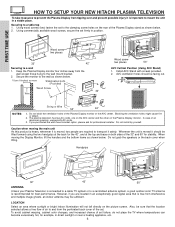
...speaker holders to the screw in screws (B) Hook this portion to the speakers as shown below . FIRST TIME USE HOW TO SETUP YOUR NEW HITACHI PLASMA TELEVISION SPEAKER INSTALLATION 42" 1. Speaker Holder Screw x2 (R) (L) (R) SPEAKER INSTALLATION 50" 1. Tighten screws (A). (R) Speaker Unscrew (B) Completely ...as shown below . (Make sure the core is toward the display monitor side.) Core Screw in screws (C) Bottom View of the Plasma TV and an external amplifier. 5 Screw the speaker holder to the loose screws (A). 7. Hook the speaker holders to the speakers as shown...
...speaker holders to the screw in screws (B) Hook this portion to the speakers as shown below . FIRST TIME USE HOW TO SETUP YOUR NEW HITACHI PLASMA TELEVISION SPEAKER INSTALLATION 42" 1. Speaker Holder Screw x2 (R) (L) (R) SPEAKER INSTALLATION 50" 1. Tighten screws (A). (R) Speaker Unscrew (B) Completely ...as shown below . (Make sure the core is toward the display monitor side.) Core Screw in screws (C) Bottom View of the Plasma TV and an external amplifier. 5 Screw the speaker holder to the loose screws (A). 7. Hook the speaker holders to the speakers as shown...
Owners Guide
Page 6
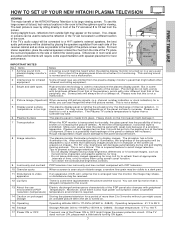
... chance of set to the clamping screw holes on both AC cords. 3. Using wood screws (two) fasten the set failure, do not place the TV where temperatures can become excessively hot, for stability. Install AVC Stand with screws provided. 2. The plasma television has two AC cords, one on the ... sure that is moved it safely. Wood screw two places 32" 42" Securing to a table-top 1. FIRST TIME USE HOW TO SETUP YOUR NEW HITACHI PLASMA TELEVISION To take measures to prevent the Plasma Display from the wall except those hung to the wall mount bracket. 2. VOL+ STANDBY (RED) ON...
... chance of set to the clamping screw holes on both AC cords. 3. Using wood screws (two) fasten the set failure, do not place the TV where temperatures can become excessively hot, for stability. Install AVC Stand with screws provided. 2. The plasma television has two AC cords, one on the ... sure that is moved it safely. Wood screw two places 32" 42" Securing to a table-top 1. FIRST TIME USE HOW TO SETUP YOUR NEW HITACHI PLASMA TELEVISION To take measures to prevent the Plasma Display from the wall except those hung to the wall mount bracket. 2. VOL+ STANDBY (RED) ON...
Owners Guide
Page 7
...plasma display monitor's panel that might trigger the power protection circuit. HOW TO SET UP YOUR NEW HITACHI PLASMA TELEVISION FIRST TIME USE VIEWING The major benefit of the HITACHI Plasma Television is not a malfunction. 4 Picture Image (Spectrum) When receving still picture signals, (e.g. ...malfunction. Do not leave stationary images appearing for a period of the screen. Storage temperature: 5˚F to avoid image retention. If the TV does not turn ON, please wait a little before turning ON again. 7 Please instruct transporters so that it is delayed compared to such ...
...plasma display monitor's panel that might trigger the power protection circuit. HOW TO SET UP YOUR NEW HITACHI PLASMA TELEVISION FIRST TIME USE VIEWING The major benefit of the HITACHI Plasma Television is not a malfunction. 4 Picture Image (Spectrum) When receving still picture signals, (e.g. ...malfunction. Do not leave stationary images appearing for a period of the screen. Storage temperature: 5˚F to avoid image retention. If the TV does not turn ON, please wait a little before turning ON again. 7 Please instruct transporters so that it is delayed compared to such ...
Owners Guide
Page 8
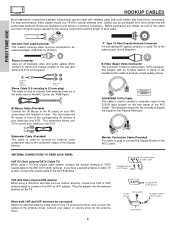
...8 To outdoor VHF or UHF antenna To UHF antenna ANT A/ANT B To outdoor antenna or CATV system Antenna Mixer This connection allows your TV to control your cable box and VCR. The resolution should use 75-Ohm coaxial shielded wire. Monitor Connection Cable (Provided) This cable is used...and front control panel. S-Video (Super Video) Connector This connector is used . Below are connected Attach an optional antenna cable mixer to the TV antenna terminal, and connect the cables to the antenna mixer. Subwoofer Cable (Provided) This cable is used on the television. Cables can be ...
...8 To outdoor VHF or UHF antenna To UHF antenna ANT A/ANT B To outdoor antenna or CATV system Antenna Mixer This connection allows your TV to control your cable box and VCR. The resolution should use 75-Ohm coaxial shielded wire. Monitor Connection Cable (Provided) This cable is used...and front control panel. S-Video (Super Video) Connector This connector is used . Below are connected Attach an optional antenna cable mixer to the TV antenna terminal, and connect the cables to the antenna mixer. Subwoofer Cable (Provided) This cable is used on the television. Cables can be ...

Owners Guide
Page 9
...right (̈) buttons when in MENU mode. 9 The volume level will be displayed on the remote control to toggle between TV and RGB (ANALOG INPUT). ቤ CHANNEL selector Press these buttons to 5, RGB, or Ant A/B source. These buttons also... depending on the input you to enter the MENU, making it possible to set TV features to (see page 31). This button also serves as the EXIT button when in the top right... corner of the TV screen. Your selection is shown in MENU mode. NOTES: Your remote control does not have ...
...right (̈) buttons when in MENU mode. 9 The volume level will be displayed on the remote control to toggle between TV and RGB (ANALOG INPUT). ቤ CHANNEL selector Press these buttons to 5, RGB, or Ant A/B source. These buttons also... depending on the input you to enter the MENU, making it possible to set TV features to (see page 31). This button also serves as the EXIT button when in the top right... corner of the TV screen. Your selection is shown in MENU mode. NOTES: Your remote control does not have ...
Owners Guide
Page 10
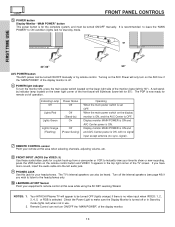
...video input when VIDEO: 1, 2, 3, 4, 5, or RGB is selected. Display monitor MAIN POWER is ON and and AVC Center power is ON. The TV's internal speakers can also be turned ON/OFF manually or by remote control. Turning on the AVC Power will only turn ON/OFF the "MAIN...). ቨ REMOTE CONTROL sensor Point your head-phones. NOTES: 1. 2. Remote Control can be heard. Turn off or in Stand-by mode. Your HITACHI Plasma TV will illuminate (lower left audio jack. ቪ PHONES JACK Use this jack for your remote at this area when selecting channels, adjusting volume, etc. ...
...video input when VIDEO: 1, 2, 3, 4, 5, or RGB is selected. Display monitor MAIN POWER is ON and and AVC Center power is ON. The TV's internal speakers can also be turned ON/OFF manually or by remote control. Turning on the AVC Power will only turn ON/OFF the "MAIN...). ቨ REMOTE CONTROL sensor Point your head-phones. NOTES: 1. 2. Remote Control can be heard. Turn off or in Stand-by mode. Your HITACHI Plasma TV will illuminate (lower left audio jack. ቪ PHONES JACK Use this jack for your remote at this area when selecting channels, adjusting volume, etc. ...
Owners Guide
Page 12
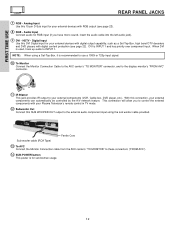
... ("FROM AVC"). ተ SUB-POWER button This power is used, hook up audio to control the external components with your Plasma Television's remote control in TV mode. ቮ Subwoofer Out Connect this 15-pin D-Sub input for your external components (VCR, Cable box, DVD player, etc.). FIRST TIME USE REAR PANEL...
... ("FROM AVC"). ተ SUB-POWER button This power is used, hook up audio to control the external components with your Plasma Television's remote control in TV mode. ቮ Subwoofer Out Connect this 15-pin D-Sub input for your external components (VCR, Cable box, DVD player, etc.). FIRST TIME USE REAR PANEL...
Owners Guide
Page 14
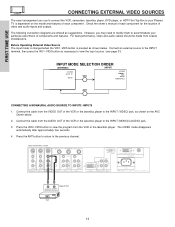
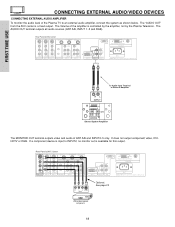
...of SRS Labs, Inc. The VIDEO mode disappears automatically after approximately four seconds. 4. Back of video and audio inputs and outputs. However, you use HITACHI specified cable. Connect an external source to the INPUT terminal, then press the VID1~VID5 button as necessary to the INPUT (VIDEO) jack, as ...shown on the model and features of the VCR or the laserdisc player to accommodate your Plasma TV is pressed as suggestions. Connect the cable from the AUDIO OUT of each component for the location of VCR AUDIO OUT VIDEO OUT VCR ...
...of SRS Labs, Inc. The VIDEO mode disappears automatically after approximately four seconds. 4. Back of video and audio inputs and outputs. However, you use HITACHI specified cable. Connect an external source to the INPUT terminal, then press the VID1~VID5 button as necessary to the INPUT (VIDEO) jack, as ...shown on the model and features of the VCR or the laserdisc player to accommodate your Plasma TV is pressed as suggestions. Connect the cable from the AUDIO OUT of each component for the location of VCR AUDIO OUT VIDEO OUT VCR ...
Owners Guide
Page 18
... PB L/(MONO) PB L/(MONO) R AUDIO INPUT 3 IR BLASTER PR R AUDIO INPUT 2 PR R AUDIO INPUT 1 ANALOG INPUT L AUDIO DVI-HDTV L/(MONO) AUDIO Please use HITACHI specified cable. TO MONITOR INPUT 1 R R AUDIO OUT RGB AC IN TruBass SRS and symbol are trademarks of SRS Labs, Inc. RL INPUT To Audio Input... cable. FIRST TIME USE CONNECTING EXTERNAL AUDIO/VIDEO DEVICES CONNECTING EXTERNAL AUDIO AMPLIFIER To monitor the audio level of the Plasma TV to INPUT2, no monitor out is available for this output. The Volume of ANT A/B and INPUT2~5 only. It does not output ...
... PB L/(MONO) PB L/(MONO) R AUDIO INPUT 3 IR BLASTER PR R AUDIO INPUT 2 PR R AUDIO INPUT 1 ANALOG INPUT L AUDIO DVI-HDTV L/(MONO) AUDIO Please use HITACHI specified cable. TO MONITOR INPUT 1 R R AUDIO OUT RGB AC IN TruBass SRS and symbol are trademarks of SRS Labs, Inc. RL INPUT To Audio Input... cable. FIRST TIME USE CONNECTING EXTERNAL AUDIO/VIDEO DEVICES CONNECTING EXTERNAL AUDIO AMPLIFIER To monitor the audio level of the Plasma TV to INPUT2, no monitor out is available for this output. The Volume of ANT A/B and INPUT2~5 only. It does not output ...
Owners Guide
Page 19
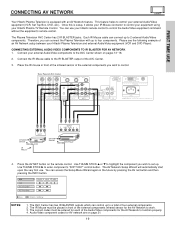
...codes for the AV Network to work. 3. FIRST TIME USE CONNECTING AV NETWORK Your Hitachi Plasma Television is setup, it allows your IR Mouse connector to control your equipment using your Hitachi Plasma TV Remote Control. The Plasma Television AVC Center has 2 IR BLASTER jacks. Use THUMB...cable to control the Audio/Video equipment command without the equipment's remote control. Press the AV NET button on pages 13~18. 2. Connect your Hitachi remote control to the IR BLASTER output of AVC Center ANT B TO CONVERTER ANT A S-VIDEO S-VIDEO VIDEO VIDEO L L/(MONO) R AUDIO MONITOR...
...codes for the AV Network to work. 3. FIRST TIME USE CONNECTING AV NETWORK Your Hitachi Plasma Television is setup, it allows your IR Mouse connector to control your equipment using your Hitachi Plasma TV Remote Control. The Plasma Television AVC Center has 2 IR BLASTER jacks. Use THUMB...cable to control the Audio/Video equipment command without the equipment's remote control. Press the AV NET button on pages 13~18. 2. Connect your Hitachi remote control to the IR BLASTER output of AVC Center ANT B TO CONVERTER ANT A S-VIDEO S-VIDEO VIDEO VIDEO L L/(MONO) R AUDIO MONITOR...

Owners Guide
Page 20
...) No Connection No Connection Transmission Test BACK Move 0-9 POWER OK Input PLAY EXIT CH UP HITACHI AV NET SET UP DVD Device Code 0 6 7 2 (Enter code "9999" to uninstall) Input 1 Using TV Transmission Test BACK POWER OK PLAY EXIT Move Set Input SEL Select CH UP THUMB STICK SELECT...DVD Device Code Video Input Audio Input 0 6 7 2 (Enter code "9999" to uninstall) Input 1 Using TV Transmission Test BACK POWER OK PLAY EXIT Move Set Input SEL Select THUMB STICK (x2) CH UP HITACHI AV NET SET UP DVD Device Code Video Input Audio Input 0 6 7 2 (Enter code "9999" to...
...) No Connection No Connection Transmission Test BACK Move 0-9 POWER OK Input PLAY EXIT CH UP HITACHI AV NET SET UP DVD Device Code 0 6 7 2 (Enter code "9999" to uninstall) Input 1 Using TV Transmission Test BACK POWER OK PLAY EXIT Move Set Input SEL Select CH UP THUMB STICK SELECT...DVD Device Code Video Input Audio Input 0 6 7 2 (Enter code "9999" to uninstall) Input 1 Using TV Transmission Test BACK POWER OK PLAY EXIT Move Set Input SEL Select THUMB STICK (x2) CH UP HITACHI AV NET SET UP DVD Device Code Video Input Audio Input 0 6 7 2 (Enter code "9999" to...

Owners Guide
Page 22
... HDTV Set-Top Box CONNECT TO IR BLASTER (PROVIDED) CONNECT TO IR BLASTER NOTE: Cables are trademarks of Display Monitor (PROVIDED) INPUT OUTPUT Cable TV Box ANT B TO CONVERTER ANT A S-VIDEO S-VIDEO VIDEO L VIDEO L/(MONO) R AUDIO MONITOR OUT R AUDIO INPUT 4 S-VIDEO VIDEO Y/VIDEO...INPUT 1 ANALOG INPUT L AUDIO DVI-HDTV L/(MONO) AUDIO INPUT 1 R R AUDIO OUT RGB Please use HITACHI specified cable. FIRST TIME USE REAR PANEL CONNECTIONS Outside antenna or cable TV coaxial cable 2-Way signal splitter VCR #1 ANT OUTPUT IN S-VIDEO V L R RGB OUTPUT DIGITAL OUTPUT ...
... HDTV Set-Top Box CONNECT TO IR BLASTER (PROVIDED) CONNECT TO IR BLASTER NOTE: Cables are trademarks of Display Monitor (PROVIDED) INPUT OUTPUT Cable TV Box ANT B TO CONVERTER ANT A S-VIDEO S-VIDEO VIDEO L VIDEO L/(MONO) R AUDIO MONITOR OUT R AUDIO INPUT 4 S-VIDEO VIDEO Y/VIDEO...INPUT 1 ANALOG INPUT L AUDIO DVI-HDTV L/(MONO) AUDIO INPUT 1 R R AUDIO OUT RGB Please use HITACHI specified cable. FIRST TIME USE REAR PANEL CONNECTIONS Outside antenna or cable TV coaxial cable 2-Way signal splitter VCR #1 ANT OUTPUT IN S-VIDEO V L R RGB OUTPUT DIGITAL OUTPUT ...

Owners Guide
Page 23
...of S-VIDEO type. • When using a DVI input from a Set-Top-Box, it is recommended to use VIDEO or S-VIDEO inputs to connect to the TV's PR input. • Your component outputs may use a 1080i or 720p input signal. 23 Refer to your VCR operating guide for more information on line...both component Y-PBPR and composite video signal. • You may be labeled Y, B-Y, and R-Y. In this feature. In this case, connect the components B-Y output to the TV's PB input and the components R-Y output to INPUT 3, 4 or 5, but note that have this case, connect the components CB output to the...
...of S-VIDEO type. • When using a DVI input from a Set-Top-Box, it is recommended to use VIDEO or S-VIDEO inputs to connect to the TV's PR input. • Your component outputs may use a 1080i or 720p input signal. 23 Refer to your VCR operating guide for more information on line...both component Y-PBPR and composite video signal. • You may be labeled Y, B-Y, and R-Y. In this feature. In this case, connect the components B-Y output to the TV's PB input and the components R-Y output to INPUT 3, 4 or 5, but note that have this case, connect the components CB output to the...

Owners Guide
Page 24
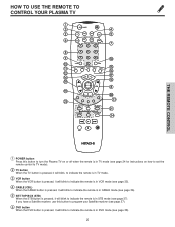
... VID 3 SURF VID 5 VID 4 FREEZE PIP MODE PIP ACCESS SWAP DAY/NIGHT ቤ REC ቢ These buttons allow the remote to control your TV, VCR, cable box, satellite receiver, DVD player, or other audio/video equipment with one area. To operate your DVD player, point the remote at the...ACCESS VIDEO SWAP PIP MODE REC CLU-5723TSI REMOTE In addition to controlling all the functions on your HITACHI Plasma TV, the new remote control is designed to operate different types of VCRs, CATV (Cable TV) converters, set -top-box. Basic operation keys are in a dark room, press the light button...
... VID 3 SURF VID 5 VID 4 FREEZE PIP MODE PIP ACCESS SWAP DAY/NIGHT ቤ REC ቢ These buttons allow the remote to control your TV, VCR, cable box, satellite receiver, DVD player, or other audio/video equipment with one area. To operate your DVD player, point the remote at the...ACCESS VIDEO SWAP PIP MODE REC CLU-5723TSI REMOTE In addition to controlling all the functions on your HITACHI Plasma TV, the new remote control is designed to operate different types of VCRs, CATV (Cable TV) converters, set -top-box. Basic operation keys are in a dark room, press the light button...
Owners Guide
Page 25
...SURF VID 5 VID 4 FREEZE PIP MODE PIP ACCESS SWAP DAY/NIGHT ብ ቦ ቨ 23 1 24 REC VOL TV POWER DVD 1 4 VCR CD SOURCETWAPIZEARD CBL 2 STB 7 SLEEP 5 3 AMP ANT 8 6 TV/RGB 0 9 A/V NET MENU INFO ASPECT MODE EXIT SELECT MUTE VCR PLUS+ SVCS VID 2 VID 1 CH PIP LAST CH PIP... MODE PIP VID 3 CH GUIDE/TV VID 4 SCHD VID 5 SWAP PIP ACCESS FREEZE REC VIDEO CLU-5723TSI THE REMOTE CONTROL ᕃ POWER button Press this button to program your Satellite...
...SURF VID 5 VID 4 FREEZE PIP MODE PIP ACCESS SWAP DAY/NIGHT ብ ቦ ቨ 23 1 24 REC VOL TV POWER DVD 1 4 VCR CD SOURCETWAPIZEARD CBL 2 STB 7 SLEEP 5 3 AMP ANT 8 6 TV/RGB 0 9 A/V NET MENU INFO ASPECT MODE EXIT SELECT MUTE VCR PLUS+ SVCS VID 2 VID 1 CH PIP LAST CH PIP... MODE PIP VID 3 CH GUIDE/TV VID 4 SCHD VID 5 SWAP PIP ACCESS FREEZE REC VIDEO CLU-5723TSI THE REMOTE CONTROL ᕃ POWER button Press this button to program your Satellite...
Owners Guide
Page 26
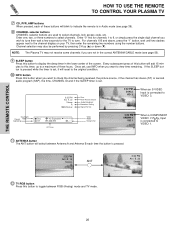
... mode (see page 39). ቩ CHANNEL selector buttons CHANNEL selector buttons are not in the lower center of the screen. Enter "0" first for the TV to view time remaining. Wide Mode Sleep Timer 3:32 PM YPBPR:1 VID 1 When a COMPONENT VIDEO: Y-PBPR Input is connected to display the sleep ... INFO button Press this button to select channels, lock access code, etc. Enter one, two, or three numbers to the channel display on your TV, then enter the remaining two numbers using the number buttons. Channel selection may not receive some channels if you want to tune. If the SLEEP...
... mode (see page 39). ቩ CHANNEL selector buttons CHANNEL selector buttons are not in the lower center of the screen. Enter "0" first for the TV to view time remaining. Wide Mode Sleep Timer 3:32 PM YPBPR:1 VID 1 When a COMPONENT VIDEO: Y-PBPR Input is connected to display the sleep ... INFO button Press this button to select channels, lock access code, etc. Enter one, two, or three numbers to the channel display on your TV, then enter the remaining two numbers using the number buttons. Channel selection may not receive some channels if you want to tune. If the SLEEP...
Owners Guide
Page 27
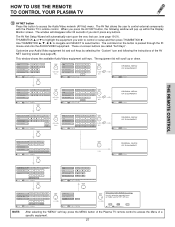
... STICK SELECT MORE.. THE REMOTE CONTROL MODE EXIT MUTE VCR PLUS+ SVCS VID 2 VID 1 HOW TO USE THE REMOTE TO CONTROL YOUR PLASMA TV VOL TV POWER SLEEP ANT TV/RGB MENU DVD 1 VCR CDSOURCE WIZARDCBL TAPE STB 4 7 2 5 AMP 3 8 6 0 9 A/V NET ASPECT INFO SELECT CH PIP PIP MODE PIP VID 3 ...INFO Device Setting CH ̆ 3 6 9 MENU INFO GUIDE THUMB STICK Cable Box Set Top Box Custom SETUP Move INFO Device Setting THUMB STICK HITACHI AV NET WIZARD (Learning) Use this button to access the Audio/Video network (AV Net) menu. DVD VCR PV Recorder AV Receiver POWER MENU MORE...
... STICK SELECT MORE.. THE REMOTE CONTROL MODE EXIT MUTE VCR PLUS+ SVCS VID 2 VID 1 HOW TO USE THE REMOTE TO CONTROL YOUR PLASMA TV VOL TV POWER SLEEP ANT TV/RGB MENU DVD 1 VCR CDSOURCE WIZARDCBL TAPE STB 4 7 2 5 AMP 3 8 6 0 9 A/V NET ASPECT INFO SELECT CH PIP PIP MODE PIP VID 3 ...INFO Device Setting CH ̆ 3 6 9 MENU INFO GUIDE THUMB STICK Cable Box Set Top Box Custom SETUP Move INFO Device Setting THUMB STICK HITACHI AV NET WIZARD (Learning) Use this button to access the Audio/Video network (AV Net) menu. DVD VCR PV Recorder AV Receiver POWER MENU MORE...


