

Owners Guide
Page 2
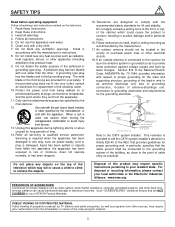
... HITACHI Plasma Televisions. REFER SERVICING TO QUALIFIED SERVICE PERSONNEL. NOTE: • There are no user serviceable parts inside the AVC center/display monitor. • Model and serial numbers are covered in the literature accompanying the appliance. CAUTION: Adjust only those controls that are not expressly approved by HITACHI could void the user's authority to this device that are indicated on this section illustrates safety tips which will display television closed captioning...
... HITACHI Plasma Televisions. REFER SERVICING TO QUALIFIED SERVICE PERSONNEL. NOTE: • There are no user serviceable parts inside the AVC center/display monitor. • Model and serial numbers are covered in the literature accompanying the appliance. CAUTION: Adjust only those controls that are not expressly approved by HITACHI could void the user's authority to this device that are indicated on this section illustrates safety tips which will display television closed captioning...
Owners Guide
Page 3
... reminder is grounded so as power-supply cord or plug is used, use the attachments/accessories specified by the manufacturer. 17. Install in any heat sources such as radiators, heat registers, stoves, or other apparatus (including amplifiers) that the cable ground shall be connected to the grounding system of the building, as close to television receivers. Protect the power cord from being walked on or...
... reminder is grounded so as power-supply cord or plug is used, use the attachments/accessories specified by the manufacturer. 17. Install in any heat sources such as radiators, heat registers, stoves, or other apparatus (including amplifiers) that the cable ground shall be connected to the grounding system of the building, as close to television receivers. Protect the power cord from being walked on or...
Owners Guide
Page 4
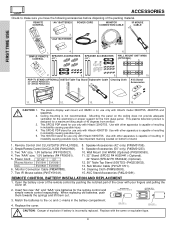
... causing possible injury. REMOTE CONTROL "AA" BATTERIES POWER CORD MONITOR CONNECTION CABLE IR MOUSE CABLE POWER CBL TV VCR SOURCE WIZARD PVR CD STB AMP 3 DVD 2 6 1 5 9 4 8 INFO 7 SLEEP TV/RGB 0 A/V NET ASPECT VIDEO ANT EXIT CH SELECT VOL VID 1 MUTE VID 2 PIP LAST CH VID 4 FREEZE VID 3 SURF PIP ACCESDSAY/NIGHT SWAP PIP MODE 3. SIMPLE REMOTE CONTROL 4. Simple Remote Control Unit CLU-120S (P#HL01861). 3. Monitor Connection Cable (P#EW07883). 7. REMOTE CONTROL BATTERY INSTALLATION AND REPLACEMENT 1. FIRST TIME USE MENU VID 5 ACCESSORIES...
... causing possible injury. REMOTE CONTROL "AA" BATTERIES POWER CORD MONITOR CONNECTION CABLE IR MOUSE CABLE POWER CBL TV VCR SOURCE WIZARD PVR CD STB AMP 3 DVD 2 6 1 5 9 4 8 INFO 7 SLEEP TV/RGB 0 A/V NET ASPECT VIDEO ANT EXIT CH SELECT VOL VID 1 MUTE VID 2 PIP LAST CH VID 4 FREEZE VID 3 SURF PIP ACCESDSAY/NIGHT SWAP PIP MODE 3. SIMPLE REMOTE CONTROL 4. Simple Remote Control Unit CLU-120S (P#HL01861). 3. Monitor Connection Cable (P#EW07883). 7. REMOTE CONTROL BATTERY INSTALLATION AND REPLACEMENT 1. FIRST TIME USE MENU VID 5 ACCESSORIES...
Owners Guide
Page 6
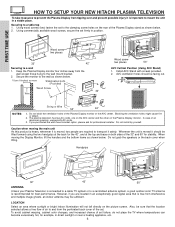
... the wall as shown below . 10cm (4 inches) or more Stabilization bolts (Provided) Wood Screw 32" Wire Wood screw two places 50" AVC Vertical Position (Using AVC Stand) 1. Using wood screws (two) fasten the set . POWER STANDBY (RED) ON (GREEN) VOL- Do not grab the speakers or the back cover when lifting. Secure the monitor to the wall mount bracket. 2. CH+ INPUT/EXIT AUDIO VIDEO CONTROL CENTER PULL AUDIO VIDEO CONTROL CENTER CH+ INPUT/EXIT CH- Install AVC Stand with screws provided...
... the wall as shown below . 10cm (4 inches) or more Stabilization bolts (Provided) Wood Screw 32" Wire Wood screw two places 50" AVC Vertical Position (Using AVC Stand) 1. Using wood screws (two) fasten the set . POWER STANDBY (RED) ON (GREEN) VOL- Do not grab the speakers or the back cover when lifting. Secure the monitor to the wall mount bracket. 2. CH+ INPUT/EXIT AUDIO VIDEO CONTROL CENTER PULL AUDIO VIDEO CONTROL CENTER CH+ INPUT/EXIT CH- Install AVC Stand with screws provided...
Owners Guide
Page 7
... that this may be heard when the plasma display monitor is turned on the front panel might be received. 12 Lip Sync There is some cases, this is functioning. If the TV does not turn ON, please wait a little before turning ON again. 7 If the TV's audio output will be connected to a Hi-Fi system's external speakers, the best audio performance will decrease automatically during still...
... that this may be heard when the plasma display monitor is turned on the front panel might be received. 12 Lip Sync There is some cases, this is functioning. If the TV does not turn ON, please wait a little before turning ON again. 7 If the TV's audio output will be connected to a Hi-Fi system's external speakers, the best audio performance will decrease automatically during still...
Owners Guide
Page 8
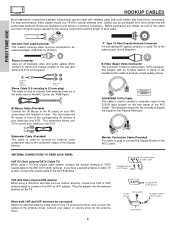
... inputs and outputs located on the Plasma Television. When both VHF and UHF antennas are illustrations and names of each cable. Phono Connector Used on all standard video and audio cables which connect to display the signal on the rear jack panel and front control panel. The resolution should use 75-Ohm coaxial shielded wire. Subwoofer Cable (Provided) This cable is used to connect an external audio component input to the subwoofer output of your AVC center when A/V Network...
... inputs and outputs located on the Plasma Television. When both VHF and UHF antennas are illustrations and names of each cable. Phono Connector Used on all standard video and audio cables which connect to display the signal on the rear jack panel and front control panel. The resolution should use 75-Ohm coaxial shielded wire. Subwoofer Cable (Provided) This cable is used to connect an external audio component input to the subwoofer output of your AVC center when A/V Network...
Owners Guide
Page 10
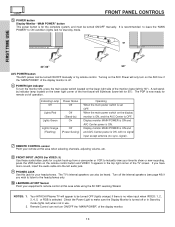
... Off Off Lights Red Lights Green Off (Stand-by mode (lights red) when not in the top right corner of the TV screen. Display monitor MAIN POWER is ON and AVC Center power is set OFF. If you wish to listen to ON condition (lights red) for stand-by remote control. NOTES: 1. 2. Remote Control can also be turned ON/OFF manually. When the main power switch on the lower right corner of the display monitor is off...
... Off Off Lights Red Lights Green Off (Stand-by mode (lights red) when not in the top right corner of the TV screen. Display monitor MAIN POWER is ON and AVC Center power is set OFF. If you wish to listen to ON condition (lights red) for stand-by remote control. NOTES: 1. 2. Remote Control can also be turned ON/OFF manually. When the main power switch on the lower right corner of the display monitor is off...
Owners Guide
Page 11
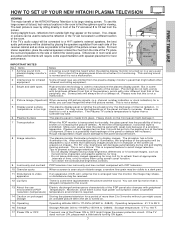
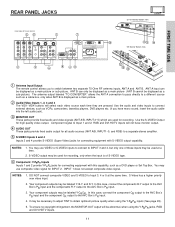
... View 2 ቢ Antenna Input/Output The remote control allows you have monitor output. ብ AUDIO OUT These jacks provide fixed audio output for all audio sources (ANT A/B, INPUT1~5, and RGB) to switch between two separate 75-Ohm RF antenna inputs, ANT A and ANT B. ANT A input can only be displayed as a main picture (ANT B cannot be used for recording, only when the input is displayed as a main picture or sub-picture. FIRST TIME USE REAR PANEL JACKS 32"/42" Monitor Bottom View REAR PANEL...
... View 2 ቢ Antenna Input/Output The remote control allows you have monitor output. ብ AUDIO OUT These jacks provide fixed audio output for all audio sources (ANT A/B, INPUT1~5, and RGB) to switch between two separate 75-Ohm RF antenna inputs, ANT A and ANT B. ANT A input can only be displayed as a main picture (ANT B cannot be used for recording, only when the input is displayed as a main picture or sub-picture. FIRST TIME USE REAR PANEL JACKS 32"/42" Monitor Bottom View REAR PANEL...
Owners Guide
Page 14
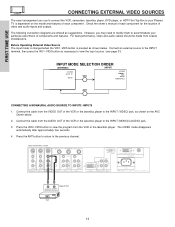
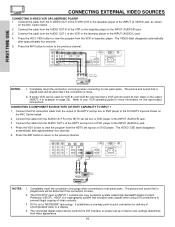
... press the VID1~VID5 button as suggestions. Rear Panel of SRS Labs, Inc. TO MONITOR INPUT 1 R R AUDIO OUT RGB AC IN TruBass SRS and symbol are offered as necessary to the previous channel. However, you use HITACHI specified cable. Connect the cable from the VCR or the laserdisc player. The VIDEO mode disappears automatically after approximately four seconds. 4. Before Operating External Video Source The input mode is changed when the VID1...
... press the VID1~VID5 button as suggestions. Rear Panel of SRS Labs, Inc. TO MONITOR INPUT 1 R R AUDIO OUT RGB AC IN TruBass SRS and symbol are offered as necessary to the previous channel. However, you use HITACHI specified cable. Connect the cable from the VCR or the laserdisc player. The VIDEO mode disappears automatically after approximately four seconds. 4. Before Operating External Video Source The input mode is changed when the VID1...
Owners Guide
Page 16
... if the connection is not a "NETWORK" technology. DVI is loose. 2. TO MONITOR INPUT 1 R R AUDIO OUT RGB AC IN TruBass SRS and symbol are trademarks of the HDTV set top box or DVD player to view the program from the HDTV set top box or DVD player to the INPUT (AUDIO/R) jack. 3. Completely insert the connection cord plugs when connecting to rear panel jacks. The connected digital output device controls the DVI interface so proper set top box or DVD player to a display. 4. Connect the cable from the output of...
... if the connection is not a "NETWORK" technology. DVI is loose. 2. TO MONITOR INPUT 1 R R AUDIO OUT RGB AC IN TruBass SRS and symbol are trademarks of the HDTV set top box or DVD player to view the program from the HDTV set top box or DVD player to the INPUT (AUDIO/R) jack. 3. Completely insert the connection cord plugs when connecting to rear panel jacks. The connected digital output device controls the DVI interface so proper set top box or DVD player to a display. 4. Connect the cable from the output of...
Owners Guide
Page 19
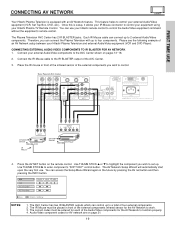
...~18. 2. Connect the IR Mouse cable to the IR BLASTER output of the external components you wish to control. TO MONITOR INPUT 1 R R AUDIO OUT RGB AC IN TruBass SRS and symbol are on the remote control. You can control up . FIRST TIME USE CONNECTING AV NETWORK Your Hitachi Plasma Television is setup, it allows your IR Mouse connector to control your equipment using your external Audio/Video equipment (VCR, Set Top Box, DVD, etc.). Rear Panel of four external components...
...~18. 2. Connect the IR Mouse cable to the IR BLASTER output of the external components you wish to control. TO MONITOR INPUT 1 R R AUDIO OUT RGB AC IN TruBass SRS and symbol are on the remote control. You can control up . FIRST TIME USE CONNECTING AV NETWORK Your Hitachi Plasma Television is setup, it allows your IR Mouse connector to control your equipment using your external Audio/Video equipment (VCR, Set Top Box, DVD, etc.). Rear Panel of four external components...
Owners Guide
Page 26
... Timer Zzzz -:-- Enter "0" first for channels 1 to 9, or simply press the single digit channel you want to VIDEO: 3. Channel selection may not receive some channels if you want to check the channel being received, the picture source, if the channel has stereo (ST) or second audio program (SAP), the time, CHANNEL ID and if the SLEEP timer is connected to view time remaining. Enter one, two, or three numbers to select channels, lock access code...
... Timer Zzzz -:-- Enter "0" first for channels 1 to 9, or simply press the single digit channel you want to VIDEO: 3. Channel selection may not receive some channels if you want to check the channel being received, the picture source, if the channel has stereo (ST) or second audio program (SAP), the time, CHANNEL ID and if the SLEEP timer is connected to view time remaining. Enter one, two, or three numbers to select channels, lock access code...
Owners Guide
Page 27
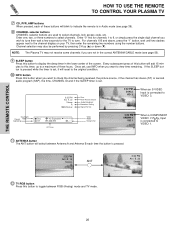
... user to select button. The command on -screen buttons are called "Soft Keys". DVD VCR PV Recorder AV Receiver POWER MENU MORE Move INFO Device Setting THUMB STICK THUMB STICK SELECT MORE.. Use THUMBSTICK to navigate and SELECT to control external components with the Plasma TV's remote control. This window shows the available Audio/Video equipment soft keys. The window will scroll up within the Display Monitor screen. The equipment list...
... user to select button. The command on -screen buttons are called "Soft Keys". DVD VCR PV Recorder AV Receiver POWER MENU MORE Move INFO Device Setting THUMB STICK THUMB STICK SELECT MORE.. Use THUMBSTICK to navigate and SELECT to control external components with the Plasma TV's remote control. This window shows the available Audio/Video equipment soft keys. The window will scroll up within the Display Monitor screen. The equipment list...
Owners Guide
Page 28
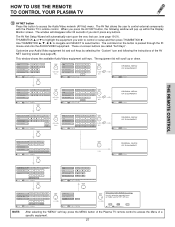
...) DVD2 (Custom) Video Input Audio Input No Connection No Connection Transmission Test POWER PLAY CH UP BACK Move OK SEL Select EXIT OK THUMB STICK SELECT Move INFO Device Setting THUMB STICK SELECT HITACHI AV NET SETTING LIST Device DVD VCR PVR AVR CBL STB DVD2 Code 0672 Video INPUT 1 Not Setup Not Setup Not Setup Not Setup Not Setup Not Setup Audio Using TV Not Setup Not Setup Not Setup Not Setup Not Setup Not Setup EXIT SEL Select...
...) DVD2 (Custom) Video Input Audio Input No Connection No Connection Transmission Test POWER PLAY CH UP BACK Move OK SEL Select EXIT OK THUMB STICK SELECT Move INFO Device Setting THUMB STICK SELECT HITACHI AV NET SETTING LIST Device DVD VCR PVR AVR CBL STB DVD2 Code 0672 Video INPUT 1 Not Setup Not Setup Not Setup Not Setup Not Setup Not Setup Audio Using TV Not Setup Not Setup Not Setup Not Setup Not Setup Not Setup EXIT SEL Select...
Owners Guide
Page 36
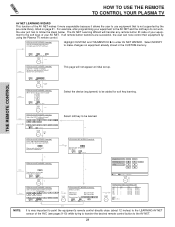
... POWER button. The CBL button light will now control your Cable box. If the cable box does not turn off , try a different two digit preset code. 6. The remote control will turn off your cable box if the correct two digit preset code is entered. REC MY CABLE BOX CODE IS: NOTE: Refer to match the remote command set of your cable box. 3. Press and release the Cable (CBL) button to switch to CABLE mode. ባ PRECODED CABLE BOX buttons These buttons transmit the chosen precoded cable codes...
... POWER button. The CBL button light will now control your Cable box. If the cable box does not turn off , try a different two digit preset code. 6. The remote control will turn off your cable box if the correct two digit preset code is entered. REC MY CABLE BOX CODE IS: NOTE: Refer to match the remote command set of your cable box. 3. Press and release the Cable (CBL) button to switch to CABLE mode. ባ PRECODED CABLE BOX buttons These buttons transmit the chosen precoded cable codes...
Owners Guide
Page 37
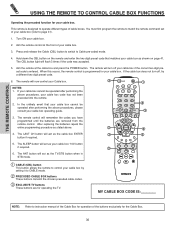
... buttons These buttons are removed from the remote control. The remote control will turn off your set -topbox/satellite receiver code has not been precoded into the remote. 2. The ANT button will flash 3 times if the code was accepted. 5. The STB button light will act as shown on the remote and enter the two digit preset code that your set -top-box/satellite receiver as the TV/STB button when in STB mode. ቢ SET-TOP-BOX (STB) button...
... buttons These buttons are removed from the remote control. The remote control will turn off your set -topbox/satellite receiver code has not been precoded into the remote. 2. The ANT button will flash 3 times if the code was accepted. 5. The STB button light will act as shown on the remote and enter the two digit preset code that your set -top-box/satellite receiver as the TV/STB button when in STB mode. ቢ SET-TOP-BOX (STB) button...

Owners Guide
Page 43
... format aspect ratio. Choose to prevent screen burn. Set Screen Saver to lock channel, video input, and front panel. Adjust brightness. Choose the Reset Video settings. Turn ON/OFF the 3:2 Pulldown detection feature. Improve sound performance. Set specific time to display dialogue/text. 43 ON-SCREEN DISPLAY Feature to Lock TV. Adjust color. Adjust shadow detail in fixed setting. Reduces conspicuous noise in antenna A. Select internal or external speakers. Ant A Ant B View/edit Channel ID, Scan, and Lock settings in the picture. Change Access Code...
... format aspect ratio. Choose to prevent screen burn. Set Screen Saver to lock channel, video input, and front panel. Adjust brightness. Choose the Reset Video settings. Turn ON/OFF the 3:2 Pulldown detection feature. Improve sound performance. Set specific time to display dialogue/text. 43 ON-SCREEN DISPLAY Feature to Lock TV. Adjust color. Adjust shadow detail in fixed setting. Reduces conspicuous noise in antenna A. Select internal or external speakers. Ant A Ant B View/edit Channel ID, Scan, and Lock settings in the picture. Change Access Code...

Owners Guide
Page 46
... THUMB STICK Video Color Management Color Decoding Auto Color Noise Reduction Auto Movie Mode Move SEL Select ANT A/B Off Low Off ON-SCREEN DISPLAY Color Management Use this input to default settings. Video Color Management Color Decoding Auto Color Noise Reduction Auto Movie Mode Move SEL Select ANT A/B Off Low Off THUMB STICK Video Color Management Set User Colors Magenta 50% Red 50% Yellow 50% Green 50% Cyan 50% Blue 50% Reset Move SEL Select Use THUMBSTICK to select the User Colors setting. Press...
... THUMB STICK Video Color Management Color Decoding Auto Color Noise Reduction Auto Movie Mode Move SEL Select ANT A/B Off Low Off ON-SCREEN DISPLAY Color Management Use this input to default settings. Video Color Management Color Decoding Auto Color Noise Reduction Auto Movie Mode Move SEL Select ANT A/B Off Low Off THUMB STICK Video Color Management Set User Colors Magenta 50% Red 50% Yellow 50% Green 50% Cyan 50% Blue 50% Reset Move SEL Select Use THUMBSTICK to select the User Colors setting. Press...

Owners Guide
Page 63
... DVD) and any remote control button will substitute for DTV programs. AUTO - Once the TV has been turned on using the AUTO LINK feature, it detects a video signal to input 2. To do this function. If no remote control button is pressed after three hours. If you are currently viewing. When the Plasma Television is powered OFF, BLACK SIDE PANEL feature will be set every time the TV is powered ON. BLACK SIDE PANEL feature needs to be set...
... DVD) and any remote control button will substitute for DTV programs. AUTO - Once the TV has been turned on using the AUTO LINK feature, it detects a video signal to input 2. To do this function. If no remote control button is pressed after three hours. If you are currently viewing. When the Plasma Television is powered OFF, BLACK SIDE PANEL feature will be set every time the TV is powered ON. BLACK SIDE PANEL feature needs to be set...
Owners Guide
Page 81
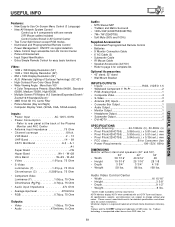
... Display Resolution (50") • 1024 x 1024 Display Resolution (42") • 852 x 1024 Display Resolution (32") • ALiS (Alternate Lighting of SRS Labs, Inc. Please access www.hitachi.com/tv for detailed specifications and dimensions for complete list. Audio Video Control Center • Width 16 15/16" • Height 3 3/8" • Depth 9 1/2" • Weight 9 lbs. 1 Screen mode availability varies by input format HDTV Monitors display HDTV when combined with one remote 2 IR Mouse cables included Control Codes Stored in AV Control...
... Display Resolution (50") • 1024 x 1024 Display Resolution (42") • 852 x 1024 Display Resolution (32") • ALiS (Alternate Lighting of SRS Labs, Inc. Please access www.hitachi.com/tv for detailed specifications and dimensions for complete list. Audio Video Control Center • Width 16 15/16" • Height 3 3/8" • Depth 9 1/2" • Weight 9 lbs. 1 Screen mode availability varies by input format HDTV Monitors display HDTV when combined with one remote 2 IR Mouse cables included Control Codes Stored in AV Control...


