
Owners Guide
Page 3
...authority to a cable system providing such programming. This product incorporates copyright protection technology that are not expressly approved by TV stations and cable companies, as well as improper changes or modifications not expressly approved by direct connection to operate the.... authorized by Macrovision Corporation, and is capable of receiving analog basic, digital basic and digital premium cable television programming by HITACHI could void the user's warranty. Dispose of the FCC rules. Note This plasma television will display television closed captioning, (...
...authority to a cable system providing such programming. This product incorporates copyright protection technology that are not expressly approved by TV stations and cable companies, as well as improper changes or modifications not expressly approved by direct connection to operate the.... authorized by Macrovision Corporation, and is capable of receiving analog basic, digital basic and digital premium cable television programming by HITACHI could void the user's warranty. Dispose of the FCC rules. Note This plasma television will display television closed captioning, (...

Owners Guide
Page 4
...see page 13) » Power Cord ² Cleaning Cloth Note: Please visit our website for optional accessories for use with Hitachi 42HDT52 and 42HDT52A. See important marking located on the ceiling does not provide adequate ventilation for the electronics or proper support for the... optional accessories, please ¿ 2 IR Mouse Cables or G-LINK Cables ¶ Power Swivel Cable (42" models only) access our web site at: www.hitachi.us/tv CAUTION: 1. HL02065). · Two "AA" size, 1.5V batteries (P# FQ00021). » Power Cord (P# EV01841). ¿ Two IR Mouse cables (P# EY01641...
...see page 13) » Power Cord ² Cleaning Cloth Note: Please visit our website for optional accessories for use with Hitachi 42HDT52 and 42HDT52A. See important marking located on the ceiling does not provide adequate ventilation for the electronics or proper support for the... optional accessories, please ¿ 2 IR Mouse Cables or G-LINK Cables ¶ Power Swivel Cable (42" models only) access our web site at: www.hitachi.us/tv CAUTION: 1. HL02065). · Two "AA" size, 1.5V batteries (P# FQ00021). » Power Cord (P# EV01841). ¿ Two IR Mouse cables (P# EY01641...
Owners Guide
Page 5
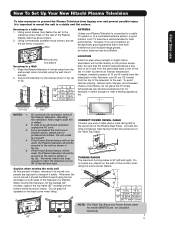
First time use How To Set Up Your New Hitachi Plasma Television To take measures to prevent the Plasma Television from tipping over and prevent possible injury it is important to the wall as shown ... mark facing front)to transport it should be long enough to allow the television to turn 30˚ to a centralized antenna system, a good outdoor color TV antenna is 30˚ (left ) to the clamping screw holes on the picture screen. Securing to a Wall 1. Secure the television to the wall as shown...
First time use How To Set Up Your New Hitachi Plasma Television To take measures to prevent the Plasma Television from tipping over and prevent possible injury it is important to the wall as shown ... mark facing front)to transport it should be long enough to allow the television to turn 30˚ to a centralized antenna system, a good outdoor color TV antenna is 30˚ (left ) to the clamping screw holes on the picture screen. Securing to a Wall 1. Secure the television to the wall as shown...
Owners Guide
Page 6
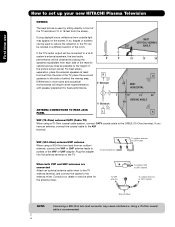
... antenna CABLE To outdoor antenna or CATV cable When both VHF and UHF antennas are connected Attach an optional antenna cable mixer to the TV antenna terminal, and connect the cables to the AIR terminal. Differences in room sizes and acoustical environments will be located in a different...least four feet from an outdoor antenna, connect the VHF or UHF antenna leads to screws of the TV, place the surround speakers to the CABLE (75-Ohm) terminal. Consult your new HITACHI Plasma Television VIEWING The best picture is recommended. VHF (300-Ohm) antenna/UHF antenna When using a...
... antenna CABLE To outdoor antenna or CATV cable When both VHF and UHF antennas are connected Attach an optional antenna cable mixer to the TV antenna terminal, and connect the cables to the AIR terminal. Differences in room sizes and acoustical environments will be located in a different...least four feet from an outdoor antenna, connect the VHF or UHF antenna leads to screws of the TV, place the surround speakers to the CABLE (75-Ohm) terminal. Consult your new HITACHI Plasma Television VIEWING The best picture is recommended. VHF (300-Ohm) antenna/UHF antenna When using a...

Owners Guide
Page 7
...control panel. This connection allows your cable box and/or VCR. Sub-Woofer Cable Used to connect the Sub-Woofer Out to control your TV, and the TV Guide On ScreenTM system, to the SubWoofer Input of the standard video cable to 75-Ohm). Before purchasing any cables, be sure of...connectors. HDMI Cable This cable is used on the television. S-Video (Super Video) Cable This cable is used to connect the swivel stand to the TV's HDMI input. Cables can be connected to an antenna adapter (300-Ohm to produce a high quality picture. "F" Type 75-Ohm Coaxial Antenna Connector ...
...control panel. This connection allows your cable box and/or VCR. Sub-Woofer Cable Used to connect the Sub-Woofer Out to control your TV, and the TV Guide On ScreenTM system, to the SubWoofer Input of the standard video cable to 75-Ohm). Before purchasing any cables, be sure of...connectors. HDMI Cable This cable is used on the television. S-Video (Super Video) Cable This cable is used to connect the swivel stand to the TV's HDMI input. Cables can be connected to an antenna adapter (300-Ohm to produce a high quality picture. "F" Type 75-Ohm Coaxial Antenna Connector ...

Owners Guide
Page 8
...on the right bottom portion of the Remote Control. INPUTS BUTTON (TV, AMP) Accesses the INPUTS menu system. / CHANNEL WHEEL (TV, CBL, STB, PVR/VCR, AMP/CD) Scroll up and down to change the Freeze mode of your HITACHI Plasma TV, the new remote control is used to change the Picture-in ...the AMP mode. 4. LEGEND TV - CD precode is included in -Picture mode. MENU BUTTON (TV, DVD, CBL, STB, PVR/VCR) Accesses the OSD menu system. PAUSE...
...on the right bottom portion of the Remote Control. INPUTS BUTTON (TV, AMP) Accesses the INPUTS menu system. / CHANNEL WHEEL (TV, CBL, STB, PVR/VCR, AMP/CD) Scroll up and down to change the Freeze mode of your HITACHI Plasma TV, the new remote control is used to change the Picture-in ...the AMP mode. 4. LEGEND TV - CD precode is included in -Picture mode. MENU BUTTON (TV, DVD, CBL, STB, PVR/VCR) Accesses the OSD menu system. PAUSE...
Owners Guide
Page 9
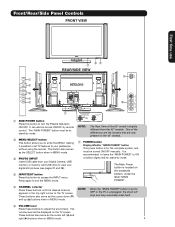
... Camera, USB memory or memory card USB drive to turn the Plasma Television ON/OFF. Firmly bind the cables. The Main Power button is set TV features to your digital still pictures (see pages 27 and 28). ብ INPUT/EXIT button Press this button to view your preference without using the... the desired channel appears in MENU mode. ቤ PHOTO INPUT Insert USB cable from the 42" models. Press again to the claw. One of the TV screen. Front/Rear/Side Panel Controls FRONT VIEW First time use CURSOR PHOTO INPUT POWER ቢ CH+ CH- ቦ VOL + VOL - ቧ INPUT/EXIT MENU...
... Camera, USB memory or memory card USB drive to turn the Plasma Television ON/OFF. Firmly bind the cables. The Main Power button is set TV features to your digital still pictures (see pages 27 and 28). ብ INPUT/EXIT button Press this button to view your preference without using the... the desired channel appears in MENU mode. ቤ PHOTO INPUT Insert USB cable from the 42" models. Press again to the claw. One of the TV screen. Front/Rear/Side Panel Controls FRONT VIEW First time use CURSOR PHOTO INPUT POWER ቢ CH+ CH- ቦ VOL + VOL - ቧ INPUT/EXIT MENU...

Owners Guide
Page 10
...your favorite show or new recording. First time use the CURSOR PAD and the SELECT button on the remote control to select INPUT 5. The Plasma TV is set to instantly view your digital video (DV) camcorder. signal). ቪ REMOTE CONTROL sensor Point your remote at this area when selecting... the AV NET Learning Wizard. ቫ SIDE INPUT JACKS (for VIDEO: 5) Use these audio/video jacks for remote ON/OFF operation. Your HITACHI Plasma TV will illuminate. Indicating Lamp Power Status Off Off Lights Red Lights Green Lights Orange Off (Stand-by mode (lights red) when not in Stand-...
...your favorite show or new recording. First time use the CURSOR PAD and the SELECT button on the remote control to select INPUT 5. The Plasma TV is set to instantly view your digital video (DV) camcorder. signal). ቪ REMOTE CONTROL sensor Point your remote at this area when selecting... the AV NET Learning Wizard. ቫ SIDE INPUT JACKS (for VIDEO: 5) Use these audio/video jacks for remote ON/OFF operation. Your HITACHI Plasma TV will illuminate. Indicating Lamp Power Status Off Off Lights Red Lights Green Lights Orange Off (Stand-by mode (lights red) when not in Stand-...

Owners Guide
Page 11
...S-VIDEO (Super Video) jacks for your Plasma Television's remote control in a single cable. In this terminal. This connection will enable the TV Guide On ScreenTM recording feature. The HDMI input is the next-generation all the way to your television screen. ቩ IR Blaster/G-LINK... your external components (VCR, Cable box, DVD player, etc.). Y, B-Y, and R-Y. distribution of high-definition video and multichannel audio in TV mode. Use the audio and video inputs to connect external devices, such as 1080i, 720p, 480i and 480p are used for both inputs....
...S-VIDEO (Super Video) jacks for your Plasma Television's remote control in a single cable. In this terminal. This connection will enable the TV Guide On ScreenTM recording feature. The HDMI input is the next-generation all the way to your television screen. ቩ IR Blaster/G-LINK... your external components (VCR, Cable box, DVD player, etc.). Y, B-Y, and R-Y. distribution of high-definition video and multichannel audio in TV mode. Use the audio and video inputs to connect external devices, such as 1080i, 720p, 480i and 480p are used for both inputs....

Owners Guide
Page 12
HITACHI will notify you enable video and audio digital data exchange between a compatible device. CableCARD is required for additional CableCARD information. Please call your TV. Insert the CableCARD into the CableCARD slot. 12 Please take note of a single cable (see Appendix E on the ... upgrade is installed ቮ To Power Swivel Connector Connects to your cable operator). If the CableCARD is properly installed or not installed, the TV will appear if a channel is available before requesting a CableCARD (also known as VCR play, rewind, fast forward, stop, etc.) from ...
HITACHI will notify you enable video and audio digital data exchange between a compatible device. CableCARD is required for additional CableCARD information. Please call your TV. Insert the CableCARD into the CableCARD slot. 12 Please take note of a single cable (see Appendix E on the ... upgrade is installed ቮ To Power Swivel Connector Connects to your cable operator). If the CableCARD is properly installed or not installed, the TV will appear if a channel is available before requesting a CableCARD (also known as VCR play, rewind, fast forward, stop, etc.) from ...

Owners Guide
Page 13
...Top Box to your choice (see page 26). If you do not, the played back picture may need to modify them to confirm your Plasma TV is dependent on the Ferrite ferrite core near the Photo Input Core or IEEE 1394 Input as shown. 2. The following examples: Left Side Panel ...jacks. Completely insert connection cord plugs when connecting to pinch the cable. Then press the SELECT button or the CURSOR PAD ̈ to accommodate your TV. 4. Wrap once the USB cable or IEEE 1394 cable (not supplied) on the model and features of your particular assortment of the standard video cable...
...Top Box to your choice (see page 26). If you do not, the played back picture may need to modify them to confirm your Plasma TV is dependent on the Ferrite ferrite core near the Photo Input Core or IEEE 1394 Input as shown. 2. The following examples: Left Side Panel ...jacks. Completely insert connection cord plugs when connecting to pinch the cable. Then press the SELECT button or the CURSOR PAD ̈ to accommodate your TV. 4. Wrap once the USB cable or IEEE 1394 cable (not supplied) on the model and features of your particular assortment of the standard video cable...

Owners Guide
Page 14
CONNECT TO IR BLASTER (PROVIDED) NOTE: Cables are optional, except when specified. HDTV Set-Top Box CONNECT TO IR BLASTER/ G-LINK 14 On-Screen Display The Remote Control First time use Rear Panel Connections Outside Antenna Cable TV coaxial cable 2-Way signal splitter VCR #1 ANT OUTPUT IN S-VIDEO V L R Optional / G-LINK DIGITAL OUTPUT CAPABILITY DIGITAL OUTPUT AUDIO OUT DVI to HDMI IEEE1394 DV INPUT Optional OUTPUT Y PB/CB PR/CR L R S-VIDEO V L R INPUT S-VIDEO V L R OUTPUT Y PB PR L R OUTPUT DVD Player (PROVIDED) VCR #2 Laserdisc player, VCR, camcorder, etc.
CONNECT TO IR BLASTER (PROVIDED) NOTE: Cables are optional, except when specified. HDTV Set-Top Box CONNECT TO IR BLASTER/ G-LINK 14 On-Screen Display The Remote Control First time use Rear Panel Connections Outside Antenna Cable TV coaxial cable 2-Way signal splitter VCR #1 ANT OUTPUT IN S-VIDEO V L R Optional / G-LINK DIGITAL OUTPUT CAPABILITY DIGITAL OUTPUT AUDIO OUT DVI to HDMI IEEE1394 DV INPUT Optional OUTPUT Y PB/CB PR/CR L R S-VIDEO V L R INPUT S-VIDEO V L R OUTPUT Y PB PR L R OUTPUT DVD Player (PROVIDED) VCR #2 Laserdisc player, VCR, camcorder, etc.

Owners Guide
Page 15
... can be used for high performance components, such as DVD players and set-top-boxes. In this case, connect the components CB output to the TV's PB input and the components CR output to the operating guide of the standard video connection if your device has this feature. • If your... quality when using a HDMI input from a Set-Top-Box, it to the left audio jack on (L/(MONO)) the Rear Panel. • Refer to the TV's PR input. • It may be distorted on page 14). Use these connections in place of your other electronic equipment for high performance laserdisc players...
... can be used for high performance components, such as DVD players and set-top-boxes. In this case, connect the components CB output to the TV's PB input and the components CR output to the operating guide of the standard video connection if your device has this feature. • If your... quality when using a HDMI input from a Set-Top-Box, it to the left audio jack on (L/(MONO)) the Rear Panel. • Refer to the TV's PR input. • It may be distorted on page 14). Use these connections in place of your other electronic equipment for high performance laserdisc players...

Owners Guide
Page 16
... #1 and VCR #2 (see page 14), but note that a VCR cannot record its own video or line output. Refer to the Y/VIDEO input jack of the TV. On-Screen Display The Remote Control First time use Connecting External Video Sources CONNECTING A VIDEO AND STEREO AUDIO SOURCE TO INPUT1 - Connect the cable from...
... #1 and VCR #2 (see page 14), but note that a VCR cannot record its own video or line output. Refer to the Y/VIDEO input jack of the TV. On-Screen Display The Remote Control First time use Connecting External Video Sources CONNECTING A VIDEO AND STEREO AUDIO SOURCE TO INPUT1 - Connect the cable from...

Owners Guide
Page 19
...or AVHD (External Hard Drive) Digital Recorder, to the IEEE1394 input terminals shown below. NOTE: 1. It will be received by the TV. First time use Connecting External Video Sources CONNECTING A COMPONENT SOURCE WITH DIGITAL INTERFACE CAPABILITY TO IEEE1394 TERMINALS. 1. IEEE 1394 allows the... plasma television and the external device to control the D-VHS from the TV IEEE1394 menu (see page 29). / G-LINK IEEE1394 DV INPUT IEEE1394 Cabl e LINE OUT R (MONO)/L VIDEO 1 R (MONO)/L VIDEO 2 S-...
...or AVHD (External Hard Drive) Digital Recorder, to the IEEE1394 input terminals shown below. NOTE: 1. It will be received by the TV. First time use Connecting External Video Sources CONNECTING A COMPONENT SOURCE WITH DIGITAL INTERFACE CAPABILITY TO IEEE1394 TERMINALS. 1. IEEE 1394 allows the... plasma television and the external device to control the D-VHS from the TV IEEE1394 menu (see page 29). / G-LINK IEEE1394 DV INPUT IEEE1394 Cabl e LINE OUT R (MONO)/L VIDEO 1 R (MONO)/L VIDEO 2 S-...

Owners Guide
Page 20
...OUT VIDEO OUT VCR / G-LINK Stereo System Amplifier OPTICAL INPUT CONNECTING MONITOR OUT The MONITOR OUT terminal outputs video and audio of the Plasma TV to the INPUT (S-VIDEO) jack, of the amplifier is a fixed output. Press the INPUTS button, then select INPUT 2 from the S-VIDEO... R L V S-VIDEO INPUT 2. Connect the cable from the VIDEO INPUT of the VCR or the laserdisc player to the VIDEO out jack on the TV Rear Panel. When making video connections, connect S-Video only or Video only. VCR or other external components 3. It does not output component video. 1. ...
...OUT VIDEO OUT VCR / G-LINK Stereo System Amplifier OPTICAL INPUT CONNECTING MONITOR OUT The MONITOR OUT terminal outputs video and audio of the Plasma TV to the INPUT (S-VIDEO) jack, of the amplifier is a fixed output. Press the INPUTS button, then select INPUT 2 from the S-VIDEO... R L V S-VIDEO INPUT 2. Connect the cable from the VIDEO INPUT of the VCR or the laserdisc player to the VIDEO out jack on the TV Rear Panel. When making video connections, connect S-Video only or Video only. VCR or other external components 3. It does not output component video. 1. ...

Owners Guide
Page 21
... FOR AV NETWORK 1. ACCESS THE AV NET SETUP WIZARD Press the MENU button. 5. This feature helps to control your Hitachi Plasma TV Remote Control. Connect your Hitachi Plasma Television and external Audio/Video equipment (VCR and DVD Player). Connect the IR Mouse cable to the IR BLASTER output..., etc.). Double-sided mounting tape may be placed in front of the infrared sensor of the Rear Panel. 3. First time use your HITACHI remote control to control the Audio/Video equipment command without the equipment's remote control. Press the SELECT or CURSOR PAD ̈ button to...
... FOR AV NETWORK 1. ACCESS THE AV NET SETUP WIZARD Press the MENU button. 5. This feature helps to control your Hitachi Plasma TV Remote Control. Connect your Hitachi Plasma Television and external Audio/Video equipment (VCR and DVD Player). Connect the IR Mouse cable to the IR BLASTER output..., etc.). Double-sided mounting tape may be placed in front of the infrared sensor of the Rear Panel. 3. First time use your HITACHI remote control to control the Audio/Video equipment command without the equipment's remote control. Press the SELECT or CURSOR PAD ̈ button to...

Owners Guide
Page 22
... Channel Manager Locks Timers Setup Power Swivel Move SEL Select NOTE: 1. One IR Mouse cable can use Connecting External Video Sources Your Hitachi Plasma Television is not necessary for D-VHS recording devices. 2. Connect the IR Mouse cable to control your cable box to receive program...and to select. 7. The G-LINK connection is equipped with your cable box and VCR recording features. First time use your HITACHI Plasma TV Remote Control and the TV Guide On Screen system to the IR BLASTER/G-LINK output of a G-LINK setup between your external Audio/Video components to ...
... Channel Manager Locks Timers Setup Power Swivel Move SEL Select NOTE: 1. One IR Mouse cable can use Connecting External Video Sources Your Hitachi Plasma Television is not necessary for D-VHS recording devices. 2. Connect the IR Mouse cable to control your cable box to receive program...and to select. 7. The G-LINK connection is equipped with your cable box and VCR recording features. First time use your HITACHI Plasma TV Remote Control and the TV Guide On Screen system to the IR BLASTER/G-LINK output of a G-LINK setup between your external Audio/Video components to ...

Owners Guide
Page 23
... the remote will light for instructions on how to program the remote to control additional Audio/Video equipment). Basic operation keys are grouped together in TV Mode by pressing the ̇ or ̈ button of the cable box and select the CABLE (CBL) by using the SOURCE ACCESS ̇ ...to program the remote to control your DVD player). 23 The Remote Control The Remote Control In addition to controlling all the functions on your HITACHI Plasma TV, the new remote control is pressed. The AMP mode indicator will blink, indicating that the remote will blink 3 times to confirm the ...
... the remote will light for instructions on how to program the remote to control additional Audio/Video equipment). Basic operation keys are grouped together in TV Mode by pressing the ̇ or ̈ button of the cable box and select the CABLE (CBL) by using the SOURCE ACCESS ̇ ...to program the remote to control your DVD player). 23 The Remote Control The Remote Control In addition to controlling all the functions on your HITACHI Plasma TV, the new remote control is pressed. The AMP mode indicator will blink, indicating that the remote will blink 3 times to confirm the ...

Owners Guide
Page 24
... the picture to freeze the picture. The Remote Control How to Use the Remote to Control Your TV ቢ POWER button Press this button to turn the TV set on or off when the remote is in TV mode. (See page 23 for ቢ instructions on how to set the remote control to... TV mode.) ባ ቤ ብ ባ MODE Indicator Turns on or blinks to show remote control mode. ቤ SOURCE ACCESS (̇ or ̈) buttons Press these ...
... the picture to freeze the picture. The Remote Control How to Use the Remote to Control Your TV ቢ POWER button Press this button to turn the TV set on or off when the remote is in TV mode. (See page 23 for ቢ instructions on how to set the remote control to... TV mode.) ባ ቤ ብ ባ MODE Indicator Turns on or blinks to show remote control mode. ቤ SOURCE ACCESS (̇ or ̈) buttons Press these ...


