Owners Guide
Page 1
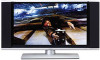
PLASMA TELEVISION AVC (Audio/Video Control Center) & Plasma Display Monitor 32HDT20 42HDT20 OPERATING GUIDE Video Audio Ch. Manager Locks Setup Move SEL Sel IMPORTANT SAFETY INSTRUCTIONS 2-3 FIRST TIME USE 4-23 THE REMOTE CONTROL 24-39 ON-SCREEN ...
PLASMA TELEVISION AVC (Audio/Video Control Center) & Plasma Display Monitor 32HDT20 42HDT20 OPERATING GUIDE Video Audio Ch. Manager Locks Setup Move SEL Sel IMPORTANT SAFETY INSTRUCTIONS 2-3 FIRST TIME USE 4-23 THE REMOTE CONTROL 24-39 ON-SCREEN ...
Owners Guide
Page 2
... is also foremost in our minds in the design of electric shock to operate the equipment. To help you . Plasma television consists of HITACHI Plasma Televisions. MODIFICATIONS: The FCC requires the user to be of a sufficient magnitude to constitute a risk of these products properly, this ... intended to alert the user to the presence of the AVC center/display monitor as improper changes or modifications not expressly approved by Hitachi America, Ltd. CAUTION: Never remove the back cover of uninsulated "dangerous voltage" within an equilateral triangle, is intended to alert the...
... is also foremost in our minds in the design of electric shock to operate the equipment. To help you . Plasma television consists of HITACHI Plasma Televisions. MODIFICATIONS: The FCC requires the user to be of a sufficient magnitude to constitute a risk of these products properly, this ... intended to alert the user to the presence of the AVC center/display monitor as improper changes or modifications not expressly approved by Hitachi America, Ltd. CAUTION: Never remove the back cover of uninsulated "dangerous voltage" within an equilateral triangle, is intended to alert the...
Owners Guide
Page 3
... for your local authorities or the Electronic Industries Alliance: www.eiae.org. Servicing is damaged, liquid has been spilled or objects have fallen into your HITACHI Factory Warranty. Follow all warnings and instructions marked on -screen displays such as power-supply cord or plug is required when the apparatus has been...
... for your local authorities or the Electronic Industries Alliance: www.eiae.org. Servicing is damaged, liquid has been spilled or objects have fallen into your HITACHI Factory Warranty. Follow all warnings and instructions marked on -screen displays such as power-supply cord or plug is required when the apparatus has been...
Owners Guide
Page 4
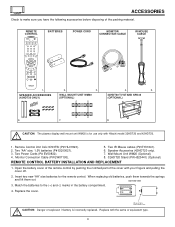
... (P# HL01823). 2. Match the batteries to make sure you have the following accessories before disposing of the cover with the same or equivalent type. 4 SPEAKER ACCESSORIES (42HDT20 ONLY) WALL MOUNT UNIT WM20 (OPTIONAL) 32HDT20 TV STAND SPD32 (OPTIONAL) 6. 7. 8. Wall Mount Unit WM20 (Optional). 8. 32HDT20 Stand (P# H520441) (Optional). Open the battery cover... of the remote control by pushing the notched part of the packing material. Insert two new "AA" size batteries for use only with Hitachi model 32HDT20 and 42HDT20. 1. Lift up on tab to remove back cover.
... (P# HL01823). 2. Match the batteries to make sure you have the following accessories before disposing of the cover with the same or equivalent type. 4 SPEAKER ACCESSORIES (42HDT20 ONLY) WALL MOUNT UNIT WM20 (OPTIONAL) 32HDT20 TV STAND SPD32 (OPTIONAL) 6. 7. 8. Wall Mount Unit WM20 (Optional). 8. 32HDT20 Stand (P# H520441) (Optional). Open the battery cover... of the remote control by pushing the notched part of the packing material. Insert two new "AA" size batteries for use only with Hitachi model 32HDT20 and 42HDT20. 1. Lift up on tab to remove back cover.
Owners Guide
Page 5
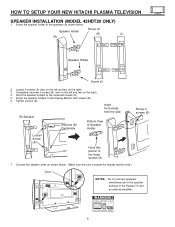
... amplifier. 5 Speaker Holder Screw x2 (R) (L) (R) Speaker Holder Screw x2 2. Loosen 4 screws (A) (two on the left and two on the right). 3. HOW TO SETUP YOUR NEW HITACHI PLASMA TELEVISION SPEAKER INSTALLATION (MODEL 42HDT20 ONLY) 1.
... amplifier. 5 Speaker Holder Screw x2 (R) (L) (R) Speaker Holder Screw x2 2. Loosen 4 screws (A) (two on the left and two on the right). 3. HOW TO SETUP YOUR NEW HITACHI PLASMA TELEVISION SPEAKER INSTALLATION (MODEL 42HDT20 ONLY) 1.
Owners Guide
Page 6
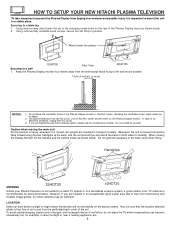
...an indoor antenna may be sure that is free from the perforated back cover of the Plasma Display stand as shown below . 2. Handgrips ANTENNA 32HDT20 42HDT20 Unless your Plasma Television is connected to a cable TV system or to a centralized antenna system, a good outdoor color TV antenna is moved it... or the AVC center. Do not grab the speakers or the back cover when lifting. Also, be sufficient. HOW TO SETUP YOUR NEW HITACHI PLASMA TELEVISION To take measures to prevent the Plasma Display from the wall except those hung to the wall mount bracket. 10cm (4 inches) ...
...an indoor antenna may be sure that is free from the perforated back cover of the Plasma Display stand as shown below . 2. Handgrips ANTENNA 32HDT20 42HDT20 Unless your Plasma Television is connected to a cable TV system or to a centralized antenna system, a good outdoor color TV antenna is moved it... or the AVC center. Do not grab the speakers or the back cover when lifting. Also, be sufficient. HOW TO SETUP YOUR NEW HITACHI PLASMA TELEVISION To take measures to prevent the Plasma Display from the wall except those hung to the wall mount bracket. 10cm (4 inches) ...
Owners Guide
Page 7
... experimentation with speaker placement for a while, you can see image-like when the picture varied. HOW TO SET UP YOUR NEW HITACHI PLASMA TELEVISION VIEWING The major benefit of the HITACHI Plasma Television is prohibited. is normal and it is not a malfunction. Points that do not light, points with brightness different from...
... experimentation with speaker placement for a while, you can see image-like when the picture varied. HOW TO SET UP YOUR NEW HITACHI PLASMA TELEVISION VIEWING The major benefit of the HITACHI Plasma Television is prohibited. is normal and it is not a malfunction. Points that do not light, points with brightness different from...
Owners Guide
Page 8
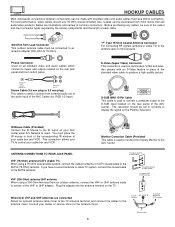
"F" Type 75-Ohm Coaxial Antenna Connector For connecting RF signals (antenna or cable TV) to screws of the VHF or UHF adapter. VHF (300-Ohm) antenna/UHF antenna When using a 75-Ohm coaxial cable system, connect the outdoor antenna or CATV coaxial cable to the ANT A (75-Ohm) terminal. Plug the adapter into the antenna terminal on the Plasma Television. Before purchasing any cables, be sure of the output and input connector types required by the various components and the length of each cable. 300-Ohm Twin Lead Connector This outdoor antenna cable must place the IR mouse in ...
"F" Type 75-Ohm Coaxial Antenna Connector For connecting RF signals (antenna or cable TV) to screws of the VHF or UHF adapter. VHF (300-Ohm) antenna/UHF antenna When using a 75-Ohm coaxial cable system, connect the outdoor antenna or CATV coaxial cable to the ANT A (75-Ohm) terminal. Plug the adapter into the antenna terminal on the Plasma Television. Before purchasing any cables, be sure of the output and input connector types required by the various components and the length of each cable. 300-Ohm Twin Lead Connector This outdoor antenna cable must place the IR mouse in ...
Owners Guide
Page 9
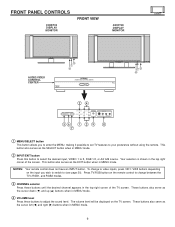
... Press these buttons until the desired channel appears in the top right corner of the TV screen. FRONT PANEL CONTROLS 32HDT20 DISPLAY MONITOR FRONT VIEW 42HDT20 DISPLAY MONITOR AUDIO/VIDEO CONTROL CENTER STANDBY (RED) ON (GREEN) MAIN POWER ቦ ቨ ቧ TruBass AUDIO/VIDEO CONTROL CENTER POWER STANDBY (RED) ON (GREEN...
... Press these buttons until the desired channel appears in the top right corner of the TV screen. FRONT PANEL CONTROLS 32HDT20 DISPLAY MONITOR FRONT VIEW 42HDT20 DISPLAY MONITOR AUDIO/VIDEO CONTROL CENTER STANDBY (RED) ON (GREEN) MAIN POWER ቦ ቨ ቧ TruBass AUDIO/VIDEO CONTROL CENTER POWER STANDBY (RED) ON (GREEN...
Owners Guide
Page 10
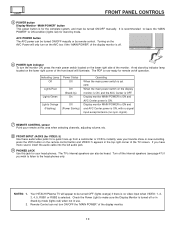
...'s internal speakers can not turn on the remote control button and VIDEO: 5 appears in the top right corner of the front bezel will illuminate. Your HITACHI Plasma TV will only turn ON/OFF the "MAIN POWER" of the display monitor is off or in use. It is recommended to leave the...
...'s internal speakers can not turn on the remote control button and VIDEO: 5 appears in the top right corner of the front bezel will illuminate. Your HITACHI Plasma TV will only turn ON/OFF the "MAIN POWER" of the display monitor is off or in use. It is recommended to leave the...
Owners Guide
Page 11
Component signal to Input 1 and 2 will not have mono sound, insert the audio cable ቤ into the left audio jack.) MONITOR OUT These jacks provide fixed audio and video signals (ANT A/B, INPUT 2~5) which are pressed. You may be used at the same time. Use the S-VIDEO Output for connecting equipment with S-VIDEO output capability. NOTES: 1. Your component outputs may be the component CR output to the AlaVbCelBedoxY's-CPBRCiRn.puItn. this to the AVC Box's PR input. To ensure no copyright infringement, the MONITOR OUT output will select each video source each time they ...
Component signal to Input 1 and 2 will not have mono sound, insert the audio cable ቤ into the left audio jack.) MONITOR OUT These jacks provide fixed audio and video signals (ANT A/B, INPUT 2~5) which are pressed. You may be used at the same time. Use the S-VIDEO Output for connecting equipment with S-VIDEO output capability. NOTES: 1. Your component outputs may be the component CR output to the AlaVbCelBedoxY's-CPBRCiRn.puItn. this to the AVC Box's PR input. To ensure no copyright infringement, the MONITOR OUT output will select each video source each time they ...
Owners Guide
Page 12
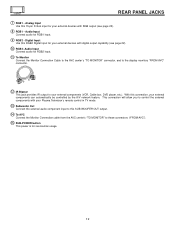
Digital Input Use this 15-pin D-Sub input for your external devices with digital output capability (see page 22). ቩ RGB1 - Analog Input Use this RGB2 Digital input for serviceman usage. 12 With this SUB WOOFER OUT output. ተ To AVC Connect the Monitor Connection cable from the AVC center's "TO MONITOR" to these connectors ("FROM AVC"). ቱ SUB-POWER button This power is for your external devices with your Plasma Television's remote control in TV mode. ቯ Subwoofer Out Connect the external audio component input to your external components can automatically be ...
Digital Input Use this 15-pin D-Sub input for your external devices with digital output capability (see page 22). ቩ RGB1 - Analog Input Use this RGB2 Digital input for serviceman usage. 12 With this SUB WOOFER OUT output. ተ To AVC Connect the Monitor Connection cable from the AVC center's "TO MONITOR" to these connectors ("FROM AVC"). ቱ SUB-POWER button This power is for your external devices with your Plasma Television's remote control in TV mode. ቯ Subwoofer Out Connect the external audio component input to your external components can automatically be ...

Owners Guide
Page 13
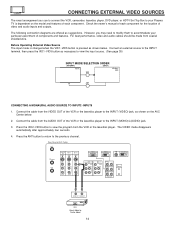
... as shown in place of your AVC box. 4. If you will find the Monitor Connector cable. 2. Back of Display Monitor 32HDT20 Back of Display Monitor 42HDT20 To AC outlet Core ANT A TO CONVERTER ANT B MONITOR OUT S-VIDEO INPUT 4 S-VIDEO INPUT 3 S-VIDEO VIDEO VIDEO VIDEO (MONO) L (MONO) L (MONO) L R AUDIO R AUDIO R AUDIO RGB...
... as shown in place of your AVC box. 4. If you will find the Monitor Connector cable. 2. Back of Display Monitor 32HDT20 Back of Display Monitor 42HDT20 To AC outlet Core ANT A TO CONVERTER ANT B MONITOR OUT S-VIDEO INPUT 4 S-VIDEO INPUT 3 S-VIDEO VIDEO VIDEO VIDEO (MONO) L (MONO) L (MONO) L R AUDIO R AUDIO R AUDIO RGB...
Owners Guide
Page 14
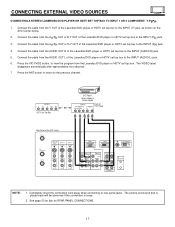
... TO MONITOR Y/VIDEO INPUT 2 Y AUDIO PB (MONO) L PB INPUT 1 AUDIO (MONO) L PR PR R R AUDIO R L AUDIOR L AUDIOR L AUDIO OUT IR BLASTER AUDIO OUT VIDEO OUT VCR Hitachi Model or Similar Model 14 CONNECTING EXTERNAL VIDEO SOURCES The exact arrangement you may need to modify them to accommodate your Plasma TV is pressed...
... TO MONITOR Y/VIDEO INPUT 2 Y AUDIO PB (MONO) L PB INPUT 1 AUDIO (MONO) L PR PR R R AUDIO R L AUDIOR L AUDIOR L AUDIO OUT IR BLASTER AUDIO OUT VIDEO OUT VCR Hitachi Model or Similar Model 14 CONNECTING EXTERNAL VIDEO SOURCES The exact arrangement you may need to modify them to accommodate your Plasma TV is pressed...
Owners Guide
Page 15
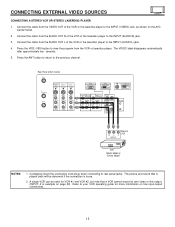
... line output. (INPUT: 4 in example on page 22) Refer to the INPUT (AUDIO/R) jack. 3. Connect the cable from the AUDIO OUT L of VCR R L V OUTPUT VCR Hitachi Model or Similar Model NOTES: 1. CONNECTING EXTERNAL VIDEO SOURCES CONNECTING A STEREO VCR OR STEREO LASERDISC PLAYER 1. Connect the cable from the VCR or laserdisc player...
... line output. (INPUT: 4 in example on page 22) Refer to the INPUT (AUDIO/R) jack. 3. Connect the cable from the AUDIO OUT L of VCR R L V OUTPUT VCR Hitachi Model or Similar Model NOTES: 1. CONNECTING EXTERNAL VIDEO SOURCES CONNECTING A STEREO VCR OR STEREO LASERDISC PLAYER 1. Connect the cable from the VCR or laserdisc player...
Owners Guide
Page 16
... label disappears automatically after approximately four seconds. 5. Connect the cable from the S-VIDEO OUT of VCR or R L V S-VIDEO Laserdisc Player OUTPUT VCR or Laserdisc Player Hitachi Model or Similar Model NOTES: 1. A single VCR can be used for VCR #1 and VCR #2, but note that is played back will be abnormal if the...
... label disappears automatically after approximately four seconds. 5. Connect the cable from the S-VIDEO OUT of VCR or R L V S-VIDEO Laserdisc Player OUTPUT VCR or Laserdisc Player Hitachi Model or Similar Model NOTES: 1. A single VCR can be used for VCR #1 and VCR #2, but note that is played back will be abnormal if the...
Owners Guide
Page 17
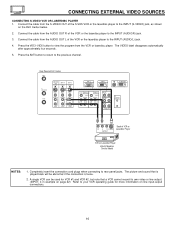
... R of the Laserdisc/DVD player or HDTV set top box to the INPUT (AUDIO/R) jack. 5. OUTPUT L R Y PB PR OR HDTV Set-Top Box DVD Player Hitachi Model or Similar Model OUTPUT Back of VIDEO AUDIO DVD Player PB/CB PR/CR Y R L Rear Panel of the Laserdisc/DVD player or HDTV set...
... R of the Laserdisc/DVD player or HDTV set top box to the INPUT (AUDIO/R) jack. 5. OUTPUT L R Y PB PR OR HDTV Set-Top Box DVD Player Hitachi Model or Similar Model OUTPUT Back of VIDEO AUDIO DVD Player PB/CB PR/CR Y R L Rear Panel of the Laserdisc/DVD player or HDTV set...

Owners Guide
Page 18
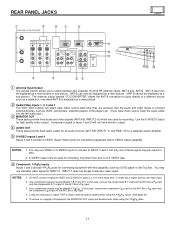
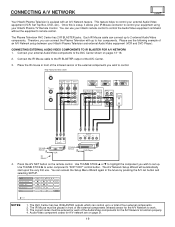
Rear Panel of the AVC Center ANT A TO CONVERTER ANT B MONITOR OUT S-VIDEO INPUT 4 S-VIDEO INPUT 3 S-VIDEO VIDEO VIDEO VIDEO (MONO) (MONO) (MONO) L L L R AUDIO R AUDIO R AUDIO RGB 1 ANALOG INPUT RGB 2 DIGITAL INPUT TO MONITOR Y/VIDEO INPUT 2 Y AUDIO PB (MONO) L PB INPUT 1 AUDIO (MONO) L PR PR R R AUDIO R L AUDIOR L AUDIOR L AUDIO OUT IR BLASTER RL INPUT To Audio Input Terminal of External Amplifier Stereo System Amplifier The MONITOR OUT terminal outputs video and audio of AVC Center ANT A TO CONVERTER ANT B MONITOR OUT S-VIDEO INPUT 4 S-VIDEO ...
Rear Panel of the AVC Center ANT A TO CONVERTER ANT B MONITOR OUT S-VIDEO INPUT 4 S-VIDEO INPUT 3 S-VIDEO VIDEO VIDEO VIDEO (MONO) (MONO) (MONO) L L L R AUDIO R AUDIO R AUDIO RGB 1 ANALOG INPUT RGB 2 DIGITAL INPUT TO MONITOR Y/VIDEO INPUT 2 Y AUDIO PB (MONO) L PB INPUT 1 AUDIO (MONO) L PR PR R R AUDIO R L AUDIOR L AUDIOR L AUDIO OUT IR BLASTER RL INPUT To Audio Input Terminal of External Amplifier Stereo System Amplifier The MONITOR OUT terminal outputs video and audio of AVC Center ANT A TO CONVERTER ANT B MONITOR OUT S-VIDEO INPUT 4 S-VIDEO ...
Owners Guide
Page 19
... must be placed in front of the external components you wish to control. CONNECTING A/V NETWORK Your Hitachi Plasma Television is setup, it allows your IR Mouse connector to control your equipment using your Hitachi Plasma TV Remote Control. This feature helps to four components. You can use . Therefore, you ...wish to set up to control your Hitachi Plasma Television and external Audio/Video equipment (VCR and DVD Player). The correct codes must be entered for each of the Audio/Video ...
... must be placed in front of the external components you wish to control. CONNECTING A/V NETWORK Your Hitachi Plasma Television is setup, it allows your IR Mouse connector to control your equipment using your Hitachi Plasma TV Remote Control. This feature helps to four components. You can use . Therefore, you ...wish to set up to control your Hitachi Plasma Television and external Audio/Video equipment (VCR and DVD Player). The correct codes must be entered for each of the Audio/Video ...
Owners Guide
Page 20
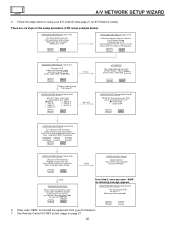
... 6. A/V NETWORK SETUP WIZARD 5. Carefully position the IR "mouse" in front of your VCR as shown in the setup procedure (VCR setup example below . BACK NEXT HITACHI AV NET Wizard (step 4b of 6) Did your VCR use to send video to uninstall the equipment from page 21. POWER PLAY CH UP BACK... NEXT HITACHI AV NET Wizard (step 6 of 6) Which RF channel does your VCR respond to trouble shoot settings. Press DONE to finish this wizard or HELP to...
... 6. A/V NETWORK SETUP WIZARD 5. Carefully position the IR "mouse" in front of your VCR as shown in the setup procedure (VCR setup example below . BACK NEXT HITACHI AV NET Wizard (step 4b of 6) Did your VCR use to send video to uninstall the equipment from page 21. POWER PLAY CH UP BACK... NEXT HITACHI AV NET Wizard (step 6 of 6) Which RF channel does your VCR respond to trouble shoot settings. Press DONE to finish this wizard or HELP to...