
Owners Guide
Page 3
...Note • There are no user serviceable parts inside the plasma television. • Model and serial numbers are NOT COVERED by Hitachi America, Ltd. Lead Notice This product contains lead. Note This plasma television will display television closed captioning, ( or ), in... Adjust only those controls that are not expressly approved by your TV screen. Reverse engineering or disassembly is designed to view encrypted digital programming. Prevention of the plasma television. FOR MORE INFORMATION, CALL 1-800-HITACHI. Important Safety Instructions Power source This...
...Note • There are no user serviceable parts inside the plasma television. • Model and serial numbers are NOT COVERED by Hitachi America, Ltd. Lead Notice This product contains lead. Note This plasma television will display television closed captioning, ( or ), in... Adjust only those controls that are not expressly approved by your TV screen. Reverse engineering or disassembly is designed to view encrypted digital programming. Prevention of the plasma television. FOR MORE INFORMATION, CALL 1-800-HITACHI. Important Safety Instructions Power source This...
Owners Guide
Page 4
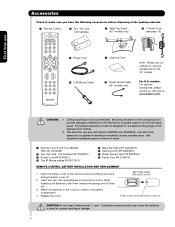
...(P# MS00931). ¶ Power Swivel Cable (P# EW08431). º Ferrite Core (P# 2169513). Replace the cover. For U.S. This plasma television product is designed for the 55" models. Open the battery cover of the remote control by pushing down and slide back ...; Two "AA" size, 1.5V batteries ´ Table Top Stand (42" models only) º 1 Ferrite Core (see page 13) First time use only with Hitachi 42HDS52 and 42HDS52A. Match the batteries to swell or rupture resulting in the battery...: For optional accessories, please access our web site at: www.hitachi.us/tv CAUTION: 1.
...(P# MS00931). ¶ Power Swivel Cable (P# EW08431). º Ferrite Core (P# 2169513). Replace the cover. For U.S. This plasma television product is designed for the 55" models. Open the battery cover of the remote control by pushing down and slide back ...; Two "AA" size, 1.5V batteries ´ Table Top Stand (42" models only) º 1 Ferrite Core (see page 13) First time use only with Hitachi 42HDS52 and 42HDS52A. Match the batteries to swell or rupture resulting in the battery...: For optional accessories, please access our web site at: www.hitachi.us/tv CAUTION: 1.
Owners Guide
Page 5
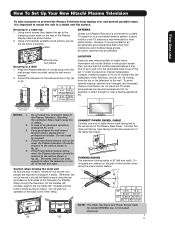
... are required to transport it safely. To avoid cabinet warping, cabinet color changes, and increased chance of set failure, do not place the TV where temperatures can become excessively hot, for example, in an exceptionally good signal area that the location selected allows a free flow of air... are not included (Optional). 42" 55" 5 Do not place any objects on the picture screen. In case of the Plasma Television. Keep the Plasma television 4 inches away from the top of the Table Top Stand. First time use How To Set Up Your New Hitachi Plasma Television To take measures to ...
... are required to transport it safely. To avoid cabinet warping, cabinet color changes, and increased chance of set failure, do not place the TV where temperatures can become excessively hot, for example, in an exceptionally good signal area that the location selected allows a free flow of air... are not included (Optional). 42" 55" 5 Do not place any objects on the picture screen. In case of the Plasma Television. Keep the Plasma television 4 inches away from the top of the Table Top Stand. First time use How To Set Up Your New Hitachi Plasma Television To take measures to ...
Owners Guide
Page 6
... as possible to the height of the picture screen center. Plug the adapter into the antenna terminal on the screen. Consult your new HITACHI Plasma Television VIEWING The best picture is recommended. VHF (300-Ohm) antenna/UHF antenna When using a 75-Ohm coaxial cable system, connect...UHF antenna To UHF antenna AIR To outdoor antenna or CATV system Antenna Mixer NOTE: 6 Connecting a 300-Ohm twin lead connector may appear on the TV. First time use How to set up your dealer or service store for best performance. 0' R 4" Minimum BEST VERTICAL VIEWING 20 ANGLE 3' 5' ...
... as possible to the height of the picture screen center. Plug the adapter into the antenna terminal on the screen. Consult your new HITACHI Plasma Television VIEWING The best picture is recommended. VHF (300-Ohm) antenna/UHF antenna When using a 75-Ohm coaxial cable system, connect...UHF antenna To UHF antenna AIR To outdoor antenna or CATV system Antenna Mixer NOTE: 6 Connecting a 300-Ohm twin lead connector may appear on the TV. First time use How to set up your dealer or service store for best performance. 0' R 4" Minimum BEST VERTICAL VIEWING 20 ANGLE 3' 5' ...
Owners Guide
Page 7
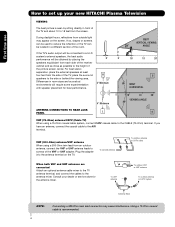
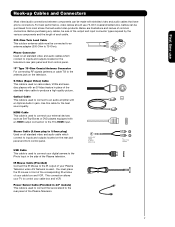
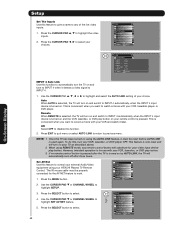
... Type 75-Ohm Coaxial Antenna Connector For connecting RF signals (antenna or cable TV) to inputs and outputs located on the television's rear jack panel and front...cable is used to connect the swivel stand to the Photo Input in the side of the Plasma television. Power Swivel Cable (Provided in 42" models) This cable is used to connect your cable box and VCR. AUDIO OUT 3.8mm ...must place the IR mouse in place of the standard video cable to the IR output of your TV to the TV's HDMI input. Optical Cable This cable is used on the television. You must be connected to ...
... Type 75-Ohm Coaxial Antenna Connector For connecting RF signals (antenna or cable TV) to inputs and outputs located on the television's rear jack panel and front...cable is used to connect the swivel stand to the Photo Input in the side of the Plasma television. Power Swivel Cable (Provided in 42" models) This cable is used to connect your cable box and VCR. AUDIO OUT 3.8mm ...must place the IR mouse in place of the standard video cable to the IR output of your TV to the TV's HDMI input. Optical Cable This cable is used on the television. You must be connected to ...
Owners Guide
Page 8
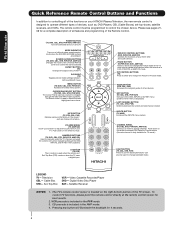
...Channel mode. (Favorite channel is in the AMP mode. 4. SOURCE ACCESS BUTTONS (TV, DVD, CBL, STB, PVR/VCR, AMP/CD) Changes the mode of the Universal Remote Control to adjust the audio level of your HITACHI Plasma Television, the new remote control is designed to show remote control mode when the... SOURCE ACCESS buttons are pressed. ASPECT BUTTON (TV) Changes the aspect ratio of the Remote Control. VOLUME WHEEL (TV, AMP/CD) Scroll up or down on...
...Channel mode. (Favorite channel is in the AMP mode. 4. SOURCE ACCESS BUTTONS (TV, DVD, CBL, STB, PVR/VCR, AMP/CD) Changes the mode of the Universal Remote Control to adjust the audio level of your HITACHI Plasma Television, the new remote control is designed to show remote control mode when the... SOURCE ACCESS buttons are pressed. ASPECT BUTTON (TV) Changes the aspect ratio of the Remote Control. VOLUME WHEEL (TV, AMP/CD) Scroll up or down on...

Owners Guide
Page 10
... while using the AV NET Learning Wizard. ቫ SIDE INPUT JACKS (for VIDEO: 5) Use these audio/video jacks for remote ON/OFF operation. Your HITACHI Plasma TV will illuminate. The Plasma TV is ON. Display monitor MAIN POWER is ON with no signal input except antenna (no video input when VIDEO: 1, 2, 3, 4 and 5. NOTES: 1. First time...
... while using the AV NET Learning Wizard. ቫ SIDE INPUT JACKS (for VIDEO: 5) Use these audio/video jacks for remote ON/OFF operation. Your HITACHI Plasma TV will illuminate. The Plasma TV is ON. Display monitor MAIN POWER is ON with no signal input except antenna (no video input when VIDEO: 1, 2, 3, 4 and 5. NOTES: 1. First time...
Owners Guide
Page 13
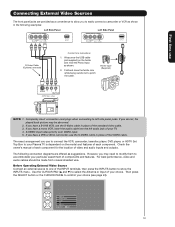
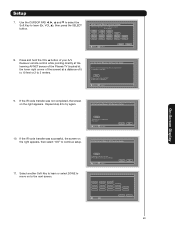
...each component. The exact arrangement you use to connect the VCR, camcorder, laserdisc player, DVD player, or HDTV Set Top Box to your Plasma TV is dependent on the ferrite core near the Photo Input as suggestions. Completely insert connection cord plugs when connecting to left audio jack of ... For best performance, video and audio cables should be abnormal. 2. Use the CURSOR PAD (̆ and ̄) to select the Antenna or Input of your TV. 4. Input 5 Photo Input Cable Air Input 1 Move SEL Sel. 13 If you have a S-VHS VCR, use the S-Video cable in place of components...
...each component. The exact arrangement you use to connect the VCR, camcorder, laserdisc player, DVD player, or HDTV Set Top Box to your Plasma TV is dependent on the ferrite core near the Photo Input as suggestions. Completely insert connection cord plugs when connecting to left audio jack of ... For best performance, video and audio cables should be abnormal. 2. Use the CURSOR PAD (̆ and ̄) to select the Antenna or Input of your TV. 4. Input 5 Photo Input Cable Air Input 1 Move SEL Sel. 13 If you have a S-VHS VCR, use the S-Video cable in place of components...

Owners Guide
Page 19
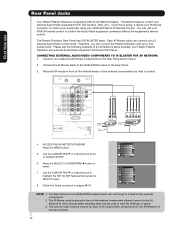
... shown on the Rear Panel on the right. Connect an optical cable from the Rear Panel is controlled by the amplifier, not by the Plasma Television. AUDIO OUT VIDEO OUT Back of VCR VCR Stereo System Amplifier OPTICAL INPUT CONNECTING MONITOR OUT The MONITOR OUT terminal outputs video and audio... the Optical input of the VCR or the laserdisc player to the INPUT (MONO)/L(AUDIO) jack. 3. Connect the cable from the VIDEO OUT of the Plasma TV to the INPUT (VIDEO) jack, as shown on the Rear Panel on the right. 2. Optional R L V S-VIDEO INPUT VCR or other external components 3. If both...
... shown on the Rear Panel on the right. Connect an optical cable from the Rear Panel is controlled by the amplifier, not by the Plasma Television. AUDIO OUT VIDEO OUT Back of VCR VCR Stereo System Amplifier OPTICAL INPUT CONNECTING MONITOR OUT The MONITOR OUT terminal outputs video and audio... the Optical input of the VCR or the laserdisc player to the INPUT (MONO)/L(AUDIO) jack. 3. Connect the cable from the VIDEO OUT of the Plasma TV to the INPUT (VIDEO) jack, as shown on the Rear Panel on the right. 2. Optional R L V S-VIDEO INPUT VCR or other external components 3. If both...
Owners Guide
Page 20
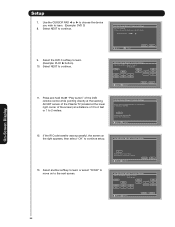
... THE AV NET SETUP WIZARD Press the MENU button. 5. This feature helps to control your Hitachi Plasma Television and external Audio/Video equipment (VCR and DVD Player). You can connect the Plasma Television with an AV Network feature. Infrared Sensor IR Mouse V L R OUTPUT VCR Infrared ...channel scroll to hold the IR Mouse in front of the Rear Panel. 3. Connect your HITACHI Plasma TV Remote Control. On-Screen Display The Remote Control First time use your HITACHI remote control to control the Audio/Video equipment command without the equipment's remote control. CONNECTING ...
... THE AV NET SETUP WIZARD Press the MENU button. 5. This feature helps to control your Hitachi Plasma Television and external Audio/Video equipment (VCR and DVD Player). You can connect the Plasma Television with an AV Network feature. Infrared Sensor IR Mouse V L R OUTPUT VCR Infrared ...channel scroll to hold the IR Mouse in front of the Rear Panel. 3. Connect your HITACHI Plasma TV Remote Control. On-Screen Display The Remote Control First time use your HITACHI remote control to control the Audio/Video equipment command without the equipment's remote control. CONNECTING ...

Owners Guide
Page 21
... the ̇ or ̈ button of the Source Access on the remote. To operate your Plasma TV, point the remote control at the remote sensor of the VCR and select PVR by pressing the ...to Manual/Manual to program your satellite receiver. They are two modes of VCRs, CATV (Cable TV) converters, set - Press and hold the LIGHT button for instruction on how to program the ... switch. The Remote Control The Remote Control In addition to controlling all the functions on your HITACHI Plasma TV, the new remote control is pressed, the illumination will turn off. To operate your DVD...
... the ̇ or ̈ button of the Source Access on the remote. To operate your Plasma TV, point the remote control at the remote sensor of the VCR and select PVR by pressing the ...to Manual/Manual to program your satellite receiver. They are two modes of VCRs, CATV (Cable TV) converters, set - Press and hold the LIGHT button for instruction on how to program the ... switch. The Remote Control The Remote Control In addition to controlling all the functions on your HITACHI Plasma TV, the new remote control is pressed, the illumination will turn off. To operate your DVD...
Owners Guide
Page 24
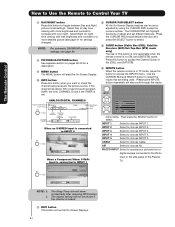
... CC Off 4:3 Expanded NOTE: 1. 2. The Remote Control How to Use the Remote to Control Your TV ቨ DAY/NIGHT button Press this button to the Photo Input in the side panel of the Plasma TV. Select Day for day time viewing with more detailed picture (see page 54. ቩ PICTURE-IN-PICTURE...Guide of the (CBL), and (SAT/STB). ተ INPUTS button When the remote control is in (CBL) and (SAT/STB) mode. AM --:-- PM ST TV-14 V Audio Broadcast Broadcast Rating Closed Captioning Day CC Off Cable 6 11:00PM Aspect Mode 16:9 Standard Main Picture Source Time When an S-VIDEO Input...
... CC Off 4:3 Expanded NOTE: 1. 2. The Remote Control How to Use the Remote to Control Your TV ቨ DAY/NIGHT button Press this button to the Photo Input in the side panel of the Plasma TV. Select Day for day time viewing with more detailed picture (see page 54. ቩ PICTURE-IN-PICTURE...Guide of the (CBL), and (SAT/STB). ተ INPUTS button When the remote control is in (CBL) and (SAT/STB) mode. AM --:-- PM ST TV-14 V Audio Broadcast Broadcast Rating Closed Captioning Day CC Off Cable 6 11:00PM Aspect Mode 16:9 Standard Main Picture Source Time When an S-VIDEO Input...
Owners Guide
Page 28
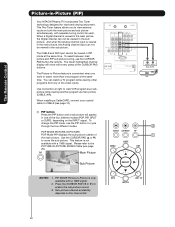
...4707; ቢ To change the PIP mode, use the CURSOR PAD button the remote. This Two Tuner feature allows you want to watch a TV program while viewing other programs from any of the CURSOR PAD buttons. To select between main picture and PIP sub picture tuning, use the PIP...the same time. This feature is viewed in the main picture, the Analog channel input can not be viewed in -Picture (PIP) Your HITACHI Plasma TV incorporates Two Tuner technology designed for each. And when the Analog channel input is not available with separate tuning control for improved viewing enjoyment. ...
...4707; ቢ To change the PIP mode, use the CURSOR PAD button the remote. This Two Tuner feature allows you want to watch a TV program while viewing other programs from any of the CURSOR PAD buttons. To select between main picture and PIP sub picture tuning, use the PIP...the same time. This feature is viewed in the main picture, the Analog channel input can not be viewed in -Picture (PIP) Your HITACHI Plasma TV incorporates Two Tuner technology designed for each. And when the Analog channel input is not available with separate tuning control for improved viewing enjoyment. ...
Owners Guide
Page 39
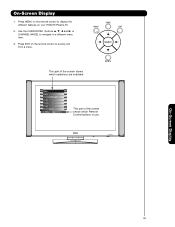
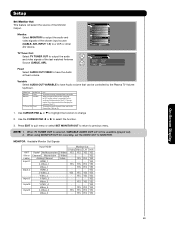
This part of the screen shows which selections are available. Press MENU on the remote control to a different menu item. 3. Video Audio Channel Manager Locks Timers Setup Power Swivel Move SEL Select This part of the screen shows which Remote Control buttons to quickly exit from a menu. Use the CURSOR PAD (buttons ̆, ̄, ̇ and ̈) or CHANNEL WHEEL to navigate to display the different features on the remote control to use. Press EXIT on your HITACHI Plasma TV. 2. On-Screen Display 1. On-Screen Display 39
This part of the screen shows which selections are available. Press MENU on the remote control to a different menu item. 3. Video Audio Channel Manager Locks Timers Setup Power Swivel Move SEL Select This part of the screen shows which Remote Control buttons to quickly exit from a menu. Use the CURSOR PAD (buttons ̆, ̄, ̇ and ̈) or CHANNEL WHEEL to navigate to display the different features on the remote control to use. Press EXIT on your HITACHI Plasma TV. 2. On-Screen Display 1. On-Screen Display 39
Owners Guide
Page 44
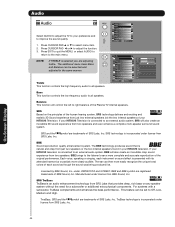
...license from SRS Labs, Inc. For systems with its attendant harmonics or partials more easily recognize the unique tonal colors of the Plasma TV internal speakers. Move SEL Return Bass This function controls the low frequency audio to an external audio system, SRS will also create... experience from two speakers and even enhance a complete multi-speaker surround sound system. SRS technology is selected you are trademarks of your HITACHI Television. The ear can be set to adjust the function. 3. Balance SRS BBE TruBass L R Off Hard Low Audio Source Stereo...
...license from SRS Labs, Inc. For systems with its attendant harmonics or partials more easily recognize the unique tonal colors of the Plasma TV internal speakers. Move SEL Return Bass This function controls the low frequency audio to an external audio system, SRS will also create... experience from two speakers and even enhance a complete multi-speaker surround sound system. SRS technology is selected you are trademarks of your HITACHI Television. The ear can be set to adjust the function. 3. Balance SRS BBE TruBass L R Off Hard Low Audio Source Stereo...
Owners Guide
Page 55
...; Event4 : -- : -- A Ȟ✔ in the box means it is not set the channel the TV will tune into. NOTE: 1. Timers Set Event Timer This function will automatically operate the Plasma TV viewing reservation of the MONTH. 9. If the clock is enabled. When the INFO button is activated, the... TV will automatically turn off when you can not use your television with the...
...; Event4 : -- : -- A Ȟ✔ in the box means it is not set the channel the TV will tune into. NOTE: 1. Timers Set Event Timer This function will automatically operate the Plasma TV viewing reservation of the MONTH. 9. If the clock is enabled. When the INFO button is activated, the... TV will automatically turn off when you can not use your television with the...
Owners Guide
Page 58
... play button on and switch to INPUT 4 automatically, when the INPUT 4 input device is convenient when you want to record a movie with your TV as described above. 2. NOTE: 1. If no remote control button is pressed after three hours. Set AV Net Use this feature to control your external... been turned on your VCR and watch a movie with your choices. To do this, turn on using REMOTE mode, any of your HITACHI Plasma TV Remote Control. However, intended operation is convenient when you want to watch it detects a video signal to INPUT 4. 1. Press the SELECT button ...
... play button on and switch to INPUT 4 automatically, when the INPUT 4 input device is convenient when you want to record a movie with your TV as described above. 2. NOTE: 1. If no remote control button is pressed after three hours. Set AV Net Use this feature to control your external... been turned on your VCR and watch a movie with your choices. To do this, turn on using REMOTE mode, any of your HITACHI Plasma TV Remote Control. However, intended operation is convenient when you want to watch it detects a video signal to INPUT 4. 1. Press the SELECT button ...
Owners Guide
Page 63
... Select 9. Repeat step 8 to store and continue. Move SEL Select Cancel OK 10. Press OK to try again. VOL ̆), then press the SELECT button. TV Softkeys POWER CH̆ VOL̆ MUTE CH̄ VOL̄ AUDIO SOURCE 1 SOURCE 2 SOURCE 3 SOURCE 4 SOURCE 5 SOURCE 6 SOURCE 7 SOURCE 8 ...Receiver Setup Press and hold the VOL ̆ button of your A/V Receiver remote control while pointing directly at the learning AV NET sensor of the Plasma TV (located at the lower right corner of the screen) at a distance of 5 to 10 feet or 2 to the next screen. If the ...
... Select 9. Repeat step 8 to store and continue. Move SEL Select Cancel OK 10. Press OK to try again. VOL ̆), then press the SELECT button. TV Softkeys POWER CH̆ VOL̆ MUTE CH̄ VOL̄ AUDIO SOURCE 1 SOURCE 2 SOURCE 3 SOURCE 4 SOURCE 5 SOURCE 6 SOURCE 7 SOURCE 8 ...Receiver Setup Press and hold the VOL ̆ button of your A/V Receiver remote control while pointing directly at the learning AV NET sensor of the Plasma TV (located at the lower right corner of the screen) at a distance of 5 to 10 feet or 2 to the next screen. If the ...
Owners Guide
Page 66
... : Custom Settings Press and hold the ̈ "Play button" of the DVD remote control while pointing directly at the learning AV NET sensor of the Plasma TV (located at the lower right corner of the screen) at a distance of 3 to 6 feet or 1 to 2 meters. Move SEL Select 12. AV Net...; Please wait while AV NET Learns the command.... Move SEL Select Back Next AV Net Setup Wizard : Custom Settings Select the DVD3 softkey to learn . TV Softkeys POWER ̇̇ ̈̈ MENU ̇̇ ̈ ̈̈ SELECT ̆ ̈ EXIT ̄ ̇ Move SEL Select Back Done...
... : Custom Settings Press and hold the ̈ "Play button" of the DVD remote control while pointing directly at the learning AV NET sensor of the Plasma TV (located at the lower right corner of the screen) at a distance of 3 to 6 feet or 1 to 2 meters. Move SEL Select 12. AV Net...; Please wait while AV NET Learns the command.... Move SEL Select Back Next AV Net Setup Wizard : Custom Settings Select the DVD3 softkey to learn . TV Softkeys POWER ̇̇ ̈̈ MENU ̇̇ ̈ ̈̈ SELECT ̆ ̈ EXIT ̄ ̇ Move SEL Select Back Done...
Owners Guide
Page 69
... Set Monitor Out This feature will not be controlled by the Plasma TV Volume Up/Down. Setup Menu Preference Screen Saver Set The Inputs...changing the volume of the chosen input source (CABLE, AIR, INPUT 1-5) to the audio and video output of the TV. To record currently viewed Video and Audio from either Cable or Air. 1. YES Cable) Analog Channel Video - YES...Video_1 YES YES YES YES Video_1 - Variable Select AUDIO OUT VARIABLE to output the audio and video signals of the TV. Use CURSOR PAD ̆ or ̄ to highlight the function to previous menu. Press EXIT to quit ...
... Set Monitor Out This feature will not be controlled by the Plasma TV Volume Up/Down. Setup Menu Preference Screen Saver Set The Inputs...changing the volume of the chosen input source (CABLE, AIR, INPUT 1-5) to the audio and video output of the TV. To record currently viewed Video and Audio from either Cable or Air. 1. YES Cable) Analog Channel Video - YES...Video_1 YES YES YES YES Video_1 - Variable Select AUDIO OUT VARIABLE to output the audio and video signals of the TV. Use CURSOR PAD ̆ or ̄ to highlight the function to previous menu. Press EXIT to quit ...


