Owners Guide
Page 6
...Off 17 Input Switching 18 Volume Adjustment 18 Audio Mute 18 Size Switching 19 Input Signal Screen Display 19 Using the Menu Screen 20 PICTURE MENU 21 AUDIO MENU 22 TIMER MENU 22 FUNCTION MENU 23 SETUP MENU 24 LANGUAGE MENU 25 OTHER FEATURES 25 Automatic Store 25 Signal... Check 26 Power Save Mode 26 IMAGE RETENTION OF PLASMA DISPLAY ......27 NOTES 27 TROUBLESHOOTING 28 Symptoms That Seemingly Appear to be Failures 28 Actions to change without our prior written permission is prohibited...
...Off 17 Input Switching 18 Volume Adjustment 18 Audio Mute 18 Size Switching 19 Input Signal Screen Display 19 Using the Menu Screen 20 PICTURE MENU 21 AUDIO MENU 22 TIMER MENU 22 FUNCTION MENU 23 SETUP MENU 24 LANGUAGE MENU 25 OTHER FEATURES 25 Automatic Store 25 Signal... Check 26 Power Save Mode 26 IMAGE RETENTION OF PLASMA DISPLAY ......27 NOTES 27 TROUBLESHOOTING 28 Symptoms That Seemingly Appear to be Failures 28 Actions to change without our prior written permission is prohibited...

Owners Guide
Page 21
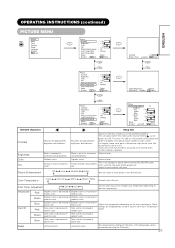
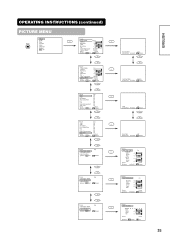
...and ADJUST buttons to adjust (example: Contrast). CH+ CH- Press the MENU button to select other items.) Picture Contrast : + 31 Brightness : - 31 OK Color : 0 Tint : + 31 Picture Enhancement : Off Color Temperature : Normal Color Temp.Adjust Reset Reset Select Return Exit 3. Contrast Next / Prev...settings. Use the and SELECT buttons to select the item to be displayed; Example: Selecting the Picture screen 1. Press the OK button to display the Picture Menu screen. (Use the and SELECT buttons to display the Main Menu screen. OPERATING INSTRUCTIONS (continued...
...and ADJUST buttons to adjust (example: Contrast). CH+ CH- Press the MENU button to select other items.) Picture Contrast : + 31 Brightness : - 31 OK Color : 0 Tint : + 31 Picture Enhancement : Off Color Temperature : Normal Color Temp.Adjust Reset Reset Select Return Exit 3. Contrast Next / Prev...settings. Use the and SELECT buttons to select the item to be displayed; Example: Selecting the Picture screen 1. Press the OK button to display the Picture Menu screen. (Use the and SELECT buttons to display the Main Menu screen. OPERATING INSTRUCTIONS (continued...
Owners Guide
Page 22
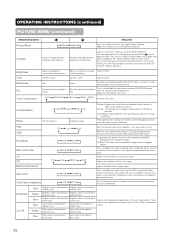
...to Normal. Green Dark scene is better for most realistic skin color. Blue Dark scene is set to magenta. ENGLISH OPERATING INSTRUCTIONS (continued) PICTURE MENU MENU OK OK CH+ CH+ CH- Black is decreased in greenish color. Enhances green and weakens red. Dark scene is not ...when receiving PAL/SECAM signal. greenish color. Adjust for dark scenes. Darkens colors. Brightness Color Tint Black is increased in each of the picture might not be grayed out. In this Menu page can adjust further till [+40] by pressing the OK button. Reset (off for ...
...to Normal. Green Dark scene is better for most realistic skin color. Blue Dark scene is set to magenta. ENGLISH OPERATING INSTRUCTIONS (continued) PICTURE MENU MENU OK OK CH+ CH+ CH- Black is decreased in greenish color. Enhances green and weakens red. Dark scene is not ...when receiving PAL/SECAM signal. greenish color. Adjust for dark scenes. Darkens colors. Brightness Color Tint Black is increased in each of the picture might not be grayed out. In this Menu page can adjust further till [+40] by pressing the OK button. Reset (off for ...

Owners Guide
Page 23
OPERATING INSTRUCTIONS (continued) AUDIO MENU MENU Picture Audio Timer CH+ Function Setup Language CH- Bass Suppresses bass. Suppresses left-side sound. Favorite: This mode should be restored by SELECT buttons on the ... CH+ CH- Adjust to distinguish between two different tones. This will automatically adjust volume so each channel and input has the same average volume level. Picture Audio Timer Function Setup Language Select OK Set Selected characters Off Timer On Timer --Min. 30Min. 60Min. 120Min. 90Min. The settable time is 00:00...
OPERATING INSTRUCTIONS (continued) AUDIO MENU MENU Picture Audio Timer CH+ Function Setup Language CH- Bass Suppresses bass. Suppresses left-side sound. Favorite: This mode should be restored by SELECT buttons on the ... CH+ CH- Adjust to distinguish between two different tones. This will automatically adjust volume so each channel and input has the same average volume level. Picture Audio Timer Function Setup Language Select OK Set Selected characters Off Timer On Timer --Min. 30Min. 60Min. 120Min. 90Min. The settable time is 00:00...
Owners Guide
Page 24
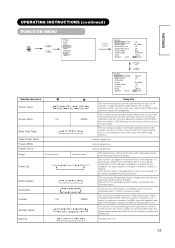
... normal viewing. Normal Off 1 On 60Min. Off 15Min. 30Min. 120Min. 60Min. It is also provided against the image retention. This can occur with stationary pictures by pressing the OK button. This function is recommended to set to reset) Normal Extend 1 Extend 2 Off On 1 2 3 4 7 6 5 On...they should have disappeared. If time is used to reduce the panel image retention. OPERATING INSTRUCTIONS (continued) FUNCTION MENU ENGLISH MENU Picture Audio Timer CH+ Function Setup Language CH- Select OK Set Function Screen Saver Off OK Screen Wipe On 60Min. Black Side ...
... normal viewing. Normal Off 1 On 60Min. Off 15Min. 30Min. 120Min. 60Min. It is also provided against the image retention. This can occur with stationary pictures by pressing the OK button. This function is recommended to set to reset) Normal Extend 1 Extend 2 Off On 1 2 3 4 7 6 5 On...they should have disappeared. If time is used to reduce the panel image retention. OPERATING INSTRUCTIONS (continued) FUNCTION MENU ENGLISH MENU Picture Audio Timer CH+ Function Setup Language CH- Select OK Set Function Screen Saver Off OK Screen Wipe On 60Min. Black Side ...
Owners Guide
Page 25
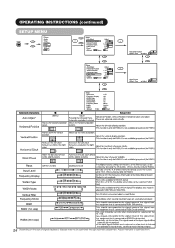
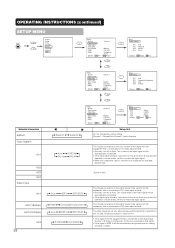
...- 0.7V Off Off Off On Movie DVI-PC RGB Return OK Horizontal Position Next / Prev Adjust 0 Return CH+ CH- OPERATING INSTRUCTIONS (continued) SETUP MENU MENU Picture Audio Timer CH+ Function Setup CH- OK Clock Phase Next / Prev 10 Adjust Return * Depending on the type of signal displayed, displays may not be...
...- 0.7V Off Off Off On Movie DVI-PC RGB Return OK Horizontal Position Next / Prev Adjust 0 Return CH+ CH- OPERATING INSTRUCTIONS (continued) SETUP MENU MENU Picture Audio Timer CH+ Function Setup CH- OK Clock Phase Next / Prev 10 Adjust Return * Depending on the type of signal displayed, displays may not be...
Owners Guide
Page 26
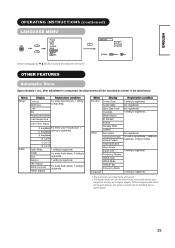
... is completed, the adjustments will be lost. • The signal mode can be recorded as the same signal. ENGLISH OPERATING INSTRUCTIONS (continued) LANGUAGE MENU MENU Picture Audio Timer CH+ Function Setup Language CH-
... is completed, the adjustments will be lost. • The signal mode can be recorded as the same signal. ENGLISH OPERATING INSTRUCTIONS (continued) LANGUAGE MENU MENU Picture Audio Timer CH+ Function Setup Language CH-
Owners Guide
Page 29
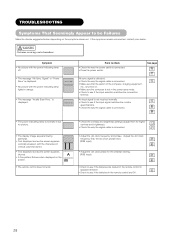
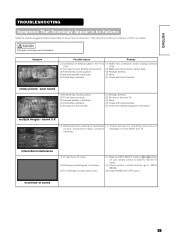
...in the remote control in opposite direction. • Check to see if the input selection matches the connection terminal. Symptom • No picture with the power indicating lamp lights in the power-save mode. • Check to be hazardous. If the symptoms remain uncorrected, contact ...matches the monitor specifications. • Check the way the signal cable is connected. • The power indicating lamp is normally lit but no picture . • The display image appears flowing slantwise. • Text displayed across the screen appears vertically streaked, with the characters in the ...
...in the remote control in opposite direction. • Check to see if the input selection matches the connection terminal. Symptom • No picture with the power indicating lamp lights in the power-save mode. • Check to be hazardous. If the symptoms remain uncorrected, contact ...matches the monitor specifications. • Check the way the signal cable is connected. • The power indicating lamp is normally lit but no picture . • The display image appears flowing slantwise. • Text displayed across the screen appears vertically streaked, with the characters in the ...

Owners Guide
Page 34
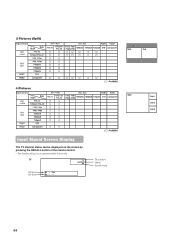
... Copyright Law. • When a normal 4:3 image is selected to play certain software, such as a TV program, the image would appear different from the original. Use the 4:3 mode to view images, which were created in some cases. Vertical picture position can be adjusted only one step up. (The range: 0 to +1) ENGLISH Position + 31...
... Copyright Law. • When a normal 4:3 image is selected to play certain software, such as a TV program, the image would appear different from the original. Use the 4:3 mode to view images, which were created in some cases. Vertical picture position can be adjusted only one step up. (The range: 0 to +1) ENGLISH Position + 31...
Owners Guide
Page 35
...• The sub-screen can be selected with the AV1, AV2, AV3, AV4 and TV channel number buttons from the video input screen 2 Pictures (Split) Pressing the PinP button one time will cancel the 2 pictures display. • "Frequency Mode" in the Setup Menu should be shifted up and down...the component signal of 1080i/50 or 1080i/60. AV1 AV2 • The speaker icon can be careful since image retention will display 2 pictures. Activating the P-in-P mode from the RGB input screen A/B button PinP button RECALL button RETURN button SELECT button Pressing the PinP button ...
...• The sub-screen can be selected with the AV1, AV2, AV3, AV4 and TV channel number buttons from the video input screen 2 Pictures (Split) Pressing the PinP button one time will cancel the 2 pictures display. • "Frequency Mode" in the Setup Menu should be shifted up and down...the component signal of 1080i/50 or 1080i/60. AV1 AV2 • The speaker icon can be careful since image retention will display 2 pictures. Activating the P-in-P mode from the RGB input screen A/B button PinP button RECALL button RETURN button SELECT button Pressing the PinP button ...
Owners Guide
Page 36
... Management OK Color Decoding Select OK Set Return CH+ CH- Adjust Color Management OK Color Decoding Select OK Set Return Picture Mode Next/Prev Select Day Return CH+ CH- Contrast Mode Next/Prev Select Normal Return YNR Next/Prev Off Select ...+ 60 Color 0 Tint + 31 Reset Reset Select Return Exit ENGLISH Adjust Color Management OK Color Decoding Select OK Set Return CH+ CH- Picture Picture Mode Day Contrast +31 OK Brightness -31 Color 0 Sharpness +15 Tint 0 Color Temperature Normal Contrast Mode Normal Reset Reset Select OK Set...
... Management OK Color Decoding Select OK Set Return CH+ CH- Adjust Color Management OK Color Decoding Select OK Set Return Picture Mode Next/Prev Select Day Return CH+ CH- Contrast Mode Next/Prev Select Normal Return YNR Next/Prev Off Select ...+ 60 Color 0 Tint + 31 Reset Reset Select Return Exit ENGLISH Adjust Color Management OK Color Decoding Select OK Set Return CH+ CH- Picture Picture Mode Day Contrast +31 OK Brightness -31 Color 0 Sharpness +15 Tint 0 Color Temperature Normal Contrast Mode Normal Reset Reset Select OK Set...
Owners Guide
Page 37
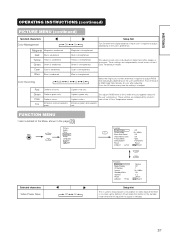
...suit the ambient brightness. Black is better for the items of this Contrast setting is increased in bluish color. Adjust for sharper picture. Normal : The gradation of the 4 Color Temperature modes. Turn up to reduce the discolorations in the Function Menu should ... These settings are independently stored in greenish color. Dark scene is decreased in greenish color. OPERATING INSTRUCTIONS (continued) PICTURE MENU (continued) Selected characters Picture Mode Day Night Setup hint Day: This setting is reproduced as faithfully as Off only when selecting DVI-STB mode...
...suit the ambient brightness. Black is better for the items of this Contrast setting is increased in bluish color. Adjust for sharper picture. Normal : The gradation of the 4 Color Temperature modes. Turn up to reduce the discolorations in the Function Menu should ... These settings are independently stored in greenish color. Dark scene is decreased in greenish color. OPERATING INSTRUCTIONS (continued) PICTURE MENU (continued) Selected characters Picture Mode Day Night Setup hint Day: This setting is reproduced as faithfully as Off only when selecting DVI-STB mode...
Owners Guide
Page 38
... adjusts R/G/B level or tint to the standby mode when the AV input with no video signal. MENU Picture Audio Timer CH+ Function Setup Language CH- Magenta Magenta is strengthened. OPERATING INSTRUCTIONS (continued) ENGLISH PICTURE MENU (continued) Selected characters Setup hint Color Management Off On Turn On when the original balance of the...
... adjusts R/G/B level or tint to the standby mode when the AV input with no video signal. MENU Picture Audio Timer CH+ Function Setup Language CH- Magenta Magenta is strengthened. OPERATING INSTRUCTIONS (continued) ENGLISH PICTURE MENU (continued) Selected characters Setup hint Color Management Off On Turn On when the original balance of the...
Owners Guide
Page 39
... Return CH+ Setup Video Input OK AV1 Auto AV2 Composite/Component AV3 Auto AV4 S.Video Select Return Exit CH- OPERATING INSTRUCTIONS (continued) SETUP MENU MENU Picture Audio CH+ Timer Function Setup CH- Selected characters System Color System AV1 AV2 AV3 AV4 Video Input AV1 AV2 (1st step) AV2 (2nd step) AV4...
... Return CH+ Setup Video Input OK AV1 Auto AV2 Composite/Component AV3 Auto AV4 S.Video Select Return Exit CH- OPERATING INSTRUCTIONS (continued) SETUP MENU MENU Picture Audio CH+ Timer Function Setup CH- Selected characters System Color System AV1 AV2 AV3 AV4 Video Input AV1 AV2 (1st step) AV2 (2nd step) AV4...
Owners Guide
Page 40
...registered. OPERATING INSTRUCTIONS (continued) SETUP MENU (continued) ENGLISH OTHER FEATURES Automatic Store Approximately 1 sec. Menu Picture Display Picture Mode Contrast Brightness Color Sharpness Tint Color Temperature Registration condition 1 setting is Tint registered. Red Color For every input function and... • The previously recorded items will be lost. after adjustment is registered. For every input function and every Picture Mode, 1 setting is registered. Green Cyan Blue Color Decoding - System 1 setting is completed, the adjustments will be recorded...
...registered. OPERATING INSTRUCTIONS (continued) SETUP MENU (continued) ENGLISH OTHER FEATURES Automatic Store Approximately 1 sec. Menu Picture Display Picture Mode Contrast Brightness Color Sharpness Tint Color Temperature Registration condition 1 setting is Tint registered. Red Color For every input function and... • The previously recorded items will be lost. after adjustment is registered. For every input function and every Picture Mode, 1 setting is registered. Green Cyan Blue Color Decoding - System 1 setting is completed, the adjustments will be recorded...
Owners Guide
Page 42
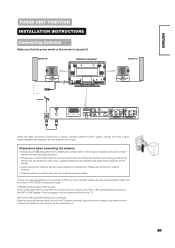
... from the antenna wire as this may occur, causing reception to screws of the VHF or UHF adapter. If there are noise appearance in the picture of CATV system, please note that the core and shielding are connected Attach an optional antenna cable mixer to the... TV antenna terminal, and connect the cables to appear on the screen. • Avoid using indoor antenna as possible. Speaker (R) Monitor rear panel Speaker (L) antenna 20 ...
... from the antenna wire as this may occur, causing reception to screws of the VHF or UHF adapter. If there are noise appearance in the picture of CATV system, please note that the core and shielding are connected Attach an optional antenna cable mixer to the... TV antenna terminal, and connect the cables to appear on the screen. • Avoid using indoor antenna as possible. Speaker (R) Monitor rear panel Speaker (L) antenna 20 ...
Owners Guide
Page 44
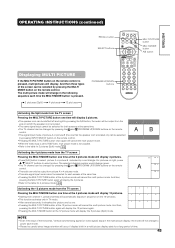
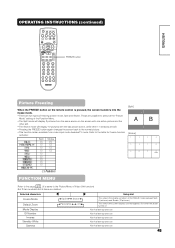
... the input of the horizontal / vertical synchronizing signal (or video signal) stops in the multi picture display, the mode will not change green. • The TV channel can be changed by pressing the and PROGRAM UP/DOWN buttons on the remote control. &#... pictures (Split) 4 pictures 12 pictures PROGRAM UP/DOWN buttons Activating the Split mode from the TV screen Pressing the MULTI PICTURE button one time will display 2 pictures. • The speaker icon can be shifted left in a multi picture display state for 4 pictures mode. the audio will be output from picture A in 4 pictures ...
... the input of the horizontal / vertical synchronizing signal (or video signal) stops in the multi picture display, the mode will not change green. • The TV channel can be changed by pressing the and PROGRAM UP/DOWN buttons on the remote control. &#... pictures (Split) 4 pictures 12 pictures PROGRAM UP/DOWN buttons Activating the Split mode from the TV screen Pressing the MULTI PICTURE button one time will display 2 pictures. • The speaker icon can be shifted left in a multi picture display state for 4 pictures mode. the audio will be output from picture A in 4 pictures ...
Owners Guide
Page 45
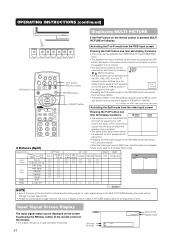
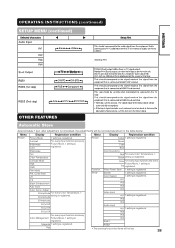
Min. The display will go out in approximately 6 seconds. ON TV position Name Sound mode 2 Pictures (Split) Main Sub Main Sub 4 Pictures Main Sub 1 Sub 2 Sub 3 Input Signal Screen Display The TV channel status can be displayed on the screen by pressing the RECALL button of the remote control. TV 1 ABCDE Off-timer On-timer OFF -- --
Min. The display will go out in approximately 6 seconds. ON TV position Name Sound mode 2 Pictures (Split) Main Sub Main Sub 4 Pictures Main Sub 1 Sub 2 Sub 3 Input Signal Screen Display The TV channel status can be displayed on the screen by pressing the RECALL button of the remote control. TV 1 ABCDE Off-timer On-timer OFF -- --
Owners Guide
Page 46
... on the remote control is also available from the same source on the screen with one active picture and the other still. • The Strobe mode will display 2 pictures from video input mode besides TV mode. Not Available (grayed out) Not Available (grayed out) Not Available (grayed out) Not...Strobe Panoramic 4:3 Setup hint This selects the display condition of Video Unit function) But 2 item is added and 5 items are possible to the normal picture. • This function is pressed, the screen transfers into the freeze mode. • There are two types of the Function Menu. •...
... on the remote control is also available from the same source on the screen with one active picture and the other still. • The Strobe mode will display 2 pictures from video input mode besides TV mode. Not Available (grayed out) Not Available (grayed out) Not Available (grayed out) Not...Strobe Panoramic 4:3 Setup hint This selects the display condition of Video Unit function) But 2 item is added and 5 items are possible to the normal picture. • This function is pressed, the screen transfers into the freeze mode. • There are two types of the Function Menu. •...
Owners Guide
Page 56
... to 9 buttons on the symptoms observed. snowy picture - no picture or sound poor sound (1) Antenna has moved position. (2) TV not tuned correctly. (3) Adverse weather conditions. (4) Transmitter problems. (5) AV Input not set to minimum. (3) TV in AV mode. (2) Picture/sound setting set correctly. (1) Re-align antenna. ...depending on your dealer. radios etc. If the symptoms remain uncorrected, contact your remote control to return to normal TV mode. (2) Check picture / sound controls (go to MAIN MENU). (3) Press POWER ON / OFF button. Symptom Possible reason Remedy (1) Connection ...
... to 9 buttons on the symptoms observed. snowy picture - no picture or sound poor sound (1) Antenna has moved position. (2) TV not tuned correctly. (3) Adverse weather conditions. (4) Transmitter problems. (5) AV Input not set to minimum. (3) TV in AV mode. (2) Picture/sound setting set correctly. (1) Re-align antenna. ...depending on your dealer. radios etc. If the symptoms remain uncorrected, contact your remote control to return to normal TV mode. (2) Check picture / sound controls (go to MAIN MENU). (3) Press POWER ON / OFF button. Symptom Possible reason Remedy (1) Connection ...


