
Owners Guide
Page 1
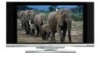
... USE 4-23 THE REMOTE CONTROL 24-40 ON-SCREEN DISPLAY USING THE RGB INPUT OF THE PLASMA TV 41-64 65-74 USEFUL INFORMATION INDEX 75-83 PLASMA TELEVISION AVC (Audio Video Control Center) & Plasma Display Monitor 32HDT50 42HDT50 50HDT50 OPERATING GUIDE Video Audio Ch. Manager Locks Setup Move SEL Sel STB POWER TV...
... USE 4-23 THE REMOTE CONTROL 24-40 ON-SCREEN DISPLAY USING THE RGB INPUT OF THE PLASMA TV 41-64 65-74 USEFUL INFORMATION INDEX 75-83 PLASMA TELEVISION AVC (Audio Video Control Center) & Plasma Display Monitor 32HDT50 42HDT50 50HDT50 OPERATING GUIDE Video Audio Ch. Manager Locks Setup Move SEL Sel STB POWER TV...

Owners Guide
Page 2
IMPORTANT SAFETY POINTS YOU SHOULD KNOW ABOUT YOUR HITACHI PLASMA TELEVISION Our reputation has been built on the quality, performance, and ease of service of benefit to you. To help you to persons. Plasma television consists of the AVC center/display monitor. NOTE: &#...within the product's enclosure that are covered in your HITACHI Plasma Television. NOTE: This Plasma Television will be of a sufficient magnitude to operate the Plasma Television. If the television does not operate properly, unplug the Plasma Television and call your warranty card and mail it ...
IMPORTANT SAFETY POINTS YOU SHOULD KNOW ABOUT YOUR HITACHI PLASMA TELEVISION Our reputation has been built on the quality, performance, and ease of service of benefit to you. To help you to persons. Plasma television consists of the AVC center/display monitor. NOTE: &#...within the product's enclosure that are covered in your HITACHI Plasma Television. NOTE: This Plasma Television will be of a sufficient magnitude to operate the Plasma Television. If the television does not operate properly, unplug the Plasma Television and call your warranty card and mail it ...
Owners Guide
Page 4
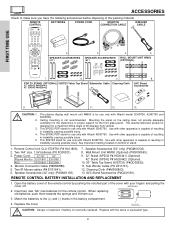
...). 13. AVC Stand Accessories (P#QJ01081). REMOTE CONTROL BATTERY INSTALLATION AND REPLACEMENT 1. This SPD32 PDP stand for use only with Hitachi 32HDT50. This SPD42 PDP stand for use only with your fingers and pulling the cover off. Use with other apparatus is capable ...2. WALL MOUNT UNIT WM50 (OPTIONAL) REC 1. 6. 7. AVC Stand Accessories 9. 10. 11. 12. 13. This plasma television product is designed for use only with Hitachi model 32HDT50, 42HDT50 and 50HDT50. This 50STD3 stand for a maximum tilting angle of stand. 1. Speaker Accessories (42" only) ...
...). 13. AVC Stand Accessories (P#QJ01081). REMOTE CONTROL BATTERY INSTALLATION AND REPLACEMENT 1. This SPD32 PDP stand for use only with Hitachi 32HDT50. This SPD42 PDP stand for use only with your fingers and pulling the cover off. Use with other apparatus is capable ...2. WALL MOUNT UNIT WM50 (OPTIONAL) REC 1. 6. 7. AVC Stand Accessories 9. 10. 11. 12. 13. This plasma television product is designed for use only with Hitachi model 32HDT50, 42HDT50 and 50HDT50. This 50STD3 stand for a maximum tilting angle of stand. 1. Speaker Accessories (42" only) ...
Owners Guide
Page 5
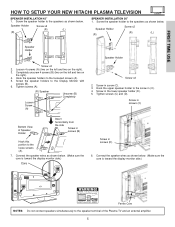
... (D). Speaker Holder Screw x2 (R) (L) (R) Speaker Holder Speaker Holder Screw x2 2. Screw in screw (C). 3. Screw in screws (C) Bottom View of the Plasma TV and an external amplifier. 5 Speaker Holder Screw x2 (R) (L) (R) SPEAKER INSTALLATION 50" 1. Connect the speaker wires as shown below . (Make sure...the right). 3. Screw the speaker holder to the Display Monitor with screws (B). 6. FIRST TIME USE HOW TO SETUP YOUR NEW HITACHI PLASMA TELEVISION SPEAKER INSTALLATION 42" 1. Connect the speaker wires as shown below . (Make sure the core is toward the display monitor...
... (D). Speaker Holder Screw x2 (R) (L) (R) Speaker Holder Speaker Holder Screw x2 2. Screw in screw (C). 3. Screw in screws (C) Bottom View of the Plasma TV and an external amplifier. 5 Speaker Holder Screw x2 (R) (L) (R) SPEAKER INSTALLATION 50" 1. Connect the speaker wires as shown below . (Make sure...the right). 3. Screw the speaker holder to the Display Monitor with screws (B). 6. FIRST TIME USE HOW TO SETUP YOUR NEW HITACHI PLASMA TELEVISION SPEAKER INSTALLATION 42" 1. Connect the speaker wires as shown below . (Make sure the core is toward the display monitor...

Owners Guide
Page 6
...To avoid cabinet warping, cabinet color changes, and increased chance of the Plasma Display monitor or the AVC center. FIRST TIME USE HOW TO SETUP YOUR NEW HITACHI PLASMA TELEVISION To take measures to prevent the Plasma Display from tipping over and prevent possible injury it is important to mount ...CH- Do not install by yourself. Do not grab the speakers or the back cover when lifting. Handgrips 3322" " 4422"" 50" ANTENNA Unless your Plasma Television is connected to a cable TV system or to the wall as shown below . 10cm (4 inches) or more Stabilization bolts (Provided) Wood Screw ...
...To avoid cabinet warping, cabinet color changes, and increased chance of the Plasma Display monitor or the AVC center. FIRST TIME USE HOW TO SETUP YOUR NEW HITACHI PLASMA TELEVISION To take measures to prevent the Plasma Display from tipping over and prevent possible injury it is important to mount ...CH- Do not install by yourself. Do not grab the speakers or the back cover when lifting. Handgrips 3322" " 4422"" 50" ANTENNA Unless your Plasma Television is connected to a cable TV system or to the wall as shown below . 10cm (4 inches) or more Stabilization bolts (Provided) Wood Screw ...
Owners Guide
Page 7
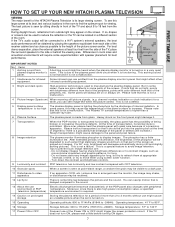
...16 Storage Storage Altitude: 300 to 1114hPa (15510ft to avoid image retention. HOW TO SET UP YOUR NEW HITACHI PLASMA TELEVISION FIRST TIME USE VIEWING The major benefit of the HITACHI Plasma Television is not a failure. During daylight hours, reflections from that stationary images would burn-in room sizes ...the side or behind the viewing area. Do not leave stationary images appearing for a period of more than a Cathode-ray-tube. 6 Plasma Surface The plasma panel is turned on . 15 Operating Operating altitude: 800 to 1114hPa (6194ft to the height of the TV and about 8 to ...
...16 Storage Storage Altitude: 300 to 1114hPa (15510ft to avoid image retention. HOW TO SET UP YOUR NEW HITACHI PLASMA TELEVISION FIRST TIME USE VIEWING The major benefit of the HITACHI Plasma Television is not a failure. During daylight hours, reflections from that stationary images would burn-in room sizes ...the side or behind the viewing area. Do not leave stationary images appearing for a period of more than a Cathode-ray-tube. 6 Plasma Surface The plasma panel is turned on . 15 Operating Operating altitude: 800 to 1114hPa (6194ft to the height of the TV and about 8 to ...
Owners Guide
Page 8
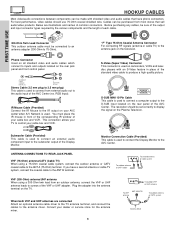
... camcorders, VCRs and laserdisc players with shielded video and audio cables that sell audio/video products. Plug the adapter into the antenna terminal on the Plasma Television. S-Video (Super Video) Connector This connector is used . Subwoofer Cable (Provided) This cable is used to connect from an outdoor antenna, connect the VHF...
... camcorders, VCRs and laserdisc players with shielded video and audio cables that sell audio/video products. Plug the adapter into the antenna terminal on the Plasma Television. S-Video (Super Video) Connector This connector is used . Subwoofer Cable (Provided) This cable is used to connect from an outdoor antenna, connect the VHF...
Owners Guide
Page 10
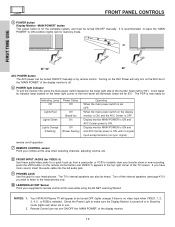
... of the TV screen. remote on/off . ቧ POWER light indicator To turn on the lower right side of the display monitor is selected. Your HITACHI Plasma TV will illuminate (lower left for stand-by mode (lights red) when not in Stand-by mode. Display monitor MAIN POWER is ON and AVC...
... of the TV screen. remote on/off . ቧ POWER light indicator To turn on the lower right side of the display monitor is selected. Your HITACHI Plasma TV will illuminate (lower left for stand-by mode (lights red) when not in Stand-by mode. Display monitor MAIN POWER is ON and AVC...

Owners Guide
Page 12
With this connection, your external components (VCR, Cable box, DVD player, etc.). Digital Input Use this DVI Digital input for your Plasma Television's remote control in TV mode. ቮ Subwoofer Out Connect this 15-pin D-Sub input for your external devices with digital output capability, such as a ...
With this connection, your external components (VCR, Cable box, DVD player, etc.). Digital Input Use this DVI Digital input for your Plasma Television's remote control in TV mode. ቮ Subwoofer Out Connect this 15-pin D-Sub input for your external devices with digital output capability, such as a ...

Owners Guide
Page 13
...3. From the owner's accessory you have their own AC Power. If you will find the Monitor Connector cable. 2. FIRST TIME USE CONNECTING PLASMA DISPLAY MONITOR TO AVC BOX 1. Firmly, and securely insert the Monitor Connection Cable to easily connect a camcorder or VCR as a convenience to ...Front panel of the AVC box "TO MONITOR" connectors. 3. To AC outlet The Display Monitor and the AVC Center have a VHS or 8mm camcorder, use HITACHI specified cable. If you to the rear panel of AVC PHONES S-VIDEO INPUT 5 AUDIO VIDEO L/(MONO) R PHONES S-VIDEO INPUT 5 AUDIO VIDEO L/(MONO) ...
...3. From the owner's accessory you have their own AC Power. If you will find the Monitor Connector cable. 2. FIRST TIME USE CONNECTING PLASMA DISPLAY MONITOR TO AVC BOX 1. Firmly, and securely insert the Monitor Connection Cable to easily connect a camcorder or VCR as a convenience to ...Front panel of the AVC box "TO MONITOR" connectors. 3. To AC outlet The Display Monitor and the AVC Center have a VHS or 8mm camcorder, use HITACHI specified cable. If you to the rear panel of AVC PHONES S-VIDEO INPUT 5 AUDIO VIDEO L/(MONO) R PHONES S-VIDEO INPUT 5 AUDIO VIDEO L/(MONO) ...
Owners Guide
Page 14
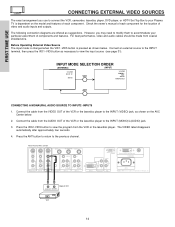
... the input source (see page 31). FIRST TIME USE CONNECTING EXTERNAL VIDEO SOURCES The exact arrangement you may need to modify them to accommodate your Plasma TV is pressed as shown below . 2. Rear Panel of AVC Center ANT B TO CONVERTER ANT A S-VIDEO S-VIDEO VIDEO VIDEO L L/(MONO) R AUDIO ...Set Top Box to your particular assortment of the VCR or the laserdisc player to the INPUT (MONO)/L(AUDIO) jack. 3. However, you use HITACHI specified cable. Before Operating External Video Source The input mode is changed when the VID1~VID5 button is dependent on the AVC Center below ....
... the input source (see page 31). FIRST TIME USE CONNECTING EXTERNAL VIDEO SOURCES The exact arrangement you may need to modify them to accommodate your Plasma TV is pressed as shown below . 2. Rear Panel of AVC Center ANT B TO CONVERTER ANT A S-VIDEO S-VIDEO VIDEO VIDEO L L/(MONO) R AUDIO ...Set Top Box to your particular assortment of the VCR or the laserdisc player to the INPUT (MONO)/L(AUDIO) jack. 3. However, you use HITACHI specified cable. Before Operating External Video Source The input mode is changed when the VID1~VID5 button is dependent on the AVC Center below ....
Owners Guide
Page 18
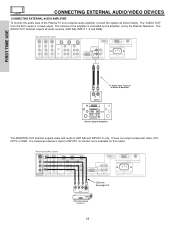
... L/(MONO) R AUDIO INPUT 3 IR BLASTER PR R AUDIO INPUT 2 PR R AUDIO INPUT 1 ANALOG INPUT L AUDIO DVI-HDTV L/(MONO) AUDIO Please use HITACHI specified cable. RL INPUT To Audio Input Terminal of External Amplifier Stereo System Amplifier The MONITOR OUT terminal outputs video and audio of the amplifier... is controlled by the amplifier, not by the Plasma Television. The Volume of ANT A/B and INPUT2~5 only. FIRST TIME USE CONNECTING EXTERNAL AUDIO/VIDEO DEVICES CONNECTING EXTERNAL AUDIO ...
... L/(MONO) R AUDIO INPUT 3 IR BLASTER PR R AUDIO INPUT 2 PR R AUDIO INPUT 1 ANALOG INPUT L AUDIO DVI-HDTV L/(MONO) AUDIO Please use HITACHI specified cable. RL INPUT To Audio Input Terminal of External Amplifier Stereo System Amplifier The MONITOR OUT terminal outputs video and audio of the amplifier... is controlled by the amplifier, not by the Plasma Television. The Volume of ANT A/B and INPUT2~5 only. FIRST TIME USE CONNECTING EXTERNAL AUDIO/VIDEO DEVICES CONNECTING EXTERNAL AUDIO ...
Owners Guide
Page 19
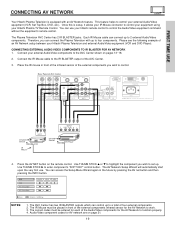
...four external components. 2. Connect your external Audio/Video components to set up to a total of an AV Network setup between your Hitachi Plasma Television and external Audio/Video equipment (VCR and DVD Player). Press the AV NET button on page 21. 19 Use THUMB STICK ...button. Each IR Mouse cable can control up . FIRST TIME USE CONNECTING AV NETWORK Your Hitachi Plasma Television is setup, it allows your IR Mouse connector to control your equipment using your Hitachi Plasma TV Remote Control. This feature helps to 2 external Audio/Video components. Infrared Sensor IR Mouse...
...four external components. 2. Connect your external Audio/Video components to set up to a total of an AV Network setup between your Hitachi Plasma Television and external Audio/Video equipment (VCR and DVD Player). Press the AV NET button on page 21. 19 Use THUMB STICK ...button. Each IR Mouse cable can control up . FIRST TIME USE CONNECTING AV NETWORK Your Hitachi Plasma Television is setup, it allows your IR Mouse connector to control your equipment using your Hitachi Plasma TV Remote Control. This feature helps to 2 external Audio/Video components. Infrared Sensor IR Mouse...

Owners Guide
Page 24
... VID 5 VID 4 FREEZE PIP MODE PIP ACCESS SWAP DAY/NIGHT ቤ REC ቢ These buttons allow the remote to control your television. To operate your Plasma TV, point the remote control at the remote sensor of the AVC box/Display Monitor and press the TV button. The DVD button will blink... VCR, point the remote at the remote sensor of the VCR and press the VCR button. To operate your set-top-box). To operate your HITACHI Plasma TV, the new remote control is chosen, as explained above. ባ,ቤ LIGHT BUTTON When you wish to control and press the CD, PVR or...
... VID 5 VID 4 FREEZE PIP MODE PIP ACCESS SWAP DAY/NIGHT ቤ REC ቢ These buttons allow the remote to control your television. To operate your Plasma TV, point the remote control at the remote sensor of the AVC box/Display Monitor and press the TV button. The DVD button will blink... VCR, point the remote at the remote sensor of the VCR and press the VCR button. To operate your set-top-box). To operate your HITACHI Plasma TV, the new remote control is chosen, as explained above. ባ,ቤ LIGHT BUTTON When you wish to control and press the CD, PVR or...

Owners Guide
Page 25
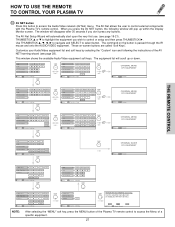
HOW TO USE THE REMOTE TO CONTROL YOUR PLASMA TV ት POWER TV DVD VCR CBL SOURCE WIZARD CD PVR STB AMP 1 2 3 4 5 6 7 8 9 SLEEP 0 INFO ANT TV/RGB A/V NET ASPECT VIDEO MENU EXIT VOL SELECT ... will blink to indicate the remote is in STB mode (see page 38). 25 If you have a Satellite receiver, use this button to turn the Plasma TV on or off when the remote is in TV mode (see page 24 for instructions on how to set the remote control to TV...
HOW TO USE THE REMOTE TO CONTROL YOUR PLASMA TV ት POWER TV DVD VCR CBL SOURCE WIZARD CD PVR STB AMP 1 2 3 4 5 6 7 8 9 SLEEP 0 INFO ANT TV/RGB A/V NET ASPECT VIDEO MENU EXIT VOL SELECT ... will blink to indicate the remote is in STB mode (see page 38). 25 If you have a Satellite receiver, use this button to turn the Plasma TV on or off when the remote is in TV mode (see page 24 for instructions on how to set the remote control to TV...

Owners Guide
Page 26
For channels 100 and above, press the "1" button, wait until two dashes appear next to select channels. NOTE: The Plasma TV may also be performed by pressing CH up to a maximum of three hours. If the SLEEP button is pressed while the timer is set , ... PLUS+ VID 1 VID 2 PIP FREEZE VID 3 PIP CH PIP ACCESS VIDEO SWAP PIP MODE REC CLU-5723TSI HOW TO USE THE REMOTE TO CONTROL YOUR PLASMA TV ቨ CD, PVR, AMP buttons When pressed, each time the button is pressed. 3:32 PM Ant A 15 Stereo G ANT 3:32 PM Ant B 22 Stereo...
For channels 100 and above, press the "1" button, wait until two dashes appear next to select channels. NOTE: The Plasma TV may also be performed by pressing CH up to a maximum of three hours. If the SLEEP button is pressed while the timer is set , ... PLUS+ VID 1 VID 2 PIP FREEZE VID 3 PIP CH PIP ACCESS VIDEO SWAP PIP MODE REC CLU-5723TSI HOW TO USE THE REMOTE TO CONTROL YOUR PLASMA TV ቨ CD, PVR, AMP buttons When pressed, each time the button is pressed. 3:32 PM Ant A 15 Stereo G ANT 3:32 PM Ant B 22 Stereo...
Owners Guide
Page 27
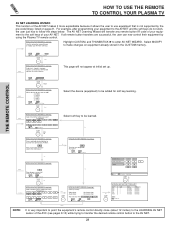
... AV Net Setup Wizard will scroll up within the Display Monitor screen. Use THUMBSTICK to navigate and SELECT to control external components with the Plasma TV's remote control. This window shows the available Audio/Video equipment soft keys. When you press the AV NET button, the following the... INFO Device Setting CH ̆ 3 6 9 MENU INFO GUIDE THUMB STICK Cable Box Set Top Box Custom SETUP Move INFO Device Setting THUMB STICK HITACHI AV NET WIZARD (Learning) Use this button to access the Audio/Video network (AV Net) menu. BACK Learn Move SEL Start Wizard Modify NOTE: ...
... AV Net Setup Wizard will scroll up within the Display Monitor screen. Use THUMBSTICK to navigate and SELECT to control external components with the Plasma TV's remote control. This window shows the available Audio/Video equipment soft keys. When you press the AV NET button, the following the... INFO Device Setting CH ̆ 3 6 9 MENU INFO GUIDE THUMB STICK Cable Box Set Top Box Custom SETUP Move INFO Device Setting THUMB STICK HITACHI AV NET WIZARD (Learning) Use this button to access the Audio/Video network (AV Net) menu. BACK Learn Move SEL Start Wizard Modify NOTE: ...
Owners Guide
Page 28
...now control their equipment by the pre-code library, listed on equipment already stored in memory. Select MODIFY to make changes on page 21. Yes HITACHI AV NET WIZARD (Learning) Press and hold desired button to transfer the command to the AV NET. 28 TV Softkeys POWER MENU Done Move Continue...This function of the AV NET makes it more expandable because it allows the user to use equipment that is not supported by using the Plasma TV remote control. TV Softkeys POWER MENU BACK Move SELECT SEL Select THUMB STICK SELECT Select Softkey EXIT Select soft key to be added ...
...now control their equipment by the pre-code library, listed on equipment already stored in memory. Select MODIFY to make changes on page 21. Yes HITACHI AV NET WIZARD (Learning) Press and hold desired button to transfer the command to the AV NET. 28 TV Softkeys POWER MENU Done Move Continue...This function of the AV NET makes it more expandable because it allows the user to use equipment that is not supported by using the Plasma TV remote control. TV Softkeys POWER MENU BACK Move SELECT SEL Select THUMB STICK SELECT Select Softkey EXIT Select soft key to be added ...

Owners Guide
Page 29
... original aspect ratio of the phosphors. THE REMOTE CONTROL MODE EXIT MUTE VCR PLUS+ SVCS VID 2 VID 1 HOW TO USE THE REMOTE TO CONTROL YOUR PLASMA TV VOL TV POWER SLEEP ANT TV/RGB MENU DVD 1 VCR CDSOURCE WIZARDCBL TAPE STB 4 7 2 5 AMP 3 8 6 0 9 A/V NET ASPECT INFO SELECT CH PIP PIP MODE PIP...
... original aspect ratio of the phosphors. THE REMOTE CONTROL MODE EXIT MUTE VCR PLUS+ SVCS VID 2 VID 1 HOW TO USE THE REMOTE TO CONTROL YOUR PLASMA TV VOL TV POWER SLEEP ANT TV/RGB MENU DVD 1 VCR CDSOURCE WIZARDCBL TAPE STB 4 7 2 5 AMP 3 8 6 0 9 A/V NET ASPECT INFO SELECT CH PIP PIP MODE PIP...

Owners Guide
Page 30
... PLUS+ VID 1 VID 2 PIP FREEZE VID 3 PIP CH PIP ACCESS VIDEO SWAP PIP MODE REC CLU-5723TSI HOW TO USE THE REMOTE TO CONTROL YOUR PLASMA TV (4) RGB (Analog Input) ASPECT DISPLAY MODE. NOTES: 1. To add channels to Favorite Channels, use THUMB STICK ̆ , ̄ to highlight the channel, then THUMB...
... PLUS+ VID 1 VID 2 PIP FREEZE VID 3 PIP CH PIP ACCESS VIDEO SWAP PIP MODE REC CLU-5723TSI HOW TO USE THE REMOTE TO CONTROL YOUR PLASMA TV (4) RGB (Analog Input) ASPECT DISPLAY MODE. NOTES: 1. To add channels to Favorite Channels, use THUMB STICK ̆ , ̄ to highlight the channel, then THUMB...


