HP Client Manager 6.1
Page 3
... change the BIOS settings simultaneously on those client computers that contain hardware supported by HP to ensure that our customers have specified, such as new or missing PCs, memory, battery, disk drives, CPUs, and monitors. With HPCM, SoftPaq installation can ... detailed client information such as the chassis serial number, computer model number, memory size, operating system, CPU identification, and many more secure client infrastructure. Manage HP ProtectTools enabled clients: Identify and inventory HP client computers that include the ProtectTools embedded security chip.
... change the BIOS settings simultaneously on those client computers that contain hardware supported by HP to ensure that our customers have specified, such as new or missing PCs, memory, battery, disk drives, CPUs, and monitors. With HPCM, SoftPaq installation can ... detailed client information such as the chassis serial number, computer model number, memory size, operating system, CPU identification, and many more secure client infrastructure. Manage HP ProtectTools enabled clients: Identify and inventory HP client computers that include the ProtectTools embedded security chip.
HP Client Manager 6.1
Page 4
... benefit of HPCM is dynamically created that checks your HP client computers. Point-and-click to keep the HP tool components (e.g. Information collected includes manufacturer, OS, language, processor, memory, and free disk space. • HP Tool Update Wizard provides an easy method to select and... download SoftPaqs. BIOS date, version number, SysID, etc. • Improved BIOS Settings Wizard lets you remotely set of your HP client computers, rapidly making ...
... benefit of HPCM is dynamically created that checks your HP client computers. Point-and-click to keep the HP tool components (e.g. Information collected includes manufacturer, OS, language, processor, memory, and free disk space. • HP Tool Update Wizard provides an easy method to select and... download SoftPaqs. BIOS date, version number, SysID, etc. • Improved BIOS Settings Wizard lets you remotely set of your HP client computers, rapidly making ...
HP Client Manager 6.1
Page 8
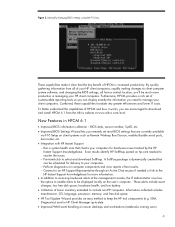
... to you to alert you to the situation. You can also monitor the status of these events using one of a theft. 8 For example, you to memory changes, disk drive changes, or CPU changes. In addition to change management by alerting you can specify that can be monitored varies by computer model...
... to you to alert you to the situation. You can also monitor the status of these events using one of a theft. 8 For example, you to memory changes, disk drive changes, or CPU changes. In addition to change management by alerting you can specify that can be monitored varies by computer model...
HP Client Manager 6.1
Page 9
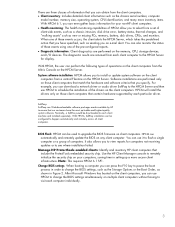
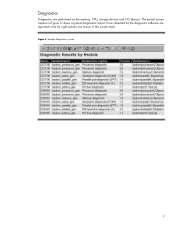
Figure 6. Sample Diagnostics screen 9 Errors detected by the diagnostic software are performed on the memory, CPU, storage devices and I/O devices. Diagnostics Diagnostics are reported in the far right column (not shown in Figure 6 shows a typical diagnostics report. The partial screen capture in this screen shot).
Figure 6. Sample Diagnostics screen 9 Errors detected by the diagnostic software are performed on the memory, CPU, storage devices and I/O devices. Diagnostics Diagnostics are reported in the far right column (not shown in Figure 6 shows a typical diagnostics report. The partial screen capture in this screen shot).
Hardware-Software Guide
Page 6
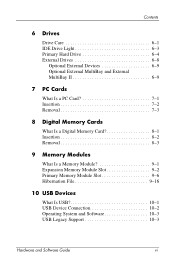
... Hard Drive 6-4 External Drives 6-8 Optional External Devices 6-9 Optional External MultiBay and External MultiBay II 6-9 7 PC Cards What Is a PC Card 7-1 Insertion 7-2 Removal 7-3 8 Digital Memory Cards What Is a Digital Memory Card 8-1 Insertion 8-2 Removal 8-3 9 Memory Modules What Is a Memory Module 9-1 Expansion Memory Module Slot 9-2 Primary Memory Module Slot 9-6 Hibernation File 9-16 10 USB Devices What Is USB 10-1 USB Device...
... Hard Drive 6-4 External Drives 6-8 Optional External Devices 6-9 Optional External MultiBay and External MultiBay II 6-9 7 PC Cards What Is a PC Card 7-1 Insertion 7-2 Removal 7-3 8 Digital Memory Cards What Is a Digital Memory Card 8-1 Insertion 8-2 Removal 8-3 9 Memory Modules What Is a Memory Module 9-1 Expansion Memory Module Slot 9-2 Primary Memory Module Slot 9-6 Hibernation File 9-16 10 USB Devices What Is USB 10-1 USB Device...

Hardware-Software Guide
Page 22
...Digital) Memory Cards or MultiMediaCards. Right-Side Components Component ID Component 1 Audio-out (headphone) jack 2 Audio-in (microphone) jack 3 USB port 4 PC Card eject button 5 PC Card slot 6 Digital Media Slot Description Connects optional headphones or powered stereo speakers. Ejects PC Cards from the PC Card..., 32-bit (CardBus), or 16-bit PC Cards. Connects USB 1.1- Hardware and Software Guide 1-11 Connects an optional monaural (single sound channel) or stereo (dual sound channel) microphone. and 2.0-compliant devices to the tablet PC using a standard USB cable, or connects an...
...Digital) Memory Cards or MultiMediaCards. Right-Side Components Component ID Component 1 Audio-out (headphone) jack 2 Audio-in (microphone) jack 3 USB port 4 PC Card eject button 5 PC Card slot 6 Digital Media Slot Description Connects optional headphones or powered stereo speakers. Ejects PC Cards from the PC Card..., 32-bit (CardBus), or 16-bit PC Cards. Connects USB 1.1- Hardware and Software Guide 1-11 Connects an optional monaural (single sound channel) or stereo (dual sound channel) microphone. and 2.0-compliant devices to the tablet PC using a standard USB cable, or connects an...
Hardware-Software Guide
Page 25
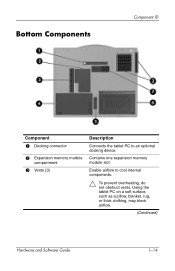
Enable airflow to an optional docking device. Bottom Components Component ID Component 1 Docking connector 2 Expansion memory module compartment 3 Vents (3) Description Connects the tablet PC to cool internal components. Ä To prevent overheating, do not obstruct vents. Contains one expansion memory module slot. Using the tablet PC on a soft surface, such as a pillow, blanket, rug, or thick clothing, may block airflow. (Continued) Hardware and Software Guide 1-14
Enable airflow to an optional docking device. Bottom Components Component ID Component 1 Docking connector 2 Expansion memory module compartment 3 Vents (3) Description Connects the tablet PC to cool internal components. Ä To prevent overheating, do not obstruct vents. Contains one expansion memory module slot. Using the tablet PC on a soft surface, such as a pillow, blanket, rug, or thick clothing, may block airflow. (Continued) Hardware and Software Guide 1-14

Hardware-Software Guide
Page 34
...Software Guide 2-4 Power Standby and Hibernation Standby and hibernation are energy-saving features that are not in use each setting. Connect the tablet PC to system components that conserve power and reduce startup time. When you resume from standby, your work returns to the screen where ...your work is saved in random access memory (RAM) and the screen is in this chapter for extended periods. When standby is initiated, your work before initiating standby is not usually necessary but is a recommended precaution. ■ When the tablet PC is cleared. Standby reduces power to ...
...Software Guide 2-4 Power Standby and Hibernation Standby and hibernation are energy-saving features that are not in use each setting. Connect the tablet PC to system components that conserve power and reduce startup time. When you resume from standby, your work returns to the screen where ...your work is saved in random access memory (RAM) and the screen is in this chapter for extended periods. When standby is initiated, your work before initiating standby is not usually necessary but is a recommended precaution. ■ When the tablet PC is cleared. Standby reduces power to ...
Hardware-Software Guide
Page 35
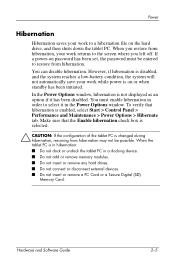
... the Enable hibernation check box is selected. Ä CAUTION: If the configuration of the tablet PC is in hibernation: ■ Do not dock or undock the tablet PC in a docking device. ■ Do not add or remove memory modules. ■ Do not insert or remove any hard drives. ■ Do not... connect or disconnect external devices. ■ Do not insert or remove a PC Card or a Secure Digital (SD) Memory Card. However, if hibernation...
... the Enable hibernation check box is selected. Ä CAUTION: If the configuration of the tablet PC is in hibernation: ■ Do not dock or undock the tablet PC in a docking device. ■ Do not add or remove memory modules. ■ Do not insert or remove any hard drives. ■ Do not... connect or disconnect external devices. ■ Do not insert or remove a PC Card or a Secure Digital (SD) Memory Card. However, if hibernation...

Hardware-Software Guide
Page 70
...more information about standby, hibernation, and changing the function of the tablet PC. For example, if an external monitor is set to initiate hibernation instead of the fn+f3 hotkey, called the "sleep button" in random access memory (RAM), the screen is cleared, and power is saved in Windows..., can be set at the factory to the tablet PC, pressing the fn+f4 hotkey multiple times toggles the image between the tablet PC display, the external monitor display, and a ...
...more information about standby, hibernation, and changing the function of the tablet PC. For example, if an external monitor is set to initiate hibernation instead of the fn+f3 hotkey, called the "sleep button" in random access memory (RAM), the screen is cleared, and power is saved in Windows..., can be set at the factory to the tablet PC, pressing the fn+f4 hotkey multiple times toggles the image between the tablet PC display, the external monitor display, and a ...

Hardware-Software Guide
Page 123
... a credit card-sized accessory designed to conform to the standard specifications of the Personal Computer Memory Card International Association (PCMCIA). ■ The tablet PC supports 32-bit (CardBus) and 16-bit PC Cards. ■ The tablet PC is equipped with one PC Card slot, and it supports one Type I card or one Type II card. ■ Zoomed...
... a credit card-sized accessory designed to conform to the standard specifications of the Personal Computer Memory Card International Association (PCMCIA). ■ The tablet PC supports 32-bit (CardBus) and 16-bit PC Cards. ■ The tablet PC is equipped with one PC Card slot, and it supports one Type I card or one Type II card. ■ Zoomed...
Hardware-Software Guide
Page 126
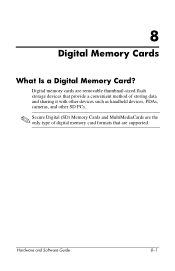
8 Digital Memory Cards What Is a Digital Memory Card? Hardware and Software Guide 8-1 Digital memory cards are removable thumbnail-sized flash storage devices that provide a convenient method of storing data and sharing it with other devices such as handheld devices, PDAs, cameras, and other SD PCs. ✎ Secure Digital (SD) Memory Cards and MultiMediaCards are the only type of digital memory card formats that are supported.
8 Digital Memory Cards What Is a Digital Memory Card? Hardware and Software Guide 8-1 Digital memory cards are removable thumbnail-sized flash storage devices that provide a convenient method of storing data and sharing it with other devices such as handheld devices, PDAs, cameras, and other SD PCs. ✎ Secure Digital (SD) Memory Cards and MultiMediaCards are the only type of digital memory card formats that are supported.

Hardware-Software Guide
Page 127
Hardware and Software Guide 8-2 Insert the digital memory card into place. Slide the card firmly into the slot until the card clicks into the Digital Media Slot. 2. Digital Memory Cards Insertion Ä CAUTION: To prevent damage to the connectors: ■ Use minimal pressure when inserting a digital memory card into a Digital Media Slot. ■ Do not move or transport the tablet PC while a digital memory card is operating. To insert a digital memory card: 1.
Hardware and Software Guide 8-2 Insert the digital memory card into place. Slide the card firmly into the slot until the card clicks into the Digital Media Slot. 2. Digital Memory Cards Insertion Ä CAUTION: To prevent damage to the connectors: ■ Use minimal pressure when inserting a digital memory card into a Digital Media Slot. ■ Do not move or transport the tablet PC while a digital memory card is operating. To insert a digital memory card: 1.
Hardware-Software Guide
Page 128
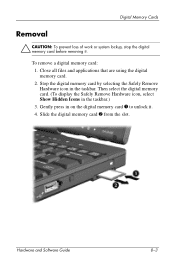
... To prevent loss of work or system lockup, stop the digital memory card before removing it . 4. Hardware and Software Guide 8-3 Close all files and applications that are using the digital memory card. 2. Stop the digital memory card by selecting the Safely Remove Hardware icon in the taskbar.) ...3. Slide the digital memory card 2 from the slot. Then select the digital memory card. (To display the Safely Remove Hardware icon,...
... To prevent loss of work or system lockup, stop the digital memory card before removing it . 4. Hardware and Software Guide 8-3 Close all files and applications that are using the digital memory card. 2. Stop the digital memory card by selecting the Safely Remove Hardware icon in the taskbar.) ...3. Slide the digital memory card 2 from the slot. Then select the digital memory card. (To display the Safely Remove Hardware icon,...
Hardware-Software Guide
Page 129
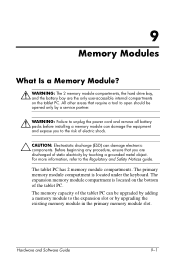
... Failure to unplug the power cord and remove all battery packs before installing a memory module can damage electronic components. The primary memory module compartment is located on the tablet PC. The memory capacity of electric shock. Ä CAUTION: Electrostatic discharge (ESD) can damage the...-accessible internal compartments on the bottom of static electricity by upgrading the existing memory module in the primary memory module slot. Hardware and Software Guide 9-1 The tablet PC has 2 memory module compartments. For more information, refer to the expansion slot or by ...
... Failure to unplug the power cord and remove all battery packs before installing a memory module can damage electronic components. The primary memory module compartment is located on the tablet PC. The memory capacity of electric shock. Ä CAUTION: Electrostatic discharge (ESD) can damage the...-accessible internal compartments on the bottom of static electricity by upgrading the existing memory module in the primary memory module slot. Hardware and Software Guide 9-1 The tablet PC has 2 memory module compartments. For more information, refer to the expansion slot or by ...

Hardware-Software Guide
Page 130
... from the tablet PC. Lift the memory module cover 2 away from the tablet PC. 6. Hardware and Software Guide 9-2 Memory Modules Expansion Memory Module Slot To add or upgrade a memory module in hibernation, turn the tablet PC on by sliding the power switch toward the front of the tablet PC. Disconnect all external devices connected to the tablet PC. 3. Turn the tablet PC upside down the tablet PC. (If...
... from the tablet PC. Lift the memory module cover 2 away from the tablet PC. 6. Hardware and Software Guide 9-2 Memory Modules Expansion Memory Module Slot To add or upgrade a memory module in hibernation, turn the tablet PC on by sliding the power switch toward the front of the tablet PC. Disconnect all external devices connected to the tablet PC. 3. Turn the tablet PC upside down the tablet PC. (If...

Hardware-Software Guide
Page 131
To protect a memory module after removal, place it : a. Memory Modules 8. If there is a memory module in the memory module slot, remove it in an electrostatic-safe container. Hardware and Software Guide 9-3 Pull away the retention clips 1 on each side of the memory module slot. Grasp the edges of the module 2 and gently pull the module out of the module. (The module tilts upward.) b.
To protect a memory module after removal, place it : a. Memory Modules 8. If there is a memory module in the memory module slot, remove it in an electrostatic-safe container. Hardware and Software Guide 9-3 Pull away the retention clips 1 on each side of the memory module slot. Grasp the edges of the module 2 and gently pull the module out of the module. (The module tilts upward.) b.

Hardware-Software Guide
Page 132
c. Align the keyed (notched) edge 1 of the memory module compartment, press the memory module 2 into place. Press the module downward 3 until the retention clips snap into the memory module slot until it is seated. b. Memory Modules 9. Hardware and Software Guide 9-4 Insert the new memory module: a. With the module at a 45-degree angle from the surface of the module with the tabbed area in the memory module slot.
c. Align the keyed (notched) edge 1 of the memory module compartment, press the memory module 2 into place. Press the module downward 3 until the retention clips snap into the memory module slot until it is seated. b. Memory Modules 9. Hardware and Software Guide 9-4 Insert the new memory module: a. With the module at a 45-degree angle from the surface of the module with the tabbed area in the memory module slot.
Hardware-Software Guide
Page 133
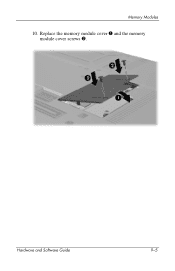
Hardware and Software Guide 9-5 Replace the memory module cover 1 and the memory module cover screws 2. Memory Modules 10.
Hardware and Software Guide 9-5 Replace the memory module cover 1 and the memory module cover screws 2. Memory Modules 10.

Hardware-Software Guide
Page 134
....0 screws 2, and one T8M2.0x5.0 screw 3. Ä The screws in the bottom of the tablet PC are not sure whether the tablet PC is off or in the primary memory module slot: 1. Shut down the tablet PC. (If you are of the tablet PC. Hardware and Software Guide 9-6 Disconnect all external devices connected to keep track of the screws...
....0 screws 2, and one T8M2.0x5.0 screw 3. Ä The screws in the bottom of the tablet PC are not sure whether the tablet PC is off or in the primary memory module slot: 1. Shut down the tablet PC. (If you are of the tablet PC. Hardware and Software Guide 9-6 Disconnect all external devices connected to keep track of the screws...

