
Hardware-Software Guide
Page 4
... Default Power Settings 2-8 Turning the Tablet PC or Display On or Off 2-8 Initiating... Password 2-14 Processor Performance Controls (Select Models Only 2-15 Battery Packs 2-17 Identifying Battery Packs 2-18 Inserting or Removing a Primary Battery Pack . . . 2-19 Charging Battery Packs 2-21 Managing Low-Battery Conditions 2-24 Calibrating a ...2-30 Storing a Battery Pack 2-32 Disposing of a Used Battery Pack 2-33 3 Pointing Devices and Keyboard Pointing Devices 3-1 Using the TouchPad 3-3 Using the Pointing Stick 3-3 Setting Mouse Properties 3-4 Hotkeys 3-5 Hotkey Quick Reference...
... Default Power Settings 2-8 Turning the Tablet PC or Display On or Off 2-8 Initiating... Password 2-14 Processor Performance Controls (Select Models Only 2-15 Battery Packs 2-17 Identifying Battery Packs 2-18 Inserting or Removing a Primary Battery Pack . . . 2-19 Charging Battery Packs 2-21 Managing Low-Battery Conditions 2-24 Calibrating a ...2-30 Storing a Battery Pack 2-32 Disposing of a Used Battery Pack 2-33 3 Pointing Devices and Keyboard Pointing Devices 3-1 Using the TouchPad 3-3 Using the Pointing Stick 3-3 Setting Mouse Properties 3-4 Hotkeys 3-5 Hotkey Quick Reference...

Hardware-Software Guide
Page 72
...+f11) Press fn+f11 to remove the system information from the screen. ✎ The system BIOS date is the version number of the system ROM. Press fn+esc a second time to turn on and off the ambient light sensor. Hardware and Software Guide 3-9 Pointing Devices and Keyboard Decreasing Screen Brightness (fn+f9...
...+f11) Press fn+f11 to remove the system information from the screen. ✎ The system BIOS date is the version number of the system ROM. Press fn+esc a second time to turn on and off the ambient light sensor. Hardware and Software Guide 3-9 Pointing Devices and Keyboard Decreasing Screen Brightness (fn+f9...
Hardware-Software Guide
Page 129
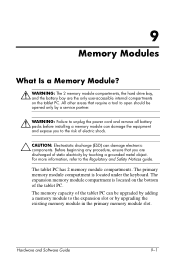
... memory module compartments, the hard drive bay, and the battery bay are discharged of the tablet PC. Hardware and Software Guide 9-1 The expansion memory module compartment is located under the keyboard. The memory capacity of electric shock. Ä CAUTION: Electrostatic discharge (ESD) can damage ...partner. Å WARNING: Failure to unplug the power cord and remove all battery packs before installing a memory module can damage electronic components. The primary memory module compartment is located on the tablet PC. For more information, refer to the expansion slot or by adding...
... memory module compartments, the hard drive bay, and the battery bay are discharged of the tablet PC. Hardware and Software Guide 9-1 The expansion memory module compartment is located under the keyboard. The memory capacity of electric shock. Ä CAUTION: Electrostatic discharge (ESD) can damage ...partner. Å WARNING: Failure to unplug the power cord and remove all battery packs before installing a memory module can damage electronic components. The primary memory module compartment is located on the tablet PC. For more information, refer to the expansion slot or by adding...

Hardware-Software Guide
Page 135
Lift up the right rear corner edge 1 and then the left rear corner edge 2 of the keyboard cover to release the front edge of the cover from the tablet PC. Remove the base enclosure cover. Memory Modules 8. 7. Turn the tablet PC display-side up from the front edge 3 to release the rear edge of the cover from the tablet PC. 10. Hardware and Software Guide 9-7 Tilt the keyboard cover up with the front toward you and open it. 9.
Lift up the right rear corner edge 1 and then the left rear corner edge 2 of the keyboard cover to release the front edge of the cover from the tablet PC. Remove the base enclosure cover. Memory Modules 8. 7. Turn the tablet PC display-side up from the front edge 3 to release the rear edge of the cover from the tablet PC. 10. Hardware and Software Guide 9-7 Tilt the keyboard cover up with the front toward you and open it. 9.

Hardware-Software Guide
Page 136
To remove the keyboard cover fully, swing the right edge of the cover toward the front of the tablet PC. Hardware and Software Guide 9-8 Memory Modules 11.
To remove the keyboard cover fully, swing the right edge of the cover toward the front of the tablet PC. Hardware and Software Guide 9-8 Memory Modules 11.

Hardware-Software Guide
Page 143
... bottom of the tablet PC. Ä CAUTION: The screws on the tablet PC by reversing the steps for removing the cover. (Reseat the left side of the cover first, and then reseat the right side. Replace the base enclosure cover. 25. Replace the keyboard cover on the bottom of the tablet PC are of the keyboard cover to replace...
... bottom of the tablet PC. Ä CAUTION: The screws on the tablet PC by reversing the steps for removing the cover. (Reseat the left side of the cover first, and then reseat the right side. Replace the base enclosure cover. 25. Replace the keyboard cover on the bottom of the tablet PC are of the keyboard cover to replace...

Hardware-Software Guide
Page 242
...do not spray liquids on the display, keyboard, or the exterior of its components. Å WARNING: To prevent permanent damage to your tablet PC, do not block the air vents or use the tablet PC on a solid, flat surface. Tablet PC Care ■ Use your tablet PC. Make sure that vents, which cool ...be disconnected from the power outlet and disconnect peripherals before attempting to clean your tablet PC or any of your tablet PC only on your lap for a week or more than 2 weeks: ❏ Shut down the tablet PC. ❏ Remove all battery packs and store them in a cool, dry place. As a...
...do not spray liquids on the display, keyboard, or the exterior of its components. Å WARNING: To prevent permanent damage to your tablet PC, do not block the air vents or use the tablet PC on a solid, flat surface. Tablet PC Care ■ Use your tablet PC. Make sure that vents, which cool ...be disconnected from the power outlet and disconnect peripherals before attempting to clean your tablet PC or any of your tablet PC only on your lap for a week or more than 2 weeks: ❏ Shut down the tablet PC. ❏ Remove all battery packs and store them in a cool, dry place. As a...

Hardware-Software Guide
Page 243
Tablet PC Care Keyboard Clean the keyboard regularly to prevent keys from sticking and to remove dust, lint, and particles that can of compressed air with a straw extension to blow air under and around the keys. Ä CAUTION: To prevent permanent damage, do not clean the keyboard with a soft, damp, lint-free cloth. ... cleaner to your display with liquids of any kind. Do not use an antistatic screen cleaner or premoistened antistatic wipes. To remove smudges and lint, frequently clean your tablet PC, never spray water, cleaning fluids, or chemicals on the surfaces, rather than...
Tablet PC Care Keyboard Clean the keyboard regularly to prevent keys from sticking and to remove dust, lint, and particles that can of compressed air with a straw extension to blow air under and around the keys. Ä CAUTION: To prevent permanent damage, do not clean the keyboard with a soft, damp, lint-free cloth. ... cleaner to your display with liquids of any kind. Do not use an antistatic screen cleaner or premoistened antistatic wipes. To remove smudges and lint, frequently clean your tablet PC, never spray water, cleaning fluids, or chemicals on the surfaces, rather than...

Hardware-Software Guide
Page 265
...3-21 freeze, system 4-11 function keys 1-5, 3-5 H hard drive caring for 6-1 DriveLock 14-13 IDE drive light 6-3 installing, primary 6-6 removing, primary 6-4 replacing, primary 6-4 hard drive bay 1-15 headphone jack 1-11, 5-2 headphones 5-3 hibernation exiting 1-13, 2-2, 2-25 file space ...hibernation file 9-16 holder, pen 4-5 hotkeys shortcut reference to commands 3-6 switch image 3-7 with external keyboards 3-10 HP administrator password 14-8 HP password 14-5 HP password guidelines 14-6 HP ProtectTools Security Manager 14-25 hub, USB 10-2 humidity specifications A-1 I IDE drive light 1-1, 6-3 ...
...3-21 freeze, system 4-11 function keys 1-5, 3-5 H hard drive caring for 6-1 DriveLock 14-13 IDE drive light 6-3 installing, primary 6-6 removing, primary 6-4 replacing, primary 6-4 hard drive bay 1-15 headphone jack 1-11, 5-2 headphones 5-3 hibernation exiting 1-13, 2-2, 2-25 file space ...hibernation file 9-16 holder, pen 4-5 hotkeys shortcut reference to commands 3-6 switch image 3-7 with external keyboards 3-10 HP administrator password 14-8 HP password 14-5 HP password guidelines 14-6 HP ProtectTools Security Manager 14-25 hub, USB 10-2 humidity specifications A-1 I IDE drive light 1-1, 6-3 ...

Hardware-Software Guide
Page 267
...Norton AntiVirus 14-21 num lock key 3-22 num lock light 1-2, 3-22 number keys, on on-screen keyboard 4-15 numeric keypad 3-22 O on-screen keyboard 4-15 operating environment specifications A-1 operating system 14-22 passwords 14-5 security 14-1 overhead projector connecting 6-9 switching...-14 forgetting 14-4 HP 14-5 HP administrator 14-8 HP guidelines 14-6 power-on 14-10 using 14-4 Windows 14-5 Windows guidelines 14-6 passwords, coordinating 14-6 PC Card enablers and card socket services 7-1 inserting 7-1, 7-2 removing 7-3 stopping 7-3 types 7-1 PC Card eject button 1-11, 7-3 PC Card slot 1-11 ...
...Norton AntiVirus 14-21 num lock key 3-22 num lock light 1-2, 3-22 number keys, on on-screen keyboard 4-15 numeric keypad 3-22 O on-screen keyboard 4-15 operating environment specifications A-1 operating system 14-22 passwords 14-5 security 14-1 overhead projector connecting 6-9 switching...-14 forgetting 14-4 HP 14-5 HP administrator 14-8 HP guidelines 14-6 power-on 14-10 using 14-4 Windows 14-5 Windows guidelines 14-6 passwords, coordinating 14-6 PC Card enablers and card socket services 7-1 inserting 7-1, 7-2 removing 7-3 stopping 7-3 types 7-1 PC Card eject button 1-11, 7-3 PC Card slot 1-11 ...

HP Compaq tc4200 Tablet PC - Maintenance and Service Guide
Page 6
Contents 6 Removal and Replacement Procedures 6.1 Serial Number 6-1 6.2 Disassembly Sequence Chart 6-2 6.3 Preparing the Tablet PC for Disassembly 6-4 6.4 Hard Drive 6-6 6.5 Tablet PC Feet 6-9 6.6 Bluetooth Module 6-10 6.7 External Memory Module 6-12 6.8 TPM Security Card 6-15 6.9 Keyboard Cover 6-16 6.10 Keyboard 6-19 6.11 Fan 6-23 6.12 Heat Sink 6-24 6.13 Processor 6-28 6.14 Internal Memory Module 6-30 6.15 Mini PCI Communications Card...
Contents 6 Removal and Replacement Procedures 6.1 Serial Number 6-1 6.2 Disassembly Sequence Chart 6-2 6.3 Preparing the Tablet PC for Disassembly 6-4 6.4 Hard Drive 6-6 6.5 Tablet PC Feet 6-9 6.6 Bluetooth Module 6-10 6.7 External Memory Module 6-12 6.8 TPM Security Card 6-15 6.9 Keyboard Cover 6-16 6.10 Keyboard 6-19 6.11 Fan 6-23 6.12 Heat Sink 6-24 6.13 Processor 6-28 6.14 Internal Memory Module 6-30 6.15 Mini PCI Communications Card...

HP Compaq tc4200 Tablet PC - Maintenance and Service Guide
Page 28
...Pentium M and Celeron M processors ■ Keyboard ■ Memory module ■ Mini PCI communications devices ■ PC Card ■ Pointing stick ■ TouchPad ■ Trusted platform module (TPM) security module Ä CAUTION: To properly ventilate the tablet PC, allow at least a 7.6-cm (3-inch)... clearance on the left and right sides of the tablet PC. Exhaust air is designed to identify replacement parts, and Chapter 6, "Removal and Replacement Procedures," for ventilation. The fan...
...Pentium M and Celeron M processors ■ Keyboard ■ Memory module ■ Mini PCI communications devices ■ PC Card ■ Pointing stick ■ TouchPad ■ Trusted platform module (TPM) security module Ä CAUTION: To properly ventilate the tablet PC, allow at least a 7.6-cm (3-inch)... clearance on the left and right sides of the tablet PC. Exhaust air is designed to identify replacement parts, and Chapter 6, "Removal and Replacement Procedures," for ventilation. The fan...
HP Compaq tc4200 Tablet PC - Maintenance and Service Guide
Page 93
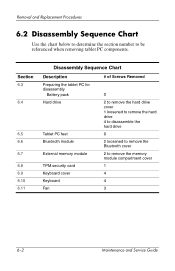
... Description Preparing the tablet PC for disassembly Battery pack Hard drive Tablet PC feet Bluetooth module External memory module TPM security card Keyboard cover Keyboard Fan # of Screws Removed 0 2 to remove the hard drive cover 1 loosened to remove the hard drive 4 to disassemble the hard drive 0 2 loosened to remove the Bluetooth cover 2 to be referenced when removing tablet PC components. Removal and Replacement Procedures...
... Description Preparing the tablet PC for disassembly Battery pack Hard drive Tablet PC feet Bluetooth module External memory module TPM security card Keyboard cover Keyboard Fan # of Screws Removed 0 2 to remove the hard drive cover 1 loosened to remove the hard drive 4 to disassemble the hard drive 0 2 loosened to remove the Bluetooth cover 2 to be referenced when removing tablet PC components. Removal and Replacement Procedures...

HP Compaq tc4200 Tablet PC - Maintenance and Service Guide
Page 107
Prepare the tablet PC for disassembly (Section 6.3). 2. Remove the two T8M2.0×9.0 screws 1 and the two T8M2.0×18.0 screws 2 that secure the keyboard cover to the tablet PC. Removing the Keyboard Cover Screws 6-16 Maintenance and Service Guide Removal and Replacement Procedures 6.9 Keyboard Cover Keyboard Cover Spare Part Number Information Keyboard cover 383558-001 1. Position the tablet PC with the front toward you. 3.
Prepare the tablet PC for disassembly (Section 6.3). 2. Remove the two T8M2.0×9.0 screws 1 and the two T8M2.0×18.0 screws 2 that secure the keyboard cover to the tablet PC. Removing the Keyboard Cover Screws 6-16 Maintenance and Service Guide Removal and Replacement Procedures 6.9 Keyboard Cover Keyboard Cover Spare Part Number Information Keyboard cover 383558-001 1. Position the tablet PC with the front toward you. 3.

HP Compaq tc4200 Tablet PC - Maintenance and Service Guide
Page 108
Open the tablet PC as far as possible. 6. Releasing the Keyboard Cover Maintenance and Service Guide 6-17 Lift up with the front toward you. 5. Removal and Replacement Procedures 4. Turn the tablet PC right-side up the front edges of the keyboard cover until the cover disengages from the tablet PC.
Open the tablet PC as far as possible. 6. Releasing the Keyboard Cover Maintenance and Service Guide 6-17 Lift up with the front toward you. 5. Removal and Replacement Procedures 4. Turn the tablet PC right-side up the front edges of the keyboard cover until the cover disengages from the tablet PC.

HP Compaq tc4200 Tablet PC - Maintenance and Service Guide
Page 109
Swing the right edge of the keyboard cover forward until the cover disengages from the tablet PC. Removing the Keyboard Cover Reverse the above procedure to install the keyboard cover. 6-18 Maintenance and Service Guide Removal and Replacement Procedures 7.
Swing the right edge of the keyboard cover forward until the cover disengages from the tablet PC. Removing the Keyboard Cover Reverse the above procedure to install the keyboard cover. 6-18 Maintenance and Service Guide Removal and Replacement Procedures 7.

HP Compaq tc4200 Tablet PC - Maintenance and Service Guide
Page 110
Remove the keyboard cover (Section 6.9). 3. Turn the tablet PC upside down with pointing stick Belgium Brazil Czech Republic Denmark Europe France French Canada Germany Hungary Iceland Israel Italy Japan Korea Latin America The ...383458-251 383458-171 383458-AR1 383458-071 383458-231 383458-101 383458-111 383458-AB1 383458-281 383458-141 383458-031 383458-001 1. 6.10 Keyboard Removal and Replacement Procedures Keyboard Spare Part Number Information Keyboards, with the front toward you. Prepare the tablet PC for disassembly (Section 6.3). 2. Maintenance and Service Guide 6-19
Remove the keyboard cover (Section 6.9). 3. Turn the tablet PC upside down with pointing stick Belgium Brazil Czech Republic Denmark Europe France French Canada Germany Hungary Iceland Israel Italy Japan Korea Latin America The ...383458-251 383458-171 383458-AR1 383458-071 383458-231 383458-101 383458-111 383458-AB1 383458-281 383458-141 383458-031 383458-001 1. 6.10 Keyboard Removal and Replacement Procedures Keyboard Spare Part Number Information Keyboards, with the front toward you. Prepare the tablet PC for disassembly (Section 6.3). 2. Maintenance and Service Guide 6-19

HP Compaq tc4200 Tablet PC - Maintenance and Service Guide
Page 111
Remove the following: 1 Three T8M2.0×9.0 screws 2 One T8M2.0×5.0 screw Removing the Keyboard Screws 6-20 Maintenance and Service Guide Removal and Replacement Procedures 4.
Remove the following: 1 Three T8M2.0×9.0 screws 2 One T8M2.0×5.0 screw Removing the Keyboard Screws 6-20 Maintenance and Service Guide Removal and Replacement Procedures 4.

HP Compaq tc4200 Tablet PC - Maintenance and Service Guide
Page 112
Open the tablet PC as far as possible. 7. Disconnecting the Pointing Stick Cable Maintenance and Service Guide 6-21 Removal and Replacement Procedures 5. Release the zero insertion force (ZIF) connector to which the pointing stick cable is accessible. 8. Slide the keyboard back 1 until the pointing stick cable is connected and disconnect the pointing stick cable 2 from the system board. Turn the tablet PC right-side up with the front toward you. 6.
Open the tablet PC as far as possible. 7. Disconnecting the Pointing Stick Cable Maintenance and Service Guide 6-21 Removal and Replacement Procedures 5. Release the zero insertion force (ZIF) connector to which the pointing stick cable is accessible. 8. Slide the keyboard back 1 until the pointing stick cable is connected and disconnect the pointing stick cable 2 from the system board. Turn the tablet PC right-side up with the front toward you. 6.

HP Compaq tc4200 Tablet PC - Maintenance and Service Guide
Page 113
Remove the keyboard. Slide the keyboard forward 2 until it rests on the palm rest. 11. Removing the Keyboard Reverse the above procedure to which the keyboard cable is connected and disconnect the keyboard cable 3 from the tablet PC. 10. Lift the rear edge of the keyboard 1 until it disengages from the system board. 12. Release the ZIF connector to install the keyboard. 6-22 Maintenance and Service Guide Removal and Replacement Procedures 9.
Remove the keyboard. Slide the keyboard forward 2 until it rests on the palm rest. 11. Removing the Keyboard Reverse the above procedure to which the keyboard cable is connected and disconnect the keyboard cable 3 from the tablet PC. 10. Lift the rear edge of the keyboard 1 until it disengages from the system board. 12. Release the ZIF connector to install the keyboard. 6-22 Maintenance and Service Guide Removal and Replacement Procedures 9.


