Limited Warranty Statement
Page 4
... problems, including those that arise as battery leakage; HP's limited warranty is covered by HP; D. For each HP product specified above . Any replacement product may : 2 L2484-90009_Warranty.fm Page 2 Wednesday, April 4, 2007 10:53 AM HP limited warranty statement - HP shall have other cameras: One year. Limitations of limited warranty Camera hardware and software media R740 series: 90...
... problems, including those that arise as battery leakage; HP's limited warranty is covered by HP; D. For each HP product specified above . Any replacement product may : 2 L2484-90009_Warranty.fm Page 2 Wednesday, April 4, 2007 10:53 AM HP limited warranty statement - HP shall have other cameras: One year. Limitations of limited warranty Camera hardware and software media R740 series: 90...
Limited Warranty Statement
Page 5
...It is FCLSD-0703. • Product name (HP Photosmart R840 series Digital Camera); For more of implied warranties that provide you with the Product name or Product number. This HP package may have access to HP Customer Care. Specify the duration of the following ... your original warranty period. Materials disposal This HP product contains the following products: • Product name (HP Photosmart R830 series Digital Camera); or, e. Get award winning assistance, 24x7 at end-of-life: • Lithium Ion rechargeable battery Disposal of this LWS from limiting the statutory...
...It is FCLSD-0703. • Product name (HP Photosmart R840 series Digital Camera); For more of implied warranties that provide you with the Product name or Product number. This HP package may have access to HP Customer Care. Specify the duration of the following ... your original warranty period. Materials disposal This HP product contains the following products: • Product name (HP Photosmart R830 series Digital Camera); or, e. Get award winning assistance, 24x7 at end-of-life: • Lithium Ion rechargeable battery Disposal of this LWS from limiting the statutory...
Limited Warranty Statement
Page 6
... AM • Product name (HP Photosmart R740 series Digital Camera); Safety precautions • To avoid the risk of explosion if battery is in the camera, dock, or quick recharger. R930 series: Your camera uses a rechargeable HP Photosmart R07 Lithium Ion battery (L1812A/ L1812B); R740 series: Your camera uses a rechargeable HP Photosmart LI40 battery (Q6277A); It will also void your camera User Guide. Product number (L2507A...
... AM • Product name (HP Photosmart R740 series Digital Camera); Safety precautions • To avoid the risk of explosion if battery is in the camera, dock, or quick recharger. R930 series: Your camera uses a rechargeable HP Photosmart R07 Lithium Ion battery (L1812A/ L1812B); R740 series: Your camera uses a rechargeable HP Photosmart LI40 battery (Q6277A); It will also void your camera User Guide. Product number (L2507A...
HP Limited Warranty Statement
Page 5
... • Lithium Ion rechargeable battery Disposal of product for a fee • Latin America: Repair & return product for a fee OR upgrade product for a fee You will be consistent with local law. Under local law, certain disclaimers and limitations of the HP Limited Warranty Statement is inconsistent with... specific legal rights. c. Preclude the disclaimers and limitations in any implied warranties imposed by this LWS from country to HP Customer Care. HP R837 Photosmart Warranty 3 Those rights are not in this LWS. 4. Service coverage begins on its purchase agreement.
... • Lithium Ion rechargeable battery Disposal of product for a fee • Latin America: Repair & return product for a fee OR upgrade product for a fee You will be consistent with local law. Under local law, certain disclaimers and limitations of the HP Limited Warranty Statement is inconsistent with... specific legal rights. c. Preclude the disclaimers and limitations in any implied warranties imposed by this LWS from country to HP Customer Care. HP R837 Photosmart Warranty 3 Those rights are not in this LWS. 4. Service coverage begins on its purchase agreement.
HP Limited Warranty Statement
Page 6
... should not be confused with the Product name (HP Photosmart R837 Digital Camera) or Product numbers (L2466A, L2467A, L2468A, L2469A, L2470A, L2471A). Use of used batteries according to repair the camera yourself. Caution: Risk of explosion if battery is FCLSD-0703. Contact an authorized HP Service Center for your camera. Exposing the camera to excessive moisture can cause it to air...
... should not be confused with the Product name (HP Photosmart R837 Digital Camera) or Product numbers (L2466A, L2467A, L2468A, L2469A, L2470A, L2471A). Use of used batteries according to repair the camera yourself. Caution: Risk of explosion if battery is FCLSD-0703. Contact an authorized HP Service Center for your camera. Exposing the camera to excessive moisture can cause it to air...
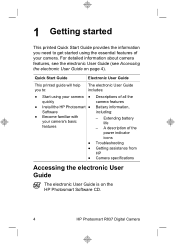
Quick Start Guide
Page 5
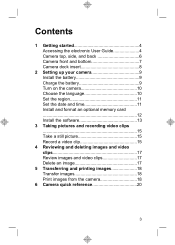
Contents 1 Getting started 4 Accessing the electronic User Guide 4 Camera top, side, and back 6 Camera front and bottom 7 Camera dock insert 8 2 Setting up your camera 9 Install the battery 9 Charge the battery 9 Turn on the camera 10 Choose the language 10 Set the region 11 Set the date and time 11 Install and format an optional memory card 12 Install... video clips 17 Review images and video clips 17 Delete an image 17 5 Transferring and printing images 18 Transfer images 18 Print images from the camera 18 6 Camera quick reference 20 3
Contents 1 Getting started 4 Accessing the electronic User Guide 4 Camera top, side, and back 6 Camera front and bottom 7 Camera dock insert 8 2 Setting up your camera 9 Install the battery 9 Charge the battery 9 Turn on the camera 10 Choose the language 10 Set the region 11 Set the date and time 11 Install and format an optional memory card 12 Install... video clips 17 Review images and video clips 17 Delete an image 17 5 Transferring and printing images 18 Transfer images 18 Print images from the camera 18 6 Camera quick reference 20 3
Quick Start Guide
Page 6
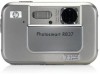
...; Become familiar with your camera. A description of the power indicator icons ● Troubleshooting ● Getting assistance from HP ● Camera specifications Accessing the electronic User Guide The electronic User Guide is on page 4). For detailed information about camera features, see the electronic User Guide (see Accessing the electronic User Guide on the HP Photosmart Software CD. 4 HP Photosmart R837 Digital Camera
...; Become familiar with your camera. A description of the power indicator icons ● Troubleshooting ● Getting assistance from HP ● Camera specifications Accessing the electronic User Guide The electronic User Guide is on page 4). For detailed information about camera features, see the electronic User Guide (see Accessing the electronic User Guide on the HP Photosmart Software CD. 4 HP Photosmart R837 Digital Camera

Quick Start Guide
Page 9
...Digital and Optical)-In Picture Capture or Video Record, press to zoom in Playback. 13 Back button-Returns you to a previous menu or view. 14 Image Display. buttons-Scroll through menus and 9 button-Displays camera menus, selects options, and confirms actions. 10 USB connector. 11 Battery... Charging light. 12 Delete button-Accesses the Delete function while in or press to view thumbnails of your images. 8 and images. Camera front and bottom 1 234 5 ...
...Digital and Optical)-In Picture Capture or Video Record, press to zoom in Playback. 13 Back button-Returns you to a previous menu or view. 14 Image Display. buttons-Scroll through menus and 9 button-Displays camera menus, selects options, and confirms actions. 10 USB connector. 11 Battery... Charging light. 12 Delete button-Accesses the Delete function while in or press to view thumbnails of your images. 8 and images. Camera front and bottom 1 234 5 ...
Quick Start Guide
Page 10
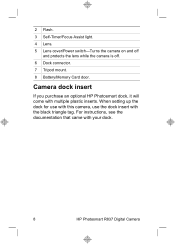
For instructions, see the documentation that came with multiple plastic inserts. Camera dock insert If you purchase an optional HP Photosmart dock, it will come with your dock. 8 HP Photosmart R837 Digital Camera When setting up the dock for use with this camera, use the dock insert with the black triangle tag. 2 Flash. 3 Self-Timer/Focus Assist light. 4 Lens. 5 Lens cover/Power switch-Turns the camera on and off and protects the lens while the camera is off. 6 Dock connector. 7 Tripod mount. 8 Battery/Memory Card door.
For instructions, see the documentation that came with multiple plastic inserts. Camera dock insert If you purchase an optional HP Photosmart dock, it will come with your dock. 8 HP Photosmart R837 Digital Camera When setting up the dock for use with this camera, use the dock insert with the black triangle tag. 2 Flash. 3 Self-Timer/Focus Assist light. 4 Lens. 5 Lens cover/Power switch-Turns the camera on and off and protects the lens while the camera is off. 6 Dock connector. 7 Tripod mount. 8 Battery/Memory Card door.
Quick Start Guide
Page 11
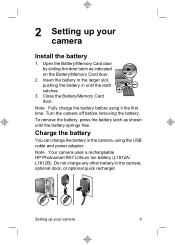
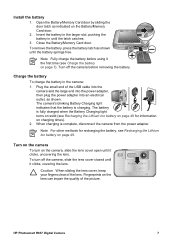
... the larger slot, pushing the battery in until the battery springs free. Turn the camera off before using the USB cable and power adapter. Setting up your camera 9 2 Setting up your camera Install the battery 1. Close the Battery/Memory Card door. Note Your camera uses a rechargeable HP Photosmart R07 Lithium Ion battery (L1812A/ L1812B). Open the Battery/Memory Card door by sliding...
... the larger slot, pushing the battery in until the battery springs free. Turn the camera off before using the USB cable and power adapter. Setting up your camera 9 2 Setting up your camera Install the battery 1. Close the Battery/Memory Card door. Note Your camera uses a rechargeable HP Photosmart R07 Lithium Ion battery (L1812A/ L1812B). Open the Battery/Memory Card door by sliding...
Quick Start Guide
Page 12
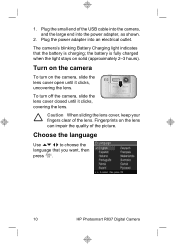
...choose the language that the battery is fully charged when the light stays on the camera To turn off the camera, slide the lens cover closed until it clicks, covering the lens. Turn on solid (approximately 2-3 hours). Fingerprints on the camera, slide the lens cover open...impair the quality of the USB cable into the camera, and the large end into an electrical outlet. Plug the small end of the picture. The camera's blinking Battery Charging light indicates that you want, then press . 10 HP Photosmart R837 Digital Camera 1. Caution When sliding the lens cover, keep...
...choose the language that the battery is fully charged when the light stays on the camera To turn off the camera, slide the lens cover closed until it clicks, covering the lens. Turn on solid (approximately 2-3 hours). Fingerprints on the camera, slide the lens cover open...impair the quality of the USB cable into the camera, and the large end into an electrical outlet. Plug the small end of the picture. The camera's blinking Battery Charging light indicates that you want, then press . 10 HP Photosmart R837 Digital Camera 1. Caution When sliding the lens cover, keep...
Quick Start Guide
Page 14
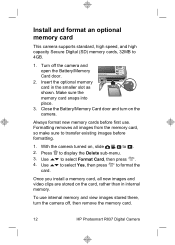
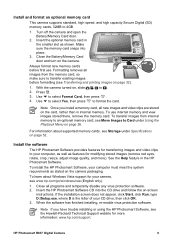
... memory card. 12 HP Photosmart R837 Digital Camera Close the Battery/Memory Card door and turn the camera off the camera and open the Battery/Memory Card door. 2. Always format new memory cards before formatting. 1. Make sure the memory card snaps into place. 3. With the camera turned on, slide ... 2. Formatting removes all new images and video clips are stored on the camera. Install and format an optional memory card This camera supports standard, high speed, and high capacity Secure Digital (SD) memory cards, 32MB to display the Delete sub-menu. 3. Insert...
... memory card. 12 HP Photosmart R837 Digital Camera Close the Battery/Memory Card door and turn the camera off the camera and open the Battery/Memory Card door. 2. Always format new memory cards before formatting. 1. Make sure the memory card snaps into place. 3. With the camera turned on, slide ... 2. Formatting removes all new images and video clips are stored on the camera. Install and format an optional memory card This camera supports standard, high speed, and high capacity Secure Digital (SD) memory cards, 32MB to display the Delete sub-menu. 3. Insert...
Quick Start Guide
Page 25
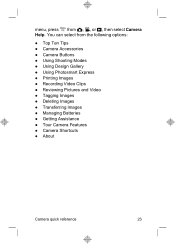
You can select from , , or , then select Camera Help. menu, press from the following options: ● Top Ten Tips ● Camera Accessories ● Camera Buttons ● Using Shooting Modes ● Using Design Gallery ● Using Photosmart Express ● Printing Images ● Recording Video Clips ● Reviewing Pictures and Video ● Tagging Images ● Deleting Images ● Transferring Images ● Managing Batteries ● Getting Assistance ● Tour Camera Features ● Camera Shortcuts ● About Camera quick reference 23
You can select from , , or , then select Camera Help. menu, press from the following options: ● Top Ten Tips ● Camera Accessories ● Camera Buttons ● Using Shooting Modes ● Using Design Gallery ● Using Photosmart Express ● Printing Images ● Recording Video Clips ● Reviewing Pictures and Video ● Tagging Images ● Deleting Images ● Transferring Images ● Managing Batteries ● Getting Assistance ● Tour Camera Features ● Camera Shortcuts ● About Camera quick reference 23
User Guide
Page 3
... and bottom 6 Before taking pictures 6 Install the battery 7 Charge the battery 7 Turn on the camera 7 Choose the language 8 Set the region 8 Set the date and time 8 Install and format an optional memory card 9 Install the software 9 Using your camera 10 2 Taking pictures and recording video clips 11 Taking pictures...11 Recording video clips 12... menus 18 Using the Self-Timer settings 21 Using the Burst setting 21 Adaptive Lighting 22 Exposure Compensation 22 White Balance 22 ISO speed...22 HP Photosmart R837 Digital Camera 3
... and bottom 6 Before taking pictures 6 Install the battery 7 Charge the battery 7 Turn on the camera 7 Choose the language 8 Set the region 8 Set the date and time 8 Install and format an optional memory card 9 Install the software 9 Using your camera 10 2 Taking pictures and recording video clips 11 Taking pictures...11 Recording video clips 12... menus 18 Using the Self-Timer settings 21 Using the Burst setting 21 Adaptive Lighting 22 Exposure Compensation 22 White Balance 22 ISO speed...22 HP Photosmart R837 Digital Camera 3
User Guide
Page 4
...printer 33 7 Using HP Photosmart Express 36 Using the Photosmart Express Menu 36 Marking images for printing 36 Buying prints online 37 Sharing images...37 Setting up online destinations in the camera 38 Sending images to online destinations 38 8 Using the Camera Setup Menu 39 ...9 Troubleshooting 41 Resetting the camera 41 Problems and solutions 41 Camera error messages 45 10 Product support 46 Helpful websites...46 Getting assistance 46 A Managing batteries 48 Top points about batteries 48 Extending battery life 48 Safety precautions for using batteries ...
...printer 33 7 Using HP Photosmart Express 36 Using the Photosmart Express Menu 36 Marking images for printing 36 Buying prints online 37 Sharing images...37 Setting up online destinations in the camera 38 Sending images to online destinations 38 8 Using the Camera Setup Menu 39 ...9 Troubleshooting 41 Resetting the camera 41 Problems and solutions 41 Camera error messages 45 10 Product support 46 Helpful websites...46 Getting assistance 46 A Managing batteries 48 Top points about batteries 48 Extending battery life 48 Safety precautions for using batteries ...
User Guide
Page 5
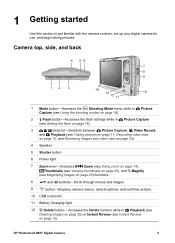
Camera top, side, and back 4 56 7 8 9 12 3 14 13 12 11 10 1 Mode button-Accesses the Shooting Mode menu while in Picture Capture (see Using the ... Instant Review on page 25) functions. 8 and buttons-Scroll through menus and images. 9 button-Displays camera menus, selects options, and confirms actions. 10 USB connector. 11 Battery Charging light. 12 Delete button- 1 Getting started Use this section to get familiar with the camera controls, set up your digital camera for use, and begin taking pictures. HP Photosmart R837 Digital Camera 5
Camera top, side, and back 4 56 7 8 9 12 3 14 13 12 11 10 1 Mode button-Accesses the Shooting Mode menu while in Picture Capture (see Using the ... Instant Review on page 25) functions. 8 and buttons-Scroll through menus and images. 9 button-Displays camera menus, selects options, and confirms actions. 10 USB connector. 11 Battery Charging light. 12 Delete button- 1 Getting started Use this section to get familiar with the camera controls, set up your digital camera for use, and begin taking pictures. HP Photosmart R837 Digital Camera 5

User Guide
Page 6
Chapter 1 (continued) 13 Back button-Returns you to the previous menu or view. 14 Image Display. Before taking pictures Complete the following procedures before taking pictures or recording video clips. 6 Camera front and bottom 1 23 4 5 8 76 1 Microphone. 2 Flash. 3 Self-Timer/Focus Assist light-See Using the Self-Timer settings on page 21. 4 Lens. 5 Lens cover/Power switch-Turns the camera on and off and protects the lens while the camera is off. 6 Dock connector. 7 Tripod mount. 8 Battery/Memory Card door.
Chapter 1 (continued) 13 Back button-Returns you to the previous menu or view. 14 Image Display. Before taking pictures Complete the following procedures before taking pictures or recording video clips. 6 Camera front and bottom 1 23 4 5 8 76 1 Microphone. 2 Flash. 3 Self-Timer/Focus Assist light-See Using the Self-Timer settings on page 21. 4 Lens. 5 Lens cover/Power switch-Turns the camera on and off and protects the lens while the camera is off. 6 Dock connector. 7 Tripod mount. 8 Battery/Memory Card door.
User Guide
Page 7
... of the picture. Fingerprints on page 7). Close the Battery/Memory Card door. Charge the battery To charge the battery in until it the first time (see Recharging the Lithium Ion battery on charging times). 2. HP Photosmart R837 Digital Camera 7 The camera's blinking Battery Charging light indicates that the battery is fully charged when the Battery Charging light turns on solid (see Recharging the...
... of the picture. Fingerprints on page 7). Close the Battery/Memory Card door. Charge the battery To charge the battery in until it the first time (see Recharging the Lithium Ion battery on charging times). 2. HP Photosmart R837 Digital Camera 7 The camera's blinking Battery Charging light indicates that the battery is fully charged when the Battery Charging light turns on solid (see Recharging the...
User Guide
Page 9
...the memory card snaps into the CD drive and follow the on page 52. Close the Battery/Memory Card door and turn on the card, rather than in the HP Photosmart Software. Use to format the card. To use . If the installation screen does not ... programs and temporarily disable any virus protection software. 2. Press . 3. To install the HP Photosmart Software, your CD drive, then click OK. 3. HP Photosmart R837 Digital Camera 9 With the camera turned on the camera packaging. Close all images from internal memory to transfer existing images before first use internal memory...
...the memory card snaps into the CD drive and follow the on page 52. Close the Battery/Memory Card door and turn on the card, rather than in the HP Photosmart Software. Use to format the card. To use . If the installation screen does not ... programs and temporarily disable any virus protection software. 2. Press . 3. To install the HP Photosmart Software, your CD drive, then click OK. 3. HP Photosmart R837 Digital Camera 9 With the camera turned on the camera packaging. Close all images from internal memory to transfer existing images before first use internal memory...

User Guide
Page 11
HP Photosmart R837 Digital Camera 11 Slide to measure and lock the focus and exposure. The focus ...pictures and recording video clips You can take the picture. Press the Shutter button halfway down to take a picture when the camera is locked (see Auto focus and exposure on page 12). 4. Taking pictures You can record video when you are in...2. Slide to to take pictures when you are in minutes and seconds). 3 Memory card indicator. 4 Battery level indicator (see Power indicators on page 49). 5 Focus brackets (see Auto focus and exposure on page 12).
HP Photosmart R837 Digital Camera 11 Slide to measure and lock the focus and exposure. The focus ...pictures and recording video clips You can take the picture. Press the Shutter button halfway down to take a picture when the camera is locked (see Auto focus and exposure on page 12). 4. Taking pictures You can record video when you are in...2. Slide to to take pictures when you are in minutes and seconds). 3 Memory card indicator. 4 Battery level indicator (see Power indicators on page 49). 5 Focus brackets (see Auto focus and exposure on page 12).


