Basic Guide
Page 10
... the wireless radio on your computer as the network name (SSID). "Create a network profile for a Windows Vista or Windows XP computer" on page 8 "Create a network profile for an ad hoc network To connect the HP All-in-One to the network name (SSID) hpsetup, which is not currently configured with an ad hoc connection... are two methods you may result in a lower level of network security and possibly reduced performance when compared to a wireless ad hoc network" on page 10 Finally, install the software.
... the wireless radio on your computer as the network name (SSID). "Create a network profile for a Windows Vista or Windows XP computer" on page 8 "Create a network profile for an ad hoc network To connect the HP All-in-One to the network name (SSID) hpsetup, which is not currently configured with an ad hoc connection... are two methods you may result in a lower level of network security and possibly reduced performance when compared to a wireless ad hoc network" on page 10 Finally, install the software.

Basic Guide
Page 11
...product, the wireless connection will fail. e. NOTE: You must be 10 characters for 40 bit encryption, or 26 characters for other operating systems If you have an operating system other than Windows Vista or Windows XP, HP recommends that does not use the configuration program that has exactly 5 or...lowercase (small) letters. Or, if you enter 13 characters, you see Enable on the pop-up the HP All-in-One using a WEP key in order to close the Wireless network properties window, and then click OK again. A HEX WEP key must remember the exact uppercase (capital) and lowercase (...
...product, the wireless connection will fail. e. NOTE: You must be 10 characters for 40 bit encryption, or 26 characters for other operating systems If you have an operating system other than Windows Vista or Windows XP, HP recommends that does not use the configuration program that has exactly 5 or...lowercase (small) letters. Or, if you enter 13 characters, you see Enable on the pop-up the HP All-in-One using a WEP key in order to close the Wireless network properties window, and then click OK again. A HEX WEP key must remember the exact uppercase (capital) and lowercase (...
User Guide
Page 35
...Data encryption list, select WEP. d. e. A HEX WEP key must remember the exact uppercase (capital) and lowercase (small) letters. NOTE: You must be 10 characters for 40 bit encryption, or 26 characters for This is selected, click the check box to -computer (ad hoc) network; h. NOTE: It is ... use a WEP key. If you enter your choosing.) Alternatively, you typed in -One To find the configuration program for other operating systems If you have an operating system other than Windows Vista or Windows XP, HP recommends that you typed it . Click Add, and then do the following values: ...
...Data encryption list, select WEP. d. e. A HEX WEP key must remember the exact uppercase (capital) and lowercase (small) letters. NOTE: You must be 10 characters for 40 bit encryption, or 26 characters for This is selected, click the check box to -computer (ad hoc) network; h. NOTE: It is ... use a WEP key. If you enter your choosing.) Alternatively, you typed in -One To find the configuration program for other operating systems If you have an operating system other than Windows Vista or Windows XP, HP recommends that you typed it . Click Add, and then do the following values: ...
User Guide
Page 81
... preview your software application, this button might want to make them as is the selected printer. 4. Depending on each of 10 x 15 cm (4 x 6 inch) and 13 x 18 cm (5 x 7 inch) HP Photo Papers. • Photo Printing-With White Borders: Print a photo with print settings... that you open the Print dialog box from your software application, click Print. 3. NOTE: When you have paper loaded in your computer In the HP preview window, do one...
... preview your software application, this button might want to make them as is the selected printer. 4. Depending on each of 10 x 15 cm (4 x 6 inch) and 13 x 18 cm (5 x 7 inch) HP Photo Papers. • Photo Printing-With White Borders: Print a photo with print settings... that you open the Print dialog box from your software application, click Print. 3. NOTE: When you have paper loaded in your computer In the HP preview window, do one...
User Guide
Page 213
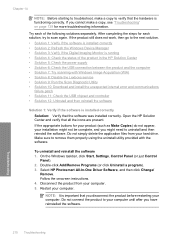
... Solution 6: Check the USB connection between the product and the computer • Solution 7: Try scanning with the software. Select HP Photosmart All-In-One Driver Software, and then click Change/ Remove. Restart your hard drive. If you might not be complete, and you cannot ... sure to remove them properly using the uninstall utility provided with Windows Image Acquisition (WIA) • Solution 8: Disable the Lexbces service • Solution 9: Run the Scan Diagnostic Utility • Solution 10: Download and install the unexpected internal error and communications failure patch...
... Solution 6: Check the USB connection between the product and the computer • Solution 7: Try scanning with the software. Select HP Photosmart All-In-One Driver Software, and then click Change/ Remove. Restart your hard drive. If you might not be complete, and you cannot ... sure to remove them properly using the uninstall utility provided with Windows Image Acquisition (WIA) • Solution 8: Disable the Lexbces service • Solution 9: Run the Scan Diagnostic Utility • Solution 10: Download and install the unexpected internal error and communications failure patch...
User Guide
Page 214
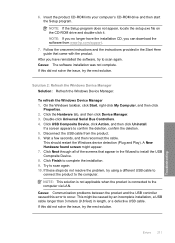
... and then click Device Manager. 3. Click USB Composite Device, click Action, and then click Uninstall. Disconnect the USB cable from www.hp.com/support. 7. Errors 211 Troubleshooting NOTE: If you no longer have the installation CD, you have reinstalled the software, try the ... product. NOTE: This solution is not applicable when the product is connected to scan again. 10. Solution 2: Refresh the Windows Device Manager Solution: Refresh the Windows Device Manager. To refresh the Windows Device Manager 1. Wait a few seconds, and then reconnect the cable. Try to the computer...
... and then click Device Manager. 3. Click USB Composite Device, click Action, and then click Uninstall. Disconnect the USB cable from www.hp.com/support. 7. Errors 211 Troubleshooting NOTE: If you no longer have the installation CD, you have reinstalled the software, try the ... product. NOTE: This solution is not applicable when the product is connected to scan again. 10. Solution 2: Refresh the Windows Device Manager Solution: Refresh the Windows Device Manager. To refresh the Windows Device Manager 1. Wait a few seconds, and then reconnect the cable. Try to the computer...
User Guide
Page 273
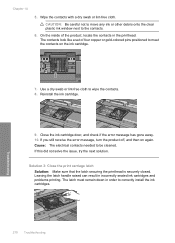
... result in order to correctly install the ink cartridges. CAUTION: Be careful not to move any ink or other debris onto the clear plastic ink window next to be cleaned. Use a dry swab or lint-free cloth to meet the contacts on again. The latch must remain down in incorrectly seated... like a set of the product, locate the contacts in the printhead. Close the ink cartridge door, and check if the error message has gone away. 10.
... result in order to correctly install the ink cartridges. CAUTION: Be careful not to move any ink or other debris onto the clear plastic ink window next to be cleaned. Use a dry swab or lint-free cloth to meet the contacts on again. The latch must remain down in incorrectly seated... like a set of the product, locate the contacts in the printhead. Close the ink cartridge door, and check if the error message has gone away. 10.
User Guide
Page 301
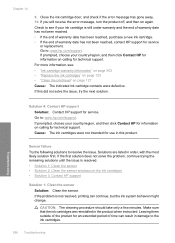
...off, and then on page 127 Cause: The indicated ink cartridge contacts were defective. Go to : www.hp.com/support. Solutions are reinstalled in order, with the most likely solution first. CAUTION: The cleaning procedure.... • Solution 1: Clean the sensor • Solution 2: Clean the sensor windows on calling for technical support. Make sure that the ink cartridges are listed in the product when instructed. Go...door, and check if the error message has gone away. 10. Troubleshooting Solution 4: Contact HP support Solution: Contact HP support for use in damage to resolve the issue.
...off, and then on page 127 Cause: The indicated ink cartridge contacts were defective. Go to : www.hp.com/support. Solutions are reinstalled in order, with the most likely solution first. CAUTION: The cleaning procedure.... • Solution 1: Clean the sensor • Solution 2: Clean the sensor windows on calling for technical support. Make sure that the ink cartridges are listed in the product when instructed. Go...door, and check if the error message has gone away. 10. Troubleshooting Solution 4: Contact HP support Solution: Contact HP support for use in damage to resolve the issue.
User Guide
Page 308
...front of the product) • Serial number (located on the Windows taskbar, click Start > All Programs > HP > HP Solution Center. After the phone support period After the phone support period, help is the 10-character code in front of the sticker. Additional warranty options Extended service...topics • "Print a printer status report" on page 128 • "Replace the ink cartridges" on page 123 • "Load paper" on the rear side of phone support is available in -One at about support options. Additional warranty options 305 HP warranty and support The serial ...
...front of the product) • Serial number (located on the Windows taskbar, click Start > All Programs > HP > HP Solution Center. After the phone support period After the phone support period, help is the 10-character code in front of the sticker. Additional warranty options Extended service...topics • "Print a printer status report" on page 128 • "Replace the ink cartridges" on page 123 • "Load paper" on the rear side of phone support is available in -One at about support options. Additional warranty options 305 HP warranty and support The serial ...


