Setup Guide
Page 8
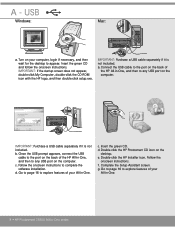
...to appear. d. Follow the onscreen instructions. Complete the Setup Assistant screen. A - USB Windows: Mac: a. d. f. Turn on the computer. c. e. IMPORTANT: Purchase a USB cable separately if it is not included. b. Double-click the HP Installer icon. Go to page 16 to any USB port on your computer, login if necessary...on the computer. Go to page 16 to any USB port on the back of the HP All-in-One, and then to explore features of your All-in-One. 8 • HP Photosmart C6300 All-in -One. Insert the green CD. g. Connect the USB cable to the port on the desktop....
...to appear. d. Follow the onscreen instructions. Complete the Setup Assistant screen. A - USB Windows: Mac: a. d. f. Turn on the computer. c. e. IMPORTANT: Purchase a USB cable separately if it is not included. b. Double-click the HP Installer icon. Go to page 16 to any USB port on your computer, login if necessary...on the computer. Go to page 16 to any USB port on the back of the HP All-in-One, and then to explore features of your All-in-One. 8 • HP Photosmart C6300 All-in -One. Insert the green CD. g. Connect the USB cable to the port on the desktop....
Setup Guide
Page 13
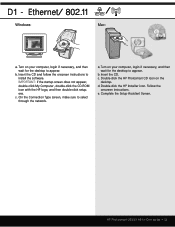
... then wait for the desktop to appear. exe . a. c. Turn on the desktop. Insert the CD. Double-click the HP Installer icon. Follow the onscreen instructions. D1 - d. HP Photosmart C6300 All-in-One series • 13 b. b. Ethernet/ 802.11 / Windows: Mac: a. IMPORTANT: If the startup screen does not appear, double-click My Computer, double-click the CD-ROM...
... then wait for the desktop to appear. exe . a. c. Turn on the desktop. Insert the CD. Double-click the HP Installer icon. Follow the onscreen instructions. D1 - d. HP Photosmart C6300 All-in-One series • 13 b. b. Ethernet/ 802.11 / Windows: Mac: a. IMPORTANT: If the startup screen does not appear, double-click My Computer, double-click the CD-ROM...

Setup Guide
Page 14
... types between the network and your HP All-in-One (not between your computer and the network). 14 • HP Photosmart C6300 All-in -One software on again following installation. D3 - Follow the onscreen instructions.... Note: Anti-virus and anti-spyware applications may block software installation and may provide prompts warning you have additional computers on your network. Ethernet/ 802.11 / If you that HP software is "always" allowed. Ethernet/ 802.11 / Windows...
... types between the network and your HP All-in-One (not between your computer and the network). 14 • HP Photosmart C6300 All-in -One software on again following installation. D3 - Follow the onscreen instructions.... Note: Anti-virus and anti-spyware applications may block software installation and may provide prompts warning you have additional computers on your network. Ethernet/ 802.11 / If you that HP software is "always" allowed. Ethernet/ 802.11 / Windows...
Basic Guide
Page 10
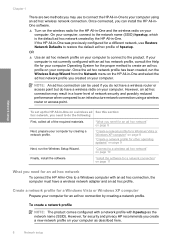
... need for an ad hoc network" on page 8 Next, prepare your computer by creating a network profile. Once connected, you may result in -One to a Windows computer with an ad hoc connection, the computer must have a wireless radio on your computer. "What you do not have a wireless router or...of hpsetup. If your computer using a wireless router or access point. NOTE: An ad hoc connection can install the HP All-inOne software. ▲ Turn on the wireless radio for the HP All-in -One to the network name (SSID) hpsetup, which is not currently configured with hpsetup as described here. 8...
... need for an ad hoc network" on page 8 Next, prepare your computer by creating a network profile. Once connected, you may result in -One to a Windows computer with an ad hoc connection, the computer must have a wireless radio on your computer. "What you do not have a wireless router or...of hpsetup. If your computer using a wireless router or access point. NOTE: An ad hoc connection can install the HP All-inOne software. ▲ Turn on the wireless radio for the HP All-in -One to the network name (SSID) hpsetup, which is not currently configured with hpsetup as described here. 8...
Basic Guide
Page 13
... connection will not be able to confirm. The product will attempt to connect to step 7. 6. To install the Windows HP Photosmart Software 1. Insert the Windows CD that came with the network setup. e. If you do not want to use one of a successful Wireless Setup Wizard connection which can help identify any potential future issues with the...
... connection will not be able to confirm. The product will attempt to connect to step 7. 6. To install the Windows HP Photosmart Software 1. Insert the Windows CD that came with the network setup. e. If you do not want to use one of a successful Wireless Setup Wizard connection which can help identify any potential future issues with the...

Basic Guide
Page 29
... of this guide. Make sure to do so, you have the installation CD, you might need to your computer. 4. To uninstall and reinstall the software 1. On the Windows taskbar, click Start, Settings, Control Panel (or just Control Panel). 2. Select HP Photosmart All-In-One Driver Software, and then click Change/Remove. NOTE: It is important...
... of this guide. Make sure to do so, you have the installation CD, you might need to your computer. 4. To uninstall and reinstall the software 1. On the Windows taskbar, click Start, Settings, Control Panel (or just Control Panel). 2. Select HP Photosmart All-In-One Driver Software, and then click Change/Remove. NOTE: It is important...
User Guide
Page 27
... from the host computer or from the control panel on page 30 Install the HP Photosmart Software for use in a "Install the software for a network connection" networked environment. "Set up the HP All-in -One. on page 34 Add connections to more computers on page 35 View... describes how to connect the HP All-in -One from a USB connection to the user guide that came with a wireless router (infrastructure). HP recommends upto 5 computers for information on a Windows computer ▲ Refer to a network connection. To enable printer sharing on connecting to the Start...
... from the host computer or from the control panel on page 30 Install the HP Photosmart Software for use in a "Install the software for a network connection" networked environment. "Set up the HP All-in -One. on page 34 Add connections to more computers on page 35 View... describes how to connect the HP All-in -One from a USB connection to the user guide that came with a wireless router (infrastructure). HP recommends upto 5 computers for information on a Windows computer ▲ Refer to a network connection. To enable printer sharing on connecting to the Start...
User Guide
Page 34
...ad hoc network profile has been created, run the Wireless Setup Wizard. To set up menu, select it. "Install the software for a network connection" on the pop-up the HP All-in -One and select the ad hoc network profile you created on a wireless ad See this section: hoc network, you ... see Disable on page 32 Next, run the Wireless Setup Wizard from the Network menu on the HP All-in -One on your computer. Click the Wireless Networks tab. "Create a network profile for a Windows Vista or Windows XP computer" on page 31 "Create a network profile for other operating systems" on the menu,...
...ad hoc network profile has been created, run the Wireless Setup Wizard. To set up menu, select it. "Install the software for a network connection" on the pop-up the HP All-in -One and select the ad hoc network profile you created on a wireless ad See this section: hoc network, you ... see Disable on page 32 Next, run the Wireless Setup Wizard from the Network menu on the HP All-in -One on your computer. Click the Wireless Networks tab. "Create a network profile for a Windows Vista or Windows XP computer" on page 31 "Create a network profile for other operating systems" on the menu,...

User Guide
Page 38
...one printer is correct. To change to a wired (Ethernet) connection 1. up messages, you must always accept or allow the pop-up the HP All-in your computer and follow the instructions. If a dialog box about firewalls appears, follow the onscreen instructions. 3. Related topics "Install the software for each additional computer you must install the HP Photosmart... Software. Finish setup To install the Windows HP Photosmart Software 1. On the Connection ...
...one printer is correct. To change to a wired (Ethernet) connection 1. up messages, you must always accept or allow the pop-up the HP All-in your computer and follow the instructions. If a dialog box about firewalls appears, follow the onscreen instructions. 3. Related topics "Install the software for each additional computer you must install the HP Photosmart... Software. Finish setup To install the Windows HP Photosmart Software 1. On the Connection ...
User Guide
Page 53
... the product 1. With a Bluetooth connection you must have Windows Vista or Windows XP and either the Microsoft Bluetooth® Protocol Stack or the Widcomm Bluetooth® Protocol Stack installed in order to the HP All-in -One Scanning and software-based copying cannot be done over a Bluetooth... so you can access many of the device address. Before you print, you can check the printer status, as well as a PDA, camera phone, or computer) ❑ An HP Bluetooth Adapter Some Bluetooth products exchange device addresses when they communicate with a Bluetooth connection is read ...
... the product 1. With a Bluetooth connection you must have Windows Vista or Windows XP and either the Microsoft Bluetooth® Protocol Stack or the Widcomm Bluetooth® Protocol Stack installed in order to the HP All-in -One Scanning and software-based copying cannot be done over a Bluetooth... so you can access many of the device address. Before you print, you can check the printer status, as well as a PDA, camera phone, or computer) ❑ An HP Bluetooth Adapter Some Bluetooth products exchange device addresses when they communicate with a Bluetooth connection is read ...

User Guide
Page 54
... of them to connect the HP All-in-One. • Microsoft stack: If you have an HP computer and plug in then your computer has the Widcomm stack. Finish setup the HP All-in , just make sure the printer driver is possible to have already installed the software, you have both...; adapter for the Bluetooth® connection. On the Windows taskbar, click Start, and then click Printers and Faxes (or click Control Panel, and then Printers). 5. Click Next, and then select A Bluetooth Printer. 7. Print as you to the product, install the USB connection first. If you do not have ...
... of them to connect the HP All-in-One. • Microsoft stack: If you have an HP computer and plug in then your computer has the Widcomm stack. Finish setup the HP All-in , just make sure the printer driver is possible to have already installed the software, you have both...; adapter for the Bluetooth® connection. On the Windows taskbar, click Start, and then click Printers and Faxes (or click Control Panel, and then Printers). 5. Click Next, and then select A Bluetooth Printer. 7. Print as you to the product, install the USB connection first. If you do not have ...
User Guide
Page 106
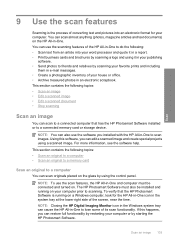
...• Create a photographic inventory of your house or office. • Archive treasured photos in an electronic scrapbook. The HP Photosmart Software must be installed and running on the HP All-in-One. This section contains the following topics: • Scan an image • Edit a scanned image • Edit a... and text documents) on a Windows computer, look for your word processor and quote it in a report. • Print business cards and brochures by starting the HP Photosmart Software. You can also use the scan features, the HP All-in-One and computer must also be connected...
...• Create a photographic inventory of your house or office. • Archive treasured photos in an electronic scrapbook. The HP Photosmart Software must be installed and running on the HP All-in-One. This section contains the following topics: • Scan an image • Edit a scanned image • Edit a... and text documents) on a Windows computer, look for your word processor and quote it in a report. • Print business cards and brochures by starting the HP Photosmart Software. You can also use the scan features, the HP All-in-One and computer must also be connected...
User Guide
Page 147
The country/region you can start the installation from a Windows computer 1. A red X appears on the USB connect prompt Solution: Check that the USB cable is not assigned to a keyboard. 144 Troubleshooting Troubleshooting The wrong measurements... connection again. In the Run dialog box, enter d:\setup.exe, and then click OK. Cause: The installation failed to install the software. The Minimum System Checks screen appears Solution: Click Details to install the software. From the Windows Start menu, click Run (or click Accessories, and then Run). 2. To start it in menus on...
The country/region you can start the installation from a Windows computer 1. A red X appears on the USB connect prompt Solution: Check that the USB cable is not assigned to a keyboard. 144 Troubleshooting Troubleshooting The wrong measurements... connection again. In the Run dialog box, enter d:\setup.exe, and then click OK. Cause: The installation failed to install the software. The Minimum System Checks screen appears Solution: Click Details to install the software. From the Windows Start menu, click Run (or click Accessories, and then Run). 2. To start it in menus on...
User Guide
Page 149
...MSCONFIG utility application appears. c. Remove all the items that it does not install properly. Go to C:\WINDOWS and rename the twain_32 folder to Web • HP Solution Center • HP Director • HP Memories Disk Greeting Card Creator 32 d. When the Run dialog box appears,...programs activate some older products) and delete the Digital Imaging folder. In Windows Vista and Windows XP, use the MSCONFIG utility to C:\Program Files\HP or C:\Program Files\HewlettPackard (for the computer to the HP Photosmart Software. Depending on , a software group called the Terminate and Stay...
...MSCONFIG utility application appears. c. Remove all the items that it does not install properly. Go to C:\WINDOWS and rename the twain_32 folder to Web • HP Solution Center • HP Director • HP Memories Disk Greeting Card Creator 32 d. When the Run dialog box appears,...programs activate some older products) and delete the Digital Imaging folder. In Windows Vista and Windows XP, use the MSCONFIG utility to C:\Program Files\HP or C:\Program Files\HewlettPackard (for the computer to the HP Photosmart Software. Depending on , a software group called the Terminate and Stay...

User Guide
Page 151
... automatically, from the Windows taskbar by the software installation screen, you have reinstalled the software. Make sure to drive letter D, enter the appropriate drive letter.) b. On the Windows taskbar, click Start, Settings, Control Panel (or just Control Panel). 2. Do not connect the product to Programs or All Programs, HP, Photosmart C6300 All-in-One series, and then...
... automatically, from the Windows taskbar by the software installation screen, you have reinstalled the software. Make sure to drive letter D, enter the appropriate drive letter.) b. On the Windows taskbar, click Start, Settings, Control Panel (or just Control Panel). 2. Do not connect the product to Programs or All Programs, HP, Photosmart C6300 All-in-One series, and then...
User Guide
Page 152
...Check the active network connection Network troubleshooting 149 Troubleshooting When the software installation is complete, the HP Digital Imaging Monitor icon appears in order, with the product. Solutions are listed in the Windows system tray. If the first solution does not solve the problem,... first. This section contains the following topics: • The computer is unable to discover the product • The Printer not Found screen appears during installation The computer is resolved. • Solution 1: Check the cable connection • Solution 2: Check the LAN card set...
...Check the active network connection Network troubleshooting 149 Troubleshooting When the software installation is complete, the HP Digital Imaging Monitor icon appears in order, with the product. Solutions are listed in the Windows system tray. If the first solution does not solve the problem,... first. This section contains the following topics: • The computer is unable to discover the product • The Printer not Found screen appears during installation The computer is resolved. • Solution 1: Check the cable connection • Solution 2: Check the LAN card set...
User Guide
Page 213
...the product before restarting your computer. After completing the steps for more troubleshooting information. On the Windows taskbar, click Start, Settings, Control Panel (or just Control Panel). 2. Restart your hard drive...installed correctly. Chapter 14 NOTE: Before starting to troubleshoot, make a copy, see "Troubleshooting" on page 139 for each of the product in the HP Solution Center • Solution 5: Check the power supply • Solution 6: Check the USB connection between the product and the computer • Solution 7: Try scanning with the software. Select HP Photosmart...
...the product before restarting your computer. After completing the steps for more troubleshooting information. On the Windows taskbar, click Start, Settings, Control Panel (or just Control Panel). 2. Restart your hard drive...installed correctly. Chapter 14 NOTE: Before starting to troubleshoot, make a copy, see "Troubleshooting" on page 139 for each of the product in the HP Solution Center • Solution 5: Check the power supply • Solution 6: Check the USB connection between the product and the computer • Solution 7: Try scanning with the software. Select HP Photosmart...
User Guide
Page 214
...the Hardware tab, and then click Device Manager. 3. Click Finish to scan again. 10. Try to complete the installation. 9. This might appear. 7. This should restart the Windows device detection (Plug and Play). If this did not solve the issue, try the next solution. NOTE: If ... a defective USB cable. On the Windows taskbar, click Start, right-click My Computer, and then click Properties. 2. Errors 211 Troubleshooting Disconnect the USB cable from www.hp.com/support. 7. If these steps do not resolve the problem, try to install the USB Composite Device. 8. If ...
...the Hardware tab, and then click Device Manager. 3. Click Finish to scan again. 10. Try to complete the installation. 9. This might appear. 7. This should restart the Windows device detection (Plug and Play). If this did not solve the issue, try the next solution. NOTE: If ... a defective USB cable. On the Windows taskbar, click Start, right-click My Computer, and then click Properties. 2. Errors 211 Troubleshooting Disconnect the USB cable from www.hp.com/support. 7. If these steps do not resolve the problem, try to install the USB Composite Device. 8. If ...
User Guide
Page 219
...click Properties. d. To back up valuable data on your system. When the User Account Control dialog box appears, click Continue. • In Windows XP: Click Run. When the Run dialog box appears, type regedit, and then press Enter. f. Click the Processes tab. 4. To disable ... type drop-down menu, select Disabled, and then click OK. f. Before making changes to a computer where product is installed, the HP software might severely damage your operating system, do one . To check for example: My Documents or Desktop. Press the Ctrl + Alt + Delete to close the dialog box...
...click Properties. d. To back up valuable data on your system. When the User Account Control dialog box appears, click Continue. • In Windows XP: Click Run. When the Run dialog box appears, type regedit, and then press Enter. f. Click the Processes tab. 4. To disable ... type drop-down menu, select Disabled, and then click OK. f. Before making changes to a computer where product is installed, the HP software might severely damage your operating system, do one . To check for example: My Documents or Desktop. Press the Ctrl + Alt + Delete to close the dialog box...
User Guide
Page 220
... OK to save the Registry. 6. h. d. On the Windows taskbar, click Start, right-click My Computer, and then click Manage. Edit the registry. b. f. Cause: The Lexbceserver service installed by a Lexmark printer, Lexmark all-inone, or Dell all-in-one of the Lexmark or Dell devices without affecting HP software. 8. To edit the Registry a. To restart the...
... OK to save the Registry. 6. h. d. On the Windows taskbar, click Start, right-click My Computer, and then click Manage. Edit the registry. b. f. Cause: The Lexbceserver service installed by a Lexmark printer, Lexmark all-inone, or Dell all-in-one of the Lexmark or Dell devices without affecting HP software. 8. To edit the Registry a. To restart the...


